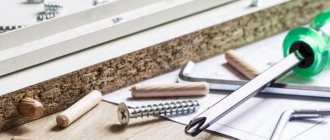
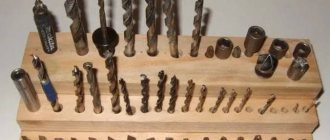
Drilling is one of the important stages of furniture manufacturing, requiring accuracy and utmost care. In production, to facilitate the marking process, they use additive machines and special furniture templates (gearboxes). At home, you will have to be content with a tape measure, a square and a marker to mark the locations of future holes for a certain type of fastener. Each type of fastener requires specific drills for furniture making. In some cases, you can limit yourself to the minimum set. For example, if your goal is to make a simple shelving rack with your own hands, then you can get by with a set of two ordinary drills with a diameter of 5 mm and 8 mm, which any “home” craftsman will probably have - in combination they completely replace a specific drill for confirmations. But if the goal is to implement a larger-scale project, you will need other drills for making furniture.
Drills for confirmation (euroscrew)
The specific shape of the confirmat drill, with a characteristic expansion from a diameter of 5 mm to a diameter of 8 mm, allows you to make two holes at once in one go, for the narrow and wide part of the Euroscrew with a countersink for the head. “work” with this type of drill with both frontal and horizontal parts, drilling the end of furniture panels and front parts. It is important not to confuse the “face” with the “wrong side” during the process - otherwise, it will be difficult to hide untidy chips instead of a neat countersink into which the confirmation cap will “sink.”
Eccentric coupler furniture installation, furniture assembly, instructions
Furniture eccentric screed is one of the types of fasteners used in furniture production. It allows you to hide the places where parts are attached, which has a positive effect on the design of products. Another advantage of an eccentric tie is that it allows you to repeatedly assemble and disassemble furniture without losing the strength of the connections, for example, during transportation. However, for all its advantages, it is more difficult to install than other types of furniture fasteners. Therefore, it is very important to correctly follow all installation instructions provided in this article.
Content
Installation of an eccentric couplerMarking for an eccentric couplerAdditive for an eccentric coupler
Assembling furniture with eccentric couplers is performed in the following sequence. The coupler consists of two parts: an eccentric and a rod. The operating principle of this fastener is very simple. The rod is attached to one part, and the eccentric to the other. Next, the parts are connected and the eccentric is turned, which fixes the parts. Assembly and disassembly of furniture using eccentric ties is very quick and easy, which is a great advantage of this type of fastener.
Fig.1.
Assembly diagram of an eccentric coupler. This scheme is identical for assembling any furniture and eccentric couplers of any configuration.
An eccentric coupler can have different sizes of both rods and eccentric. The most common is a 15 mm eccentric. The rod can have sizes of 10, 26, 34 mm. The size of the eccentric coupler is selected based on the application conditions. So, for shelves, a rod with a length of 10 mm is suitable, and for connecting furniture parts, choose 26 or 34 mm.
Furniture ties: Minifixes, Rafixes, Confirmats.
Go directly to the required sections:
Catalog of furniture ties
Craftsmen believe that beauty in furniture joints is unnecessary; in any case, this is a topic in third place after the strength of the joint and installation method. True, none of the professionals denies the best option when the furniture screed is invisible. Such fasteners can be obtained in different ways: in the old-fashioned way using the permanently glued method, or using mechanical ties (eccentric, angular, tightened) which essentially work by “crashing” into the array or laminated chipboard.
The essence of any screed is to assemble disparate pieces of furniture without using glue, in a minimum of time with a set of “household” tools. The queen of furniture ties is a tie that, among other things, allows the assembled furniture not only to be disassembled, but also to be reconnected. Usually buyers think about it this way: “We are not planning to move, such options are unnecessary for us.” Nevertheless (it’s amazing, isn’t it, how someone constantly straightens our plans, we knew for sure that nothing like this would happen?) every day, good-quality furniture is damaged, either during disassembly or during transportation. At a crucial moment, you remember that the table or cabinet is on a “disposable” fastener, and you are forced to move it in the assembled state, damaging it during loading/unloading/delivery, because protecting an entire piece of furniture is much more difficult than a separate part. The advice is simple, always think in reserve, come to us, see why the parts are added with an additive and equipped with permanent fasteners, and why you need to acquire the right ties.
Minifix (eccentric) semi-hidden fastener, providing quick installation for solid wood and laminated chipboards.
Ideally withstands repeated assembly/disassembly cycles. Relevant for furniture that is often used for moving, for “event” furniture that is used for a short time, and then disassembled and carefully stored until the next time, etc.
The minifix is invisible on the furniture façade. Thanks to its hidden capabilities, this type of fittings allows you not to violate the integrity of the front layer. You will only find it inside the product if you look in a closet, under a table, etc., but if the eccentric coupler is made by Hefele, then in an instant it will conquer you with its grace, not to mention other advantages. However, since we are talking about the advantages, we will not hide them:
1. Hefele minifixes implement a centric ball principle in tightening (the bolt always moves equidistantly in a circle relative to the vertical axis), which centers the body and allows for a connection without loss of rigidity, displacement towards the parts, and can be used at any angle (if a connection is used on mustache).
2. Hefele allocated 5 mm for the tightening stroke! Any professional will be happy with this option, because he knows that every rotation of the body by less than half a turn will compensate for the tolerance (for drill size) from 1 to 0.5 mm, while maintaining the clamping force.
3. Now you don’t need to rotate the body 195 degrees (all the way) to get a clamping force, a moderate tension is enough.
4. All bolts and minifix housings are friendly with each other, hence their mutually beneficial combination.
5. Even if you have disassembled your furniture several times, loosened and tightened the cabinet, Hefele minifixes will remain the most reliable cabinet tie of all.
6. Can tighten parts with a thickness of 12 mm.
Of the minuses, one can note one - this is scrupulousness in the preparatory work. Without additive equipment, which not everyone has, due to its high cost (it is included in the Expert kit, so this item may not be important to you), installing minifixes will require time and technical effort. For manual installation, prepare to make high-precision markings for all three holes, which are also located in different planes; not every master is able to devote so much effort to this painstaking task. The slightest mistake and you will not be able to adjust the connection.
Since the cost of minifixes is considered significant today, all buyers who are more or less counting money are reasonably asking the question: are invisible fasteners really necessary, or are there places in furniture products where the elegance of eccentrics can be abandoned? Indeed, in furniture structures there are a lot of “non-working” places (by non-working we mean places hidden from the eye, not in plain sight) that can do just fine with a confirmatory screed. A powerful screw tie (euroscrew, confirmat) will replace the specific installation of a minifix, and will outcompete it in price, but not in preparatory details.
Usually (we’ll tell you about the mistakes now) there is no preparatory work at all - we put together the parts that require ties, made a hole in them with a drill and screwed the confirmation. Correct installation requires the addition of parts by analogy with minifixes: with precise and painstaking markings, mandatory dowels, and at the end, tightening.
The number of holes selected in this case speaks in favor of confirmations, after all, two against three is strength, and most importantly, 30% less work.
Let us immediately remind you of another mistake: many furniture makers, usually inexperienced, believe that the stronger they tighten the screw and press the parts together, the more reliable the structure will be. And this is just the opposite, the force arising in the connection will cause gradual deformation in the chipboard, destruction of the connections, twisting and the material will “float”. So, everything in moderation, we tighten the nodal structure carefully, not to the point of crunching, and we focus our work on the main furniture algorithm - the connected parts are immobilized and gently attracted to each other.
German engineers from Hefele have developed another furniture tie - Rafix, which is so aesthetic in its design that it is beautiful in any furniture product without plugs. Unlike the minifix, this fastener, like the confirmat, requires only two holes. But at its core, it is an eccentric (with all its advantages), hidden in a decorative plastic casing and a stem, so the integrity of the furniture’s front covering is ensured. The uniqueness of the screed is its versatility. In addition to the fact that it connects the parts of the product, the tie can simultaneously serve as a shelf holder. From now on there are no backlashes. The Rafix line was equipped with bolts and couplings for any installation program.
In conclusion, I would like to remind you of the simple rules that should be followed when choosing a furniture screed:
1. To any expected load, add 15% margin
2. If the invisibility of the fittings cannot be avoided, make it the main advantage.
3. Use plugs if you don’t have enough budget to show off the fittings.
4. Always take into account the subsequent disassembly of furniture.
Catalog of furniture ties
See how our ties are made at the factory in Germany!
30.06.2016, .
Installing an eccentric coupler
When connecting parts with an eccentric coupler, it is important to strictly observe the installation dimensions. Correct installation of the tie will ensure an accurate connection of the parts. The installation dimensions for all types of eccentric couplers are the same, with the exception of the rod dimensions, which were mentioned earlier.
Fig.2.
Installation of an eccentric coupler. The installation diagram and installation dimensions are shown in the drawing. The necessary grooves are made in the parts to be connected, after which the rod and eccentric are installed and the parts are tightened.
When connecting parts with an eccentric coupler, it is important to monitor the position of the rod relative to the eccentric. If the rod is tightly twisted, then the eccentric cannot be rotated 180 degrees and the connection will not be secured; if the rod is not tightened, then it will not be possible to tightly connect the parts with an eccentric tie.
We mark and connect the parts using shelf support ties with short pins
So, we mark a hole for a short pin with a self-tapping thread.
Then, on the mating part, at a distance of 9.5 mm from the edge, mark the center of the hole for the eccentric.
Next, I use a 5 mm drill to drill a blind hole for the pin, and on the mating part, using a 20 mm Forstner drill, I drill a blind hole for the eccentric.
I screw in the pin and install the eccentric in the housing into the mating part.
I connect the parts, after which I turn the eccentric to fix it.
Once again I would like to repeat, for better marking and drilling of parts, it is advisable to use jigs, thanks to which the accuracy, quality and speed of work increases, and the money spent on a jig will come back to you in the form of no defects, saved effort and time.
Marking for eccentric coupler
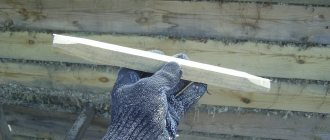
Before you start making grooves for the eccentric tie, you need to make markings. The markings are quite easy to do manually using a ruler. To do this, it is convenient to place the parts to be connected on top of each other with a slight offset and make marks for the grooves.
Fig.3.
Marking the eccentric coupler. Marking can be done manually. If carried out carefully, this will not affect the installation of the eccentric coupler.
A more convenient and accurate way of marking is to use a special template. The template for the eccentric coupler allows you to accurately mark the installation location and avoid making mistakes. You can buy it ready-made or make it yourself.