A furniture jig is a simple mechanical device that serves to speed up and simplify the actions when drilling holes. The use of this device allows you to create technological holes without pre-applied markings and do this with perfect accuracy, as well as a adjusted slope. The device is indispensable during the assembly of furniture structures and carpentry work. For use in everyday life and in small-scale production, it is very easy to make a furniture jig with your own hands.
What is it and its purpose
In essence, a furniture jig is an ordinary template with holes of the required diameter. The working part of the device is a rectangular block of solid material with holes located according to the required markings. For convenience, it can be equipped with adjusting and locking mechanisms. Based on the simplicity of the design, you can quickly make stencils for furniture with your own hands using available materials.
The jig ensures the desired direction of the drill at an angle of 90 degrees to the surface, eliminating the possibility of deviation. This is especially important when working with narrow parts of furniture, such as the ends of walls or doors. Without this device, it is quite difficult to maintain the required angle, which can lead to defects, because even a slight deviation in the direction of the mounting hole can make it impossible to assemble individual elements into a single structure.
For the perfect fit of furniture elements to each other, the accuracy of the location of the holes for fasteners is also of great importance. Those who make furniture with their own hands are often faced with the need to create a number of identical holes at a certain distance from each other. To make the work easier, make it faster, it’s easier not to mark up every time, but to use a template.
Using the jig you can work with different furniture materials: wood, chipboard, MDF.
Workflow Description
Let's consider the basic rules for carrying out work; they are quite simple, so almost anyone can cope with them, the most important thing is to do everything carefully and use high-quality materials and tools.
Making dowels
Of course, you can buy ready-made elements, but their price is quite high, and the DIY process is not very difficult.
The work is done as follows:
When making dowels, neatness and attractiveness are not important, what is important is accuracy and compliance of the elements with the holes
- First, you need to choose a manufacturing method; if you have at least a simple lathe, then you can make round versions that are no different from the ready-made ones that are sold in the retail chain. If there is no equipment, then you can get by with rectangular elements, there won’t be much difference anyway;
- The length of the blanks should be 2.3 times the thickness of the timber. This is due to the fact that the correct location involves an option in which each fastening element passes through three beams, and in the upper and lower crown it should be located approximately 2/3 of their thickness. As noted above, the dowel must be recessed by at least 20 mm so that deformation does not occur when the structure moves;
This diagram clearly shows all the basic rules for fixing crowns; this option has been used by professional carpenters for more than two centuries
Advice! You can simplify the manufacturing work by purchasing a block of the required size; its cost is low, but you just need to round the corners a little - and the fasteners will be ready.
- You don’t have to cut the elements right away, but do it as you work, it all depends on which option is preferable for you.
Fastening the timber
It is important to carry out the work correctly, since this determines how securely the structure will be fixed; the list of measures is as follows:
- First you need to choose a high-quality drill for dowels for timber. Too weak options are often used, so cases when a power tool burns out while drilling are not uncommon. Low-speed modifications with a three-stage gearbox with a power of 1300 watts or more are best suited; they do the job well, as they are designed for high loads;
Choose modifications with a handle on top, it will be much more convenient for you to carry out work on drilling timber
- As for the drill, select a screw version of the required length; it is better not to save money and purchase a product from a well-known brand, since cheap analogs are usually not durable and can fail almost on the first hole. The length depends on how thick your timber is, and the diameter varies depending on the width of the walls; most often, products from 20 to 30 mm are used;
Drills with a diameter of 30 mm are among the most popular
- Drilling is carried out starting from the third row, and it is very important to maintain the vertical position of the equipment when working, because the dowel will serve as a guide, and if it is located at an angle, the surface may bend over time. The work should be entrusted to a physically strong person, as the drill sometimes jams and can turn the tool, which is unsafe when working at height;
When working, you need to hold the drill very tightly
- Remember a simple rule - the hole should be 1-2 mm larger than the size of the dowel, this will ensure its sufficiently tight location, and the fastening will not interfere with the shrinkage of the structure. That is, with a drill diameter of 30 mm, the dowel should be 28-29 mm;
- The distance from the edge of the beam must be at least 300 mm, the distance between the attachment points is from one and a half to two meters. Sometimes you can increase the number of dowels by placing them in places that may become deformed;
- Driving in the dowels is done using a heavy hammer or sledgehammer weighing 2-3 kg; in order to drown the elements, stock up on a spacer in advance.
As you can see, the instructions for carrying out the work are not complicated; it is important to have a reliable tool on hand and use fasteners of the right size.
Selecting a model for production
Conductors of industrial production can be highly specialized and universal. Templates of the first type are used to perform certain operations on typical parts. Universal devices are suitable for working with different materials and objects of various configurations.
Based on design features and functionality, conductors are divided into the following types:
- overhead - when used, they are applied to the surface in the desired area, fixed with clamps or held by hand. Used for drilling holes in flat parts;
- rotary - the working part moves in both vertical and horizontal planes. Used when working with elements of complex geometric shapes and to create holes, the axis of which must be located at an angle;
- tipping - used to create holes in perpendicular planes.
A marking jig is used to mark the locations for drilling holes. It is much thinner and lighter.
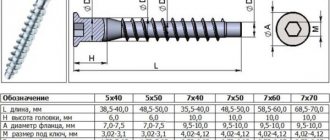
The conductor device can be specially created for a certain type of fastener: dowels, confirmations, screws, corners. There are devices to simplify the process of installing fittings.
According to the type of fixation, furniture jigs can be sliding or fixed. The former can be moved freely over the surface if necessary, while the latter are rigidly fixed in the right place. The presence of an adjustment mechanism will help to combine the device with different types of workpieces.
For large furniture manufacturers, the availability of a variety of additional accessories plays a decisive role, since they significantly reduce time costs. In this case, the cost of the tools does not matter much. A completely different approach to purchasing the necessary equipment from those who have a small furniture production facility or from independent craftsmen who produce certain types of furniture. In this case, making furniture templates with your own hands turns out to be much cheaper and more practical. The choice of the necessary options and the complexity of the device are determined not only by production needs, but also by the skill and experience of furniture manufacturers.
Overhead
Turning
Universal
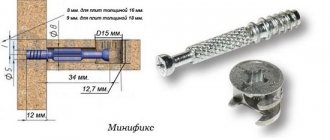
Eccentric coupler
An eccentric coupler is often used in the factory production of furniture. The reason for this is the difficulty of drilling holes. An eccentric coupler consists of two parts: a pin and an eccentric. The pin is installed in one part, and the eccentric in another.
Increase
Fig.7.
The main advantage of this type of fastener is that this fastener is hidden and therefore does not spoil the appearance of the furniture. In addition, this type of fastener, unlike confirmat, allows you to repeatedly assemble and disassemble furniture, which is important, for example, when moving. Also, using an eccentric coupler, you can connect parts at different angles.
Materials and tools
To manufacture a device, you must first decide on the tasks that it will perform. Accordingly, the necessary material is selected from which the furniture template will be made with your own hands. The most durable, reliable and “long-lasting” is considered to be a metal conductor. To create a furniture jig for drilling with your own hands, it is permissible to use wood, plywood, textolite, and plexiglass. This is due to lower labor costs and cheaper materials. All this is important, especially if you are going to make several different templates yourself.
To make a conductor, a piece of reinforcement, a block or a plate is suitable - something that can probably be found in any garage or home workshop. To make a simple marking device, you can take a regular school ruler - wooden, plastic or metal.
Of decisive importance in the manufacture of the jig is the accurate calculation of the location of the holes on the workpiece. You can take a ready-made diagram or make it yourself. The latter option is preferable, since the dimensions in the drawings must correspond to the tasks being solved.
Tools you will need:
- drill;
- grinder or jigsaw;
- a set of locksmith tools;
- clamps;
- vice.
When manufacturing a jig, you will need perfectly accurate drilling of guide holes and hardening of the finished device
Drawing of a homemade conductor for drilling holes for confirmations
Features of self-production
When designing a conductor for confirmation, it is necessary to correctly calculate what functions it will have to perform in the future. It should be done for the most commonly used fasteners in the house. If such a device is required by furniture makers for constant work, then it is better to buy a factory model, which is distinguished by great precision. In addition, manufacturers often include additional fasteners, stops and templates in the kit.
Manufacturing stages
Let's consider the process of creating a metal conductor device for confirmations. This fastener is most often used when assembling furniture:
- A piece of the required length is cut from a square metal block (10x10 mm) using a grinder. The ends of the resulting segment are leveled and cleared of burrs using a file. Corners and edges can be rounded for ease and safety of use;
- The hole locations are marked on the workpiece. Their centers should be located at a distance of 8 mm from the side edge (the thickness of the chipboard sheet is 16 mm). There should be 32 mm from the end and between the holes, in accordance with the generally accepted system of furniture fastenings. For marking, you can use a carpenter's angle or caliper. It is better to make marks on the part using a sharp metal object - an awl or a large needle. You can use a core and a hammer to make holes for the initial installation of the drill. When drilling holes, it is important to prevent the drill from moving and make them strictly perpendicular to the surface of the workpiece;
- use a drill with a diameter of 5 mm to make holes;
- to create a stop, you need to cut a piece of the required length from a metal plate (1x25 mm);
- sand the edges with sandpaper;
- bend the workpiece at a right angle, holding it in a vice. Fold the parts, aligning them coaxially;
- fasten the parts in this position using a clamp;
- From the side of the plate along the length of the device and at the end, drill holes corresponding to the size of the screw. Cut threads and fasten parts;
- Cut off the excess thrust plate and process the edges.
CONFIRMAT + DOCK
In turn, I purchased a 250 mm square from the “everything for 37” store for experiments. Despite the price, the markings correspond to the USSR metal ruler made according to GOST 427-75 and the angle is 90, really 90 degrees!
We mark with a pencil:
- from the edges 8 mm if the slab is 16 mm or 9 mm if the slab is 18 mm (size “A” in the diagram).
- Using the internal markings of the square, I mark the points where the 8 mm and 5 mm holes will be, starting from 37 mm and then through 32 mm.
- in the top row there are holes with a diameter of 8 mm, in the bottom row 5 mm.
I will write about the results of my research on the topic of simplifying and speeding up the assembly of cabinet furniture in the near future...
Source: hobbi-mebel.ru
Blum furniture fittings: price, reviews, where to buy, how to set up
If you look at the assortment, then all factory or factory conductors can be divided into 2 categories. These are universal and highly specialized devices. The first type of template is suitable for performing various tasks, working with standard furniture elements. They can be used when drilling different materials and performing all kinds of operations. It is the universal models that have become widespread in everyday life and among those who assemble tables with their own hands and make original designs.
In particular, I recently had to deal with the creation of a manicure table. I also have plans to try to assemble a table with a hiding place myself. Everything is still at the design stage, but there are interesting ideas. In many ways, I reflected my observations in the material at the link.
Conductors can be classified depending on their design features and functionality.
There are actually 3 main varieties here. These are the ones home craftsmen should pay attention to.
- Invoices. When working with a conductor, you need to attach it to the material at the desired point, fix it with a clamp, if there is one, or hold it with your hand. Suitable for drilling flat parts;
- Rotary. Here the working part can move in a vertical and horizontal plane. An indispensable jig if you need to drill elements with a complex geometric shape, as well as for holes at an angle;
- Tiltable. This is an option for situations where you have to drill in a perpendicular plane.
There is a category of conductors that are designed for specific tasks and work with certain fastenings. This includes tools for dowels, for confirmations, corners, screws, etc. There are also solutions that are used for installing fittings for cabinet furniture and more.
Areas of use
Furniture jigs and templates are devices that are practically indispensable when assembling furniture structures. The use of jigs allows you to avoid the main problem that arises when drilling holes - the drill entering the workpiece at the wrong angle. Correcting this error takes a lot of time and effort, and it is not always possible to fix it at all. The jig used for drilling holes not only allows the drill to be correctly oriented at the processing site, but also prevents the tool from straying from the specified trajectory.
Devices such as furniture jigs and templates are used both in the production and assembly of furniture, when holes must be made in the elements being connected to accommodate fasteners. In such cases, a jig for dowels or a jig for drilling for confirmation is often used, without which it is not possible to make high-quality holes for fasteners. Such a device is indispensable in cases where it is necessary to make holes, including at an angle, in thin slabs (in particular, when making holes in chipboard or MDF).
A jig for oblique holes is indispensable when making hidden connections between panels and boards
When using a jig to drill holes, the process of assembling furniture is simple and fast. Using such a device, holes can be drilled at any distance from the edge of the part, regardless of its width.
Modern furniture actively uses dowels, which at the same time are a rather outdated fastening element. That is why the doweling jig is used in the production of furniture structures. The main difficulty when using such fasteners is that the axes of the holes made in the parts being connected have a right angle to each other. Accordingly, such holes should be located strictly perpendicular to each other. Without the use of such a device as a dowel jig, it is difficult to perform them.
A jig for making holes in tubes will be a very useful device for a home workshop
Furniture production is not the only area in which jigs designed for drilling holes are used. Templates are no less often used to drill a hole in a pipe and other cylindrical parts. Conductors allow you to make high-quality holes even in small-diameter pipes.
The size and operating principle of modern conductors may vary. Some of the models of such devices are much easier to buy, and some are easy to make with your own hands. The fact that serial devices, especially those for universal use, are not cheap, also speaks in favor of making a furniture jig for drilling holes with your own hands.
General principles of drilling + (Video)
As already mentioned, drilling is the most common activity for a repairman, and therefore it is important to immediately learn a few basic rules associated with this activity.
- Use of suitable tools. There are many drills, each of which is designed for a specific type of material. Therefore, you should not try to drill concrete with a wood drill and vice versa. It is also important to consider the conditions in which the tool will be used. For example, industrial drills cannot be used for interior repairs (this is simply unsafe). It is also important to take into account resistance to moisture: for outdoor work you will need a tool of class IP34 if the climate in the area is humid and IP32 if you have to work in good weather. IPX2/ can be used indoors
- Correct markup. Before starting any work, it is important to carefully and accurately mark the drilling locations with a marker. You can also put paper tape under the marker to prevent the drill from slipping on the material.
- Selecting the required drilling speed. Here everything depends equally on both the material and the diameter of the blade. If we are talking about very thin drills (with a diameter of less than 3 mm), then you need to work at low speeds, less than four hundred per minute. For other drills, the following rule applies: the thinner the drill, the higher the drilling speed required.
It is also important to ensure that the handle is securely attached to the shaft of the hand drill. The drill must also not be allowed to skew.
Conductors presented on the domestic market
Among home craftsmen who independently manufacture furniture, as well as among specialists working in small furniture shops, jig devices of the following brands have gained popularity.
The Assistant marking jig belongs to the professional series. This is a multifunctional jig device, which, when using appropriate bushings, can be used not only for marking, but also for adding holes.
Marking hardware using the Assistant template
The Dubel-Profi conductor is produced by KVB. This is an inexpensive but functional device for home use. The kit of such a conductor includes various devices (clamps, rulers, etc.) that greatly simplify the work with it and make its use more convenient.
Despite its simplicity, the Dubel-Profi jig is used for many operations
These are Russian-made conductors - inexpensive, but quite functional. They are equipped with a positioning system and a set of replaceable bushings.
The Condor jig allows you to drill perpendicular holes of the required diameter by choosing the distance between them and changing the bushings included in the kit
A separate category consists of professional conductors used for the manufacture of furniture and its assembly. Such devices are distinguished by maximum functionality; they are supplied with a set of replaceable bushings designed for drills of different diameters.
The choice of a specific type of conductor device primarily depends on what tasks and with what performance you are going to solve with its help.
Source: met-all.org
Homemade conductor devices
Jigs of the simplest design, for example, those used for drilling holes for confirmation, are relatively inexpensive, so many craftsmen do not bother making them themselves and purchase serial models. Meanwhile, there are those who try to make even such simple devices with their own hands. The question of how to make a jig for drilling with your own hands often arises and, if necessary, drill non-standard holes.
To make your own jig for dowels or a jig for confirmations that is simpler in design, you can use drawings and videos on the Internet.
When manufacturing a jig, you will need perfectly accurate drilling of guide holes and hardening of the finished device
To manufacture such a device, naturally, you will need a drawing of it. You also need a minimum set of tools and equipment:
- electric or hand drill;
- a set of locksmith tools;
- Bulgarian;
- welding machine (for the manufacture of jig devices of a more complex design).
Main types
Based on the type of design and functionality, devices used for adding (drilling) holes in elements of furniture structures may fall into one of the following categories.
These are jigs that are applied to the surface of the workpiece and either fixed on it or held in a given position by hand. Using such a device for making furniture, holes are made in flat parts (for example, in slabs made of chipboard or MDF).
Classification
According to the characteristics of their use, conductors are classified into the following types:
- Invoices. These are simple and mobile devices that do not require fixation, but are held by hand. In view of this, drilling using these jigs has to be done with one hand. They are used mainly when processing chipboard and MDF boards. The devices in question are easy to create yourself.
- Rotary. These conductors are equipped with brackets. Designed to perform drilling in two adjacent planes in one pass.
- Sliding. These devices are designed to create multiple holes without changing settings. They belong to professional equipment requiring appropriate skills.
- Angular (at an angle). They are presented in highly specialized versions, designed for making holes at different angles. Often made according to an overhead scheme.
Communities › DIY › Blog › Tools for assembling furniture (personal experience).
In yesterday's topic about building cabinets, a lot of people asked to tell us what tools my friend and I used to assemble the furniture.
I believe that professionals will not be interested in this, and many will even say that they could have made the templates themselves and not spent money. It is possible, but without experience, it is difficult and time-consuming. We took the fast, but costly, route - we bought ready-made ones. However, I am very grateful to everyone who sent me drawings of their templates - it really helped me understand the topic and understand what's what.
In general, as I understand it, two approaches are used to connect chipboard using confirmations: 1) Templates for drilling end and front holes. They can be in the form of rulers (like Cheron) and in the form of drums. They can also consist of entire systems that are attached to a sheet of chipboard. But the general idea is that each sheet is drilled out one at a time. Perhaps you can save time and use another method. 2) Clamps for fixing chipboard sheets at the desired angle (usually 90 degrees) and a confirmatory drill. The advantage of this option is that in one pass we get both holes at once and can immediately tighten the confirmation. It would seem that everything is easy and simple, but now try to combine panels with a length of 2600 and 1200 mm at an angle in an apartment. Hard? running away? yes, and not alone at all (not like in the first option).
DIY furniture jig: drawings with dimensions to help
The principle of this equipment:
- Angular housing. It is superimposed on the planes of the parts, which will then be connected to each other.
- Guide bushings. The drill will go through them.
- Clamping devices. They fix the conductor and are made from the end part.
Designing your own jig should be based on the fact that with the help of this equipment it is possible to do most of the work performed related to various types of fasteners.
Important! If you need a universal assistant - this applies to professional furniture makers, then it would be better to purchase industrial equipment that is made more accurately and with high quality. It is this kind of device that will be preferable and will quickly pay for itself, especially if you also take into account the fact that this device often comes with many different templates, stops and other little things that are also necessary in the work. They are much cheaper than buying at retail.
And yet this device, if necessary, can be made with your own hands.
Such equipment may not be needed very often in any given industry, and even more so for a home craftsman. So for many users it will be much more profitable to do it themselves.
If the design of such remains relevant, then you need to prepare materials for the manufacture of a homemade conductor for drilling for confirmation:
- Corner. Your choice should be made on the unequal type of this rental - its possibilities are wider. The corner shelf must be chosen with the greatest thickness, which can reach up to 8 mm. This is quite justified, since then it is possible to insert guide bushings with an outer diameter of up to 6 mm. Based on this, you can use drills from 3.5 to 4 mm. Even if that diameter is not enough, then the material is drilled out with a large drill, without using any other devices.
- Guide bushings. Here, stainless steel pipes will be preferable, which are selected primarily by internal diameter. Example: a 6×1.5 pipe is suitable for a drill no larger than 2.7 in diameter. Explanation: its internal hole will be 3 mm, and a small gap along the entire internal diameter is taken into account due to thermal expansion of the material. The length of the sleeve is the depth of the hole in the corner, multiplied by two or more. The fit of the bushings is either transitional, or with an interference fit, or according to the shaft system. The latter is the most appropriate.
Read also: Classification of tungsten electrodes by color
Instead of pipes, of course, you can use ready-made bushings used in wire drawing machines - these are available, for example, in mechanical engineering. Such parts (even used ones) come in handy: they are made of alloy steel and have an almost unlimited service life.
Choosing a mounting method
- Fixation using self-tapping screws. They are screwed into the part, which prevents the device from moving due to friction. This is convenient because these marks will be needed for subsequent drilling of other holes.
- Spring stop. It will securely fix the jig to the part. For such a stop, a flat spring with an appropriate clamping force is suitable.
- External clamps. Rubber pads must be placed under them. Corrugated rubber is ideal as a material. This, of course, slightly increases the weight of the equipment, and the elasticity of the pads can negatively affect the perpendicularity of the bushings. To prevent this from happening, the drill is inserted into the sleeve to mark the hole, and only then the clamps are clamped.
Washing machine in the kitchen: installation options, reviews, pros and cons
Furniture jigs are fairly simple mechanical devices. They are needed in order to simplify and speed up the process of drilling various holes. Using such an object, you can make a hole according to the markings and with optimal accuracy and the required angle of inclination. It is actively used in the process of assembling furniture and when performing various carpentry tasks. The conductor is perfect for household use, since you can always do it yourself or purchase a small tool for personal use.
In essence, we are talking about a template for holes with different diameters. The main part of the tool is presented in the form of a rectangular block made of durable material. There are holes on the block.
To simplify work with the conductor, many models are equipped with additional adjustment and fixation mechanisms. If desired or necessary, you can make the tool yourself. And sometimes the result turns out to be no worse than Cheron.
With the help of a jig, the drill moves in a given direction and creates a hole of the required size. In this case, the material is drilled strictly at a right angle of 90 degrees. Some models allow you to adjust the angle or they initially have a certain inclination. It is extremely important to eliminate deviations when processing thin materials, the end parts of doors and walls. It is difficult to maintain the correct angle manually. Often there is a lot of waste, and you have to waste extra material.
The jig is designed for drilling all materials used in furniture production, including wood. Chipboard and MDF.
If you need to make many identical holes on different parts, or make them perfectly straight along one line, the jig will become simply an indispensable device.
Homemade template for inserting furniture hinges
Many home craftsmen prefer to make furniture with their own hands. A cabinet or stool assembled in a garage is sometimes in no way inferior in quality to a factory-made product. If the master has the tools and skills, of course.
Moreover, homemade furniture is much cheaper. A sheet of laminated chipboard is relatively inexpensive. With proper sawing, you can make a cabinet and several stools, and maybe more, from one blade. The only question is the size.
But to make furniture, in addition to the above-mentioned skills and tools, you also need special equipment. Various types of conductors and templates for marking, which greatly facilitate the work.
For example, in order to install hinges when assembling cabinet fronts, it is necessary to make the most accurate markings for the strike plates and hinge cups. That's what a template is for. It can, of course, be purchased in a store or online. But in small towns or villages, due to the remoteness, purchasing such devices is very difficult.
This article just talks about how to make a template for installing furniture hinges. Only available materials are used, in general, what came to hand. Some semblance of the drawing is shown schematically in the first figure (Figure 1).
Figure 1 - Schematic drawing of the template
Nowadays in furniture production, four-hinge cup hinges are mainly used. They are installed in a blind hole with a diameter of 35 mm. To drill such holes, use a Forstner drill.
So, you will need the loops themselves. As well as strike plates and screws included in the kit (Figure 2).
Figure 2 - Hinges, strikers and screws
The standard factory template is made in the shape of a corner. After a short search, the upper part from the old rim lock, also having an angular shape, was adopted. It fit almost perfectly (Figure 3).
Figure 3 - Lock
Tools (Figure 4):
- Drill.
- Clamp.
- Roulette.
- Calipers.
- Forstner drill with a diameter of 35 mm.
- Drills with a diameter of 2.5 mm and 5 mm.
- Roulette.
- Hammer.
- A metal pencil with a sharpened carbide tip (punch punch).
- Three small pieces of chipboard.
- A screwdriver, but you can also use a screwdriver.
Figure 4 - Tools
We place the part on a piece of chipboard and begin marking (Figure 5). First, use a caliper to draw a center line. Then we retreat from the inner part of the corner 22 mm along this line and make a notch with a center punch. This will be the hole for the hinge cup.
Figure 5 - Template layout
We also measure 37 mm from the inside of the corner and draw a segment perpendicular to the center line. We retreat from the center 16 mm to the left and to the right along the segment and make notches. Here holes will be drilled for strikers for overhead or external hinges.
The next step will be marking the holes for internal or inset hinges. This is when the facade (door) does not cover the cabinet wall, but goes inside it. This operation is similar to the previous one, with the difference that you need to retreat 67 mm from the corner (Figure 6).
Figure 6 - Template marking, continued
We check the markings very carefully and drill holes along all notches with a drill with a diameter of 2.5 mm.
Now you will need to install the loops using the manufactured conductor. To do this you will need two more pieces of chipboard. We place the pieces next to each other and set them aside approximately 80 mm from the edge (Figure 7).
Figure 7 — Marking of blanks
We draw two parallel lines along the chipboard scraps (Figure 8).
Figure 8 - Marking of workpieces. Continuation
Having attached the template, we mark the drilling point for the hinge cup, first the right one and then the left one. You can immediately make shallow holes with a drill with a diameter of 2.5 mm (Figure 9).
Figure 9 — Marking for the hinge cup
Similarly, we mark the places for the strikers (Figure 10).
Figure 10 — Marking for strikers
Use a Forstner drill to make a hole in the chipboard. Carefully, slowly, trying to keep the drill strictly vertical. Each time we check the depth with the loop cup (Figure 11).
Figure 11 — Drilling the hinge cup
Using a drill with a diameter of 5 mm, we make holes for the screws that secure the strikers. Here, too, it is necessary to monitor the drilling depth (Figure 12). If the holes are not deep enough, the powerful screws will not go in completely and will be squeezed out of the chipboard. Otherwise, you can pierce the workpiece right through. Therefore, it is better to use a limiter.
Figure 12 - Drilling holes for strike plates
Insert the loops into the holes. Using an awl or center punch, we mark the places for attaching the cup to the workpiece, trying to get exactly into the center of the hole. Then we use a small drill to dig deeper into the chipboard. We secure the hinges with self-tapping screws with a diameter of 3.5 mm (Figure 13).
Figure 13 - Holes for screws and blank for Forstner drill
We assemble the structure and check it for opening and closing (Figures 14 and 15).
Figure 14 - Hinges ready for assembly
Figure 15 - Assembled loops
Source: hobbywood.ru
How to drill a hole straight + (Video)
A fairly common problem is that the drill slips off the mark and the hole is not made in the right place. Paper tape glued to the top of the tree can help combat this. Also, sometimes similar difficulties arise if you have to work with an overly thick drill. Then you should first make a recess in the material with a thinner drill, and then drill, resting against the mark you made.
It is important to pay attention to the quality of sharpening. If the edges are not sharp enough or sharpened unevenly, problems with drilling accuracy may occur.

