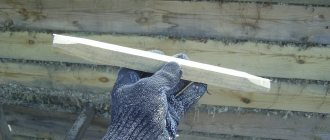
A furniture stapler, or, as they also like to call it, a strobe shooter, is a very necessary thing. But sometimes, even when recently purchased, it begins to work incorrectly and either does not drive the staples into the tree completely, or they completely get stuck in the tool. In most cases, this can be “cured” by simple adjustments or is associated with improper use of the tool. But there are situations when the stapler has already exhausted its service life to such an extent that the parts in it have simply worn out or have worn out over time. How to fix a stapler so that it works again as before, and is it even possible to do this in principle?
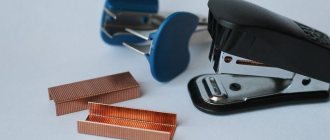
Two main varieties and their structure
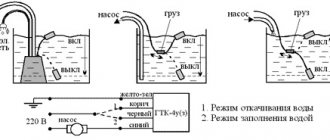
But in order to begin repairing a stapler or to understand from problems what may “break” in it or cause these problems, you should familiarize yourself with the structure diagram of staplers in more detail. We present to your attention two types of mechanical furniture staplers, which are most widespread. The most common is this option, in which the spring adjustment screw is located on top.
Here is another type of stapler, where the spring tension screw is located under the handle. This is a rarer variety.
It can be seen that the operating principle of both mechanisms is similar, and therefore the setup and repair will be almost the same, as well as the causes of problems with the operation of the tool.
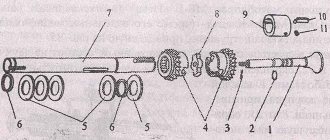
Furniture stapler diagram
A manual construction stapler has a magazine into which a clip of staples or special nails is loaded. The bracket is hit by a firing pin, which is attached to the firing pin. The size of the striker in the tool depends on the dimensions of the consumables (staples) used. The hammer, in turn, touches the spring, the degree of compression of which is adjusted by a special screw. The shock is absorbed using a shock absorber located inside the stapler.
See the diagram for the device of the stapler:
Stapler device with a twisted mainspring
A coiled mainspring is installed on inexpensive models.
Manual stapler with a leaf (spring) mainspring
A stapler with a leaf spring is more powerful and expensive.
The problem of incomplete driving of staples
This problem can be solved by simply setting up the tool. If the stapler does not jam staples, repairs will not be necessary. Just tighten the spring adjustment screw. The tighter the screw is screwed in, the more tension the spring will be under and the next time it is lowered it will push the bracket to the end.
If the problem is not in the settings and the stapler was working normally before and suddenly stopped, most likely the problem is that one of the next staples was jammed and stuck in the slot. Over and over again, the striking mechanism hits it, but it is stuck firmly, thereby preventing the magazine clamping device from moving the next staple to the “starting” position. Here you need to open the magazine and remove the jammed staple. With the next shot everything will fall into place.
Additional options
It seems to many that a stationery stapler is a fairly simple device that cannot be improved in any way. But manufacturers are making it more convenient to use. So, when purchasing, pay attention to the fact that there is a plastic footrest or rubberized inserts at the bottom. They will protect your table from scratches.
Another important and convenient addition is the presence of a built-in destapler. This is a special device with which you can quickly straighten the staples. It will come in handy in situations where you need to separate previously fastened sheets. It is inconvenient to pick out staples with scissors, much less with fingernails, and it looks unsightly.
The problem of issuing a pair of staples at once
How to repair a stapler yourself if it starts producing a pair of staples at once? This problem is more serious. Due to improper use or over time, the firing pin of the impact mechanism may become deformed. If the metal from which the striking part of the mechanism is made was of poor quality, which applies to almost all cheap and Chinese models, its striker can either flatten or bend slightly, as a result of which, with the next blow, it will catch not one, but a pair of staples at once. How to fix the stapler in this case and is it even possible in principle? You can correct the situation, but you will have to disassemble the entire stapler. You can read about the procedure in the next section.
The hardness of staples and what it affects
The greater the hardness of the consumable, the higher the efficiency of its penetration into the surface of the driven material. To understand why staples of different hardnesses are produced, you need to imagine a picture when it is necessary to drive a staple into a board made of hard wood. A soft aluminum or copper staple will not penetrate the surface of such wood. The result is a damaged bracket with bent legs. To prevent this from happening, manufacturers produce consumables with the following hardness names:
- Simple
- Very hard
- Red-hot
A description of the degree of hardness of the staples is presented in ascending order. The ends of the devices may have additional sharpening, which allows for effective insertion of the part into the surface of solid materials with the least resistance.
The problem with staples that keep getting stuck
This problem stems from the same area as in the previous case. Even though the striker of the impact mechanism fits into the slot, if it is even slightly bent, staples will constantly get stuck between it and the guide wall of the casing. At first, it will work normally every other time, and then it will become impossible for it to work at all due to the fact that the staples that become clogged over and over again will deform it more and more. In these cases, it can be stated that the stapler is broken, and how to fix it should be described in more detail.
First of all, you should prepare the necessary tools. What you will need to completely disassemble the stapler:
- a regular screwdriver;
- metal file;
- pliers;
- hammer;
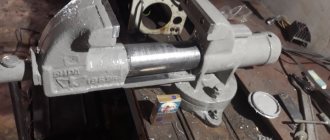
- vice (required).
When everything is prepared, you can start disassembling. There is nothing complicated about this and you shouldn’t be afraid that you won’t be able to assemble it later. You simply won't be able to do it any other way. For repair you need:
- Open the magazine and remove the remaining staples.
- Turn out the adjusting screw completely.
- Remove the released spring through the hole at the top.
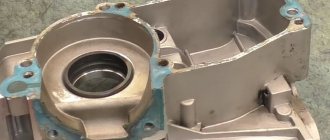
- Now disassemble the body. The casing parts are held in place with pins. They have molded caps on one side and locking washers on the other. They must be pulled out so that each pin can freely come out of its hole.
For repairs, it will be enough to remove two pins from the impact mechanism side.
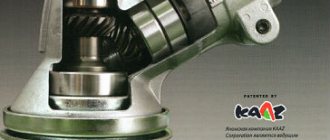
- Afterwards, the entire stapler device appears before you in all its glory. It is necessary to remove the impact mechanism and examine it.
- Regardless of whether the firing pin is bent, the firing pin is flattened, or there is a bend in the place where it comes into contact with the rocker arm of the spring charging lever, you will have to clamp it in a vice. If the striker is deformed, use pliers to return it to its original even shape. If the firing pin is broken, we grind off the irregularities with a file.
- When the defect is corrected, we proceed to assembly in the reverse order.
- Don't forget to lubricate the impact mechanism with oil. It is advisable to use sewing machine oil.
It happens that the stop on the impact mechanism against which the spring rests may break off. In this case, only welding will help, and it is not a fact that the tool will last for a long time in this case. As a result, the welded stop will still fall off and you will have to buy a new stapler.
When the tool is completely assembled, we check it, at the same time adjusting the spring. If everything is fine, you are great. If not, it means that something was “missed” somewhere. You will have to disassemble everything and check the evenness of the parts of the impact mechanism more carefully. Therefore, it is better to do everything efficiently the first time and check it ten times.
How to choose a device: advice from professionals
To choose the optimal stapler, you need to solve the following problems for yourself:
- frequency of use of the tool: every day or from time to time;
- places of use: indoors, outdoors. Is there electricity there?
- Do you need precision driving of equipment;
- materials you plan to work with.
Depending on the purpose and working conditions, choose the type of stapler:
- for infrequent work with non-solid materials, a mechanical stapler is suitable;
- If you don't need precision in installing staples and have the ability to swing, then consider choosing an impact stapler. He's light. Attached to the mounting belt;
- for a large amount of work in places where mobility is needed, take a closer look at a cordless tool;
- if you work indoors with an outlet and don’t want to overpay for the battery, buy a stapler with a mains connection;
- If you need a stationary powerful device, don’t hesitate to take a pneumatic tool.
What characteristics to look for when choosing a stapler:
- presence of impact force regulator. A mechanical tool has two types of regulation: minimum and maximum or smooth adjustment. Electric has up to 6 modes. The setting is made using a software switch. The thinner the material, the less the impact force, otherwise dents will form;
- Double punch. Only electric staplers have it. For hard materials, large equipment is used that will not clog immediately. The double strike mechanism itself determines this and works a second time. If there is no such mechanism, then you will not immediately see that the nail heads are not completely hammered in;
- removing fasteners using a stapler. If this function is available, then to remove poorly hammered equipment you will not have to do it manually or with a nail puller;
- body material. Structural steel staplers weigh more than plastic ones;
- rubber inserts on the handle. Their presence reduces the recoil of the tool, and the hand gets less tired;
- Battery type: nickel-cadmium suitable for low temperatures. But they have a memory effect, so they discharge quickly. They are used in inexpensive models;
- lithium-ion. They hold a charge longer, but are less resistant to mechanical stress;
- nickel metal hydride. Lightweight and have a long charge life;
Selecting staples for a stapler
When purchasing staples, you should know which staples will fit your stapler. The type of equipment is indicated on the packaging, in the instructions and on the tool body. Staples have characteristics that must be taken into account when choosing:
- form. It can be U-shaped or semicircular.
The latter is used for cable installation; Staple shape - type of sharpening of ends: sharpened. Hammering such staples requires less effort;
- unsharpened. They jam more often and do not always clog completely;
- height H;
Staple dimensions
The most common consumable is U-shaped brackets marked “Type 53”. They have found their application in upholstering furniture with textile materials and in joining products made of wood, plywood, chipboard and hardboard. Type 140 staples are in second place in demand. They are shorter and thicker. Due to the increased contact area with the material being joined, the likelihood of material rupture at the point of attachment to the base is reduced. Therefore, they are convenient when working with thin parts: fabrics, PVC film, as well as wood, plywood, chipboard and hardboard. There are two types of semicircular staples.
Types of semicircular staples
| Bracket type | Cable diameter, mm | Thickness, mm | Height, mm |
| S (28) | 4,5 | up to 1.25 | from 6 to 10 |
| L (36) | 6 | 1,25 | from 9 to 11 |
Two characteristics are important for a stapler: shape and size. And you choose the type of sharpening for yourself. By the size of the equipment you can judge the purpose of the stapler.
Examples of types of staples and nails for staplers
| Equipment type | Description | thickness W, mm | width L, mm | height H, mm |
| Type 13 (H/19/37) | Flat metal staples | 0,7 | 10,6 | 6–14 |
| Type 53 (A/3/530) | Thin metal staples | 0,75 | 11,4 | 4–18 |
| Type 140 (G/4/11) | Thin metal staples | 1,25 | 10,6 | 6–14 |
| Type 48 | Nails | 2,8 | 1,65 | 14–25 |
Breakdown prevention measures
Some craftsmen advise that when storing a tool for a long time, loosen the screw of the furniture stapler that regulates the compression of the spring. The less the spring is compressed, the greater the possibility that it will not sag in the shortest possible time and will last several times longer than stated in the warranty card. Of course, before the next use it will need to be adjusted again, but this is the lesser of two evils. It's better to spend a few staples on resetting than to go to the store for a new stapler.
An important factor in preventing “diseases” of a tool such as a stapler is its lubrication. Regardless of whether it was in constant use or in storage, it is advisable to lubricate the mechanical parts of the tool once every three months, then you won’t have to rack your brain every time about why the stapler is not working well and how to repair the tool. What should be lubricated and how:
- Unscrew the adjustment screw completely, pour some sewing machine oil into the hole, screw the screw into place and fire a few dry shots.
- Then open the magazine where the staple blocks are inserted and pour some lubricant into the slot of the impact mechanism. Raise the stapler upside down and fire a few more blank shots.
- It is also advisable to lubricate the mechanism (rammer) for feeding staples.
This simple maintenance won't take much time, but will extend the life of your instrument.
Classification
There are different types of construction staplers: staplers.
Manual
This category also includes manually operated mechanical devices.
These devices hammer the staples in with forceful blows. Compared to manual analogues, the performance of this model is much higher. This tool is convenient for performing the following work:
- Fastening insulating material.
- Installation of roofing felt.
This tool is used for installing cables with a voltage load of 50 V. The maximum cable diameter is 7.5 mm. These staplers are used when performing the following work:
- Cable fixation.
- Laying an electrical network.
- Installation of communication lines.
Classic model
This hand-operated tool has become a true classic. After the release lever is pressed, the staple is driven into the material. A special category is hybrid models, with which you can perform several types of described operations.
They have only one drawback: a relatively high price.
What to do if a bracket gets stuck
It is worth noting another very important point that will help you in your work. It happens that the staples become bent and get stuck in the exit hole. They cannot be hammered into the surface and cannot be pulled out by hand.
In this case, we will need to pull out the feed magazine completely.
This option exists for almost all professional staplers.
First you will have to repeat the opening of the metal plate and pull out the spring.
Next, in the middle of the lower part of the stapler you need to find an iron part, slightly protruding from both sides. Grasp it tightly with your thumb and forefinger on both sides and pull down forcefully.
This will remove the entire feed magazine that was in the tool.
You will see a jammed staple that can now be easily pulled out by hand.
Putting the stapler back together is not difficult: the entire pulled out block returns to its place with a press. You should hear a click when you do this. Afterwards, do not forget to replace the spring.
Not just parentheses
Some staplers can work not only with staples, but also with studs of various shapes. The designations of what the stapler works with are indicated on its body or in the instructions.
I tuck the nails into the stapler in the same way as with staples, but you need to be careful after pulling out the spring. A row of nails must be loaded along one of the outer edges of the letter “P”, and not inside this very letter!
If you want it to produce two nails side by side when working with a stapler, load the second row along the second outer edge. Next, the spring is inserted and the stapler is closed.