What to paint with?
Products for painting bench vices can be like this.
- Hammer enamel. This type of painting leaves behind an attractive appearance of the instrument. But it is worth considering that the paint easily chips under mechanical stress.
- Epoxy paint. Reliable type of painting. It has no cons. A minor drawback is the small color palette of the presented assortment.
- Sadolin paint. Car paint. Before work, the surface should be well primed.
- Set for painting bathtubs. White epoxy two-component paint is suitable for bench vices.
Those parts that are not planned to be painted can be sealed with tape. Some craftsmen advise using soapy newspaper. It also adheres well to the surface. There is no need to paint the threads and those places where some parts move or are inserted. With further use, turning the handle will be quite problematic.
As you can see, it is quite possible to restore a mechanic’s tool at home. Of course, you should not bring the device to a deplorable state. But some recommendations will help restore even those instruments that have not been used for a long time and are covered with a coating of rust.
It is also necessary to observe safety precautions when performing work. It is worth remembering that you should wear a mask and safety glasses when working with paints and sanding tools.
Restoration of a bench vice is presented in the video below.
Safety precautions
When performing any welding work, cast iron is no exception; it is important to follow safety rules:
- if work is performed indoors, it must be well ventilated and have high-quality lighting;
- Grounding must be used;
- cast iron parts should not cool quickly, so when working with them they must be protected from moisture;
- The welder must work in a fire-resistant suit and shoes, gloves, and a protective mask.
Cast iron vices should not cool quickly.
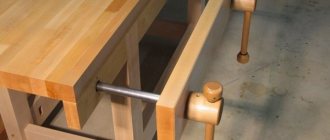
Workbench vice
These vices are also called Moxon vices or bench vices; they cope quite successfully with clamping large boards, plywood, and various panels. The advantage of this type is that they do not take up a small area in the workshop, and they are made of wood.
You need to select the dimensions yourself; you can make a carpenter's vice for a workbench with your own hands using a minimum of tools and material.
The design looks like this:
For production you will need two studs, four nuts, three boards. After the boards are prepared and cut to size, it is necessary to drill two holes in the fixed and moving parts. Then, in the fixed part, insert the nuts into the drilled holes, having previously lubricated them with glue on both sides. A small nuance: the holes in the fixed part should be slightly smaller in diameter than the nuts themselves, in order to prevent the nut from twisting in the hole. First, the studs need to be welded on the knob for convenience or a wooden handle must be made. The bed for the fixed part can be made in the form of a step. Screw the finished structure to the workbench with self-tapping screws or bolts.
Using old mechanisms and scrap metal at hand
A high-quality new channel, angle, plates are not the only suitable material for making your own vice.
An old jack will work as a basic mechanism. For ease of work, a support plate is made (or pipes with a rectangular profile, as shown in the illustration) and clamping jaws are welded - also from a pipe or channel, angle. Do-it-yourself jack vices are no less convenient than industrial ones.
- Another budget option is a rail vice. Considering the load capacity of this rolled metal, the model turns out to be very powerful. It can also be used as an anvil, the main thing is to securely fasten the product to the workbench.
- For those who work primarily with wood, a wooden vice would be a good solution; making them with your own hands is easier and faster - no welding is needed, the parts can be sawed off by hand. The main thing in this model is to select suitable threaded elements.
- The option shown in the photo is designed to be permanently attached to a workbench. To make a quick-release version, it is better to make the base part with a plate that is bolted to the workbench.
- For milling and carving, models with double-sided clamping are convenient - this design allows you to center the workpiece and/or move it during operation without removing it from the vice.
- If the clamping force required is not very large, but you often need to change the position of the parts or the parts themselves in the jaws, you can look for a cam mechanism and make a quick-clamping vice. In this version, the screw clamp is replaced with a small cam; the clamp can be loosened or strengthened by slightly turning the lever.
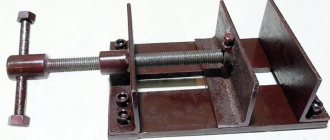
Metalwork yews
If you often work with metal, then for these tasks you need a strong metal vice that you can make yourself.
In order to assemble a bench vise with your own hands, you need the following tools:
- Welding machine.
- Electric drill.
- Grinder with a grinding wheel.
- Square to maintain the required angles.
- Drills of various diameters.
In addition to the tool, you will need:
- Steel channel with a diameter of 6 mm.
- Sheet metal 5-6 mm thick, more possible.
- Corner 70 by 70 or 50 by 50.
- Twenty bolts and nuts.
If there is a pin with a diameter of 16 mm, then you can use it as a clamping screw that will move the moving part. The two nuts into which the screw will be screwed are quite difficult to make yourself, and besides, the remaining parts are quite non-standard and quite difficult to find, so it makes sense to turn to a turner.
Then weld the nut to the channel, this must be done coaxially.
The ends of the channel must be covered with a piece of sheet metal and a hole for the screw must be cut in the strip.
Use a grinder to cut out two corners and a plate. Place the corners against the channel on both sides and cover the top with a piece of sheet metal. The result will be a kind of U-shaped design.
The frame can be cut out of 7-10 mm metal and four holes can be drilled on each side, as well as 6 holes in the U-shape.
Weld one nut to the frame, and weld two metal stoppers on the sides of the nut.
Then weld the second workpiece onto the moving part. On the sponges themselves you need to make some kind of heels from thick metal. They can be welded or bolted.
If desired, you can reinforce the jaws on both sides with corner gussets made of thick metal.
These vices are no worse than purchased ones, and the material costs required are minimal. Using this principle, you can make another version of yews from a hand jack. The finished product can be painted to give it an aesthetic appearance.
What size and weight are vices and where are they used?
The production of vises continues to this day, and one of the main criteria for choosing these tools is their size. The size of the tools used determines the ability to fix the relevant parts. For example, it is simply not possible to tighten the bolt at “22” in small devices, since this will not allow for a small stroke of the jaws.
The situation is similar when using a large vice. In such devices, it is possible to fix a small part, but with the slightest increased impact, it can be crushed.
That is why today manufacturers produce stationary clamping devices in the following sizes:
- Small - their weight reaches 8 kg. The dimensions also do not go beyond the following values: height - 140 mm, jaw stroke - 80 mm, length - 290 mm
- Medium - the weight of such devices varies from 8 to 14 kg. Tools for fixing workpieces do not exceed the dimensions: height - 180 mm, jaw stroke - 125 mm, and length - 372 mm
- Large ones are special units whose weight reaches 30 kg. However, there are even larger vises that weigh up to 60 kg, but these are used exclusively in industrial settings. The dimensions of large tools are within the following range: length - 458 mm, height - 220 mm and jaw stroke - 160 mm
One of the main parameters of the devices under consideration is the stroke of the jaws, which determines the possibility of fixing parts of different sizes. For a home garage, options are selected from the category of small and medium-sized devices, which allows you to fix workpieces of different sizes for subsequent processing.
This is interesting! Vices can be rotary or non-rotary. Rotary models are equipped with a double support plate, which has the ability to change the angle of the tool. Such models of devices allow you to attach workpieces of different lengths to the jaws.
How to repair?
Before you repair the instrument yourself, you need to disassemble it and wash every part. If the device is covered with rust, it must be removed. To do this, you can use both a professional rust converter and home remedies. Vinegar or kerosene will help get rid of plaque. The product should be soaked in liquid and left for a while. Later you should go over the tool with a stiff brush. The vice should be polished until the original shine of the metal appears.
After the cleaning and disassembly procedures, you should begin the repair process itself. If the cause of the breakdown is the screw turning in the nut, then it is necessary to cut the nut lengthwise into 3 parts and renew the thread. For this you will need a grinder. Then you need to restore the integrity of the nut by welding the cut parts back into place.
Now you need to reassemble the tool. The procedure for assembling the vice is as follows:
- the main legs are pushed onto the base;
- the paws are moved as far to the left as possible, this will help you easily install the bars during the next step;
- First one strip is attached, then the second;
- to finish fixing the slats, you need to move the tabs to the right;
- After this, you need to insert the nut and secure the screw in it.
If the vice is in disrepair, it is recommended to use kerosene to unscrew rusty bolts and parts. You should lubricate the parts and wait a few minutes. After which the rusted bolts begin to gradually turn. After repairs, you can sand the device. There is no need to do this manually. Moreover, this will take a lot of time. For grinding, take a special brush for an angle grinder. Safety glasses must be worn during operation. To eliminate minor defects (scratches, shallow cracks), the surface of the product must be cleaned or soldered.
Machine tools
As stated above, it is most profitable to make a machine vice with your own hands. They greatly simplify drilling work, and the material for the machine vice is suitable for almost any available material: from a channel, see video:
to plywood, see story:
And again sponges
The strength and stability of the jaws for a machine vice is even more important than for a bench vice: if a drill (cone, cutter) turns a part out of them, this can lead to serious injury. And so, we return to the question above: what are the vice jaws made of? From a corner from 40x40x4. In this case, the entire sponge will work not for shear, but for bending, to which the metal resists much more strongly. This is the case when less iron turns out to be stronger.
But not every corner of the same size is suitable. A drawn and cold-rolled corner (pos. A and B in the figure below) is unsuitable - the metal is rather weak. The jaws of both homemade and metalworking and machine vices must be made from hot-rolled angle (pos. B). Firstly, it is much stronger. Secondly, the range of its standard sizes is wider: if the thickness of the flange of a cold-rolled general-purpose angle is up to 0.1 of the width of the smaller one, then for a hot-rolled angle it is up to 0.2b. That is, you can find a hot-rolled angle, say, 60x60x12 - the vise jaws from it will be quite reliable.
Types of steel angle
A hot-rolled angle is easy to recognize by the type of cut: the entire edge of the outer corner is always sharp (shown by the arrow on the left in the next figure), and inside it there is a fillet larger than that of a cold-rolled angle. If the vice is assembled by welding, both equal and unequal angle angles will do. If you assemble them with bolts, it is better to use an unequal shelf with a shelf width ratio of (1.5-2)/1 (a/b = 1.5...2/1). In this case, the large shelf is laid horizontally!
Angle steel machine vice
The design diagram of a homemade machine vice from a corner with bolts is given in the center in Fig. on the right are drawings of their general appearance. The slider and bracket for the clamping screw are bent from a steel strip with a thickness of 1.5 mm. The screw in it can be fixed with a groove, because its fixation works only when the movable jaw is retracted and is loaded negligibly. On the clamp, the tail of the screw rests directly on the sponge; the screw itself is M16-M20. For more information about homemade machine vices from a corner, see the video:
Fly tying tool
Most anglers prefer homemade fly tying vices to commercial ones. The device itself has a fairly simple design, which allows you to make them in a short time and without special tools at home. The most difficult step in making a vice is the jaws themselves. They are made from rectangular steel bars. Two holes are drilled in the finished jaws for fastening to the yew and one for the adjusting screw. The holes need to be threaded (M6) with a tap.
Next, you need to tighten both jaws with a screw. After tightening, disassemble the jaws and install the clamping screw, and adjust the opening angle to suit you. You need to make a small groove on the jaws for the hook.
The yew support can be made from a T-shaped or L-shaped steel rod. Sponges are welded to the end of one of the workpieces. The rod must be welded to the support, and if you need to make the support adjustable, then a piece of edged pipe is welded to the workpiece, the diameter of which is equal to the diameter of the workpiece. It is recommended to make the length of the support about 20-50 cm high for more comfortable work.
If the vice has become unusable and there is no way to repair it, then you should not immediately buy new ones, but try to make it yourself. Such a tool will serve for quite a long time and will cost several times less.
Types of vices
How to make a summer gazebo with your own hands at the lowest cost: photo, video, step-by-step instructions
The main types of vices are metalworking, machine, carpentry and manual.
Bench vice
An all-metal tool that is mounted on a workbench or table and secured to the base with bolts.
- The design differs between chair and parallel vices.
- Available in stationary and swivel versions, allowing you to work from different angles.
- The width of the jaws is 45-200 mm.
- The stroke length of the movable lip reaches an average of 140 mm.
Parallel vice
- They are divided into rotating and non-rotating. The first ones rotate parallel to the base around an axis by 60 degrees or more. Fixed models are rigidly fixed and designed for work in one position.
- The movable jaw moves when the screw rotates parallel to the fixed part.
- The base of the tool is cast from cast iron, and the moving parts are made from carbon steel.
- The overhead jaws of high-strength models are made from U8 tool steel, complemented by a cross-shaped notch, and are attached to the main jaws with screws after hardening.
Chair vice
Outdated design type. Previously they were attached to a chair-shaped base. Modern devices are fixed on workbenches.
- The structure is made of forged steel. Consists of a body complemented by sponges.
- The working surface of the jaws is reinforced with screw-on hardened plates or a layer of U8A steel is welded onto it.
- The working surface inside is covered with notches for strong fixation of workpieces in a vice.
- The fixed jaw is equipped with a claw for fixation, the rod is clamped with a bracket.
- The width of the jaws is 100-180 mm. In terms of opening length, options are available for 90-180 mm.
- The jaws are moved by rotating a screw with a rectangular thread, and moved apart by inserting the screw into the tubular nut.
Models are most often equipped with an anvil platform. The frame is a structure consisting of a base and a rotating disk, which are connected in the center with screws or additionally secured with a return ring.
When the screws are loosened, the ring releases the movement lock.
According to GOST 4045-75, the types of bench vices differ from those presented. Three types are declared:
- general purpose;
- with rotating jaw;
- with additional pipe jaws.
The standard applies to models with jaw widths of 63-200 mm. Rotary and non-rotary manufacturing options with or without accelerated idling are assumed.
Machine vice
A tool of increased precision, which differs from locksmith models in the absence of play or its small run-up. Designed for production work.
- Fixed on industrial workbenches for machining large parts.
- For ease of adjustment of parts, they are often equipped with a rotating mechanism.
They are divided into basic and sine; in addition, a different number of axes is provided:
- Basic or stationary - the part is attached perpendicular to the tool.
- Sine – the workpiece is fixed at an arbitrary angle.
- Multi-axis – supports rotation along several coordinate axes.
Machine vices for home use are also available, but they are smaller in size than production models.
Hand vice
Compact tool for processing small parts, does not need to be attached to tables. There are two types, differing in the fixation system.
- With jaws – consists of a jumper with a screw, steel lips and a handle. The convergence of the jaws is achieved by rotating the handle. The cone is located on the reverse side, enters between the shanks of the jaws, causing them to compress.
- With levers - reminiscent of pliers with a latch. They have a locking mechanism, which consists of two levers that clamp the jaws.
Holdfast
Used when working with wooden and plastic workpieces. Most often they are fixed with screws to the table or frame. Variations available with front clamp.
- Wooden spacers are usually attached to the jaws to hold the workpiece without damaging the surface of the workpiece.
- Overlays are provided to prevent marks on parts made of light or soft wood.
- Front mount models are suitable for vertical surfaces.
- There are models with a combined clamping device - a combination of cast iron and wood.
Some carpentry vice models are equipped with quick-release screws for easy positioning of the movable jaw and pre-clamping.
Signs and causes of failure
The main reason for the breakdown of a bench vice is the excessive force applied by the master when tightening the workpieces. The second reason may be the use of the tool for other purposes. Detection of a breakdown occurs later, after several years or even more. As a rule, cast iron models of bench vices are subject to deformation.
Signs that the vice has broken:
- destruction of movable legs;
- nut failure in machine models;
- destruction of the anvil in cast iron fixtures;
- curvature of the fixing legs;
- screw play;
- the shaft is unscrewed when trying to open the workpiece;
- inability to release the workpiece;
- cut pin;
- poor fixation of workpieces.
After identifying signs of damage, the vice should be repaired. This can be done at home.
Design Features
Starting the difficult process of making metal yews at home yourself makes practical sense because of the achievement of great advantages. This essential tool:
- will be useful to everyone who is interested in metal arts - carpentry, plumbing;
- will be needed in an apartment, in a country house, in your home;
- allows you to perform various types of work with high precision - surface treatment, deburring, drilling, chamfering, etc.
An additional motivation for making a bench vice with your own hands is saving money. Finished products sold in stores are expensive.
Mechanic's vices installed in various factory workshops consist of structural cast iron (frame) and tool steel (thrust screw, handle, clamping jaws, bolts, nuts and other fasteners). Due to technological and objective difficulties, it is not possible to manufacture the necessary tools for the home from the alloys listed above. Therefore, home craftsmen have to look for an alternative, choosing a design where the use of cast iron is not necessary.
To understand how to make powerful metalworking yews without outside help for your own needs, a person must know the structure of standard samples installed in factories, as well as the specifics of the operation of such devices. Structurally, a bench vice consists of several main parts:
- base;
- movable and fixed jaws;
- parallel replaceable plates;
- thrust and clamping screws;
- inner nut;
- pen.
Popular models of factory vises have a rotation mechanism for a certain number of degrees. It is not of great interest for home modifications, so craftsmen who make vices for their own needs do without such a common improvement.
Before starting the required actions, the master, using a long handle, pulls back the movable mechanism with a replaceable metal plate. Next, he inserts a part or a workpiece into the gap formed and begins to tighten the mobile part of the vice until it stops, with the clamp, applying characteristic forces.
Adjustment of the bench vice forward/backward using a movable jaw is carried out by a long screw with an inch or trapezoidal thread, with a large pitch, which moves sequentially inside a fixed nut installed in the body. The rotation of the mechanical device is carried out after loosening the clamping screw and is carried out by the master using the necessary forces.
Some men, in order to save money and personal time, make miniature bench vices from improvised tools. The most famous version of a simple device used at home is the improvement of pliers. A through hole is drilled in the clamping jaws and a thread is cut. A bolt is screwed into the prepared hole on one side, and a nut is screwed on the other. During operation, the part is inserted between the jaws and clamped with a bolt/nut pair. It is difficult to prove all the advantages of a mobile design, because to achieve comfort and safety it is still better to use a stationary vice.
Do-it-yourself repair and restoration of bench vices
- Signs and causes of failure
- How to repair?
- Recovery
- What to paint with?
A bench vise is an indispensable tool for home and professional work. Over time, any tool can fail. Don't rush to buy a new device. You can repair the vice yourself. This article will discuss the causes and signs of failure, as well as how to restore the instrument.
Peculiarities
The device performs two tasks: it fixes the workpiece firmly and has a positive effect on the quality of its processing. It also achieves good execution speed.
The main and significant parameter for machine vices is rigidity. The absence of squealing, which hurts the ear, when processing a part is achieved using the rigidity of the vice. Without this, the cutter could rattle. A tool that is expensive would simply fail before its intended service life. The surface of the part would also not have been processed properly and would have been rough. Such parts are often rejected, which leads to financial losses.
Universal bench vices are equipped with grooved jaws, while machine vices always have smooth jaws. The surface must be processed - the use of a rough version immediately after they have been cast is excluded. The processing of sponges is carried out on a cutting tool (a cutter or cutter is used). The next step is sanding. A surface grinding machine is used, with which it is possible to achieve the desired result: the roughness and shape of the surface acquire the specified values.
The production of any product, including machine vices for CNC, has equipment that meets the requirements of the required standard - GOST (state standard):
- the vice meets the requirements of GOST 16518-96;
- use of bolts included – 13152-67;
- vice – 4045-75;
- clamps – 4735-69;
- clamps – 18758-80.
Signs and causes of failure
The main reason for the breakdown of a bench vice is the excessive force applied by the master when tightening the workpieces . The second reason may be the use of the tool for purposes other than its intended purpose . Detection of a breakdown occurs later, after several years or even more. As a rule, cast iron models of bench vices are subject to deformation.
Signs that the vice has broken:
- destruction of movable legs;
- nut failure in machine models;
- destruction of the anvil in cast iron fixtures;
- curvature of the fixing legs;
- screw play;
- the shaft is unscrewed when trying to open the workpiece;
- inability to release the workpiece;
- cut pin;
- poor fixation of workpieces.
Some defects in a bench vice can be detected immediately. Such minor damage includes cracks, chips, breaks or bending of individual parts.
After identifying signs of damage, the vice should be repaired . This can be done at home.
How to repair?
Before you repair the instrument yourself, you need to disassemble it and wash every part . If the device is covered with rust, it must be removed. To do this, you can use both a professional rust converter and home remedies. Vinegar or kerosene will help get rid of plaque. The product should be soaked in liquid and left for a while. Later you should go over the tool with a stiff brush. The vice should be polished until the original shine of the metal appears.
After the cleaning and disassembly procedures, you should begin the repair process itself . If the cause of the breakdown is the screw turning in the nut, then it is necessary to cut the nut lengthwise into 3 parts and renew the thread. For this you will need a grinder. Then you need to restore the integrity of the nut by welding the cut parts back into place.
The seams are cleaned with a petal wheel. Welds can also be processed with a metal file.
Now you need to reassemble the tool. The procedure for assembling the vice is as follows:
- the main legs are pushed onto the base;
- the paws are moved as far to the left as possible, this will help you easily install the bars during the next step;
- First one strip is attached, then the second;
- to finish fixing the slats, you need to move the tabs to the right;
- After this, you need to insert the nut and secure the screw in it.
If the vice is in disrepair, it is recommended to use kerosene to unscrew rusty bolts and parts. You should lubricate the parts and wait a few minutes. After which the rusted bolts begin to gradually turn. After repairs, you can sand the device. There is no need to do this manually. Moreover, this will take a lot of time. For grinding, take a special brush for an angle grinder . Safety glasses must be worn during operation. To eliminate minor defects (scratches, shallow cracks), the surface of the product must be cleaned or soldered.
Recovery
After the repair has been completed, the vice must be restored. In order for the tool to take on the proper appearance, it needs to be lubricated and painted. Before lubricating the vice, the surface must be degreased. To do this, use acetone or any other solvent. For lubrication, ordinary lubricating oil is used. You can also use silicone grease or litol with grease. Since the device does not have components that operate under heavy loads, almost any product is suitable for lubrication.
To lubricate the tool, do the following:
- remove the movable legs;
- turn the handle, extend the foot and remove it;
- Clean the screw and the hole in the foot with a brush and degrease again;
- then apply lubricant to the screw in a moderate amount.
Next, you should assemble the vice and turn the handle. If the mechanism runs smoothly, then nothing else needs to be done. If the yews move slowly, then you can additionally lubricate the sliding legs with oil. After lubrication, the bench vise must be left for some time.
Installation procedure
When all the preliminary work is completed and the parts are prepared, you can begin directly installing the vice. We fasten the slides coming out from the rear edge of the frame with nuts, having previously cut the threads. The nut should also be screwed onto the screw. To ensure its fixation, a corresponding groove is made on the surface of the frame, in accordance with the dimensions of the nut.
Mounting a carpenter's vice
After installing the fixed frame, screw and slides, a movable jaw is installed. A nut and locknut are screwed onto the edge of the threaded screw, extending beyond the front surface of the moving jaw, with an inserted washer, to ensure fastening.
After all the elements are secured, the knob is installed.
The carpenter's vice is ready for use. When turning the knob, the screw enters the nut on the stationary frame and attracts the movable jaw.
Making a wooden vice yourself is quite simple. In addition, they can be made according to the dimensions of the parts being processed. The location of the scenes and the length of the lead screw depend on this. The jaws can be extended and two clamping screws can be made to allow longer parts to be clamped. Here everyone must independently determine the required dimensions, depending on what work the vice will be used for.
What to paint with?
Products for painting bench vices can be like this.
- Hammer enamel. This type of painting leaves behind an attractive appearance of the instrument. But it is worth considering that the paint easily chips under mechanical stress.
- Epoxy paint. Reliable type of painting. It has no cons. A minor drawback is the small color palette of the presented assortment.
- Sadolin paint. Car paint. Before work, the surface should be well primed.
- Set for painting bathtubs. White epoxy two-component paint is suitable for bench vices.
Those parts that are not planned to be painted can be sealed with tape. Some craftsmen advise using soapy newspaper . It also adheres well to the surface. There is no need to paint the threads and those places where some parts move or are inserted. With further use, turning the handle will be quite problematic.
As you can see, it is quite possible to restore a mechanic’s tool at home. Of course, you should not bring the device to a deplorable state. But some recommendations will help restore even those instruments that have not been used for a long time and are covered with a coating of rust.
In case of obvious damage, it is recommended to completely disassemble the product and make a complete repair.
Also, when performing work, it is necessary to observe safety precautions . It is worth remembering that you should wear a mask and safety glasses when working with paints and sanding tools.
Restoration of a bench vice is presented in the video below.
Repair and modernization of bench vices.
Posted by fenixjune November 15, 2014
I thought long and hard about where to put this article. There are several similar topics on the forum. I wanted to go to one of them. But the button accordion, I see, turned out to be too long and stretched. Wherever you push it, it will stick out. I decided to publish here, with some reference to the topics mentioned.
By chance I got this bench vise (photo 1)
I equipped it with sponges (there were none there) and screwed it to the table. Started to work. Vise, powerful and reliable. One thing didn’t suit me - the sponge consumption was too small (80mm, see photo 2).
One day I was sitting in thought and began to doubt: well, it can’t be, such a powerful vice opens so little. Without hesitation, I removed them from their mounting on the table and completely disassembled them. (see photo 3).
. I was not mistaken. As it turned out, it was a vice with a quick-reset movable jaw. As you can see, the previous owner greatly improved them for the worse. Firstly, I welded the nut to the ratchet thrust bar, thereby eliminating not only the possibility of quick reinstallation, but also the possibility of adjusting the consumption of the jaws. And secondly, he welded a groove for lifting the screw to quickly change the position of the jaw, and the welding site was carefully sanded and painted. This was what was confusing.
First of all, what I did was cut off the nut from the bar (photo 4)
along the seams (note that the seams were very reliable - penetration was 5-6 millimeters) as a result, the nut and strip in these places became 10-12mm narrower. I wanted to restore them by surfacing and then milling, but when I tried to process the weld remaining in the grooves with a file, I realized that it would not be possible to mill them, since these parts become very hot during welding. In addition, having made a test calculation of one tooth of the ratchet mechanism for strength, I determined that it must withstand a force of at least 3000 kg. Therefore, I straightened all the teeth with a triangular file (in some places, helping with a grinder) and left it as is.
Of course, I milled the welded groove in the movable jaw to lift the screw for quick reinstallation
Assembled the vice. An adjustment appeared, the flow rate increased to 180mm. One thing was not clear - sometimes, when clamping the screw, the ratchet of the nut jumped out of engagement and, clearly, the jaws relaxed (most likely, for this reason the nut was welded to the ratchet).
I took everything apart again. I started to complain that the nut was sitting too loosely in the body of the movable jaw guides and was engaging with a distortion. I welded a guide element to it (photo 5)
) from a 4mm thick strip and bent it so that it was spring-loaded to the wall of the guide. In addition, I chose the length and installation location of this bar in such a way that by touch from below it would be possible to determine the location of the nut, which facilitates adjustment when reinstalling the jaw, and, importantly, helps improve safety, since in the process of clamping the vice sometimes a deadlock situation occurs , when the closing of the jaws (clamping of the part) occurs almost simultaneously (or a little later) with the beginning of the contact of the nut with the stop of its extreme position. In this case, even applying the maximum possible force to the screw lever may not provide reliable clamping of the part being fastened; the force will be expended in the contact of the nut-stop transition (By the way, I’m not the only one who encountered this problem. See, for example, the post https://www .chipmaker.ru/topic/89198/page__view__findpost__p__2277400 author insof, in the topic: Bench vice. Repair). Assembled the vice. To my deep chagrin, the nut coming off the ratchet bar was not eliminated.
. I removed the vice from the mount, put it on its side in order to at least somehow visually observe the clamping process, while loosening the screws securing the bar by 2-3mm (photo 6).
Here everything became clear and understandable. Most likely a factory defect. When clamping the bar, when the teeth of the nut entered it, it began to rise (retract into place, since I loosened the fastening screws), and significantly (3mm). Without hesitation, I took two sanded strips 3mm thick and installed them in the resulting gap (photo 7).
and grabbed them to the bar with two welded points (to prevent them from creeping out, although pressed with screws, they should stand securely anyway).
Installed a vice. He began to clamp, moving the sponge to different positions. The clamp is reliable, the nut has stopped slipping out of engagement. Something else began to confuse me: when I rotated the screw to unscrew it, the jaws did not move apart, the nut, together with the screw, rose and jumped to the next position of the ratchet. By and large, you could work like this - loosen the screw, pull the sponge back by hand. This is unusual for me. I started to figure out how to make it so that it could be unscrewed like in a regular vice, but the function of quickly reinstalling the jaws would be preserved. An idea came to me. I decided to weld a shank to the washer located between the thrust surface of the screw and the body of the movable jaw and thus secure the screw from lifting up along with the nut when unscrewing. And to maintain the possibility of quick reinstallation, a groove was milled in this shank with a length equal to the length of the groove in the body of the movable jaw. The washer is secured in working position with a screw. (photo 
Restoration of the USSR vice with alteration, electrolysis and painting
After these vices appeared, there was a desire to restore them. The vice was made back in Soviet times. after some failures, it was possible to return the clamping jaws to their place (the threads were torn off, they were M9, the bolts were practically unusable), but it was not possible to drill out the jaws themselves to a diameter of M10 (hardened).
Because of these difficulties, I came up with the idea of making a different type of pressing jaws, and making them so that there was a small flat surface on top for straightening small pieces of iron (strips, corners, etc.)
Materials and tools:
- old vice
- metal sheet 25mm
- screws (internal hexagon) m10x25 (6 pcs.)
- brush for angle grinder (grinder)
- grinding wheel for angle grinder (grinder)
- cutting wheel for angle grinder (grinder)
- flap circle for angle grinder (grinder)
- marker for marking (or marking pencil)
- spray paint
- sewer pipe cleaner
- degreaser (acetone, thinner, etc.)
- construction basin 90 liters (plastic)
- tin metal (sacrificial)
- clamps (G and F shaped)
- work vice
- Angle grinder (grinder) 125 and 230 circle
- drill
- drills 8,11,17 mm
- car charger 12 volt
- Allen keys (hex keys)
- wrenches (open-end or box-end)
- tape measure, ruler, square (anything suitable for marking)
- work vice
- thread cutting kit
RESPIRATOR, SAFETY GOGGLES, HEADPHONES and SAFETY KNOWLEDGE MANDATORY
Step 1: Marking and cutting off excess
- Once all the excess has been removed (the support on which the stationary part of the vice rotates, the screw), we proceed to marking the perimeter in place, so that we can cut off the place where the old jaws are attached and get a plane on which the plate will be installed.
- Once everything is marked, we begin sawing. BUT! if you have no or little experience, then it’s better to ask someone who has experience in cutting such thick plates with a grinder! Maybe contact organizations that can cut with laser, plasma, etc. Because When cutting, the cutting wheel may “bite” and you may be injured.
These are the sawn-off jaws that should remain after the sawing process
- Now you need to grind the resulting surface until approximately a plane begins to appear..... If you overdo it and remove the excess layer of metal with a grinding wheel, it’s okay, cracks or pits can be corrected either by welding, or by placing pieces of metal of a suitable thickness. To control the plane you are grinding, it is best to use a metal ruler or square. They will best show the irregularities that need to be either removed or welded (if necessary, in case you overdo it).
- After grinding we get the desired surface. There is no need to grind to an ideal surface; this plane will still be covered with new sponges. The main thing is that the sheet of metal does not “dance” on this surface.
Step 2: Marking and cutting on 25mm sheet metal
We take sheet metal (it can be easily found at scrap metal collection centers, that’s where I found it), put it on the table and place our vice upside down on top.
- First we outline the formed sole. Next, we make an outline after the first marking with a margin of 5-10mm (as you like). This is necessary because casting in those days was not ideal (but the quality of the metal was excellent) and if we do it “back to back”, we can end up with a crooked design in the final. The main thing is not to forget to increase the length by 10-15mm on the side that will be located along the body of the vice; this must be done so that the cast iron of the vice under the jaws does not participate in clamping the part. If you pay attention to any vice, there is a gap of 5 to 10mm under the jaws when clamped. Track. photo (below) shows an example.....
- Once everything has been marked, we begin cutting. Follow safety precautions! The cast iron was cut off quite easily, but the 25mm metal itself gave in hard and “bite” the disk so that the washer on the cutting wheel was, one might say, chewed.
- Now we get a piece of metal, which will later become new jaws for our restored vice.
Step 3: Installation of metal for further work
- Once everything has been cut out and put in place, now we need to mark the drilling locations. As was written, I will use M10x25 screws so that the heads are hidden in the thickness of the metal of the jaws.
- I decided to screw three screws into each of the jaws, I think that will be enough.
- First, we fix a piece of sawn metal in the desired position on the vice itself as it will be at the end of the work. First of all, we drill a hole with an 8mm drill (under m10) both parts, sheet and vice, in one pass, drill all three holes. Then we remove the sheet and expand it, in it, into the finished hole 8mm to 11mm, this is necessary so that the M10 screw can be twisted easily and does not encounter obstacles in the face of the thickness of the metal. After drilling with the 11th drill, we drill 17mm into the same place to the depth of the height of the screw head, this is necessary so that the head is “hidden” under the plane of the jaws and is “flush” or level with the surface. In the cast iron of the vice itself, we cut a thread for M10.
- After we cut the thread in the stationary part of the vice, drilled all the necessary holes, and secured the sheet with 3 screws, we move on...... we drill holes on the moving part as described above.
- The sheet that has not yet been sawn into jaws is attached, and we pull out the moving part so that its future jaw does not lie on it, we make markings for sawing into two parts. And once we have marked it, we begin to cut, making sure to try as hard as possible to keep the grinder at a right angle to the plane of the jaws. Otherwise, when clamping the part, there will be a slope. Well, after sawing, we screw on the second sponge.... and check the accuracy of the cut with a square.
Everything worked out.....
Step 4: Rough cleaning before electrolysis followed by painting
- To clean pieces of rust from an accessible surface, it is better to use a grinder brush. It removes rust like a charm, but for hard-to-reach places electrolysis is needed. First you need to “fray” the visible rust. There is only one photo, but everything is clear on it.
- Before cleaning, I decided to sand the rough areas after casting into the mold, so that the final result would look more or less neat.
- All other purification work was carried out under electrolysis.
Step 5: Electrolysis
- In order for all the parts to fit into one trough, I had to buy it for 400 rubles. plastic construction basin 90 liters. This decision was made to clear everything at once.
- How are all the parts placed and connected to the wire (all parts must be connected to the wire, the better the contact, the better the metal is cleaned), connect to the “-“ wire, then cut the sheet metal (sacrificial) and place it along the walls of the pelvis, they will be connected to wire “+”. The most important thing is that the parts (-) and the sacrificial metal (+) do not come into contact, otherwise there will be a short circuit.
- Once everything is ready, fill in water (regular) and add a sewer pipe cleaner (there should be sodium hydroxide, you can use the cheapest one, I did that and the result was obvious). Mix. We connect the terminals from the battery charging (described above).
- We connect the battery charging to the network and set it to 5A. Everyone has different chargers, if you have a cool charger (not cheap), then you can immediately set it to maximum. In my case, the charger was bought for the purpose of charging the battery, so I bought it, as they say, cheap and cheerful. At first I set it to maximum (about 8-10A), it quickly overheated, the fuse tripped, and I had to wait until it cooled down, but at 4-6A, for the last 12 hours, I set it to 5A. Worked great until the end of the cleanse.
- Cleansing is visible during the process. Places of metal that were dark or rusty will begin to lighten and acquire a characteristic metallic tint, which means that the process is successful. At the same time, it will seem to boil, hiss, etc.
Step 6: Painting
- After turning off the battery charging, drain the water, and it is advisable to rinse the parts with water after such cleaning. The product itself has a soapy consistency; you can feel it on the details.
- We wait until the water dries, or you can use a compressor (if you have one) to blow it off.
- Next, we degrease these parts and prepare the place where they will be painted, so as not to spoil the surrounding areas with paint, I used the cheapest bath curtain.
- Apply a primer layer.
- Before applying paint, it is better to wait almost a day and a half, despite what manufacturers write on paint cans (in short, I have already encountered the fact that after drying according to the manufacturer’s instructions, the primer-paint wore off and did not harden). After paint the same conditions.
- I painted it in two colors: blue and red.
And finally, the already assembled vice in a new form
The result is obvious. I was glad that I was able to restore the tool, and actually already used them (clamped the bearings for disassembly, I needed an outer race from it, and other work)
How to repair a bench vise with your own hands
Sometimes it happens that the handle of the vice rotates, but the movable jaw stands still. It is clear that such a tool will not work.
However, this flaw can be corrected. In this review, the master shows how to repair a bench vise with his own hands.
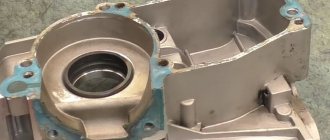
First of all, the vice will need to be disassembled. Specifically, in this case, we are interested in the screw and nut.
The screw rotates in the nut, and therefore the movable jaw remains in place when the handle is rotated.
Now that the problem has been identified, you can begin to fix it. And to do this, you will first need to cut the nut lengthwise into three parts.
What it is?
Precision machines are a device that allows you to ensure the most accurate position of a part and its minimum deviation relative to the jaws.
The advantages of these machines include:
- quick installation of a vice on the working surface;
- 100% alignment of the equipment relative to the required plane;
- high accuracy of part positioning, as well as minimal displacement;
- guides of increased hardness;
- constant clamping force, without loosening;
- increasing the cutting speed and material removal.
Precision vices are widely used not only in large industries, but also in small companies engaged in milling and other processing of metal, wood and other materials.