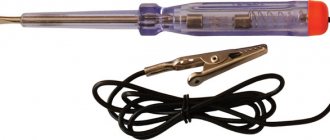
The building level is a spirit level, a necessary tool when determining the relationship of building planes to the horizon. Recently, this instrument has been replaced by laser ones, and even earlier, optical instruments such as theodolite and level began to be used. However, professional tools are rarely used in home construction. They are expensive, in addition, with the help of an ordinary spirit level, measurements were taken during the construction of real masterpieces of architecture, long before the invention of sophisticated instruments. Let's remember how to make a water level with your own hands, especially since it is very simple.
Spirit levels come in two varieties.
- A spirit level in the form of a bar of varying lengths with an oblong glass cone in the middle with a cone sealed in it. When the bar is positioned horizontally, the bubble appears exactly in the middle of the cone.
- A level operating on the principle of communicating vessels. It consists of a primitive design of a tube with glass funnels at the ends. A tube filled with water to the middle of the funnels and placed strictly horizontally shows the same level of liquid in both funnels. The working principle is shown in the figure below.
Despite the fact that the level is a primitive tool, it is widely used in construction due to its advantages over other devices, namely:
- ease of measurement combined with high measurement accuracy;
- easy to make from scrap materials;
- the device can be used to determine the ratio of planes to the horizon having a length from one to ten or more meters.
The only drawback of the water level is that it cannot be used in the cold season. However, if water is replaced with non-freezing liquid, then this drawback can be overcome.
A water level can be purchased at construction equipment stores, or you can make it yourself. It is inexpensive, however, why spend extra money if you can make the device yourself. It is especially instructive to make a level together with a child and teach him basic construction skills. The ability to determine the level is fundamental knowledge for a builder of any level of training; it will be useful even when building a birdhouse.
Return to content
A water level is a reliable and inexpensive tool for marking
After watching the video, you can easily see that using a spirit level you made yourself is not at all as difficult as it seems at first glance. At the same time, a homemade device has many other advantages:
- low cost. All you need to buy is a silicone hose, which is inexpensive;
- ease of manufacture of the device. The only requirement for this process is to carefully remove air bubbles from the hose, as they can negatively affect the correctness of the marking;
- When using dye, you can easily discern the water level in the hose even in poor indoor lighting, so you don’t have to do any additional work.
Are you interested in details on the manufacture of a spirit level, as well as on the most varied features of using this particular level? Just watch the video and you can easily avoid even the smallest mistakes in the process of applying horizontal markings both on the walls and on the floor or ceiling of the room.
Homemade level from a syringe in a few steps
There are several assembly options (bubble structures, double-sided), but we will give preference to the simplest homemade level. You can find the materials in any first aid kit, and even a child can do the assembly. Let's get started with the task and look at everything step by step.
STEP 1: procurement of materials. We will need 2 syringes of 15-20 cubes each and a thin silicone hose 3 meters long, the internal diameter of which will be slightly smaller than the “nose” of the syringe. That is, it should be pulled tightly onto the syringe . Construction or stationery tape and rope will also come in handy.
STEP 2: connecting the structure. We throw away the needles from the syringes, heat the edges of the hose a little and connect them to the first syringe. If you want to make a level “forever”, then you need to wrap a thread around the place where the hoses are attached to the syringe and tie it - this way it will definitely never fall off.
STEP 3: pumping water. Now we need to pour water into the system so that our level from the syringe works. We take out the piston of the first syringe, put it aside, and attach the body with the attached hose to the wall. Using another syringe, we draw water and pour it into the hose until the water rises somewhere to the middle of the first syringe glued to the wall.
Rules for using the hydraulic level
For convenience and to obtain more accurate results, 2 people should work with the hydraulic level.
Mark the starting point. To draw a horizontal line, you need to move this point to another section of the wall.
The first person holds one end of the level at a given mark, the second takes the other part of the level and moves to the opposite end of the wall. Places the tube with the flask on the surface and holds it motionless for a while so that the water level in the tube equalizes after moving.
The first worker, who continues to hold his end of the tube, controls how much the second worker needs to raise or lower the hose so that the water in his flask reaches the control mark. When, after all the manipulations, the goal is achieved, the desired point on the wall is marked, then a line is drawn.
How to properly use a hydraulic level alone? When marking, one end of the hose must be accurately fixed at the level of the control mark. This can be done using tape, fasteners, or any other available method. You can see all the intricacies of the process in more detail by watching the video.
To make sure that the markings are correct, you can additionally measure the evenness using a regular bubble level.
Drawing a horizontal line around the entire perimeter of the room
All measurements are carried out from the first control point.
Using the same principle as described above, make marks on the other three walls (2 - 3 on each), and then connect everything using a dye cord. If everything is done correctly, the end line exactly coincides with the starting point.
Moving a mark to an adjacent room
This job will require 2 people.
One holds his end of the hose at the control point, the second moves to the room where the mark needs to be moved. The procedure for working is the same as when marking on one wall: wait for the water level to equalize, and then change the location of the second flask until the liquid in the first reaches the marked level.
During work, you need to ensure that the hose lies freely on the floor and is not twisted or bent. Otherwise all measurements will be incorrect. When the first point in the adjacent room is set, it is used as a reference point for drawing a horizontal line.
The nuances of using a water level
To get an accurate result, it is recommended:
Monitor its position while working
Avoid kinks and mechanical damage to the hose - all this affects the accuracy of the measurement. Having finished working with the device, you should drain the water and carefully twist the hose and put it in a storage place. If you need to constantly use a water level, and it is difficult to fill it with liquid every time, you can add alcohol or vodka to the water - this will prevent it from blooming. A technique that will help distinguish a correctly functioning device from one that gives inaccurate results is to place the flasks next to each other, holding them vertically. If the fluid level in them coincides, the readings are correct; if not, the tool is damaged. To store the water level, you should choose a place not illuminated by sunlight so that the hose material remains transparent and does not become cloudy over time.
If the fluid level in them coincides, the readings are correct; if not, the tool is damaged. To store the water level, you should choose a place not illuminated by sunlight so that the hose material remains transparent and does not become cloudy over time.
Having learned how to use a hydraulic level, you can use this useful tool when carrying out repair and construction work.
Let's sum it up
Now you know how to correctly use a hydraulic level to determine the evenness of a plane relative to the horizon. Moreover, you can assemble the hydraulic level yourself. I also recommend watching the video in this article, and if you have any questions or need clarification, write about it in the comments.
Source
The need to perform horizontal markings arises for various reasons. This includes repair and construction work, arranging furniture, and hanging decorative items on the walls. Many devices and tools serve this purpose, the simplest of which is a construction water level. The device consists of two vessels with divisions connected by a transparent hose. The length of the connection may vary depending on the task being performed. The principle of operation is the law of communicating vessels.
Of course, you can buy such a device in a store, but it’s even better to make a water level with your own hands. Moreover, it is not anything complicated, and the source materials can be found in any hardware store or on the market.
How to use a water level correctly?
It is easier and faster to work with the device, with good flow of liquid in the tube. To do this, the hose diameter should be approximately 10 or 12 mm. As for the length, it depends on the dimensions of the room and can be either 3 meters or about 30 meters. For beginners, it is better to purchase models of water levels with rubber sliders for flasks. This makes using the device convenient. The weight of the tool is small - from 500 g to 1 kg, so even ladies can use it.
As described above, the device tube is filled with water, usually at room temperature. Next, you should carefully measure the level of this water in the containers. To make a mark at a given height, one tank remains in place, the second moves in the desired direction. It is necessary to strictly ensure that at this moment there are no even the slightest creases or bends on the tube. You should wait a few seconds until minor fluctuations in the water in the device disappear. Control marks must be made when the liquid level strictly matches in both flasks.
You should prepare in advance for working with a hydraulic level. After all, for this you will need not only the device itself, but also several other improvised tools, namely: a ladle, or better yet a small watering can, for filling the level with water; small funnel; tape measure and ruler; scotch; pencil. If desired, you can use dye to brighten the water. Well, of course, all work with the water level must be carried out with the assistance of an assistant. If you work alone, you will have to make a fixation for one of the flasks, for example, a hook or other fastening. This makes the level difficult to use. Still, the design of the tool is designed for two people to work with it.
To avoid errors in measurement, the water level should be thoroughly rinsed before use, as contamination may interfere with the accuracy of the marks.
It is not recommended to fill the hydraulic level with water directly from the tap, as in this case the liquid is enriched with a large amount of oxygen, which can affect the accuracy of the level and the easy flow of water inside the instrument. Therefore, professional craftsmen who set ideally even marks often use boiled water, which eliminates the air content.
Let's figure out what kind of tool this is!
Anyone who has had to deal with construction or serious repairs at least once knows exactly what a construction hydraulic level is and how to use it. For those who have never encountered such a device before or prefer modern analogues: an optical level or a laser level, we note that man has not yet come up with a simpler and more reliable tool. It is necessary to determine the horizontality of certain structures and lines, that is, precisely for what responsible builders often do to ensure that surfaces do not deviate from the standards. By the way, let us immediately note that it is also called a water level or spirit level.
Perhaps some of you will immediately be puzzled by the question: why do you need a hydraulic level when you already have construction measuring rulers with a level in your arsenal? The answer is simple: it is, of course, convenient to work with a ruler, but its length is limited to 3-4 meters. But what about the need to determine the horizontal level at a greater distance: at 10, 20, or even 30 meters, for example, when setting up formwork and pouring the foundation? Here, of course, the already mentioned level and laser device can be used, however, in both cases there are negative nuances. And if it is necessary to set a level around the corner of a building, then there is simply no other option but to use a hydraulic level.
So, a hydraulic level, which significantly simplifies some repair and construction work, is a transparent flexible tube with a length of 2 to 30 meters, a diameter of 5-6 mm to 2 cm, with thickenings at the ends on which divisions are applied. It is filled with water, ideally with the addition of food coloring, which makes the work much easier. Some craftsmen use boiled water, since there are almost no air bubbles left in it that interfere with measurements.
Level or water level?
We’ll look at how to use the device further, now let’s talk about its advantages. Firstly, it should be noted the affordable cost and the ability to make it from available materials. In addition, the water level is tolerant of mechanical damage: it does not lose its qualities even with all kinds of falls and impacts. It can be used in a wide variety of conditions and spaces. In places with no direct visibility, the device can be easily used on different sides of building corners, as well as near large obstacles. But, for example, the level will have to be installed several times. Difficulties that arise with focusing the level can be avoided by using a flexible water level. Therefore, it is also convenient in small rooms. Even one person can operate such a device. And the last, but one of the most important aspects is measurement accuracy, in which the level loses.
Tubular design
The pipe version is a type of bubble building level. To make it, you need to take several small tubes and a square element from the profile.
Place the cord on the tubes using perforated tape. Markings are applied to the profile. By applying it to any surface, you can make sure that the object, walls, door and window openings are even.
Preparing the hydraulic level for work
To make the readings better visible, pour colored liquid into the container.
Before using the hydraulic level, you need to fill it with liquid. Most often it is water, only for clarity of measurements it is tinted.
It would seem that a water level is a fairly simple device, but if some shortcomings were made when preparing the device for use, all measurements in the future may have a large error.
An example of such a case is air bubbles in a plastic pipe. To prevent their appearance, water (pre-colored) should be collected from a container located at a height (by lowering the level tube there). Accordingly, the 2 bulb should be located as close to the surface of the earth as possible.
As soon as you notice that there is a sufficient amount of water in the plastic tube, you should remove one end from a container located at a height and hold it with your fingers so that air does not get in there. Only after this can the flask be connected.
To check the accuracy of the device readings, 2 flasks must be compared together at the same level; they must show the same value on the scale. If the entire procedure is carried out successfully, then further operation of the water level should be problem-free.
However, many builders strongly recommend purchasing water levels with mounting clips or rubber bands. For the secrets of working with the device, watch this video:
Having learned how to properly use a hydraulic level and prepare it for use, you can safely begin various construction works. The water level will serve as a reliable assistant in all your endeavors and will never let you down, since it is a fairly simple and reliable measuring device.
Bubble option
You can make a bubble level using a syringe and a wooden block. Water is drawn in with a syringe so that there is minimal room for air. Use chewing gum to plug the hole for the syringe. Having secured the syringe with tape, you can begin the process. If the surface of the product is smooth, the bubble will be located directly in the center.
If you take two ampoules, you can work with vertical surfaces. One can determine the evenness of horizontal planes.
Pouring water into the device
Before starting measurement work, it is necessary to properly prepare the instrument. To do this, it is recommended to perform these steps in this order:
Take a bucket of water or any other large container with an open surface. The bucket is placed at some elevation relative to the ground. One end of the device is placed in a container of water, and the other is lowered below the location of the bucket. Usually located on the ground
In this case, due to the property of communicating vessels, the liquid begins to move through the tube, filling it. When filling, it is important to monitor the presence of air bubbles in the device. Wait until all the gas comes out of the tube
After this, one end is clamped with a finger or bent. The second horse is taken out of the container. Check the movement of water and again the presence of air. Both ends are closed or clamped and the device is transferred to the workplace.
After completing these steps, you can begin measurements.
Some tips
- To simplify the process, you can color the water poured into the device in a bright color. This will allow you to quickly determine the water mark in the tube without straining your eyes.
- The larger the diameter of the hose, the faster the liquid will level out in it. It is recommended to purchase products with a diameter of 10-12 mm.
- The leveling speed also depends on the length of the tube. Don't choose items that are too long.
What is the depth of an artesian well?
The depth of artesian wells can be very different, and depends, first of all, on the nature and geological structure of the rocks that make up the underground layers. The main condition here is the presence of an upper impermeable layer that completely isolates deep aquifers from the penetration of upper groundwater. They are usually contaminated with various mechanical suspensions, as well as chemical elements entering the soil in the form of sewage, precipitation and atmospheric emissions.
Thanks to this protection, artesian waters are especially valued for their purity from mechanical and chemical pollution. At what depth can these waterproof layers lie? Typically these values are on the order of 200-300 meters, but can vary significantly depending on the geological features of a particular area. For example, in the Moscow region, according to geological surveys, the artesian aquifer can be located at depths from 40 to 200 meters. In some cases, the artesian basin lies at a distance of more than 1000 meters below the surface of the earth.
Main advantages and disadvantages
The use of artesian sources has a number of advantages over the use of surface groundwater:
- The purity of the water source. Not contaminated by various mechanical and chemical impurities contained in excess in the upper layers of the soil.
- Large flow rate of the water well. This is achieved due to the significant amount of groundwater contained between two impervious horizons. The significant pressure under which the aquifer is located also plays an important role. In most cases, when drilling a well, water spontaneously flows to the surface.
- Duration of operation. Due to the large volume of underground sources, even at high flow rates, they do not deplete for a very long time. And with regular use, without allowing the well to stagnate, it can last up to 50 years or more.
There are only two disadvantages to such a water supply source:
Large depths, which increases the cost of drilling.
The need to officially register the source of water supply with the ensuing need to obtain permission to drill and pay taxes for the use of state subsoil.
How to find out the depth of artesian waters
Thanks to the above advantages, many owners of country houses or summer cottages would like to equip an artesian spring in their backyard. In this regard, the question arises: at what depth does the aquifer lie? This question is far from idle, given two factors:
- The cost of drilling for each meter passed. It is not possible to equip such a well on your own, without using special drilling equipment.
- There is a large scatter of possible indicators of the occurrence of aquifers, sometimes reaching hundreds of meters. As already mentioned, in the Moscow region the minimum level of an artesian pool can be 40 meters, and the maximum can exceed 200 meters.
There are several ways to try to find out the more or less accurate depth of deep water in the area where the land is located:
- Contact your neighbors in your dacha or cottage community. It is likely that one of them has already drilled a deep well and will be able to guide you regarding the location of the aquifer.
- Make inquiries with specialists from companies involved in drilling wells in the area. Such organizations usually have schematic maps that indicate the depth of aquifers in the places of their normal operation.
- Try to find a map of deep water occurrence in your area yourself. This can be done via the Internet, or by studying special geological literature.
- Contact the territorial geological exploration department with a request to provide the information you need.
Having established how many meters the depth of the water horizon is, you can calculate the estimated cost of drilling work.
Application
How to use a water level? It is more convenient to do the work together. If you plan, for example, to install a suspended ceiling, then you need to draw a horizontal line along the entire perimeter at the level of its placement. To do this, the ends of the water level are placed in different corners of the room and held next to the wall. This task can be performed at any height, because at the first stage only reference marks are made. It will be difficult to cope with it alone. After the water in the tube has settled, marks are made on the walls opposite its level. If the surface is pasted over or painted, then it is best to make dots on stickers that are pre-attached to the required places.
If the diameter of the tube is small, as well as a pronounced meniscus, it is worth agreeing with your partner on the serifs: along its upper or lower border. To move a point to another corner, one end is installed on the already marked area, and the other - in the intended marking location. When transferring the tube, close the holes with your finger - this prevents water from splashing. At the end of the work performed, points are marked at the designed ceiling height above one of the benchmarks. The vertical distance between them is measured. Then the same value is plotted from the marks in other corners. You can draw a chalk line corresponding to the height of the stretch ceiling between the obtained marks for convenience.
All reference marks can be immediately made at the required height. However, as practice shows, working on the floor is more convenient and stable. After completing the marking, it is transferred to the required level using a stepladder. But if it is not possible to work with someone in pairs, then a wire loop is attached to each end of the level. It is fixed with adhesive tape. In this case, the opposite side is hung on a nail. When not in use, the tool can be secured to the loops in a convenient location. The flexible water level, which does not require much effort in operation, will become an indispensable assistant with which you can work independently.
Other reasons for the “movement” of the SMA along the plane
If the adjustment is made correctly, and the jumping and shaking do not disappear, the cause may be the close proximity of large stationary objects - cabinets, walls. With slight vibration, which is natural, the SMA can hit an object and move from its established boundaries. Therefore, a gap of 5-10 cm is left between the wall and the device.
A smooth floor can also cause the washer to “move” around the kitchen or bathroom. In this case, it is worth purchasing a rubber mat 1-2 cm thick and placing it under the device.
DIY water level
The building level is a spirit level, a necessary tool when determining the relationship of building planes to the horizon. Recently, this instrument has been replaced by laser ones, and even earlier, optical instruments such as theodolite and level began to be used.
However, professional tools are rarely used in home construction. They are expensive, in addition, with the help of an ordinary spirit level, measurements were taken during the construction of real masterpieces of architecture, long before the invention of sophisticated instruments.
Let's remember how to make a water level with your own hands, especially since it is very simple.
Spirit levels come in two varieties.
A spirit level in the form of a bar of varying lengths with an oblong glass cone in the middle with a cone sealed in it. When the bar is positioned horizontally, the bubble appears exactly in the middle of the cone.
A level operating on the principle of communicating vessels. It consists of a primitive design of a tube with glass funnels at the ends. A tube filled with water to the middle of the funnels and placed strictly horizontally shows the same level of liquid in both funnels. The working principle is shown in the figure below.
Despite the fact that the level is a primitive tool, it is widely used in construction due to its advantages over other devices, namely:
- ease of measurement combined with high measurement accuracy;
- easy to make from scrap materials;
- the device can be used to determine the ratio of planes to the horizon having a length from one to ten or more meters.
The only drawback of the water level is that it cannot be used in the cold season. However, if water is replaced with non-freezing liquid, then this drawback can be overcome.
A water level can be purchased at construction equipment stores, or you can make it yourself. It is inexpensive, however, why spend extra money if you can make the device yourself.
It is especially instructive to make a level together with a child and teach him basic construction skills.
Return
Types of measuring instruments based on liquid level
Several measuring instruments that are used in construction work using the principle of the fluid equation, namely:
- hydrostatic device of the simplest design.
- bubble level
- model used for pipes.
The first type is widely used in construction both by beginners, when carrying out home renovations, for example, and by experienced and professional representatives of the construction professions. It is not difficult for a beginner to understand how to use a hydraulic level.
It is interesting that such a device weighs about one kilogram after filling the flasks with water, and the empty device weighs about three hundred grams.
When filling the device with water, you need to take into account the fact that this must be done carefully and efficiently, since this affects the accuracy, you need to make sure that there are no air bubbles left in the device.
As for the bubble level, it works on the basis of air bubbles in flasks that are filled with a special liquid. On the ruler, the air bubble should be in the center, which will indicate a flat vertical or horizontal surface.
But the pipe models mentioned above, equipped with a magnet, are used mainly when laying utility networks: water, gas, sewer pipes and profiles. They are easy to attach to a support or pipeline due to their shape and magnet.
How is it arranged?
The device of this type of level is based on Pascal's law about the level of liquid in communicating vessels. Use the device only for marking on horizontal surfaces. Due to a certain design, two people are required when using a hydraulic level, although, in principle, it is possible to work alone, but this is more difficult. The first container must be kept at the desired level, make a mark with a pencil or marker and fix the indicator with the device, holding it motionless, you can attach it with tape. The second flask must be moved to the second point, while making sure that there is no bend in the tube, and adjust the desired level.
When both levels are combined, the measured areas are located in the same horizontal position. As auxiliary materials for working with a liquid level, you also need: tape, marker, tape measure, container and water dye. To get more accurate measurements, before work, you should wash the instrument with warm soapy water to remove any possible dirt and then rinse well with water. There are two ways to fill the liquid level; when using the first, you need to:
- straighten the hose well;
- Pour liquid into a bucket and place it on any elevation;
- lower one end of the tube to the bottom of a container of water;
- draw liquid through the opposite hole.
The second method is to lower one part along with the flask to the ground, and pour liquid into the other hole using a funnel. In the same way, you can pour tap water into the instrument, although with this option quite a lot of air bubbles get into the tube, which reduce the accuracy of the readings. It is worth knowing that in boiled and settled water there are much fewer air bubbles, so experts recommend using it to fill the tool. To get rid of air bubbles, you can tap the tube with your fingers, so they will begin to move up. Also, pinch the hose at the point where bubbles appear with your fingers, and running them along the tube, force the air upward.
Basic principles of operation of the hydraulic level:
- suitable for two people;
- used only for horizontal measurements;
- do not use at temperatures below 0°C when filled with water;
- the accuracy of the indicators depends on the filling of the tube.
There is no point in using water in instruments at low temperatures; it freezes. Therefore, in cold weather it is necessary to fill in antifreeze or brake fluid; you can also add alcohol or salt to the water. In addition, the spirit level is ideal as a mason’s working tool, because it allows you to:
- perform work outdoors;
- take measurements from different angles;
- measure in hard-to-reach places;
- carry out work to align points located at some distance from each other.
Manufacturing
The choice of source materials should be approached responsibly, so that later you do not have to redo or buy other components.
- You need to prepare two vessels, preferably cylindrical with divisions. It is convenient to use flasks from large-volume syringes.
- The hose must exactly fit the diameter of the vessel fitting. A hose for a construction hydraulic level is considered suitable if it has sufficient elasticity and does not deform or crack when bent. The most acceptable diameter is considered to be from 10 to 15 mm. It all depends on the amount of work being performed. Large sleeves are also quite suitable.
- The connection points between the hose and the flasks must be treated with sealant to prevent liquid leakage and air ingress.
- If there is no ready-made scale on the flasks, then the marks are applied independently with a marker. This is necessary for ease of use.
You can make a simple hydraulic level with your own hands, without using vessels, but with only a hose. You should cut a piece of the sleeve of the required size, fill it with water, leaving a little free space, and solder the ends.
What is better to fill in the hydraulic level?
The purpose of using this device is to achieve the same water level in both flasks. Then the required line will turn out smooth. First of all, you need to fill the device with liquid. Usually water at room temperature is used, which can be slightly tinted. This makes it more convenient to observe the condition of the liquid inside the device and the presence of air bubbles.
Filling the device with water should be done in such a way that the possibility of creating air pockets inside the hose is completely excluded. If this happens, then the air must be expelled, otherwise the markings will not be accurate. You can simply check that the filling is correct by raising both flasks side by side to the same height. If the liquid in them is at the same level, then everything is in order. Otherwise, air still got into the sleeve and must be removed.
Basic materials
The simplest design can be made from unused items with your own hands. It’s not difficult to make a level with a laser pointer; you just need to prepare the necessary material and follow the instructions. Do not neglect the instructions and do it your own way; before implementing the change, you need to study the design, because The output parameters may become incorrect. For the simplest installation you will need:
- a regular laser pointer, sold in office supplies or children's toy stores;
- porous rubber of sufficient thickness, but small in size;
- a small, simple type bubble level, which is checked for accuracy before use;
- a wooden block, the size of a matchbox, pre-polished;
- support in the role of a level stick;
- plywood sheet 10×10;
- a metal clamp or thick plastic clamp corresponding to the diameter of the pointer;
- screws.
After preparing the entire list of materials, you can begin the process of assembling the required product with your own hands.
When does the hydraulic level LYE?!
1) The hydraulic level lies when there are air bubbles in the tube with liquid (for example, water).
The air bubble in the hydraulic level hose must be REMOVED!
To expel an air bubble from a hose, you just need to re-pump water into it (I’ll tell you how to pump it later), which will displace both the bubbles and some of the water, or there is a more labor-intensive process in which the flasks are opened and by tapping and changing the hose lifting level, bubbles will float lazily at the ends of the hose and be removed through the flasks.
2) The hydraulic level lies when, while working with it, the hose with liquid does not allow the liquid to move freely through it. That is, if the hose is broken or crushed.
The hydraulic level tube is bent, which interferes with the flow of fluid between the vessels, which leads to an error in the readings.
Soap bubbles from laundry soap
To make the bubbles stronger and shine better, the solution will have to be slightly boiled. To do this, rub a whole glass of laundry soap as finely as possible and pour it into the pan. Pour 10 cups of boiling water, stir the mixture and heat it on the stove as it cools. It is important to maintain a stable temperature while you continue stirring. Do not stop until the liquid becomes completely homogeneous, but most importantly, do not let it boil. In the process, add 2 more tablespoons of glycerin for strength and beautiful shine.
Terms
Route line - Length/distance along the route - distance between points along . Corresponds to the difference in picketage between points. Floodplain is a part of a river valley that is flooded during high water or during floods. Bed is the lowest part of a river valley. Water level (horizon) is the position of the water surface, which changes under different natural conditions. It is characterized by the height and area of flooding, on the route - by the level line and width (flooding). There are several types of water levels - GWV 1%, GWW 2%, GWW 3%, GWW 5%, GWW 10%, GWW 20 days, 10%, GVV obs., GVV ldkh., SMGV, SRGV, SMGV summer, SMGW winter, Abs. min. summer, abs. min. winter, Urez, GVV (date). Water level line is a straight line on a longitudinal section that shows the position of the water level. Formed based on water level points. Bounded by the ground line. Points of the water horizon - points on the route that characterize the flow of water in the horizon (picketage, elevation, speed and water flow). Water edge - the established water horizon on a certain date. SMGV - average low-water horizon. GWV 1% (horizon high waters 1%) - predicted water horizon with a probability of 1%. Flood width of the GWW 1% - the distance between the extreme points of the line of the GWW 1% level. Width at low water - the distance between the extreme points of the line of the SMGW level. Width of the floodplain - the distance between the extreme points of the line REDUCTION. Bottom erosion line - predicted marks of river bottom erosion. Bottom level mark - mark on the water level line in the picketage of the bottom of a water body. Level width along the route (flooding width along the route) - the difference between the picketage of the beginning and end of the level line. For example, the width during low-water periods is determined by the boundaries of the SMGV level line, the width of the floodplain is determined by the water edge level line.