Hello, readers of the “build a house” blog. Almost all mechanical and electrical tools require proper handling and timely adjustment. We have already discussed how to properly set up a mechanical plane in our previous article on planing wood. Today I propose to consider the issue of planing with an electric planer . At the end you will find a video tutorial on how to use this tool.
Hand electric plane
Electric planer knives
The first electric plane was released by Makita. Today it is difficult for a master to imagine life without this incredibly useful tool.
How to adjust an electric planer
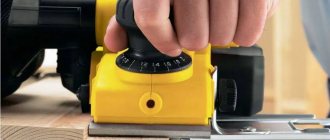
Adjustment of electric plane knives should be carried out according to the situation using a special adjustment mechanism, which is located on the front handle of the electric plane. By rotating this handle, we achieve the required amount of release of the knives (0-2 mm); they should be positioned evenly, parallel to the bed. Excessive release makes work difficult and puts additional stress on the plane motor.
Sharpening electric planer knives
Sharpening the knives of an electric planer is carried out similarly to a mechanical one. The main sharpening difference between an electric planer and a mechanical planer is the number of knives. There are two of them here.
Knife sharpening
Guys, you know what...
In an electric planer, knives should be changed strictly in pairs, using one set. This will help avoid the appearance of imbalance. And it will not only spoil the quality of planing of the workpiece, but can also damage the power tool.
What are there
On sale you can find household and professional (semi-professional) electric planers. They differ from each other in color and markings. The first ones are cheap and light. The second ones are more expensive, more powerful and heavier. Their motor life is many times greater; they can do work every day for many hours.
As a rule, in everyday life there is no such need; an electric planer is used from time to time, so purchasing a household model for your home, but from a well-known manufacturer, is a common solution.
The processing width in one pass for household models is usually 82 mm; less common are models with knife lengths (knives are positioned horizontally) of 100 mm and 110 mm. Professional models may have more.
The tool bed is divided into two parts - the front, adjustable, which rests on the workpiece in front of the knives, and the back, which rests on the already processed wood. On the front part of the bed there is a longitudinal recess (several recesses of various sizes), into which you can hang the edge of the workpiece when chamfering, which will allow you to chamfer most accurately.
On the front handle there is usually a regulator for the thickness of the removed chips (depth of cut).
Another important component is the chip removal system. Planing produces a significant amount of chips. The planer has a pipe into which dust and chips are thrown out during operation.
An industrial vacuum cleaner can be connected to the pipe. But you can also connect a bag to collect shavings so as not to litter the room with them.
Some models of electric planers are equipped with such a bag. But you can do it for any model yourself.
How to make a chip bag? You will need a spare tube from the vacuum cleaner, which connects to the nozzle of the plane. And also a piece of fabric, a zipper sewn into the fabric to remove shavings, and a crimp clamp to secure the neck of the bag to the tube.
Some models are equipped with side and top stops, which allow you to guide the plane along the edge of the workpiece at a certain distance from it and to a certain planing depth. This allows you to select folds.
Some expensive, powerful models are equipped with a planer-thicknesser device or a simpler frame, with which the plane can be secured with the knives up, thus obtaining a small planer (thicknesser).
How to replace knives
The electric planer is equipped with knives made of high-strength, abrasion-resistant alloys.
If the knives begin to leave a mark on the wood, this indicates they are damaged and need to be replaced. A knife, as a rule, has two sharp edges, and if one is dull, then you just need to turn the knife over.
To replace knives, you must first disconnect the electric planer from the power supply. Then you need to unscrew the screws securing the knife holders and remove the holders from the groove, and then remove the knives from them.
By inserting new knives into the holders (turning the existing ones over), you can reassemble in the reverse order. It is important to set the knives in height, which is not easy and requires effort.
Planing with an electric planer
A separate condition for correct and safe planing of any structures with electric planers is the rigid fixation of the workpiece being processed.
Only after the workpiece being processed is clearly fixed, you can start planing it. First you should start with rough processing. For this, sherhebel is often used. When using scherhebel, movements should be directed not along, but across the fibers. Otherwise, you may cut off too much wood.
Subtleties of working with an electric planer
After finishing processing the surface of small workpieces with Sherhebel, it should be cleaned first with a single, then with a double plane. If you are dealing with long workpieces, such as bars, then it is better to use a jointer or semi-jointer. Movement on the surface must be directed not against the grain, but along it. This is the only way you can get the most even and smooth surface of the wood.
Planing
Laying the laminate correctly
This material is particularly sensitive to the quality of base preparation, so this process will be examined especially closely. After preparing the old wooden floor, laying the flooring itself will not take much time.
Checking the strength of the old foundation
An old wooden floor often creaks under load - this is a sure sign that some of the joists are rotten or some of the boards require replacement.
For high-quality preparation of the base, several recommendations can be given:
- The most radical way is to remove the floorboards and inspect the joists. If there is even the slightest hint of damage to the wood due to moisture or insects, it changes;
In advanced cases, you will have to re-lay the floor
Note! Plywood under the laminate on a wooden floor is laid only after the floor has been repaired. If you lay it on sagging floorboards, the laminate will not last long.
- in old houses, the spacing between the joists may be such that the floorboards sag when walked; in the case of laminate flooring, this is unacceptable; the locks on the sides will wear out in a matter of months. In this case, it will be necessary to lay additional wooden logs;
- in the most advanced cases, the logs can simply lie on the ground; the instructions for preparing the floor for laminate do not allow this. You can simply raise them above ground level by laying brick pillars;
The joists need to be replaced here
- but if the logs are laid on top of a concrete base and are not attached to it, then it would not be superfluous to attach them to the concrete base with metal anchors;
- Next, we inspect the floorboards themselves; there should be no cracks or traces of insects. If some of the floorboards have to be replaced, then you can only use boards of the same thickness; a difference in height of even a couple of millimeters is unacceptable.
Leveling the floor with an electric planer
Detailed requirements for the quality of the wooden base for laminate flooring are contained in the SNiP standard 3.04.04-87. The main thing to pay attention to is the evenness of the surface. The requirements are very strict, unevenness of no more than 1 mm/2m 2 area is allowed, this can be explained by the fact that the laminate boards are connected into a lock, and differences in height of the base will lead to its rapid destruction.
If the laminate is laid on an uneven base, the lock will quickly collapse
As for the surface preparation itself, you can proceed to it only after the correction of more serious defects (such as sagging floorboards, rotten joists) has been completed.
Instructions for leveling the floor are as follows:
- first, the cracks are puttied, unevenness on the floor surface is measured, it is advisable to use a grinder or electric planer only to eliminate height differences within 4-7 mm;
- then the floor is divided into squares and each of them is machined;
The sanded part is highlighted in color
Note! You can treat the entire floor at once, but in this case it will simply be more difficult to control the quality of the surface.
- Before processing, all nails must be buried inside the board with hammer blows. Moreover, you don’t need to hit the board as hard as you can with a hammer, leaving dents; just use a punch. It is placed against the head and the nail is carefully buried in the board. If this is not done, then when leveling the floor, the knives of the power tool will simply be damaged;
Planes - even a board, even a beam
When planing the ends of a beam or board, make several movements with an electric planer from the edge of the end to the center, and also from the opposite edge. This will help avoid the occurrence of flakes and spalls. There is no need to put much effort into the process . The plane should move smoothly along the grain of the wood.
Make several movements with an electric planer on the surface to be treated. On the second and third movements on the surface, turn off the electric planer each time, come back and turn it off again.
An electric planer can be used to chamfer a part . Based on the width of the required chamfer, run the plane along the edge of the workpiece the required number of times.
Adjusting the position of the cutting edge
Adjustment of the position of the knives is carried out according to two parameters:
- height of the cutting edge relative to the back plate;
- the size of the protruding part of the knife for planing quarters.
Layout of the drum with blades.
Having installed the ruler or glass, you need to rotate the drum, controlling the gap between the knife and the device at the edges of the slabs. The edge of the knife should lightly touch the tool without lifting it. If the knife clings to the device or does not reach it, the position must be adjusted.
Typically, knives are secured with a special wedge with expansion bolts. Using an 8 or 10 wrench, you need to screw the bolts into a wedge until the bolt moves freely. Then, using the installed eccentrics, align the height of the cutting edge with the device. Tighten (unscrew) the mounting bolts and check the position again. The desired result can be achieved after several repetitions of this operation.
At the same time as adjusting the height of the cutting edge, you need to control the protruding part of the quarter planing knife. The optimal size should be indicated in the manufacturer's instructions. On most models it is 1 mm. The size is set by moving the knife left or right along the axis of the drum. It is important to set the size correctly. It should be the same on all knives. This can be achieved by using a feeler gauge of a certain size or by measuring the distance with a caliper (a caliper with a protruding back) from the edge of the knife to the drum. After adjusting the first knife, you need to move on to the next ones. The operation for all knives is performed similarly. If a knife cannot be installed in the required position, you need to remove the wedge and check the eccentrics for integrity and free rotation.
The adjustment must be completed by checking the free rotation of the drum and the fastening of all knives.
Included with electric planer
When you install a separate side stop on the electric planer (it is usually supplied as a kit), you can perform folding . The stop, fixing the tool at a certain distance, must touch the workpiece.
Folding boards
Folding a board
The depth of folding depends on the number of passes with a plane over the workpiece. The more passes, the deeper the rebate.
After planing, remove the knives from the electric planer, wash them with kerosene and place them in a separate box until next time.
Method two - “knocks out a wedge with a wedge”
Lumber loses its shape due to external factors : humidity, temperature, mechanical damage. We will fight deformation using the same methods:
- Wet the curvature area with warm water.
- Place the board between two relatively straight lumber (or wood with the same warp, but facing the other direction, mirrored).
- Tighten the resulting “sandwich” with clamps.
- Leave the structure in this state for 2-3 days. In this case, the room should not be damp.
If it was not possible to straighten it using this method the first time, then repeat all the steps or try the third method.
