From the author: Hello, beginners! The building level is an interesting tool: it resembles a large ruler, but sometimes there are not even divisions on it. Therefore, beginners often have a question about how to use a building level to obtain an accurate result. But before you figure this out, you need to understand what the tool is needed for and what types of tools exist.
What is a building level
A building level is an indispensable tool that helps draw straight lines when repairing floors, walls and ceilings, as well as determine deviations from a given vertical or horizontal. It is needed in order to:
- glue the wallpaper evenly,
- hang shelves and cabinets evenly,
- make a flat wall on which the kitchen set will not warp,
- make a flat ceiling and floor on which the computer chair itself would not roll,
- And much more.
There are several types of levels: from the simplest to the professional.
How to level floors quickly and inexpensively
For noticeable unevenness, a cement-sand screed is used.
It is not enough to determine the evenness, the unevenness must be eliminated. You can do it like this:
- If the base is almost flat, then extruded polystyrene or dry screed is sufficient.
- Minor curvature can be raised with a wet screed measuring 2-3 mm. Additionally, plywood sheets are used.
- Filling cracks, potholes, and chips allows you to raise the level with extreme precision. Self-leveling mixtures are available for both thin-layer and thick-layer substrates, so it is worth paying attention to this material.
- For noticeable unevenness, a cement-sand screed is used. It will help raise the floor so that it is perfectly leveled for a beautiful and expensive final coating.
- The solution for very old floors is a screed with expanded clay or adjustable joists. This technology allows you to raise the floor by one level, even if it horizontally resembles your own roads.
It is possible to cope with checking the evenness of the base, you just have to take a closer look at the issue and spend a little time on it. But the decision to lower or raise the floors is up to you, but as a rule, it is easier to slightly raise the base than to chop off uneven surfaces to achieve an ideal surface.
Plumb
A plumb line is the easiest way to draw a straight vertical line. It can be easily made from scrap materials; all you need is thread/rope and something heavy. Usually a plumb line is lowered from the ceiling level, then they wait until it stops oscillating, fix it and draw a line.
Working with such equipment is one of the easiest compared to using various other construction levels. It is useful when gluing wallpaper, laying walls or ceramic tiles.
How to use the meter
Before you start using a three-bubble bubble level or other product, you should pick it up and inspect it carefully. Having freed the device from its packaging, you will notice that its edges differ in color and structure. Each level has a so-called working side: the metal on it looks somewhat rough, as if cut with a circular saw.
Inexpensive devices have one working side. It is with this that you need to apply the level to the surface being tested. If you use another side of the case, most likely nothing bad will happen. However, the measurement error will be greater. For precision work this plays a significant role.
Advice! Before applying the level, it is advisable to clear the surface being tested of debris.
Horizontal control
For ease of understanding, the process of hanging a bookshelf is suitable. First they make the markings. A hole for the first side fastening is marked. Then the edge of the level is applied to the drilling point. While maintaining its position, move the second end of the body. As soon as the air bubble in the horizontal control bulb is located between the inner edges or is positioned exactly on the central mark, you can draw a marking line. This means that the level was shot correctly, as professional builders say.
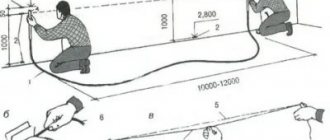
Water (liquid) level
Another name for this tool is a hydraulic level. It is a rubber thin transparent tube. It works on the principle of communicating vessels, that is, the water level at the ends of the hose will be the same. Of course, if the device is not twisted.
Sometimes there are flasks at the ends of the hose, but they only harm the work, as they interfere with accuracy. Professionals most often either remove them or immediately buy the option without flasks. This tool is used only for horizontal measurements. Most often, at the very beginning of the renovation, they use the “horizon”, along which there is a guideline for floors or ceilings.
Terms of use
First you need to fill the hose with water, not reaching the ends by about 10–15 centimeters. Further work is done with a partner. One person stands at the corner and places a point at the desired height, then brings the water level in the hose under this point, raising and lowering the device.
At this moment, your partner stands in another corner and places the hose at approximately the same level. The first person at this moment watches when the water “settles down” and stands exactly at the mark. When this happens, the partner must make a mark in his corner, then move on to the next one. Next, the marks are connected with a paint cord or a pencil with a tape measure.
An example of work can be seen in the video.
Peculiarities
Since the length of the hose sometimes reaches 10 meters, work is only possible with a partner. But this makes it possible to “draw the horizon” even on a large construction site.
The hose requires careful storage without twisting or rough bends. Not suitable for work in winter in unheated rooms, since water can change its density.
Misconception. The device does not require
It is better to say that the laser level requires minimal maintenance. After all, there is nothing complicated in its maintenance. It is necessary to periodically clean the case from dirt and promptly replace batteries. It is also important to remember that careful handling of the device is a guarantee of its long service life . Store and carry it in a special bag or case, so you will reduce the risk of damage from accidental impacts. After all, mechanical impact can lead to the laser’s accuracy being lost, and calibration will have to be carried out. If this happens, do not try to fix the problem yourself; it is better to entrust it to professionals. This way you will be sure that everything will be done quickly and efficiently, and the device will again become your reliable assistant.
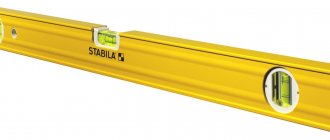
Bubble level (spirit level)
The most common construction-grade model, since it most often allows you to work in both vertical and horizontal space, does not require the help of a partner and is inexpensive. Used when installing windows, doors, mounting stairs, laying flooring, attaching shelves, sinks, and so on.
The bubble level looks like a large ruler with ampoules filled with colored liquid. The body is most often made of aluminum. On the one hand, this is good, since you often have to work with a spirit level at heights, and aluminum is a lightweight material. On the other hand, if dropped, especially from such a high height, the instrument can easily be damaged and will no longer be accurate.
There are usually 2 or 3 ampoules on a spirit level. Most often they are filled with alcohol, sometimes it is tinted with fluorescent liquid to make it easier to work in the dark. The ampoules help determine vertical, horizontal and 45 degree angles. Alcohol does not freeze at subzero temperatures, so the tool can be used even in winter.
Settings
After purchase, the spirit level must be checked and, if necessary, adjusted. This procedure is also indicated after the instrument has been dropped or damaged.
You need to fill a large container with water, put a thin piece of polystyrene foam - this will create a perfectly flat surface. If the spirit level shows an error, that is, the bubble is not exactly in the center, you need to twist the ampoule with alcohol around its axis, thereby adjusting it.
Operating rules
Such a tool has a working surface, usually it is “back”, absolutely flat, without markings, and sometimes not painted. If you do not work with it, slight errors may occur due to the protruding surface of the front side.
It is wrong to place a corner in the wall with its side, since in this way no objective data will be obtained, because a non-existent surface is being measured. The most that can be said is whether there are any dips or bulges on the wall under the instrument.
Most often, a “bubble” is used, which is located in the center of the spirit level - it allows you to determine the horizontal - that is, a plane parallel to the horizon. This will come in handy when working with floors, ceilings, doors, windows, and so on.
The bubble perpendicular to it is responsible for the vertical, that is, everything that is located at an angle of 90 degrees to the floor: these are slopes, doors, arches, pillars, etc.
Let's say we need to hang a shelf. To do this, take it in your hands, place the level on top with the bubble up and bring it to the intended location. Next, we observe the bubble: if it is tilted to the left, it is necessary to lower the left side or raise the right side. And vice versa. Next, we make notes with a pencil and remove the tool.
If you need to check the evenness of the wall, then you need to place a level with the working surface against the wall vertically with the ampoule at the top. If the bubble deviates from the wall, it means the bottom is sticking out, you need to add plaster on top. And vice versa.
Working with a spirit level is not difficult, but it requires time and care.
Simple methods for determining surface position
Bubble building level diagram.
What should you do if you need to immediately check the horizontality of the surface, but there is no instrument at hand? You can make the simplest bubble level yourself. To do this, you need to take a plastic bottle with slightly convex walls. Tinted water is poured into it so that the air bubble is 0.5-1 cm in size. Place the bottle on a strictly horizontal surface and mark the position of the bubble with a marker. This way you will get a reference mark for the horizontal surface.
The second method is to use a small metal ball from a bearing. On smooth surfaces it will roll easily in the direction of the greatest slope.
The above instruments are designed to determine the horizontalness of a surface. The vertical position can be set using a very simple device - a plumb line. It is a metal weight suspended on a long thread. By adjusting its weight and cord length, you can create a device that will be comfortable to use in a specific situation. By fixing it along the wall, you will get an exact vertical. In order not to disturb the position of the thread during repairs, several screws are screwed along it into the wall, which will lightly touch it with their heads.
Laser level (level)
This is a relatively new tool among building levels. A level is a device that uses a laser beam to show the horizontal, vertical or angle. It can send a laser to all four walls of the room or just one - it all depends on the model itself.
Working with it looks easy, since you don’t have to do anything yourself, just repeat the line drawn with the laser with a pencil or marker. But installing the tool on a flat surface plays a big role - if it is at an angle, then the line will be located the same way. This is especially true for inexpensive models.
Professional laser levels have a mechanism that reacts to unevenness of the floor and still produces a clear and even line.
How to work with a level
First you need to check the power supply. There are three options:
- the level operates from the network - connect,
- from batteries - insert,
- from the battery - charge.
Next, you need to clear the room of obstacles, since refraction of the beam will lead to an interruption of the line. It is worth reading the instructions to find out at what maximum distance the level can be placed: the closer, the more accurate.
After this, you need to level the device. To do this, a regular bubble level is located on the body. More expensive models have a self-leveling feature, so you can skip this step.
It is worth removing animals and children, since getting the laser beam into their eyes can injure them. It is advisable to protect yourself with sunglasses. Then you can turn on the level and take measurements.
Special purpose
There is an opinion that only professionals need a level, but it can also be useful for ordinary work. For example, if there is a need to lay out tiles evenly, then you can turn on the vertical and horizontal beams and navigate by them. Or, when decorating wallpaper with borders, a horizontal laser level beam will greatly save time and effort.
If you need to hang several shelves exactly under each other, a vertical laser beam will come to the rescue. You just need to bring it under the beginning of the first shelf, and then, when attaching the next ones, just focus on it.
Working with a level is a rather serious task that requires great care. But there is nothing complicated about it: even a beginner can easily handle any type of equipment.
Vertical check
After checking the horizontal, you need to compare the vertical. Place the tool against a vertical surface and make marks along the edges of the body.
You remember the readings. Next, remembering all of the above about the working surface, turn the level over relative to the vertical axis.
Here it would be incorrect to turn the instrument 180 degrees relative to the horizontal!
If the readings match, then everything is fine. Otherwise, calibration is required.