A construction bubble level is the same necessary tool for an electrician as a tape measure, marking cord or ordinary pliers.
Without it, it is impossible to correctly install a switchboard, socket block, or lay a cable line route. Not to mention that for ordinary builders this is simply an indispensable device. There are several simple rules when choosing and using this tool.
Bubble level
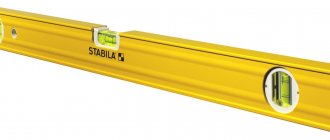
The bubble level is a profiled aluminum frame in which flasks with an alcohol solution are fixed. There are marks on the surface of each, and there is a small air bubble inside. The number of flasks can vary from 1 to 7. The simplest level is designed for measuring one horizon (vertical or horizontal), the average one has a container with a bubble rotated 45 degrees, and professional ones are designed for special work and are practically not used in everyday life.
Important! The problem is that all the bubble levels in the store lie. They cannot perfectly measure the correctness of the horizon. Responsible, expensive brands test each product for accuracy and put a mark on the body that shows the measurement deviation in the left and right directions.
How exactly to check the construction level of the bubble type depends on the design of the flask holder. Products produced today:
Frame
When choosing a level, first of all you should pay attention to its body. It must have thick walls (minimum 1.5-2mm thick) or be cast.
If there are inserts at the ends, it is difficult to determine the thickness of the metal “by eye”. Therefore, focus more on weight. Thin-walled ones are very light and can literally be pressed through with your fingers.
Even T-rails do not always have greater rigidity compared to a rectangular profile. Here a lot depends on class=”aligncenter” width=”720″ height=”322″[/img]
A defect in the form of bending of the profile may appear if you carry it not in a separate case, but in a simple bag with the rest of the tool.
It would be very good if there were shockproof rubberized inserts along the edges. It's rubber, not plastic. When dropped, the plastic simply breaks off.
For home needs, the most optimal length of the building level is 60cm.
Sometimes it is very useful if the level has magnetic inserts.
And if there are also holes for the size of the 220V socket block, then this greatly facilitates the electrician’s work.
Of course, you can have several tools of different lengths. One is small for installing a block of sockets, the other is larger for large switchboards, boxes and cable channels.
What are bubble levels?
All models of bubble levels are divided into several significant groups. But regardless of the functionality of the device, in all versions it will have a number of key characteristics. The main one is the design of the body. This is necessarily a strong frame, made in the form of a box-shaped structure, an I-beam, profiled by milling an all-metal billet or cast from aluminum.
The second key characteristic of a bubble device is the measuring flasks. These are cylindrical plastic containers with a slight bend along the axis. Inside there is a non-freezing liquid, usually alcohol-based. It does not completely fill the volume of the flask. An air bubble is formed, which is used to measure the horizon.
Today you can buy the following types of products.
- With one flask. You can use a building level of this type only to check one horizon. Usually this is a horizontal surface.
- With two flasks. This tool is designed to control both vertical and horizontal surfaces. Each of the flasks performs a separate task.
- With three flasks. The device of this class is the most popular. In addition to vertical and horizontal control, inexpensive products allow you to measure the inclination of a plane at an angle of 45 degrees. Having purchased a more expensive model, the user receives a third flask in the rotary block. It allows you to measure arbitrary angles with a fixed step.
Professional products are worth considering separately. For example, there are devices with six flasks. Each of them serves to control a specific horizon. Models of this class are designed to perform special measurements. In particular, devices were produced specifically designed to control the laying of pipelines and its compliance with standard requirements.
Photo of bubble level
The bubble building level is very often used in the process of construction, renovation of apartments or houses. Builders simply call it “level.” Although other types of building levels are used in practice, such as a hydraulic level (tubes filled with water) and a laser level, the bubble building level has gained popularity because it does not require special handling skills and is purchased at a low price. Therefore, it is quite accessible for use when renovating residential premises for owners who do not have professional skills.
Responsibility measures
For violation of the law on silence, you can be subject to the following types of liability:
- Administrative. In accordance with Art. 6.4 of the Code of Administrative Offenses of the Russian Federation, a fine of 500 to 1,000 rubles is imposed on the guilty person. The decision is made by an administrative commission under the local administration. To bring a neighbor to justice, you must submit an application to the local police officer to draw up a protocol on an administrative violation.
- Civil law. If noise from a neighbor’s apartment leads to health problems, then you can recover compensation for moral damages from the culprits. The applicant will have to prove a cause-and-effect relationship between the health disorder and the noise from the neighboring apartment. In practice, such requirements are rarely met.
In 2022, there are no serious measures to address noisy neighbors. The only option is eviction at the request of the district administration. But this requires a whole range of violations (non-payment of bills, noise, dirt). In this case, the court can evict the owner, sell the apartment, and transfer the proceeds from the sale to the former owner.
Design
The metal bar, the base of the tool, is made of metal or aluminum . There are also levels with plastic strips; such tools do not provide sufficient measurement accuracy. The length of the plank varies from 10 centimeters in pocket levels to 4 meters in professional construction ones.
The tire contains “eyes” and sights. Inside the hole is a flask filled with colored liquid or technical alcohol. There are divisions and marks on the walls of the ampoule. A large air bubble moves freely inside the flask, providing measurements.
The number of sights is 1-3, depending on the functionality of the instrument:
- a bubble at the end of the long side of the main one, it is used to measure the horizontalness of the surface;
- the sighting device, equipped with a straight bulb, is used to construct vertical lines;
- The angular position of the cylinder to the horizon accordingly indicates the measurement of angles.
To improve visibility at night, the alcohol is tinted with fluorescent additives ; sometimes the manufacturer additionally installs a lens on the visor.
We recommend: Working with a laser level on a construction site. How can you use a modern device to make work faster and easier?
The side of the plank that is applied directly to the surface is specially selected and is called the working side.
What do the divisions on the flasks mean?
Most of the divisions at the construction level are quite understandable to a novice user. On various models there is a familiar ruler for measuring distances or marking segments. Some manufacturers offer offset blocks for marking holes according to a template.
The most questions are raised by divisions at the construction level, seen on cylinders with bubbles inside. Let's look at what these marks are below.
- Marking marks needed to determine the accuracy of the horizon. When the device is placed on a flat surface, the air in the corresponding flask will be placed strictly between the marks, the edges of the bubble will come close to them.
- Error marks. They are located behind the horizon accuracy marks, closer to the edges of the bulb. Present in products of the middle and expensive categories. Each of them comes with instructions that indicate the division price. When the bubble is displaced to such marks, the slope of the surface can be determined in millimeters per linear meter.
Important! In levels with rotary flasks, on which the risks of determining the error are marked, it is proposed to measure angular deviations. All data necessary for calculations is given in the operating instructions for a particular device.
1.How to install the Radar Master program.
It is not possible to download the Radar Master program for configuring level gauges for free. This program is supplied on a CD along with the level gauge. If you wish, you can buy the program on the developer's website. I don’t know how much it costs. To receive information, you must send a request by filling in your details. When installing a program using the HART protocol, you must have a driver installed for your existing modem. How to install a driver for a HART modem can be found on the page “Configuring devices using PACTware ” . There are no problems when installing the Radar Master program. To connect via the Foundadation Fieldbas protocol (hereinafter referred to as FF), you must have a USB Fieldbus Modem. For example, the manufacturer Emerson . The modem comes with software. Detailed instructions for installing the program and connecting to the device are available in the operating instructions.
Bubble level (spirit level)
The most common construction-grade model, since it most often allows you to work in both vertical and horizontal space, does not require the help of a partner and is inexpensive. Used when installing windows, doors, mounting stairs, laying flooring, attaching shelves, sinks, and so on.
The bubble level looks like a large ruler with ampoules filled with colored liquid. The body is most often made of aluminum. On the one hand, this is good, since you often have to work with a spirit level at heights, and aluminum is a lightweight material. On the other hand, if dropped, especially from such a high height, the instrument can easily be damaged and will no longer be accurate.
There are usually 2 or 3 ampoules on a spirit level. Most often they are filled with alcohol, sometimes it is tinted with fluorescent liquid to make it easier to work in the dark. The ampoules help determine vertical, horizontal and 45 degree angles. Alcohol does not freeze at subzero temperatures, so the tool can be used even in winter.
Settings
After purchase, the spirit level must be checked and, if necessary, adjusted. This procedure is also indicated after the instrument has been dropped or damaged.
You need to fill a large container with water, put a thin piece of polystyrene foam - this will create a perfectly flat surface. If the spirit level shows an error, that is, the bubble is not exactly in the center, you need to twist the ampoule with alcohol around its axis, thereby adjusting it.
Operating rules
Such a tool has a working surface, usually it is “back”, absolutely flat, without markings, and sometimes not painted. If you do not work with it, slight errors may occur due to the protruding surface of the front side.
It is wrong to place a corner in the wall with its side, since in this way no objective data will be obtained, because a non-existent surface is being measured. The most that can be said is whether there are any dips or bulges on the wall under the instrument.
Most often, a “bubble” is used, which is located in the center of the spirit level - it allows you to determine the horizontal - that is, a plane parallel to the horizon. This will come in handy when working with floors, ceilings, doors, windows, and so on.
The bubble perpendicular to it is responsible for the vertical, that is, everything that is located at an angle of 90 degrees to the floor: these are slopes, doors, arches, pillars, etc.
How to connect to the device using the Foundadation Fieldbas protocol
The instruction manual for the FF modem contains a diagram of connecting a laptop to the device.
When connecting to a device in a laboratory setting, this scheme is of course applicable. The proposed connection diagram in the field involves connecting the device to a laptop in the field, which is not always possible. According to safety requirements, a laptop when used in a hazardous area must be explosion-proof. It is not always convenient to carry a laptop in the field, especially in bad weather or frost. When setting up the device, the laptop's battery power may turn off, and the device may go into error. The device readings will be lost. Because Usually, operating personnel allocate a very short period of time for setting up the device, then a long absence of readings can lead to disruption of the technological process. To be able to configure the device and monitor its operation over a long period of time, I connect an FF modem in the crossover cabinet. Before performing any actions with any device using the FF protocol, as usual, you must coordinate all your actions with the operating personnel. The device must be put into “service mode”. Those. The process control system engineer must programmatically switch to the “Out of Service” mode. When connected in the “Auto” operating mode to the device, a software failure may occur, and readings may be lost (“freeze”) of all devices of the same “FF segment”.
In the distribution cabinet we find the wires of the segment field bus to which the device is connected. We connect the FF modem in parallel. For the FF protocol, “polarity” does not matter. Launch the Radar Master program.
To connect to the level gauge when starting the program, select the type of communication protocol Foundadation Fieldbas
The program starts. The level gauge settings window opens. We are searching for devices. The “List of Devices” window will display a list of devices connected to the program.
We select the device we need. Let's connect it
Go to the “General Settings” menu. We check whether the device is switched to the “Out of Service” mode. If the unit is in the “Auto” mode, switch to the “Out of Service” mode.
How to adjust the bubble level
If there is a need to adjust the construction bubble level, two tests must be carried out: vertically and horizontally . In the latter case, the procedure is simple: apply the level to the wall, and draw a line on it with a pencil along the bottom edge of the device. The extreme point of the frame is marked. The tool is rotated 180 degrees and the lower boundary is drawn again. In this case, you need to position the edge of the frame at the previously marked point.
If the fixture readings are incorrect, the two lines will be at an angle to each other. It is necessary to find and draw the bisector. After this, the level is applied to the new line and the flask is adjusted using a screw that changes the position of the holder. To achieve the correct reading, be sure to test in the opposite direction, turning the device 180 degrees.
Checking the building level along the vertical horizon is done plumb. All adjustments until the correct readings are achieved are also made by turning the bulb holder screw.
Important! An important rule must be followed. The metal element of the plumb line must be made of a non-ferrous non-magnetic alloy.
The situation is more complicated with inexpensive devices. As a rule, their flask holder does not provide for adjustment, and the cylinder with liquid itself is glued. But even such a device is easy to calibrate with due patience. You can adjust the bubble level using a Phillips screwdriver and a hammer. First you need to determine in which direction you need to move the flask. Using a screwdriver, by applying light blows, drive the upper (protruding) edge of the container down to move the bubble to the left or right. After completing such a barbaric adjustment, if the flask has survived, it is tightly filled with superglue in the holder.
Looking for the horizon
To tune, you need a standard. The best tool for this purpose is the same or similar tool, but it is guaranteed to work. If there is none, you need to find the ideal horizon.
For example, it will arrange the surface of the water in an aquarium. If it is convenient to place a tool on its glass, then the water level in the container can serve as a standard. In addition, you can draw out the line of the ideal horizon using the beam of a laser level.
Finally, the calculation is also carried out using a knocked down tool. If you attach it to the wall and, turning the device the same 180 degrees, build two false levels from one point, then the bisector in the resulting angle will be the reference horizon.
How to properly use different types of building levels
When carrying out construction work, you cannot do without a level to make accurate measurements of the corners on the site in accordance with the drawing.
They use different types of tools, for example, bubble, laser, water. Their use helps to accurately transfer angles of inclination from one structural element to another.
The use of a level or level in construction allows you to take measurements of small angles.
Rules for using a bubble level
The most common is the bubble level. Its design has the shape of an oblong narrow rectangle with 1-3 flasks. The body of the instrument can be either solid or hollow.
The body can be metal or plastic. Deviations are determined by the presence of flasks filled with alcohol. They contain a ball of air.
One flask is characterized by a vertical error, and the second - horizontal.
The defining characteristic of a bubble-type device is its length, which can vary from 20 centimeters to 4 meters. Each of the tools, including using a plumb line and a level, can only perform certain types of work, since there is no specific model for all cases. Each device is used when performing the following types of work:
- Using a short level allows you to install small elements, for example, sockets with switches, spotlights.
- The use of a medium level is associated with large-scale work, for example, related to laying tiles.
- A two-meter level allows you to check for “out-of-flatness” if it is used as a control rod.
Since the design of the bubble level is made of liquid and glass, you should act carefully when using this tool. If the device has ever been dropped or hit, its readings may be erroneous. After purchasing a tool, you should definitely configure it. For this purpose, it must be applied to a perfectly horizontally flat surface.
You can achieve an accurate result if you fill a large container with water and place a piece of foam plastic with a flat surface on top. This position allows you to check how the air bubble is located in the capsule. If a certain error is detected, the capsule should be rotated around its axis, adjusting the level.
Using a level, it is applied to the surface that needs to be examined.
Next, determine the position of the air bubble. If it is located exactly in the middle between the marks, then this means that the surface is perfectly leveled.
If the bubble deviates from the vertical to the right or left, it is necessary to tilt the surface in this direction. If the bubble deviates downwards when it is placed on a horizontal surface, then it is lowered. When the bubble deviates upward, the surface is raised.
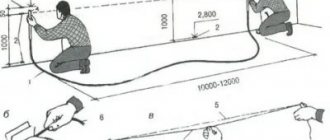
How to use a building level - determine the horizontal plane
The simplest thing is to determine the horizontal using a bubble level. To do this, you need to make a mark on the wall with a pencil where you plan to drill a hole for the dowel. To ensure that the future shelf or cabinet hangs level, the location for drilling the second hole is determined using a level. To do this, we combine it with the mark, and by aligning the bubble in the flask, a second mark is installed.
To make sure that the shelf or cabinet will hang straight, you need to connect the resulting dots and perform a control check. If the device is used to level the refrigerator or washing machine being installed, then the legs on this household appliance must be screwed so that the bubble at the level is centered in all planes of the device’s position.
How to use a bubble level to determine a vertical surface
Using the second flask on the device, the evenness of vertical surfaces is checked, for example, the quality of brickwork, plaster, plasterboard sheets, etc. To do this, you need to lean the device against the surface and look at the location of the bubble. It should be exactly in the center, which indicates the evenness of the surface.
It is important to consider that the vertical surface is measured so that the flask with the bubble is at the top. This simplifies not only reading the result, but also reduces the error.
Tilt control
There are known models of bubble levels, the design of which has 2 transparent flasks. Such a tool is needed to check the angle of inclination of the surface, as well as determine the location of the line at a certain angle relative to the horizontal or vertical surface. Such a tool performs the function of a protractor.
Different models can be used to determine different angle sizes: inexpensive models are used to determine an angle of 45 degrees. More expensive level models can be used to determine other angle values. Such models are equipped with a third rotary flask. By rotating the flask, you can select the required angle.
When working with levels with 3 flasks, it is recommended to follow the following sequence of actions:
- Place the rotary flask in the position required for operation. To do this, loosen the screws, focusing on the graduated scale and latches. After the angle is set, screw them all the way.
- Place the tool with the working surface against the wall.
- The location of the bubble of the third flask in its central part indicates that the surface is located at the required angle of inclination.
It is recommended to use a bubble level with three bubbles if you need to control the angle of inclination of the surface. Using a building level with 1 or 2 transparent flasks for this purpose will not give results.
What not to do
When using a bubble building level, you should adhere to some rules for working with it. Among them are the following:
- Do not apply the level to the working surface with its side or top.
- Do not use the tool without first adjusting it. To do this, you need to prepare a level, pencil, ruler and nail:
- Perform adjustments on as level a surface as possible. This can be the left corner of the wall with convenient access to it;
- retreat from the corner 3-5 cm;
- drive a nail into the wall;
- bring one side of the level to the nail, resting it against the surface of the wall;
- draw a line on the wall;
- lean the other side of the level against the nail;
- draw another line.
What you need to know when choosing a construction spirit level
Before you learn how to use a construction bubble level, you should first buy one. Finding a point where to purchase a tool is not at all difficult, but choosing a measuring device that is suitable for its parameters is much more difficult. What you need to consider to select the right bubble type level is listed below.
- What material is the tool made of? It can be plastic, metal, aluminum.
Wooden and polystyrene foam spirit levels are less common. Plastic has an advantage over its competitors in that such devices are much cheaper, but they are intended exclusively for household use. Plastic has larger measurement errors than metal and aluminum levels - The length of the device depends on where and what you plan to do with the tool.
For external construction and finishing work, levels of 1-2 meters in length are used. The maximum length of the devices is 4 meters. Levels with dimensions of 30 cm or more are suitable for interior finishing work. - The number of ampoules located in the instrument design affects the functionality.
Usually, for home use, two ampoules on a spirit level are enough, while construction specialists use devices with three flasks. The difference in price between devices with one or three flasks is insignificant, so it is better to immediately buy a spirit level with three ampoules - How firmly the ampoules are fixed - they must be firmly attached to the base through a plastic or rubber base.
If the containers wobble or fall off, then it is better not to buy such levels - Where are the control marks located - they should be applied to the inner surface of the glazing, which will eliminate the likelihood of their abrasion during operation
- The presence of additional functions - this affects the cost, but at the same time facilitates the operation of measuring instruments.
Additional features include the presence of magnets, backlight, and a telescopic mechanism to increase the length of the device - The presence of handles for ease of operation of the device - usually such handles are presented in the form of rubberized recesses in the body of the instrument.
Such handles are found mainly on expensive models of instruments.
It is on the basis of these criteria that it is necessary to choose a measuring instrument - a spirit level. When purchasing, it is recommended that you take a few steps to ensure that the device measures correctly. Let's look at how to check the accuracy of the bubble level below.
This is interesting!
Analogues of bubble levels are electronic ones, which use an electronic display instead of a glass bulb. The display shows digital values in the form of deviation from the linear surface. With their help, you can find out the magnitude of the deviation, which is sometimes very important.
What is a round bubble level for and how to use it
A type of bubble levels are round, which are designed for testing horizontal surfaces. The round spirit level differs from the rectangular body in design, but its operating principle is similar. Structurally, the device is a sealed flask, which has the shape of a hemisphere. The device consists of a plastic base and a hemisphere made of impact-resistant glass. On the sphere in the center there is a marking in the form of a circle. The flask is filled 95% with alcohol or distilled water. The remaining 5% is air or a measuring droplet. The central location of the droplet determines the deviation from the horizontal surface.
What are round bubble levels for? They are used not only in construction, as well as when checking the degree of shrinkage of constructed buildings, but also when conducting photo and video filming. The measuring device allows you to adjust the tripod horizontally, eliminating the possibility of skewed photographs or video recordings. Round spirit levels are also used when installing scales, as well as for leveling the position of installed machines, industrial equipment and jewelry surfaces.
This is interesting!
A round bubble level is used to level the horizontal surfaces of small objects.
Sources
- https://instanko.ru/izmereniya/uroven-stroitelnyj-puzyrkovyj.html
- https://tehnika.expert/dlya-remonta/stroitelnyj-uroven/kak-polzovatsya-puzyrkovym.html
- https://texnotoys.ru/bytovaya-tehnika/kak-pravilno-proverit-uroven.html
- https://zaborprofi.com/instrument/stroitelnyj-uroven.html
- https://seberemont.ru/kak-polzovatsya-stroitelnym-urovnem-pravilno/
- https://svetodyody.ru/kak-pravilno-polzovatsya-stroitelnymi-urovnyami-raznyx-vidov.html
- https://moiinstrumentu.ru/uchimsja-pravilno-polzovatsja-puzyrkovymi-stroitelnymi-urovnjami.html
- https://TehnoPanorama.ru/instrumenty/kak-polzovatsya-puzyrkovym-urovnem.html