Set of socks, Omsa socks
349 ₽ More details
Set of socks, Omsa socks
349 ₽ More details
Wallpaper in Provence style
A hydraulic level is a construction tool that is used to determine the level of a surface located at a certain distance. Externally, the device resembles a flexible tube with a scale. Before using a water level, it is recommended to familiarize yourself with the principle of its operation. It is based on Pascal's law of communicating vessels. The level is determined relative to the position of the horizon.
The operation of the hydraulic level is based on Pascal's law of communicating vessels
Operating principle of the device
The device is designed for horizontal marking and detection of deviations from the horizon. It can be either homemade or factory-made. The principle of operation is simple, so to use the device you do not need to have deep knowledge in the field of construction.
A hydraulic level is a device that works on the principle of communicating vessels. The second name of the device is a water level. It is a long thin hose. If you lift the ends of this hose, then no matter how far apart they are located, after a certain time the liquid in them will align at the same mark.
Thanks to the law of physics, the accuracy of the device is quite high, which allows it to be used when constructing a foundation. An important factor is the simplicity of the design and affordable price. The simplest version of the hydraulic level is a transparent long hose. You can also purchase a more complex device in the store, equipped with two containers with a measuring scale and mounting hardware. Both options, simple and advanced, work the same.
Laws of physics in construction
Pascal's law of communicating vessels, familiar to us from school, underlies the principle of operation of the water level. The spirit level is a transparent flexible tube with plastic flasks at the ends, on which markings are applied. These flasks are control vessels, and the position of the water determines the level relative to the horizon. If the liquid level at both ends is the same, then the objects are at the same height.
Where can I buy a water level? Yes, at any hardware store. But a self-respecting master will not refuse to do it himself. To do this, you only need to buy a transparent hose of the appropriate length. Flasks can be replaced with disposable syringes.
The length of the tube depends on the object of repair and varies from 2 meters to 30. If it is a small room, for example, a bathroom, then 6-8 meters will be enough. To work in private homes with large halls, a length of 20 meters or more may be needed. It is not recommended to take a very long hose, as during operation it can become twisted, bent, interfere, and the results can be distorted. Too short may sag. The optimal length is when the hose falls freely along the wall and lies freely on the floor. The diameter can also vary from 5 mm to 2 cm. But you shouldn’t take a very small one. You have to choose the appropriate option yourself.
Leveling the foundation horizontally
To check the evenness of an already poured foundation, you need to use a water level in the following order:
- A base is made to secure the device. To do this you will need to take two boards and two bars. I place the boards horizontally, and the bars are attached to them perpendicularly, placing them approximately in the middle. It is important to align the angle between the boards and bars: if it is not equal to 90 degrees, the measurements may be inaccurate. Leveling can be done with a construction square.
One of the options for attaching a hydraulic level for breaking the foundation.
- Next, the ends of the hydraulic level tube are secured to the workpiece. It is best to use only the tube. Stores sell ready-made devices that, in addition to the tube, include a container with a measuring scale and mounting hardware. You can use these, but due to the difference in the thickness of the tube and the hole in the measuring container, the liquid will take a very long time to level out during the measurement process. To increase the speed of work, it is recommended to use the simplest level, consisting only of a tube.
- After installing the device on one of the corners of the foundation, allow the liquid to level out and mark the water horizon on the device. You can mark with a regular pen. This will be the basic o. Then the ends of the tubes are clamped.
- The next step is to check the deviations of one corner of the foundation relative to the other. To do this, one end of the tube with the board is transferred to the corner being tested. Unclench the ends of the device and allow the liquid to level off relative to the horizon.
- They take readings. To do this you need a ruler. It is used to measure deviations of the water level relative to zero (the first mark).
Measuring the difference in height of foundation corners.
- Calculations are performed using the difference method. To do this, the deviation at the tested point is subtracted from the deviation at the base point. It is important to take into account the signs of deviations. If the water column has dropped below the base mark, then the value is taken with a minus sign, and vice versa. For example, after transferring the level to the required point of the foundation, the deviation of water from the marked horizon at the base angle was minus 3 mm, and at the tested angle minus 7 mm. (-3 - (-7) = 4 mm). This means that the angle being tested is 4 mm higher than the base angle. If a negative value is obtained, then the angle is located below the horizon of the accepted zero.
- In the same way, all corners of the foundation are checked for which the length of the hydraulic level is sufficient. To ensure that all points are checked, two diagonally located sections can be taken as base ones.
It is important to use the difference method, because when the tube moves along the ground, the level of liquid in it changes, the tube bends, contracts - this changes the internal volume. If you return the device to the original point, the water in the hydraulic level will be at the same mark, but it will not coincide with the base mark. To prevent errors, it is necessary to use relative changes.
After the measurements have been taken, it is necessary to check the design's compliance with the standards. During construction, it is important to align the edge of the foundation horizontally. Maximum deviations are specified in the manual for SNIP “Regulatory requirements for the quality of construction and installation work” and SP “Load-bearing and enclosing structures”.
| Deviation | Permissible value |
| horizontal plane for the entire length of the foundation section being inspected | 20 mm |
| local surface irregularities, except for supporting areas | 5 mm |
| at the junction of two adjacent areas | 3 mm |
All deviations are indicated for height marks. If the measured values do not fit within the required framework, the quality of work is considered unsatisfactory and the surface must be leveled. For private housing construction, leveling can be done when laying a brick plinth.
How to make a hydraulic level with your own hands using improvised materials
To make a hydraulic level from improvised means, you will need to use a transparent PVC tube, the diameter of which should not be less than 8-10 mm. If you are trying to get a device that will be completely similar to the production one, then you will also need two syringes. Further steps for making a homemade hydraulic level are as follows:
- Clean the hose with soapy water to remove any remaining industrial oil. The soap solution will also make the inner walls smooth, which will have a positive effect on eliminating air bubbles
- Expand the syringe holes to the outer diameter of the hose. Connect the syringes to the hose using sealant or a glue gun
- Remove the pistons from the syringes. The resulting holes can be closed with tape after filling the instrument with water.
- Homemade hydraulic level is ready for use
If you need to make a hydraulic level as quickly as possible, then you only need a transparent hose. The ends of the hose are marked with a marker during calibration. After this, the tool is ready for use. How to make the device with your own hands is shown in the video.
Although the hydraulic level is a replaceable tool, it is still popular even today. If you plan to use the meter at sub-zero temperatures, then you need to use anti-freeze for cars or alcohol as the liquid. Antifreeze or antifreeze cannot be used, as these liquids are toxic. It is also impossible to store the device with liquid filled for a long time, and therefore the water should be drained after use. The measuring tool must be stored away from the sun. Having this primitive meter available, you can always easily, quickly and correctly level the horizontal plane.
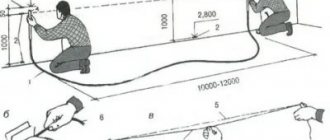
Foundation marking
Removing the axes and boundaries of the house onto the terrain is done using wooden posts and crossbars, a cord, a tape measure and a hydraulic level. In some cases, instead of a hydraulic level, an eye gauge is used, but this is an extremely inaccurate method.
The crossbars of the cast-off should be located at the same vertical height. You can hit all the marks with a hydraulic level. To do this, perform the steps in the following order:
- Nail the first crossbar (rail) at the required height.
- Attach one end of the measuring device to it.
- Before nailing the second cast-off element, check its vertical position using a regular building level. To set the correct mark, the second end of the tube is attached to the mounted crossbar.
- It is necessary to bring the location of water in communicating vessels to one level; the upper edge of the first rack can be taken as the base level; the second rack is positioned so that its upper edge coincides with the water level. It is necessary to achieve a position in which the water level coincides with the upper edge of both slats.
- After this, the second rail is nailed to the castoff posts or screwed with self-tapping screws. Move to the next element.
Important! Make sure that the hose does not bend when working with the level, otherwise the measurements will not be correct.
Setting the water level
By definition, the hose device needs to be filled with liquid, that is, water, which needs to be tinted for better visibility. The diameter of the tube should be about 12-15 mm. The overhang of one edge along the wall is at least 1 meter, perpendicular to the floor. There should be no kinks in the hose.
Pour colored water into a bucket and place it on a hill, about 2 meters, this is similar to the action of “draining gasoline from a tank.” Water directly from the tap will not work, because... There may be bubbles that interfere with the measurement. Place one end of the hose into the bucket, and pull water through the other so that it flows into it.
After this, you need to remove the ends of the hose and take it in your hands in the shape of the letter U. There should be a distance of about 15 cm from the top edge, i.e. excess water must be drained. After setting the simplest water level, you should also check the tube for bubbles: unnecessary air is removed by folding the hose in half with the ends up and lightly tapping the structure.
Laying out formwork and pouring the foundation
To ensure a level base for the house, the formwork must be accurately installed. The work is carried out as in the previous case. First, vertical pegs are driven into the ground to which the shields will be attached. Start work from the top board of the shield. The first one is nailed at the required level, and the rest, as if worn out, checking the height with a hydraulic level.
Next, mark the top edge of the fill on the inside of the formwork. To ensure evenness along the entire length, they are copied to other corners of the formwork using a tube. The location of the water in one tube is aligned with the mark on the formwork. The second end of the hose is moved to the desired point and the liquid level is checked there. This is done with all angles. To increase control, you can make marks along the length of the tape.
Difficulty of use
With all its advantages, the hydraulic level also has its disadvantages and difficulties. The following can be distinguished:
- work only in the horizontal plane (not suitable for vertical alignment);
- working with a partner (you can do it on your own, but it will take more time and effort);
- filling the tube with liquid (a long tube is more difficult to fill with water).
But, despite everything, the hydraulic level is a very practical, accurate and necessary tool. Real masters have long appreciated it.
Wall masonry
To begin the construction of enclosing structures, it is necessary to determine the highest angle of support for the masonry. If you have checked the previous point, you can use the previous measurements and, after analyzing them, select the highest point.
Starting work on laying bricks or gas blocks from a high angle will allow you to bring the wall to one horizontal level. To level the edge of the enclosing structure at the same level, a thicker layer of masonry mortar is laid at the lower points.
To determine the required point, you must use a hydraulic level in the same way as in the previous paragraph. Calculate the elevations of the entire surface of the structure relative to the base one and determine the required area to begin masonry work.
Video text
An excellent alternative to a hydraulic level is a laser level - https://goo.gl/RkmMuN How to use a hydraulic level! In our age, when during construction we use the latest technical devices, such as a laser level, the old proven tools go into complete shadow! Fewer and fewer ordinary people know how, and even want to know, how a construction plumb line, hydraulic level and square work. This is not possible - it’s not right! And the “Guys from Stone” channel does not want to forget the achievements of our predecessors in construction. Bright video No. 97 – “How to use a hydraulic level”! The hydraulic level looks like a simple flexible hose and nothing more, unless, of course, you are familiar with the works of Pascal. That's right, the law of communicating vessels in action! With such knowledge, the hose (hydraulic level) easily turns into an in-person tool for finding the horizon! When building a foundation in an open space, a laser level is useless; if the batteries are dead, you won’t be able to work with a laser. But our work should not stand still! Watch video No. 97 “How to use a hydraulic level”, do not forget the instructions of the Masons!
Read also: How to use a spray gun video
Instagram is a young portal, but photos about working with a hydraulic level will work there - https://www.instagram.com/guys_stone_/ Yo, for you and only you, a video on how to properly use a hydraulic level when pouring a foundation - https:// www.youtube.com/c/Guysstone And Vkontakte is now all over the ears! Video No. 97 about the exciting hydraulic level device - https://vk.com/guysstone
The collection of our channel is simply amazing! In addition to the video about the hydraulic level, we offer three more episodes that you need at your construction site: No. 1 Working with the hydraulic level will help you decide where to start repairs wherever you want -
Oh, hydraulic level! We remember how to work with you!
How to use the hydro level! In our age, when in the construction we use the latest technical devices, such as laser level, the old proven tools go into total shadow! Fewer ordinary people can, and wants to know how the dispensation plummet, hydro level and square. So you can’t – it’s not true! And the channel “Men of Stone” does not want to forget the achievements of our predecessors in the construction of . Bright Video No. 97 – “How to use the hydro level”! Gidrouroven seemingly simple hose and no more than that, if you are, of course, are not familiar with the works of Pascal. That's right, the law soobschayaschihsya vessels in action! #Hydraulic level #Brickwork #Tools
Builder 4th category
A hydraulic level is a construction tool that is used to determine the level of a surface located at a certain distance. Externally, the device resembles a flexible tube with a scale. Before using a water level, it is recommended to familiarize yourself with the principle of its operation. It is based on Pascal's law of communicating vessels. The level is determined relative to the position of the horizon.
Read also: Metal engraving tool
Description and characteristics of the tool
The water device consists of a hose and two reservoirs. It is used when installing suspended ceilings and pouring screeds. It helps to align objects located in different rooms.
To simplify the work with the hydraulic level, it is recommended to use tubes with a larger diameter. They provide easy passage of water. The optimal length of the tube is 3-30 m. The water tool weighs up to 1 kilogram. Not only specialists, but also novice builders will be able to work with a water level.
To check the accuracy of the device, the liquid in two containers is measured. To mark a given height on an object, one tank is held at a certain point, and the second is moved in space.
In this video you will learn how to work with a hydraulic level:
On large construction projects, a laser level with a beam 100 meters long is used. To determine deviations in any plane, use a bubble level. It is presented in the form of a straight body of 15-200 cm with flasks and liquid. Taking into account the position of the bubble, the angle of inclination of the device relative to the surface is determined.
Description of the construction hydraulic level and its purpose
Externally, this device consists of two containers in the form of flasks, as well as a hose connecting these reservoirs. The main feature of the device is that the flasks, as well as the hose, have transparent walls, which is necessary for monitoring the liquid. A measuring tool is used when installing a suspended ceiling, installing pillars and pouring screed with a foundation. It helps to align objects that are located on two parallel or perpendicular bases.
The hose used is PVC or silicone, and the flasks are made of plastic and have a graduated scale. Accurate measurements are taken using this scale. It is important to say that the scale on the flask is not mandatory, since it can be replaced with a mark made with a marker. Why you need a scale and marker marks on the instrument flasks, you will learn when studying the section on how to use a hydraulic level.
Due to the fact that the tool has a simple design, it costs no more than 500 rubles. Moreover, the price depends on two main factors - the length of the hose and its diameter. The greater the length and diameter, the correspondingly higher the price of the hydraulic level. Modern manufacturers produce devices with hose lengths from 3 to 30 meters. This primitive device is now being replaced by a laser level, which costs many times more.
Varieties
Choosing a laser level for a non-professional is not an easy task. There are many types of devices with different sets of functions, which is the determining factor in choice.
| Rangefinders | These devices are also called construction laser tape measures. In fact, they are not levels, but they are still used to level heights. Rangefinders emit a light beam over significant distances, which are difficult to measure with a tape measure, and determine the values of the measured sides with high accuracy. This device is useful in the construction of foundations. |
| Line Builders | These are devices that emit laser beams, which, when refracted, create perfectly even angles with the required parameters. For devices, the magnitude of the angle sweep can be different - from none to 1600, and sometimes more. The devices project from 1 to 8 lines simultaneously, so they have a wide range of action. They are used both for marking the foundation and for repairs, interior decoration, and facade decoration. |
| Axis builders | These are simple devices that do not emit radiation; they only project points on vertical and horizontal surfaces. Using such levels, you can determine the evenness of the foundation walls and mark the foundation pit, but only with the use of an auxiliary strip. The use of the device is limited to obtaining only control points (axes). |
| Rotational builders | This type of laser levels is universal and has a wide range of applications, but due to the wide range of functions in everyday life, it remains unclaimed - these are professional devices. The emitted laser beam creates a wide marking in the vertical and horizontal planes. Using a rotational laser level, they mark the foundation and control the vertical and horizontal of the structures being built. |