In a modern home, it is necessary that all levels of floors and ceilings be the same and perfectly level. The time of littered floors and lopsided ceilings is irrevocably a thing of the past.
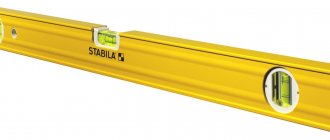
To perform this task, builders actively use laser levels and levels. But at the same time, the water level remains very popular. This is a very simple, practical and precise tool that is difficult to do without. It is not always advisable to buy an expensive laser level, especially when it comes to renovating one apartment. In addition, the accuracy of this device is very high. In this article we will look at how to properly use a water level - also known as a hydraulic level.
Let's figure out what kind of tool this is!
Anyone who has had to deal with construction or serious repairs at least once knows exactly what a construction hydraulic level is and how to use it. For those who have never encountered such a device before or prefer modern analogues: an optical level or a laser level, we note that man has not yet come up with a simpler and more reliable tool. It is necessary to determine the horizontality of certain structures and lines, that is, precisely for what responsible builders often do to ensure that surfaces do not deviate from the standards. By the way, let us immediately note that it is also called a water level or spirit level.
Perhaps some of you will immediately be puzzled by the question: why do you need a hydraulic level when you already have construction measuring rulers with a level in your arsenal? The answer is simple: it is, of course, convenient to work with a ruler, but its length is limited to 3-4 meters. But what about the need to determine the horizontal level at a greater distance: at 10, 20, or even 30 meters, for example, when setting up formwork and pouring the foundation? Here, of course, the already mentioned level and laser device can be used, however, in both cases there are negative nuances. And if it is necessary to set a level around the corner of a building, then there is simply no other option but to use a hydraulic level.
So, a hydraulic level, which significantly simplifies some repair and construction work, is a transparent flexible tube with a length of 2 to 30 meters, a diameter of 5-6 mm to 2 cm, with thickenings at the ends on which divisions are applied. It is filled with water, ideally with the addition of food coloring, which makes the work much easier. Some craftsmen use boiled water, since there are almost no air bubbles left in it that interfere with measurements.
Manufacturing process
The main part of the water level is the hose. In this case, it is absolutely not necessary to additionally use transparent flasks, which you have seen more than once in ready-made models of levels sold in building materials stores, since at low temperatures the hose from these flasks, as a rule, flies off, and it is quite inconvenient to draw water into the flasks (there are extra bubbles).
Selecting the hose diameter
Transparent polyethylene hose
So, what is still needed to make a water level? All you need is regular tap water and a clear, thick-walled polyethylene hose that won't break when bent. It is in such a hose that water moves freely and quickly along its entire length, but in a small-diameter hose the water flows slowly, and you have to wait quite a long time for the level to be established and you can put a mark (besides, the water level in such a tube is difficult to see ). The main problem with a thin hose is the tiny air bubbles that form when it is filled with water.
It is best to use a hose with a diameter of 1.2 to 1.5 cm to make a hydraulic level.
Over time, the hose begins to become cloudy, and as a result, the visibility of the water level inside will deteriorate. Ultraviolet radiation is harmful to polyethylene.
Determining the length of the hose
Selecting the hose length
The length of the hose must be selected based on the size of the room. Typically, the length of the rooms is equal to the length of the floor slabs, that is, approximately six meters. Therefore, the maximum length of the hose used to make a water level can be no more than ten meters. If the hose is short, you will have to make transitions, and this increases the likelihood of errors.
Slowly fill the resulting homemade level with tap water. Be careful not to create any air bubbles. If you notice their appearance, then wait a while until the air comes out. This rule must be followed so that the results of measurements of the water level made by your own hands are accurate.
How a water level works - let's figure it out!
To understand how the hydraulic level works, you will have to remember the school physics curriculum. No, not all of them, of course, only the law of communicating vessels, Pascal’s law. Do you remember? In communicating vessels, the water level will always be the same. Look into the kettle - the water in both the spout and the main container is at the same height. If you tilt it, the water will react, but the levels will still remain the same. And one more thing: pour water into a transparent glass with a horizontal pattern so that the liquid reaches one of the lines. If you place the glass on a flat surface, the water will confirm this by touching the lines, and if you place it on something inclined, the liquid will instantly react and show the level of inclination.
In general, you can trust the water, it will not deceive! And, once in the hydraulic level system, it will allow you to quickly make horizontal marks.
To answer the question frequently asked in search engines: “hydraulic level, how to use”, we will need to carry out some simple preparation. Some transparent hoses, which, as you know, are the basis of spirit levels, may contain slight residues of oily liquid inside, which will interfere with the accuracy of measurements. To remove this deposit, it will be enough to pass a warm soapy solution through the system.
Advantages and disadvantages
Construction tools on the market are available in several sizes, and have the following hose length:
- three meters;
- five meters;
- seven meters;
- ten meters;
- fifteen meters;
- twenty meters.
Different lengths of the cord allow you to make markings at different heights and in rooms of different sizes.
Among the advantages, builders note:
- accuracy;
- ease of use;
- light weight;
- ability to work in large areas.
Among the disadvantages the following are noted:
- high sensitivity to elevated air temperatures;
- air entering the system;
- cloudy hoses;
- inability to work in very small spaces.
Depending on the manufacturer, the price of a hydraulic level varies from 30 to 300 rubles. The water level from the Zubr (MASTER) company has received positive recommendations on the construction market; it has different markings, depending on the length of the hose.
How to use a hydraulic level for a foundation?
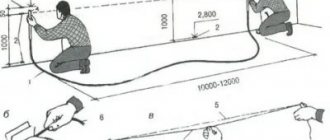
Many craftsmen advise using a hydraulic level when constructing foundations in the following way: attach a metal or wooden strip of the same length to both edges of the spirit level using tape, and it is on them that we will make marks.
So, all the familiar preliminary work to prepare the system has been completed: water is poured in, air bubbles are released. We install rail No. 1 at the place where the formwork will be installed in the trench to fill the ground part of the foundation strip, for example, at the corner of the future structure. We notice the liquid level and from it we build a mark where we want to see the formwork, securing it, of course. We fix this calculated size; it will need to be repeated the required number of times.
Having installed rail No. 2 at some distance along the trench, we repeat everything done with the second edge of the spirit level. We mark the calculated size from the water level on the lath and fix the formwork again. Leaving rack No. 2 in place, move rack No. 1 to a new place and repeat the operation. When everything is done to install the formwork, you can start pouring the foundation.
Experts advise taking such a responsible approach not only to pouring foundations for residential buildings, but also when constructing foundations for outbuildings, regardless of their size, and when constructing even small-height foundations for corrugated board fences enclosing your plots. Work done in accordance with all the rules will, firstly, ensure the durability of the structure, and secondly, it will look aesthetically better, which is also important.
Purposes of use
What is a water level used for? Why is it needed when there are convenient factory bubble levels? The hydraulic level is used in places where the use of other types of levels is impractical due to price and scale of work. Use a water level to level and make horizontal marks. Among the work performed during repairs, the level will be useful to you for pouring floor screed, or marking the height of installation of a stretch ceiling. When the repair is completed, do not remove the level far away from the shelf. It will help you hang kitchen cabinets, bookshelves evenly, and maintain symmetrical interior elements in different rooms. The scope of application of the water level is extensive, and the cost will pay off already with the first repair. In addition, you are quite capable of making a water level with your own hands. To do this, just purchase a transparent hose of the required diameter and length.
How to make a water level - step by step diagram
Step 1: Buy a transparent hose
So, firstly, you will need a transparent hose, not narrow, but not wide: at least 5 mm in diameter, but no more than 2 cm. Run a warm soapy solution back and forth through it, this way you will protect yourself and your tool from oily base inside.
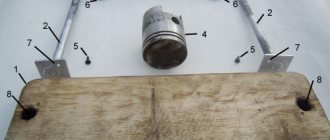
Step 2: Connect the syringes to the hose
You will also need two identical disposable plastic medical injection syringes that are the same size as the hose. We won't need the needles, but we'll put the pistons aside for a while. We cut off the cones at the end of the syringes so that we can connect them to the ends of the hose - this way we will get the side flasks of the spirit level, with divisions along which we will look at the level.
Step 3: Fill with water - let's work!
Slowly, pour water into the spirit level, release air bubbles by stepping on the middle of the hose and lifting its free edge up.
Getting started, we will use the syringe pistons as plugs while transferring the system from place to place. If desired, we can make a hydraulic level with a reservoir. To do this, we need to connect one of the ends of the hose to some container, which, by the way, will replace one of the assistants when making marks - we will place it on a stepladder. Such a container could well serve as a plastic bucket, in which you will need to make a hole, install a small fitting into it (gaskets and sealant will help make the connection perfect), then insert a hose into it. This will also simplify the process of filling the system with water.
- Author: Manager Andrey
Rate this article:
- 5
- 4
- 3
- 2
- 1
(1 vote, average: 5 out of 5)
Share with your friends!
Manufacturing
The choice of source materials should be approached responsibly, so that later you do not have to redo or buy other components.
- You need to prepare two vessels, preferably cylindrical with divisions. It is convenient to use flasks from large-volume syringes.
- The hose must exactly fit the diameter of the vessel fitting. A hose for a construction hydraulic level is considered suitable if it has sufficient elasticity and does not deform or crack when bent. The most acceptable diameter is considered to be from 10 to 15 mm. It all depends on the amount of work being performed. Large sleeves are also quite suitable.
- The connection points between the hose and the flasks must be treated with sealant to prevent liquid leakage and air ingress.
- If there is no ready-made scale on the flasks, then the marks are applied independently with a marker. This is necessary for ease of use.
You can make a simple hydraulic level with your own hands, without using vessels, but with only a hose. You should cut a piece of the sleeve of the required size, fill it with water, leaving a little free space, and solder the ends.
What is better to fill in the hydraulic level?
The purpose of using this device is to achieve the same water level in both flasks. Then the required line will turn out smooth. First of all, you need to fill the device with liquid. Usually water at room temperature is used, which can be slightly tinted. This makes it more convenient to observe the condition of the liquid inside the device and the presence of air bubbles.
Filling the device with water should be done in such a way that the possibility of creating air pockets inside the hose is completely excluded. If this happens, then the air must be expelled, otherwise the markings will not be accurate. You can simply check that the filling is correct by raising both flasks side by side to the same height. If the liquid in them is at the same level, then everything is in order. Otherwise, air still got into the sleeve and must be removed.
Pouring water into the device
Before starting measurement work, it is necessary to properly prepare the instrument. To do this, it is recommended to perform these steps in this order:
- Take a bucket of water or any other large container with an open surface. The bucket is placed at some elevation relative to the ground.
- One end of the device is placed in a container of water, and the other is lowered below the location of the bucket. Usually placed on the ground. In this case, due to the property of communicating vessels, the liquid begins to move through the tube, filling it.
- When filling, it is important to monitor the presence of air bubbles in the device. Wait until all the gas comes out of the tube. After this, one end is clamped with a finger or bent.
- The second horse is taken out of the container. Check the movement of water and again the presence of air.
- Both ends are closed or clamped and the device is transferred to the workplace.
After completing these steps, you can begin measurements.
Some tips
- To simplify the process, you can color the water poured into the device in a bright color. This will allow you to quickly determine the water mark in the tube without straining your eyes.
- The larger the diameter of the hose, the faster the liquid will level out in it. It is recommended to purchase products with a diameter of 10-12 mm.
- The leveling speed also depends on the length of the tube. Don't choose items that are too long.
Advice! If you need builders to build a foundation, there is a very convenient service for selecting specialists from PROFI.RU. Just fill out the order details, the experts will respond and you can choose who to collaborate with. Each specialist in the system has a rating, reviews and examples of work, which will help with the choice. Looks like a mini tender. Placing an application is FREE and does not oblige you to anything. Works in almost all cities of Russia.
What is the depth of an artesian well?
The depth of artesian wells can be very different, and depends, first of all, on the nature and geological structure of the rocks that make up the underground layers. The main condition here is the presence of an upper impermeable layer that completely isolates deep aquifers from the penetration of upper groundwater. They are usually contaminated with various mechanical suspensions, as well as chemical elements entering the soil in the form of sewage, precipitation and atmospheric emissions.
Thanks to this protection, artesian waters are especially valued for their purity from mechanical and chemical pollution. At what depth can these waterproof layers lie? Typically these values are on the order of 200-300 meters, but can vary significantly depending on the geological features of a particular area. For example, in the Moscow region, according to geological surveys, the artesian aquifer can be located at depths from 40 to 200 meters. In some cases, the artesian basin lies at a distance of more than 1000 meters below the surface of the earth.
Main advantages and disadvantages
The use of artesian sources has a number of advantages over the use of surface groundwater:
- The purity of the water source. Not contaminated by various mechanical and chemical impurities contained in excess in the upper layers of the soil.
- Large flow rate of the water well. This is achieved due to the significant amount of groundwater contained between two impervious horizons. The significant pressure under which the aquifer is located also plays an important role. In most cases, when drilling a well, water spontaneously flows to the surface.
- Duration of operation. Due to the large volume of underground sources, even at high flow rates, they do not deplete for a very long time. And with regular use, without allowing the well to stagnate, it can last up to 50 years or more.
There are only two disadvantages to such a water supply source:
Large depths, which increases the cost of drilling.
The need to officially register the source of water supply with the ensuing need to obtain permission to drill and pay taxes for the use of state subsoil.
How to find out the depth of artesian waters
Thanks to the above advantages, many owners of country houses or summer cottages would like to equip an artesian spring in their backyard. In this regard, the question arises: at what depth does the aquifer lie? This question is far from idle, given two factors:
- The cost of drilling for each meter passed. It is not possible to equip such a well on your own, without using special drilling equipment.
- There is a large scatter of possible indicators of the occurrence of aquifers, sometimes reaching hundreds of meters. As already mentioned, in the Moscow region the minimum level of an artesian pool can be 40 meters, and the maximum can exceed 200 meters.
There are several ways to try to find out the more or less accurate depth of deep water in the area where the land is located:
- Contact your neighbors in your dacha or cottage community. It is likely that one of them has already drilled a deep well and will be able to guide you regarding the location of the aquifer.
- Make inquiries with specialists from companies involved in drilling wells in the area. Such organizations usually have schematic maps that indicate the depth of aquifers in the places of their normal operation.
- Try to find a map of deep water occurrence in your area yourself. This can be done via the Internet, or by studying special geological literature.
- Contact the territorial geological exploration department with a request to provide the information you need.
Having established how many meters the depth of the water horizon is, you can calculate the estimated cost of drilling work.
Wall masonry
To begin the construction of enclosing structures, it is necessary to determine the highest angle of support for the masonry. If you have checked the previous point, you can use the previous measurements and, after analyzing them, select the highest point.
Starting work on laying bricks or gas blocks from a high angle will allow you to bring the wall to one horizontal level. To level the edge of the enclosing structure at the same level, a thicker layer of masonry mortar is laid at the lower points.
To determine the required point, you must use a hydraulic level in the same way as in the previous paragraph. Calculate the elevations of the entire surface of the structure relative to the base one and determine the required area to begin masonry work.
Operating principle of the device
The device is designed for horizontal marking and detection of deviations from the horizon. It can be either homemade or factory-made. The principle of operation is simple, so to use the device you do not need to have deep knowledge in the field of construction.
A hydraulic level is a device that works on the principle of communicating vessels. The second name of the device is a water level. It is a long thin hose. If you lift the ends of this hose, then no matter how far apart they are located, after a certain time the liquid in them will align at the same mark.
Thanks to the law of physics, the accuracy of the device is quite high, which allows it to be used when constructing a foundation. An important factor is the simplicity of the design and affordable price. The simplest version of the hydraulic level is a transparent long hose. You can also purchase a more complex device in the store, equipped with two containers with a measuring scale and mounting hardware. Both options, simple and advanced, work the same.
Terms
Route line - Length/distance along the route - distance between points along . Corresponds to the difference in picketage between points. Floodplain is a part of a river valley that is flooded during high water or during floods. Bed is the lowest part of a river valley. Water level (horizon) is the position of the water surface, which changes under different natural conditions. It is characterized by the height and area of flooding, on the route - by the level line and width (flooding). There are several types of water levels - GWV 1%, GWW 2%, GWW 3%, GWW 5%, GWW 10%, GWW 20 days, 10%, GVV obs., GVV ldkh., SMGV, SRGV, SMGV summer, SMGW winter, Abs. min. summer, abs. min. winter, Urez, GVV (date). Water level line is a straight line on a longitudinal section that shows the position of the water level. Formed based on water level points. Bounded by the ground line. Points of the water horizon - points on the route that characterize the flow of water in the horizon (picketage, elevation, speed and water flow). Water edge - the established water horizon on a certain date. SMGV - average low-water horizon. GWV 1% (horizon high waters 1%) - predicted water horizon with a probability of 1%. Flood width of the GWW 1% - the distance between the extreme points of the line of the GWW 1% level. Width at low water - the distance between the extreme points of the line of the SMGW level. Width of the floodplain - the distance between the extreme points of the line REDUCTION. Bottom erosion line - predicted marks of river bottom erosion. Bottom level mark - mark on the water level line in the picketage of the bottom of a water body. Level width along the route (flooding width along the route) - the difference between the picketage of the beginning and end of the level line. For example, the width during low-water periods is determined by the boundaries of the SMGV level line, the width of the floodplain is determined by the water edge level line.
Examples of maximum errors
| Stated error | Maximum run up 5 m | Maximum run up to 10 m |
| ± 0.1 mm per 1 meter | 1 mm | 2 mm |
| ± 0.2 mm per 1 meter | 2 mm | 4 mm |
| ± 0.4 mm per 1 meter | 4 mm | 8 mm |
| ± 0.5 mm per 1 meter | 5 mm | 10 mm |
| ±0.15mm/1m (±1mm/7m) | 1.5 mm | 3 mm |
Yes, you also need to remember and know that all laser levels, of any brand, are initially adjusted at the manufacturer’s factory in accordance with the declared characteristics, but long-term delivery from China to Russia is not as simple a task as it seems at first glance, during which anything can happen whatever.
That is why you can get or buy a laser level in a store with an error that goes beyond the declared one. But even if this happens, then you shouldn’t worry, since adjusting the level is not so difficult at home, and if you try, you can adjust the device much more accurately than it was originally done at the factory.
Recommended reviews and articles
A selection of the cheapest laser levels
Review of the rotary laser level FIRECORE FRE207R (FRL-500HR)
How to choose a rangefinder. Criteria for choosing the right laser tape measure