Even the simplest repair of an angle grinder in a service workshop can cost from a third to half of its cost. Therefore, before turning to professionals, you should always try to fix it yourself. Moreover, the passports of Bulgarian women often contain tables of the most common faults and the reasons for their occurrence. For home repairs, in most cases, you can get by with a set of the most common tools: screwdrivers, pliers, wrenches and a multimeter. The only time mandrels, pullers, or similar devices may be required is when removing and installing bearings. And spare parts for repairing an angle grinder can be purchased without any problems in well-known online stores.
General rules for repairing power tools
The safety rules for repairing an angle grinder are the same as for repairing any other power tool. Cleaning from dust, disassembling and assembling is carried out only with the device completely de-energized. Repair work must be carried out on a dielectric surface, and the power source must be equipped with a short circuit protection circuit breaker. It is strictly forbidden to manually turn the angle grinder spindle if the power supply is turned on. It is also prohibited to carry out test runs during or after repair with a cutting disc installed on the spindle.
Tool elements
Knowledge of the general principles of angle grinder design helps to better diagnose the causes of failure . It is important to know that each of the components of the grinder (mechanical or electrical) has its own specific features. Based on the presence of characteristic signs in the work, you can always decide in which part to look for problems.
Scheme of operation of the grinder. Source here
Common problems in the operation of angle grinders
The grinder is a fairly unpretentious tool, as it is designed to work with high loads and in dusty environments. The main problems in its operation in most cases are associated with improper operation, as well as non-compliance with maintenance and scheduled repairs. The most common malfunctions are:
- The angle grinder does not turn on. The most common reason for this phenomenon is a broken wire in the power cable or a faulty switch. And for grinders with electronic control, the speed control unit or soft start fails.
- The grinder operates at low speeds. As a rule, this is due to an interturn short circuit in the rotor windings or an electronic malfunction.
- The angle grinder gets very hot. This often occurs due to a violation of the ratio of recommended work cycles and breaks. In addition, heating may be a result of poor engine cooling due to dust accumulated inside the housing.
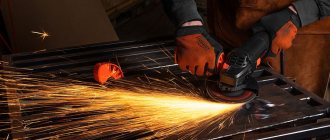
- The grinder sparkles. In this case, the main reasons are wear of the carbon brushes or wear of the electric motor commutator. Brushes also spark when there is increased contamination and oxidation of the commutator plates.
- The Bulgarian smokes. This is usually observed when the unit is used too intensively and the air cooling ducts are filled with dust. The reason that the tool smokes can also be short circuits in the rotor or stator windings.
- The angle grinder hums, but does not rotate. As a rule, this happens when the gears of the gearbox jam or the bearings fail.
- The spindle lock button is broken. The reason for this is that dust gets inside the clamp, causing wear on its rod.
- The bearings are broken. Bearing failure most often occurs after prolonged use and work with shock loads.
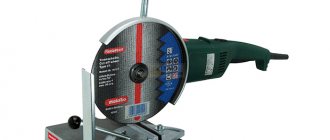
Another fairly common problem with angle grinders is the jamming of the clamping nut.
Specifications
The model is suitable for the role of a “workhorse” within the framework of standard construction and repair activities or, even more so, in the household sector. Another question is how durable and versatile the power filling of the Makita 9069 is - the 230 mm disk and mains power indicate a good start in terms of the possibilities of using the tool, but this is not all the advantages of the device. More detailed characteristics of the angle grinder 9069 are presented below:
- Power – 2,000 W.
- Torque – 6,600 rpm.
- The diameter of the working circle is 230 mm.
- Spindle thread size – M14.
- Weight – 4.2 kg.
It is worth emphasizing that for the effective use of the model, many additions are already included in its basic equipment. For example, full operation of a grinder is impossible without a clamping nut, support washer and socket wrench. The manufacturer supplies a protective cover and the aforementioned side handle as optional but still useful accessories.
General instructions for disassembling an angle grinder
All angle grinders consist of two main parts: a plastic drive housing and a metal gearbox. In addition, for many angle grinders you can separately disassemble the rear handle, inside of which there is a power input, as well as control system units. To repair an angle grinder at home, you may need Phillips and flathead screwdrivers, wrenches and thin pliers. In addition, to check and repair electrical circuits, you will need a multimeter and tools for working with wires. Before disassembling the grinder, it is necessary to remove the cutting disc and protective casing.
Main modules used
- Housing, usually made of special impact-resistant plastic.
- Powerful electric motor.
- High quality gearbox.
- Smooth start.
- Electric motor switch.
- SJS system. The presence of the system allows the tool to work smoothly without jumps. In addition, it turns off the angle grinder if the disk jams and minimizes vibration. It saves the operator from serious injury.
- Protective cover.
- Additional handle. With its help you can hold the grinder while doing work. This handle can be installed in a variety of positions, which gives the tool versatility.
Step-by-step electrical diagnostics with a multimeter or light bulb
When diagnosing and repairing the electrical part of an angle grinder, it is most convenient to use a multifunction tester (abbreviated name - multimeter). If such a device is not at hand, then a screwdriver with an indicator or a light bulb with two wires will be suitable for some checks. During the repair process, the multimeter allows you to measure both voltage and current values, as well as the resistance of the motor windings. The indicator and light bulb can only show the presence or absence of voltage.
Diagnosis of power failure
Perhaps the most common malfunction of an angle grinder's electrical equipment is a break in the power wires inside the power cable sheath. To diagnose and repair such damage, it is enough to disassemble the rear handle of the angle grinder and check the voltage at the terminals in front of the switch. Another way is to disconnect the cable terminals and use a multimeter to check the resistance of each wire for an open.
Checking the stator and rewinding it
To check the stator of the electric motor of the angle grinder, you need to disconnect both of its windings from the power circuit, and then measure their resistance with a multimeter in the range of 200 Ohms. On a working winding, the device will show a resistance of about one ohm, and on a faulty winding (with a break) - tens or hundreds of ohms. If the winding fails as a result of a short circuit, carbon deposits can usually be seen on the inside of the stator housing. It is impossible to check the stator for interturn short circuit with a conventional tester - there are special induction devices for this. The only ways to repair the stator are to replace it or rewind it. The second is only possible if you have the appropriate qualifications, so most often the stator is simply replaced.
Armature diagnostics with a tester
It is necessary to check the armature of the angle grinder both for breakage of the windings and for their short circuit to the core. In the first case, the resistance is measured in a circle between two adjacent plates of the commutator located on the rotor shaft. All values should be the same (within one ohm), and a significant difference indicates an open circuit. In the second, measurements are taken between the rotor magnetic circuit and the collector plates. To search for an interturn short circuit, as in the case of the stator, you need to use a special device. If a malfunction is detected, it is necessary to decide how to repair it: by rewinding the armature or replacing it with a new one. It is unrealistic to rewind the armature windings yourself without the appropriate skills and equipment, and rewinding at a service center will cost almost the same as a new armature. Therefore, the best repair option is to purchase and replace the anchor yourself.
Checking the starting and control unit
Diagnostics of the electronic components of an angle grinder comes down to determining the serviceability of individual units, and repair (if there are no skills in radio engineering) means completely replacing them. The soft starter can be checked with a dial ammeter, comparing the current surge with and without it. To accurately diagnose the speed control unit under load, you will need an oscilloscope. Although, in order to understand whether it is in principle working or not, it is enough to simply observe the behavior of the angle grinder in different modes.
Checking carbon brushes
During operation, the carbon brushes are worn out and must be replaced when they reach the minimum size. The first sign of problems with the brushes is an uneven spark ring around the commutator with flashes. Some models have round holes with screw caps on the body for replacing and checking brushes. But in most angle grinders, in order to change them, you have to completely disassemble the body or rear handle, as during repairs.
Diagnostics of the start button and speed controller
The most common malfunction in the electrics of an angle grinder is the failure of the start button, which is most often a consequence of dust getting into it. You can check the functionality of the button using a multimeter or an indicator screwdriver by measuring the voltage at its output contact. It usually cannot be repaired and is simply replaced with a new one. It is even easier to determine the malfunction of the rotation speed controller: when the wheel rotates, it either changes the spindle speed or not. If you don’t have the skills to repair such devices, then it’s easier to buy a new one for a few hundred rubles.
The simplest regulator circuit
The electrical circuit of the speed controller for the angle grinder is assembled on a printed circuit board or mounted. Moreover, a printed circuit board can also be made independently using PCB and ferric chloride for etching. Instead of iron, you can use a mixture of hydrogen peroxide, salt and citric acid.
Engine speed controller diagram for grinder
Electrical circuit configuration
To make the diagram you will need:
- resistor R1 (4.7 kOhm);
- symmetrical thyristor DIAC (DB3);
- symmetrical thyristor TRIAC (VT-136/138);
- trimming resistor VR1 (500 kOhm);
- capacitor C1 (0.1 µF*400V).
Principle of operation
The operating principle of the circuit is constructed as follows. VR1 is responsible for counting the charging time of C1. When voltage is applied to the circuit, the thyristors are closed, the output is 0. As the capacitor charges, the voltage in it increases and opens the DIAC, which supplies voltage to the TRIAC. It also opens and allows current to pass through. Then both thyristors close and remain in this position until C1 is completely recharged. As a result, a complex wave signal is formed at the output with an amplitude that directly depends on the operating time of the C1-VR1-R1 circuit.
Speed controller connection diagram
Final assembly and testing of the regulator
The circuit is assembled on a printed circuit board or copper (aluminum) radiator
When mounted on an assembly, the location of the thyristors is especially important (strictly on the radiator, it plays the role of a heat sink). Then a mandatory check of the circuit’s functionality is carried out using a regular light bulb.
The smoothness of the change in heat will be the same as in the finished speed controller for an angle grinder after final assembly.
Factory models are equipped with a plastic adjustment wheel; if desired, it can also be purchased separately and included in the homemade regulator kit. If the testing was successful, the regulator is attached to the angle grinder and fits into the power supply circuit of the tool.
Diagnostics of the mechanical part of an angle grinder
Most often, bearings and gears are repaired or replaced in the mechanical part of the angle grinder (see figure below). Wear and failure of these parts is usually accompanied by increased vibration, unusual sounds or gearbox jamming. Diagnosis of their condition is carried out visually after complete disassembly of the case, and based on its results, a decision is made on the need and type of repair.
In addition, the gearboxes of angle grinders use protective couplings that prevent a sharp jerk of the housing when the disk jams. Such devices are initially designed to operate in extreme conditions and, as a rule, require repair very rarely.
Checking the gears of the gearbox
In order to inspect the gears of the angle grinder gearbox, it is necessary to separate it from the drive and then completely disassemble it. Diagnostics consists of visually determining the degree of tooth wear, and repair involves replacing the worn-out gear with a new one. The main types of gear malfunctions that require gearbox repair are grinding and chipping of teeth.
Checking the lock button
The angle grinder spindle lock (locking button) is necessary to hold it stationary when tightening the clamping nut. If it starts to sink, you need to remove the button, remove the rod and spring, and then clean the inside and visually check the condition of the rod, seal and spring. Repairing the retainer usually involves replacing one of these components (see video).
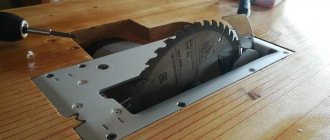
Checking the disk mounting flange
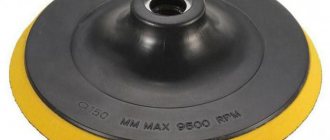
The usual support flange of an angle grinder is a simple device in the form of a disk, against which a cutting wheel is pressed. Its surface should be smooth, without potholes or burrs. It cannot be repaired, and when worn out it is simply replaced with a new one.
Checking the rotor bearings
The bearing of the drive shaft of the angle grinder, which is the rotor shaft of the electric motor, can be inspected and replaced without completely disassembling the gearbox. To do this, it is enough to disconnect the gearbox and drive housing (see figure above). If the decision is made to repair and replace the bearing, then you will have to completely remove the electric motor rotor, remove the drive gear (see photo below), and then remove the old one and install a new bearing.
Design features of the Bosch angle grinder
A design feature of the Bosch angle grinder is represented in the use of a needle bearing in a gearbox as a support bearing for the driven helical gear. In Bosch rotary hammers, the driven gear is attached to the spindle shaft by pressing.
In low-power Bosch angle grinders, in which spur gears are installed in the gearboxes, the installation of shims is provided. This design allows you to restore the functionality of the gear contact by reducing the thickness of the gasket. At high tool speeds, helical gears wear out significantly less than spur gears.
The work environment for grinders is in most cases a dusty place. Dust is the main danger leading to failure of power tools, grinders and grinders.
How to remove bearings from the rotor of a Bosch angle grinder
To remove bearings from the rotor pos. 803 of a Bosch angle grinder, it is recommended to use pullers.
Bearing pos. 15 near the manifold is easily removed, but removing bearing pos. 14 from the impeller side is complicated by the fact that a number of preliminary operations need to be performed.
Bearing pos. 15 is closed with a soft rubber seat. A similar rubber protection, pos. 33, also covers the bearing, pos. 14.
To dismantle the bearing pos. 14, you need to unscrew the nut pos. 45, remove the spur gear pos. 17 and the plastic protection pos. 33. Using a puller, you can simply remove the bearing from the rotor shaft.
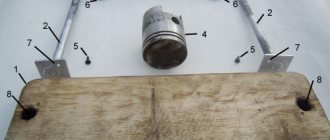
What if there is no puller? A vice, two iron strips and a hammer with a soft metal attachment will come to the rescue.
Disassembling a Bosch angle grinder
Speed controller malfunctions
In angle grinders of the Bosch
, especially low power ones, speed controllers are installed. Access to the speed controller is achieved by opening the handle of the stator housing, which is held on by one end screw.
The frequency spectrum of the regulator can be set using a potentiometer hidden in the handle panel.
It is quite easy to remove a faulty regulator, since it is attached only to a guide.
Repairing an angle grinder speed controller is a difficult process, the implementation of which requires not only special knowledge, but also tools and equipment.
If the speed controller is faulty and there is no new one, then disconnect the supply wires and install a jumper.
Shown in red is the jumper that is installed when the speed controller fails.
Stator repair
Bosch angle grinder repair
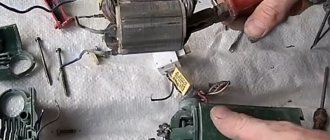
also includes stator restoration. The main sign of stator failure is a spontaneous increase in the speed of a working angle grinder, which cannot be reduced by adjustments. The burnt stator winding changes color and becomes darker. The stator core also darkens due to high temperatures.
It is easier to rewind the stator, although here you also need to follow certain rules and sequence.
If you have removed the stator housing cover, carefully inspect the condition of the carbon brushes and lamellas of the rotor commutator.
The length of carbon brushes should not be less than eight mm. By the way, Bosch angle grinders use carbon brushes with a “shot”, a device that stops the operation of the angle grinder when the carbon brush is short.
The collector lamellas should not have any traces of carbon deposits or wear. Carbon deposits are simply removed with cotton wool soaked in alcohol.
How to disassemble the gearbox
When repairing the mechanical part of an angle grinder, first of all, it is necessary to separate the gearbox from the drive by unscrewing the four bolts and disengaging the drive and driven gears. To inspect it internally and repair its components, you need to remove the lower part of the gearbox, which is also bolted to the main body. Next, the gearbox is disassembled into individual parts, sequentially separating the bearings, gear and flange from the shaft.
How to remove gears
The drive gear of the grinder gearbox is usually attached to the shaft by tension and pressed with a nut, and the driven gear is fixed with a key and a split washer. The video below shows the repair procedure with disassembling the gearbox, removing the upper bearing and replacing the driven gear. The video is in English, but everything is very clear, so you can watch without sound.
The choice of lubricant and the procedure for applying it to the gearbox of the Sparky angle grinder
Manufacturers of the Sparky angle grinder recommend using Liver T-0-1.00 kg grease to lubricate the tool. But it is also possible to use domestic lubricants specially designed for lubricating gearboxes of grinders. Today, the choice of lubricants for angle grinders is quite wide.
In addition, high-quality lubricant for the grinder gearbox can be made at home.
You just need to use a lubricant as a basis, which adheres very well to metal surfaces and is difficult to come off at high speeds. Scientifically, the base lubricant should have increased adhesion.
As a base that meets the requirements, a lubricant for automotive joints is best suited. Take CV joint-4 lubricant as a basis. Add TAD-17 lubricant to it using a syringe and mix thoroughly until the consistency of thick sour cream is obtained. It is better to mix the lubricant using a drill equipped with a homemade mixer.
The amount of lubricant should be placed in the gearbox housing as will fit in half the volume of the gearbox.
Gearbox lubrication
Grease is applied after carefully removing the old grease. To thoroughly and completely remove old grease, it is recommended to use a hairdryer, which heats up the old grease and easily flows out of all hard-to-reach cavities
Prevention of angle grinders
Prevention of an angle grinder includes compliance with passport requirements during its operation, periodic maintenance and scheduled repairs.
First of all, it is necessary to strictly observe the ratio of work cycles and breaks recommended by the manufacturer. It is also necessary to periodically clean the internal space of the angle grinder body from dust, change the brushes in a timely manner and lubricate the gearbox. If persistent vibrations and uncharacteristic sounds occur during operation of the angle grinder, you should immediately carry out an internal inspection of the mechanical part and carry out the necessary repairs. Unlike a regular angle grinder, the quick-release nut is a rather expensive device. How long can it last and is it possible to repair it if it fails? If anyone knows the answer to this question, please share the information in the comments.
Useful tips.
- After 700 hours of operation, check the condition of the carbon brushes;
- Whenever the body of the angle grinder heats up, perform maintenance on the tool;
- It is better to change carbon brushes more often than to buy a new grinder;
- Monitor the condition of the lubricant and replace it if there is a significant change in color;
- To reliably turn on the low-power Sparky angle grinder, periodically lubricate the power button lever with silicone grease;
- Listen to the sounds of the gearbox (a working machine does not make extraneous loud sounds);
- Check the clearance between gears frequently. When increasing it, use special shims. (There are three of them in the design of grinders of the Sparky family);
- Do not skimp on lubricant or carbon brushes; the more often you change the lubricant and install new brushes, the longer it will serve you;
- If the design of your Sparky angle grinder uses a copper-graphite bushing in the gearbox as a support bearing, replace it with a needle bearing of the appropriate size.
If you decide to purchase an angle grinder from the Sparky family, you will receive a high-quality tool that will bring you joy when working, but will create some problems during repairs