A bore gauge is a precision instrument for determining the dimensions of grooves, holes and internal surfaces of products using absolute or relative measurement methods. When determining the diameter, the operating principle of the device is similar to a radius meter, but allows measurements to be taken in hard-to-reach places.
Existing types of bore gauges are divided by design features, type of contact, reading device, etc. Most often, these devices are divided by measurement method - absolute or relative. For absolute measurements, micrometric types of instruments are used, for relative ones - indicator ones. We will focus our attention on these types of bore gauges.
Description of the tool and its purpose
A bore gauge today is a high-precision tool that is designed to determine the size of holes, grooves and other internal elements of any product. It is distinguished by high reliability and ease of use. It can be used to measure a variety of parts with low mass. This instrument is also called shtikhmas. The word comes from the German language. Translated, shtihmas is a device or instrument that measures the diameters of holes.
The design of the bore gauge, in its classical sense, provides for measurement using two ball tips. This method is called two-contact. There are also three-point models for more accurate measurements that have automatic alignment. The mechanism is also equipped with a special element, thanks to which the measurement line is centered.
The types of instruments depend on the method by which the measurement is made. There are two options: absolute and relative. Based on this data, the types of bore gauges are divided. There are two main ones: indicator and micrometric devices.
A mechanical or digital element may be used to demonstrate measurements. Models with a screen, as a rule, weigh less and are practically not susceptible to mechanical stress. They also have a wider range of functions. Their memory can store the data of all measurements in the required sequence.
Indicative bore gauge and its features
An indicator bore gauge is a device that uses a relative measurement technique. It must first be configured to a specific value, and then determine how much the real indicator differs from the specified one. The indicator bore gauge can measure holes from 6 mm. In this case, the device has a minimum error in the range of 0.015–0.025 mm.
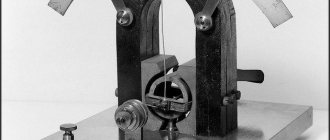
The design of the indicator bore gauge is quite simple. It has only two components. The first is a rod with measuring nozzles, the second is a round indicator head with a scale on which two types of divisions are presented:
- The main scale with a step of 0.001 mm displays the relative deviation of the parameter being measured.
- Small scale. It marks the total number of revolutions of the instrument needle (a full revolution is 1 mm). With its help you can find out the size of the hole in millimeters.
The device is equipped with additional attachments, the use of which allows you to measure various parts in an extended range.
Before using the indicator bore gauge, you need to select a replacement element that will fit in length and attach it to the device. The tool is then inserted at an angle into the hole being measured. Next, light rocking is carried out to set it strictly perpendicular to the axis of the hole.
After completing these steps, the arrow will begin to oscillate. If its stroke is directed to the left, then the diameter of the hole is larger than the established one, if to the right, then it is smaller. To make the calculations, you will need some data. For example, if, when using a 10 mm interchangeable nozzle, the pointer moves 12 divisions to the right, then the final size will be calculated as 10−0.12 = 9.88 mm. When deviating in the other direction, the sign in the example changes to positive.
To ensure that all measurements are carried out correctly, the device should be held only by the special handle. You cannot touch the rod itself, since minimal heating will cause the metal to lengthen by several hundredths. This will give a significant error and lead to erroneous calculations.
Measurement methods
There are two measurement methods:
- Absolute - carried out using micrometric type models placed inside the part being measured.
- Relative – carried out using an indicator sample.
To successfully perform the operation, you need to take a bore gauge and set on it the approximate value of the hole being measured. The head part falls inside the hole, fitting tightly to its walls.
- For even immersion of the bore gauge, a rotating drum and ratchet are used. Next, the screw is tightened and locked, and the measuring tool must be removed from the hole being measured.
- The result will be the measured parameter on the scale plus the length of the head and, if used, the length of the extension. With the relative measurement option, rocking of the tool inside the hole for measuring cylindrical surfaces is allowed.
The deviation of the arrow on the indicator bore gauge to the left indicates that the measured diameter is less than the required value; when the arrow is tilted to the right, it is greater. Then readings are taken on the scale and summed up in the diametrical size of the hole.
For deep holes, extensions are also used. It only remains to add that, like any measuring instrument, bore gauges require precision and accuracy in their work.
How to use a micrometer bore gauge
For more accurate checking and measurements, a micrometric gauge is used - what it is was described above. This device shows real size values. The measurement error is very small and amounts to only 0.006 mm. To understand how to use a bore gauge correctly, you need to understand its features.
The micrometric bore gauge consists of the following elements:
- drum with scale;
- head for connecting the drum with extensions and removable nozzles;
- fixing screw;
- extension;
- tip - element for taking measurements.
A micrometric bore gauge is not used to measure the diameter of cylinders. With its help, only internal dimensions are determined. There are several ranges that it can measure (in millimeters):
- 50–75;
- 75–175;
- 75–600;
- 150–1250;
- 860–2500;
- 1520–4000.
The design of this device is similar to a micrometer. It also has a screw and a drum, rigidly connected to each other using a special cap. There is also a spherical tip rod, a safety cap and a locking stopper.
To figure out how to use a bore gauge, you need to know the rules for installing it. The measuring device is installed strictly perpendicular to the axis of the hole. One end of the measuring rod should rest on the edge of the hole, and the other should be moved all the way to the opposite surface. This installation principle is similar for all types of bore gauges.
What does the device measure?
Before you buy or use the used measuring device used by youtonoztimtotomdarkvymtemethonymetemenoThe main task of the bore gauge is to determine the distance from one surface to another inside the groove.
Measuring internal dimensions can be done with a regular ruler, for which you need to apply a regular ruler. However, such a tool is not effective in the case of obtaining high-precision, high-precision values kachenotekenotekenenekenenekenenekenenekenokekenenekenone. Fractions of millimeters play a very important role; a tool called a bore gauge has been developed specifically for measuring internal cavities.
With its help, two types of measurements are performed - absolute and relative methods. To determine absolute values, a micrometric bore gauge is used. The principle of its operation is similar to a micrometer. First, the tool needs to link inside the hole and then take readings. The device allows you to obtain absolute values in millimeters.
The relative method involves the use of an indicator bore gauge. With its help, the size is not determined, but the deviation along the entire length of the surface is detected.
The device measures the following parameters of the part:
- diameter of holes of round, square, oval and other types of sections;
- groove width;
- distances in parts with complex shapes.
| The device is used in workshops for repairing internal combustion engines and other mechanisms.
Purpose
In modern conditions, the use of a bore gauge is only welcome, and often necessary, because it allows you to implement a universal method for measuring measurements. This is relevant for mechanical engineering, machine shops, repair of industrial equipment, automobile stations - for any area in which it is necessary to know the exact indicators of internal dimensions.
When carrying out work, the tips are usually placed at an angle of 180 degrees to each other, centylotrikoterosterosterunotherutur. This solution also simplifies the transfer of movement from the tips.
Operating principle
The operating principle of these instruments is based on the use of a screw pair (screw-nut) to convert the rotational motion of a micrometer screw into a translational one. The main parts of micrometric instruments are: a body, a stem, inside of which, on one side, there is a micrometric thread with a pitch of 0.5 mm, and on the other, a smooth cylindrical hole corresponding to the exact direction of movement of the screw. A drum is installed on the screw, connected to a ratchet, providing a constant measuring force (for micrometric bore gauges, a ratchet is not installed). The stopper serves to secure the screw in the desired position.
The reading device of micrometric instruments consists of two scales: longitudinal and circular. Whole millimeters and 0.5 mm are counted on a longitudinal scale, and tens and sotimemila on a circular scale.
Depth gauge functions
Not a single scuba diver dives into water without this small device. It is necessarily included in the standard equipment set. The accuracy and correctness of the readings guarantees safety when diving. | Special equipment is produced for each environment.
- In the sea, salt water has a higher density.
- A polluted body of water will require additional illumination of the scale.
- High altitude lakes require special setup due to different environmental conditions.
- What depth is it designed to dive to?
In addition, you should be aware that different manufacturers do not use common fixing systems. The scale can display metric or imperial values.
What types of bore gauges are there?
Their classification is rather arbitrary, but nevertheless, according to the method of taking measurements, they are divided into:
- Micrometric - allow you to determine the actual length using the absolute method.
- Indicative - get all values in a relative way, comparing them with an already configured path.
According to the head they can be:
- spherical - all located on the same circle;
- collet - with a kind of cylinder in the final part;
- edge - with intersecting axes forming an arrow-shaped tip.
By type of transmission:
- lever;
- wedge;
- conical
By number of points of contact:
- two-pin - the most common;
- passimeters - with one movable tip.
By operating range:
- narrow - 18-50 mm;
- wide - 3-1000 mm.
There is also a section on whether there is a vernier or not, whether the head is electronic or whether
Micrometric bore gauges (NM)
They are used for absolute measurements. By design, the micrometric bore gauge is a screw with a rigidly fixed bar.
Accuracy reaching 0.01 mm. Instruments are stored in cases that protect the instruments from contamination and mechanical damage.
Bore indicator gauges (NI)
Designed for relative measurements. By design, indicator bore gauges consist of two elements: measuring parts and bore gauges
Design of a micrometric bore gauge
A micrometric bore gauge is designated NM and is used to measure internal dimensions using the absolute method, that is, it allows you to find out the exact value of the distance. The components of the devices are:
- The drum is a rotating part with a vernier scale for determining readings. When the drum rotates, the rods move.
- The head is the connecting element of the drum with a removable rod and extensions.
- Locking screw or clamp - secures the device in a stationary position.
- .
- The tip is an important part of the measuring instrument.
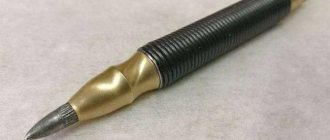
The design of a micrometric bore gauge is shown in the photo above. It is worth noting that such a tool is for measuring distances from 50 to 2500 mm. To determine the diameter of parts ranging in size from 5 to 50 mm, devices with side jaws are used. This type of design is shown in the photo below.
— Such devices are produced in standard sizes with a three-measurable range from 1250 to 10000 mm. The design of this is shown in the photo below.
To designate them, the abbreviation NMI is used - internal micrometric indicator meter. Measuring instruments are supplied in wooden cases, which ensure a long service life of the instruments, protecting them from the negative effects of various factors.
Device and technical characteristics
The bore gauge consists of a micrometer head 1, a set of extensions 2 and a measuring tip 3. For devices with an upper measurement limit of over 2500 mm, the micrometer head is equipped with a dial indicator with a division value of 0.01 mm. The bore gauge kit also includes installation measure 4.
Main technical characteristics
Micrometric bore gauges are manufactured in accordance with GOST 10-88. Verification is created in accordance with GOST 17215. The average service life of the tool is at least 8 years.
| Device designation | Measuring range, mm | Division value, mm | Permissible error limit, microns |
| NM 50-75 | 50–75 | 0,01 | from ±4 to ±90 |
| NM 50-175 | 50–175 | 0,01 | |
| NM 50-600 | 50–600 | 0,01 | |
| NM 75-175 | 75 — 175 | 0,01 | |
| NM 75-600 | 75 — 600 | 0,01 | |
| NM 150-1250 | 150–1250 | 0,01 | |
| NM 150-1400 | 150–1400 | 0,01 | |
| NM 150-2500 | 150 — 2500 | 0,01 | |
| NM 150-3000 | 150–3000 | 0,01 | |
| NM 350-4000 | 350–4000 | 0,01 | |
| NM 350-6000 | 350 — 6000 | 0,01 |
Technical requirements
It’s better to familiarize yourself with them before watching how to use the bore gauge indicator correctly, the video won’t tell you about the standards, but they are also important - at least for understanding the operating conditions of the meter.
- Devices must be manufactured in accordance with GOST 868-82 or 10-88 (micrometric).
- Error limits at normal temperature (20 0С ± 5 0С) and humidity (up to 80%) should be no more than 0.005 to 0.022 from 0.004 to 0.09 mm (depending on the range, accuracy class, work area).
- The range of readings (the biggest difference between them) is up to one third of the scale division.
- The contact surfaces of the rods are precisely spherical in shape, with radii from 1.8-2.8 to 30-40 mm.
- The heads are made of hard alloys (from 57 HRC), with strictness specified by GOST standards (for example, Ra ≤ 0.16 microns according to interstate standard 2789).
- The handle is made from a material with a low thermal conductivity coefficient).
- The coating of external metal surfaces must be durable and anti-corrosion, according to Giost.303 9.032.
MTBF deserves special attention. - On the other hand, the reserve is quite significant - from 14,000 double strokes (or from 35-45,000 movements of the rod of indicator models) - which results in a total service life of at least 4-5 years.
A characteristic indicator that the device has reached a limiting state at which it will soon fail is the wear of the movable rod, in which it allows errors beyond the norm.
The recovery time for tools between work cycles is from 1 to 4 hours, depending on the mode.
1,5
How to set up a bore gauge
Setting up a bore gauge is impossible without understanding its operating principle. You should know that it is identical to the operating principle of a micrometer, which allows you to compare the indicators obtained on the two devices. If the micrometer has an error within acceptable limits, then you need to follow the following procedure to set up the bore gauge:
- Select a base rod. It can be of any length and must be mounted on a measuring rod.
- The micrometer is set to the same value as the rod.
- The locking screw must be tightened to secure the value.
- The rod sleeve should be fixed in a vice, and its main part should be placed between the measuring jaws.
- The arrow must be aligned with the zero on the dial by rotating the caliper head.
In this way, you can calibrate the value of the device and adjust it to the data necessary for operation and accurate measurement. This will make it possible to measure with an accuracy of a hundredth of a millimeter. Setting up a bore gauge is a very important process that will affect the quality of work in the future. The same algorithm is used to carry out annual verification of the device.
Completeness.
The measuring device kit includes:
- bore gauge;
- indicator;
- replaceable measuring rods, washers, extension in accordance with table 2;
- key;
- case;
- passport for indicator;
- passport for the caliper.
Table 2. Product components
| Modification | Replaceable measuring rods | Washers | Extension cord, pcs. | ||
| Number of pieces included | Number of sets | Number of pieces included | Number of sets | ||
| NI10 | 9 | 2 | — | — | — |
| NI18 | 9 | 2 | 1 | 2 | — |
| NI35 | 8 | 1 | 1 | ||
| NI50 | 6 | 2 | 3 | 2 | 1 |
| NI100 | 6 | 1 | — | — | 1 |
| NI160 | 9 | 1 | — | — | 1 |
| NI250 | 10 | 1 | — | — | 1 |
| NI450 | 4 | 1 | — | — | — |
| NI700 | 4 | 1 | — | — | — |
| NI1000 | 3 | 1 | — | — | — |
How to store the tool after use
Proper storage and operation of the device is necessary to ensure its operation and reliability of use. Since the purpose of the instrument is to make accurate measurements, it is necessary to maintain its integrity and avoid major mechanical influences that could affect the calibration. Failure to follow these rules can cause a lot of inconvenience later.
An important step when using the unit is verification. The interval of such examination is one year. During this period, the mechanism may lose its integrity or the strength of the fixing screw, and the accuracy of the readings largely depends on these factors.
The verification procedure includes a number of necessary and extremely important actions. They must be carried out in compliance with all standards, as well as the correct installation of equipment.
The purpose of the bore gauge is to provide accurate data on the internal diameter of the product being measured. In order for these indicators to continue to correspond to reality, it is important to store the instrument correctly. The storage procedure is carried out in compliance with a number of rules:
- the air temperature in the room should be in the range from 15 to 25 degrees;
- the humidity level should not exceed 80%;
- Before you start measuring something with a bore gauge, the needle on the scale must be set to zero.
Proper storage will help keep the tool tuned for a long time in order to carry out work without a high level of error. Also, such measures will allow the device to always be ready for operation, since the harmful influence of various factors is excluded.
Assembling and disassembling the tool
To prepare the bore gauge for work, you need to perform certain steps in this order:
- Attach the meter to the fixture rod.
- Screw in the extension rod for final assembly.
This procedure for preparing the device for operation is basic and must be strictly followed. Disassembly is carried out strictly in the reverse order to eliminate the possibility of calibration violation. First you need to unscrew the rod so that the meter becomes independent of further actions, then remove the indicator itself.
If you do not plan to use the device further, you must do the following before storing it:
- First of all, the device must be wiped dry. This should be done as carefully as possible using a soft, lint-free rag.
- After this, all elements of the meter, except the dial scale, must be wiped with aviation gasoline or another substance suitable for this case.
- Packaging is carried out in a special case, which closes securely and eliminates the possibility of movement of parts inside.
Such care will help avoid corrosion on metal elements, eliminate the possibility of damage, and also fully preserve the functionality and configuration of the instrument.
If there is any doubt about the integrity or correct operation of the device, the following procedure must be followed:
- inspect the tool for markings and all components;
- check all elements for correct connection;
- all distances must fully comply with the standards;
- product error indicators must be within acceptable values;
- The device should not have any dents, chips, scratches or other damage that appears during improper use or storage.
Such an inspection will help eliminate incorrect operation and errors in measurements. Incorrect measurements can have fatal consequences in the production of precision machine parts.
Maintenance.
8.1. Periodically clean and change the lubricant of the mechanism, since with prolonged use of the bore gauge, the lubricant thickens and becomes contaminated with dust entering the mechanism, as a result of which the movement of the moving parts becomes unsmooth and the error of the device increases.
8.2. To change the lubricant, partially disassemble the bore gauge, wash the parts with gasoline, wipe and lubricate the ends of the rod, the movable measuring rod and other rubbing surfaces with a thin layer of watch oil.