Every owner of home plants or garden plots, one way or another, is faced with the need to care for seedlings, which is largely associated with spraying. To perform this task efficiently, there is a special device - a spray gun that can provide effective spraying of liquids without connecting to a network or compressor. Over the years of its existence, this simple device has received many different modifications and designs. In this topic, we will tell you how a hand sprayer works, where it is used and which models are trustworthy. At the end of the article, we will give detailed instructions on how to make a water sprayer with your own hands from the most popular household appliances.
Product Features
A do-it-yourself paint sprayer for a car or repair can be made from various available materials. This device is a spray gun that is used in the process of painting various surfaces.
A hand sprayer is sometimes used to water indoor plants. More powerful varieties are suitable for painting different surfaces. This equipment allows you to apply a uniform layer of paint. The spray method is very convenient. As a result, it is possible to process different surfaces quickly, and the result will be high.
The spray bottle is suitable for paint and varnish compositions, as well as water-chalk or water-lime based products. There are several popular ways to create a spray gun. Various improvised means will be used. You can choose the best option for yourself.
Advantages of irrigation systems
Artificial “rain” from a sprayer has a beneficial effect on the growth of agricultural crops. After scattered watering, a crust does not form on the soil surface and there is no need to loosen the soil. Gradual moistening does not erode the soil near the roots of plants; therefore, finely dispersed watering promotes better and faster growth of irrigated crops. Dripping water onto the leaves and stems of plants stimulates their active growth.
The modern gardening market offers a huge selection of water sprinklers for watering your garden or lawn. But for a small garden plot it is not at all necessary to purchase an expensive sprayer. Even a novice gardener can make an effective spray bottle from scrap materials that is not inferior in watering quality to factory-made analogues.
Regular pen
How to make a spray bottle with your own hands? There are several options for such designs. One of the easiest ways is to use a ballpoint pen. This is the most primitive design. You can assemble it in just 30 minutes.
The operating principle of such a device is simple. A man blows into the tube of the pen body. Splashes of paint burst out through it on the other side. The material must be blown with high intensity. If you do this half-heartedly, the drops of paint will not spread evenly over the surface. You can practice before starting work.
To make such a spray gun, you will need to purchase:
- regular gel pen,
- container into which the paint will be poured,
- a needle from a regular syringe.
A small bottle can be used as a container. It must have a lid. It is better to prepare not one, but several needles. They may break during operation of the device.
What to do if the spray bottle “breaks” and stops spraying
What would we do without spray bottles? Surely they would have pressed with force, smeared and generally been a lot nervous. And any task, from washing windows to blow-drying hair, would take much longer. But all atomizer sprays have one big drawback: fragility. What to do if the bottle suddenly stops spraying liquid? Use this tip!
If your spray bottle stops working, there could be several reasons.
The most “popular” among them: mechanical damage, clogged holes or flaws in the mechanism itself. Let's try to figure out how to fix each of them.
Method number 1: replacement
The easiest and fastest way to fix it is to replace the spray nozzle. Use the appropriate size, borrowing it from another “donor” product. If this solves the problem, then it was in the “button” itself. You're in luck, it was too easy!
Method number 2: cleaning
Very often, spray bottles stop working because the spray nozzle is clogged. This type of failure is most common in bottles containing viscous liquids, such as foam, hairspray, or perfumes with a high oil content. To repair, remove the “pulver” (if possible), carefully rinse it in alcohol or vinegar (this will dissolve the sediment), and then use a thin needle to clear any possible blockage, as in the photo. If the design allows, carefully clean the liquid supply tube with a needle. It is possible that the place where it connects to the spray gun is clogged.
Method number 3: “extend”
Due to the ill-conceived design of the mechanism, it happens that there is still a lot of product in the bottle, but it is impossible to spray it. Often the reason is a short tube that does not reach the bottom. To fix this, you will have to disassemble the mechanism and “extend” it using an ordinary plastic straw, cut to the desired size. Simple and it works!
Model assembly
When creating a small spray bottle for painting with your own hands, you need to perform several sequential steps. First you need to prepare the bottle cap. A hole is cut out in it as wide as the refill of a gel pen.
The tube will be installed in the cut hole. You need to disassemble the gel pen. The cork will contain its rod. The handle body will be connected to it. This is what a medical needle was needed for. It is put on the wide end of the gel pen. The needle is inserted into the body of the pen. Its tip should come out from its thin side.
All components must be properly prepared. Having disassembled the handle, remove the paint rod from it. His nose is cut off. The content must be removed. For this purpose alcohol is used. This procedure is done carefully, otherwise the dye will end up on clothes, interior items, etc. The body and rod are connected with a needle.
Using a spray gun
Next you need to try the resulting product. First, water is filled into the container. Next here will be paint. You need to blow intensely into the bottle. The paint will come out through one end of the prepared pan.
To adjust the jet, you need to adjust the position of the rod and pen body. The pressure of the jet depends only on the force with which the master blows into the bottle. This is how a homemade spray bottle works. It is not difficult to assemble it with your own hands. However, the texture of the paint will not be thin and uniform. It will consist of individual drops.
This option is suitable for those surfaces for which a high degree of evenness is not important. As a result of this processing, an interesting texture is obtained. It consists of many drops. This allows you to create a certain visual effect. The quality of work is influenced by the experience of the master. Therefore, before starting surface treatment, you need to practice.
Model improvements
You can make your own spray bottle for water or paint according to the described scheme, but with some modifications. In this case, the device will be able to perform more delicate, precise work. To do this, you need to perform a number of modifications.
Another hole is made in the bottle cap. Another rod from another gel pen is inserted into it (it needs to be prepared in the same way as before). Only its diameter and length should be smaller. This is taken into account when choosing a handle. This action allows you to increase the pressure in the bottle. As a result, you can blow out more paint with less effort.
A second needle is inserted into the body of the pen. It connects to the second rod. Next, you can practice applying paint. The wizard's actions will be the same. But now the coverage will be better. To adjust the jet, you need to move the rod that supplies the paint.
Problems with the bottle - what to do?
Oh, the disappointment that befalls us when we notice that something is wrong with a bottle of perfume! Problems can be different: the spray leaks, the aroma evaporates, the spray bottle does not work, or the stopper is broken.
The feeling of irreversible loss covers us, even if such a fate befell a not very valuable bottle. What can we say about a beloved, expensive or even vintage piece, which was spent sparingly and “worn” only on exceptional occasions. However, do not rush to get upset, because such “diseases” often, albeit in difficult, but effective ways. Today we have prepared a selection of possible breakdowns and ways to solve problems.
Sprayer doesn't work
Unfortunately, in most cases, if this problem occurs, you will have to completely replace the broken part with a suitable option taken from another bottle. Another way out is to transfer the aromatic liquid into an atomizer. Some owners are psychologically not ready to part with their “native” bottle or categorically do not accept atomizers, so for them any empty bottles with screw-on atomizers will be a lifesaver. For example:
Serge Lutens fragrances
Let's revive the spray gun ourselves
If you have the time and desire, you can try to fix the problem yourself. The cause of failure is often a clogged hole in the spray head. Then it is enough to thoroughly blow out the mechanism, soak it in alcohol and then “purge” it with force. Another option, which is often found on thematic forums, is to carefully clean all the holes with a needle.
Additional options
You can also hit the spray hard with your palm, or turn the bottle over and tap it on something hard several times. Replacing parts of the mechanism, in particular the spring, is also a fail-safe way to fix the problem, but it requires certain skills and tools.
The bottle is leaking
There may be several reasons for such a breakdown. Most often, this is the same problem with a clogged hole in the nozzle. When you press it, the mechanism usually takes the amount of liquid from the bottle, but due to the narrowed hole, some of the perfume does not spray, but leaks out from under the spray head. The way out of the situation is described above.
It also happens that the spring inside the spray bottle itself pumps up the perfume even during the rest period, which again leads to leakage. Why this happens is unclear, but it is mainly the perfumes of Caron and Montal that are guilty of this. You can, of course, try to replace the same spring, but, judging by the experience of avid perfumers, most often the problem is solved with an atomizer.
Clogged nozzle hole
Problems with the stopper
Not all bottles are equipped with sprayers; splash bottles use plastic or glass ground stoppers. It happens that the upper part of this part turns out to be fragile and breaks off, while the lower part remains in the bottle, “tightly” stuck in the neck. To get the remains of the lid, you will have to use your imagination and work hard.
If the stopper is plastic
- You can try to pick up the plastic part with a thick needle or other sharp instrument (for example, an awl) and pull it up.
- You can also carefully drill a hole in the bottom of the polymer stopper, screw a self-tapping screw into it, and, grasping it with pliers, try to pull out the “chopik”. For easier removal, it is recommended to heat the neck of the bottle by wrapping it in a cloth soaked in boiling water, or blowing hot air from a hairdryer.
If the lid is made of glass
In the case of a glass stopper, you need to find some suitable “handle” that is comfortable to grab onto, and glue it to the remaining part. When the glue dries well, carefully, with twisting, begin to pull. After a few manipulations everything should work out. And, of course, don’t forget to worry in advance about where you will transfer the saved aroma. Empty bottles from other perfumes and atomizers will do. An excellent way out of the situation would be to find another stopper similar to the original one.
Advantages and disadvantages of the model
It’s easy to make a spray bottle for painting with your own hands according to the proposed scheme. Almost everyone can cope with this task. The advantage of the model is the possibility of its modifications. If necessary, a compressor hose or a hand tool (for example, a bicycle tire pump) is connected to this structure. In this case, the work will be easier.
The disadvantage of the model is its limited range of applications. The pattern that paint creates may not suit the existing interior style or type of object. Therefore, before starting work, you need to test the tool on a training surface. It is also worth considering that this model is suitable for thick paint. It will be difficult to apply whitewash using this method.
If the container does not have a lid, you can make one from available materials. If the paint is water-based, regular foam plastic will be suitable for these purposes. If the composition contains chemical dyes, you need to make a stopper for the container from rubber or other similar material. It will not be destroyed by solvent.
How to Make Spray Tips for a Watering Hose
Neither beds nor flower beds should be watered directly from a hose: a powerful stream of water washes away the soil, forms puddles and can damage plants and cut their leaves.
Therefore, special sprayers are used. The water, crushed by them into small splashes, is evenly distributed over a fairly large area and is immediately absorbed into the ground.
There are many designs for spray tips, and some of them are quite easy to make yourself. We'll tell you about them.
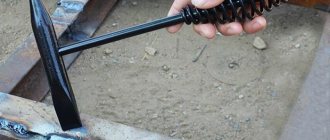
This is the simplest spray tip (Fig. 1). It is made from a piece of metal tube - brass, aluminum or steel. One end of it is flattened with a hammer to a narrow, uniform slot width 1 - 1.5 mm. To make the gap neat, a metal plate of appropriate thickness is first placed into the pipe. Then the plate is removed, burrs and irregularities are removed from the edges of the slot, processed with a file or needle file.
If the working end of the hose is equipped with a universal adapter for replaceable nozzles, which we talked about in the article “Watering Hoses,” then installing and removing the fan nozzle will not be difficult. If there is no adapter and the end of the tube fits into the hose too loosely, wrap it with several layers of insulating tape.
It is also very simple and is also made from a piece of metal tube, the diameter of which corresponds to the internal diameter of the hose. Place a plug on one end of the pipe or securely hammer it with a wooden plug. Make a narrow (about 1 mm) oblique slot in the pipe wall at an angle of approximately 45° to the axis. Finish the edges well with a file so that there are no burrs.
A side slot in the pipe provides fan-shaped spraying of water in a sector of approximately 120° over a distance of 3 to 7 m (at a water pressure in the water supply of 1-2 atm).
To ensure watering along the entire circumference, you need to make three slits in the pipe at different levels, slightly overlapping each other. True, the watering will not be completely uniform - the area near the sprayer will remain almost dry.
It is not difficult to compensate for this drawback - during watering, you need to gradually change the water pressure, gradually turning off the tap at the water point.
The slot sprayer is connected to the hose with a universal adapter or on a thread using nipple connections.
Such a sprayer (Fig. 3) can be made from a piece of metal tube about 10 cm long. A standard water pipe of the appropriate diameter that would fit tightly into the hose or adapter is also suitable. In the upper, outlet part, the pipe must be equal-walled - only then will the water be evenly sprayed in a circle. Therefore, if necessary, turn the end of the tube on a lathe or carefully process it with a round or semi-circular file.
A cross-section of a circular sprayer is shown in Figure 3. A metal cylinder with four to six holes for water is pressed or soldered into the tube. A threaded pin is screwed into the central hole of the cylinder. A conical head is screwed onto the upper end of the stud. By twisting it, you can change the width of the gap between the head and the edges of the tube, thereby adjusting the flow of water. The narrower the gap, the finer the water is sprayed and the larger the irrigation radius.
To spray water more uniformly in a circle, 3-4 concentric grooves can be machined on the underside of the cone head. They will “spin” streams of water. Such a control device at a pressure in the water supply network of 1-2 atm ensures uniform spraying of water over a distance of 5 to 10 m.
This is a portable sprayer that provides a very fine and uniform spray of water within a radius of 1 - 2 m. It is good to use for watering fruit trees and shrubs, and for spraying their foliage. Such a sprayer can be left under a tree or bush unattended for a long time - when watering, no puddles form, the soil is not washed away, and all the water is completely absorbed into the soil.
The general view and cross-section of a turbulent atomizer is shown in Figure 5. It can be made from cans. The basis is a standard jar 0 8.5 cm or smaller. Small parts and a hose pipe are cut out from another can. The parts are carefully soldered. To make the sprayer last longer, coat it inside and outside with varnish, preferably bitumen.
Each of the sprayers proposed here can be installed on the site and left for the time necessary for watering. But for this you will need to make a special tripod or bracket. The simplest design of the bracket is shown in Figure 4. On a metal rod 100–120 cm long and 0 6–8 mm, a hinged and movable unit is installed, which allows you to attach the sprayer with a hose at any height and at any angle. The rod is stuck into the ground.
The sprayers we introduced you to have a drawback. They irrigate the plot only in a circle, so it is impossible to water the entire garden in one go. The designs of watering sprinklers, which evenly cover the area of a rectangular area, are too complex for homemade production. But you can achieve the same result if you use several identical sprayers in one installation. Look at Figure 6.
Its device is shown here. The installation is constructed from standard water pipes laid between rows, elbows and half-inch tees. Sprayers are installed on tees at such a distance from each other that their areas of action overlap each other, forming a continuous and, if possible, uniform irrigation zone. This depends on the pressure in the water supply network and on the adjustment of the nozzles. For example, when the pressure in the water supply is not lower than 1.5 atm, the distance between them is selected to be about 5-7 m. This means that with 8 sprayers, a rectangular area of about 200-250 square meters will be simultaneously covered by watering. m.
Aerosol can
There are several more options on how to make a paint sprayer with your own hands. A simple design can be made from a regular aerosol can. It is suitable for applying water-based paint.
To assemble such a spray bottle, you will need to prepare a bicycle inner tube, a plastic bottle, a regular can, for example, deodorant, and a hand or foot pump. The second option is more convenient. You can work with the spray can with both hands.
The structure is assembled according to a certain scheme. With the help of such a spray gun it will be possible to perform high-quality application of liquid material to the surface. Spraying in this case will be more uniform than in the previous version. And it will be easier to work with this device. Air will be supplied to the cylinder using a pump. This ensures good paint atomization.
Sprayers and atomizers: types and principles of operation, which one to choose for the garden and repair
An atomizer or atomizer is a mechanical device for converting a stream of liquid into a stream of small drops. Professional models are used for working with suspensions and powdery substances.
By type of drive, products are divided into:
- manual - human muscular strength is used, for example, a home spray bottle for cologne or perfume;
- mechanical – electric, pneumatic, hydraulic and other types of drive are used, example: spray gun.
By purpose:
- household – intended for use at home;
- garden - used for work in garden plots;
- professional - used in various industries, for example, medicine or when carrying out painting work in construction.
Design, principle of operation
Manual pump sprayer
The spray bottle is:
- The container where the working fluid is located.
- A compressor can be a simple rubber bulb, a cylinder of compressed air, a piston or other type of pump, with a manual or mechanical drive. The purpose of the device is to create excess pressure to ensure fluid movement.
- A tube or hose for moving liquid from a storage container to a sprayer.
- The sprayer is a small hole, 0.5–2 mm; motorists will immediately draw an analogy with a jet. Designed to transform a continuous stream of liquid into a directed cloud of small drops.
The principle of operation is based on the creation of excess pressure, as a result of which a flow of liquid moves towards the sprayer and is ejected from it in a directed stream in the form of a suspension of small drops.
What does this give?
A spray jet is the directed movement of liquid droplets at a certain speed. Colliding with a surface, it forms turbulence, that is, chaotic movement - this phenomenon allows you to cover not only a flat plane with liquid material, but also penetrate into hard-to-reach places. In addition, possessing kinetic energy, a flow of small drops, colliding, comes into close contact with the surface, penetrating into the smallest holes and cracks. The pressure created increases the adhesion of moisture to the material being processed.
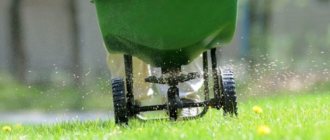
Which spray bottle to choose for the garden?
When choosing a sprayer for treating plants, you need to consider a number of factors:
The purpose of the tool is that the sprayer can be used to apply liquid fertilizers or chemicals, or can be used for drip irrigation. It is not recommended to mix several functions in one device - washing the container after chemicals will require considerable time. A small amount of liquid material containing any component from chemicals will have a detrimental effect on the life of the treated plant.
- Storage capacity - its volume directly depends on the number of plants, more precisely, the area of green foliage, branches and trunks.
- Tool drive : manual , with a liquid volume in the tank of up to 1–2 liters , - beneficial for spraying small areas, for example, external liquid feeding of tomato bushes, in quantities of no more than 50 pieces;
- manual – volume up to 5–10 l , floor-mounted or shoulder-mounted with a foot pump; it can be used to process large areas of herbaceous plants, shrubs, and trees;
- mechanical - the tool is designed for processing large areas and for intensive use.
Adviсe
Tip 1. It is advisable to have several types of sprayers, each for a specific job: drip irrigation, external liquid feeding and treatment against insect pests or diseases.
Tip 2. Manual type with a small volume of up to 1 liter, used for treating plants during flowering, drip watering of flowers. With this tool it is easier to narrow the flow of sprayed liquid and concentrate it on one watering point.
Tip 3. A device driven by a hand pump is convenient for working with bushes and trees. Due to this mechanical drive, less effort is required to create operating pressure. In addition, the kinetic energy of the jet allows you to spray moisture at a distance of 1–2 meters from the plants - this will reduce the exposure of people, for example, to chemicals.
Tip 4. The design of the garden sprayer should have a device that allows you to create several operating modes, from “fog” to a directed powerful stream of water jet.
The optimal set for a summer cottage with an area of 4–6 acres:
- 1–3 devices with a capacity of up to 1.5 liters with manual drive, - drip watering of flowers, narrowly targeted fertilizing or application of preparations;
- one device with a volume of up to 5 liters, designed for applying chemicals, powered by a pump;
- one spray bottle up to 10 liters for the purpose of applying liquid fertilizers, with a foot pump or electric drive.
Approximate price
Approximate prices for garden sprayer models:
- a hand-held device with a capacity of up to 1.25 liters , intended for irrigating or fertilizing plants planted in pots or flower boxes; used in greenhouses or greenhouses; price 100–250 rub. ;
- design with a volume of up to 1.5 liters with a manual drive , having several operating modes, used for spraying water, chemicals, liquid fertilizers; used indoors and outdoors; price 300–800 rubles ;
- device up to 1.5 l, equipped with a pump ; functions - careful watering, treatment with drugs against pests or diseases, application of fertilizers; price 1200–2500 rub. ;
- universal design with manual drive from a pump , with several operating modes, storage tank capacity up to 5–11 liters ; allows you to perform all gardening operations and minor painting work; price 2000–4500 rub.
How to repair?
The sprayer is subject to the following breakdowns:
- Mechanical damage to the storage tank body, outlet tubes or hoses, breakage of levers, etc. - restoration of functionality by eliminating leaks with patches, clamps, or replacing the damaged unit with a new element.
- Corrosion of device elements by aggressive liquids - replace with new parts or buy a new one.
- Clogging of the supply system is caused by a clogged filter or blockage with a solid mechanical object. Repair is carried out by disassembling the tool.
Assembly procedure
If you want to make a spray bottle with your own hands for whitewashing with lime or water-based paint, a spray can design is suitable. First you need to cut the nipple off the bicycle tube. Its lid has a diameter of approximately 3 mm. A hole is made in the bottle.
Next, you need to fix the nipple onto the inner wall of the bottle. It will force air inside the container. After this, you need to remove the sprayer from the can. To do this, you need to saw the body of the container with a hacksaw. The spray module with valve must match the diameter of the bottle neck.
The valve must be attached to the bottle cap by cold welding. The connection must be tight. This is a must. After all, the system works under pressure. After the manipulations, the device is tested under a pressure of 3 atm. You should also try applying paint on the training surface.
Spray gun from a vacuum cleaner
There is another way to make a spray bottle with your own hands. If you need to paint walls or ceilings, using a hand sprayer will be quite difficult. To process a large area, you will need a device with automated paint supply. In this case, use a refrigerator compressor or (which is simpler) an old vacuum cleaner.
Such designs spray water-based paint well. It is not suitable for powder dyes. It is also worth considering that only an old Soviet-era vacuum cleaner is suitable for such work. Their design was significantly different from modern models.
The hose of the old vacuum cleaner could be connected to both the inlet and outlet pipes. This allowed the equipment to work both in blowing and blowing. It is the second mode that will be required when creating a spray gun. If the owners have a similar unit left somewhere in the pantry, this will be an ideal option for painting the walls and ceiling.
Method number 2: cleaning
Very often, spray bottles stop working because the spray nozzle is clogged. This type of failure is most common in bottles containing viscous liquids, such as foam, hairspray, or perfumes with a high oil content. To repair, remove the “pulver” (if possible), carefully rinse it in alcohol or vinegar (this will dissolve the sediment), and then use a thin needle to clear any possible blockage, as in the photo. If the design allows, carefully clean the liquid supply tube with a needle. It is possible that the place where it connects to the spray gun is clogged.
Making a spray bottle
A DIY paint sprayer is assembled from an old vacuum cleaner. In some cases, a new model that is no longer planned to be used for its intended purpose will also be suitable for this purpose. In such a vacuum cleaner you will need to change the direction of traction. To do this, you need to change the poles on the terminals. They are adjacent to the stator and rotor.
After the unit begins to operate in the desired mode, you need to select a suitable container (bottle) for the paint. The neck of such a container should be wide. There should be a rectangular ledge on the plug. It will allow you to insert the tube from the gel pen here at a right angle. You can also use a dropper for these purposes.
Holes are made in the lid and tubes are inserted into them. One of them will supply paint, and the second will provide compressed air. You also need to make another hole in the cork. This is necessary to allow air to enter the bottle. When the volume of paint in the container decreases, a vacuum occurs in the tightly closed container. Another plug should connect the hose from the vacuum cleaner and the paint spray system.
What to do if the spray bottle “breaks” and stops spraying
Receive one of the most read articles by email once a day. Join us on Facebook and VKontakte.
What would we do without spray bottles? Surely they would have pressed with force, smeared and generally been a lot nervous. And any task, from washing windows to blow-drying hair, would take much longer. But all atomizer sprays have one big drawback: fragility. What to do if the bottle suddenly stops spraying liquid? Use this tip!
If your spray bottle stops working, there could be several reasons. The most “popular” among them: mechanical damage, clogged holes or flaws in the mechanism itself. Let's try to figure out how to fix each of them.
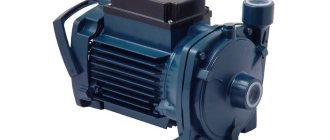
Refrigerator compressor
You can assemble a spray bottle with your own hands from a compressor that was left over from an old refrigerator. Such a unit will be quieter than a vacuum cleaner. When whitewashing ceilings with lime or water-based paint, such equipment will provide significant savings in materials.
Assembling such a spray gun will be more difficult. You need to select a sufficiently large sealed container (receiver). This could be a canister, fire extinguisher, cylinder or other similar product.
You need to remove the compressor with the start relay. Copper tubes need to be sawed off with a hacksaw or cut with a special tool. Next, the system is connected to the network. You need to pay attention to which tube the air is supplied through. A gasoline filter from a car is attached to the structural element that absorbs it using a hose and sealant. This protects the spray gun from dust getting into it.
Inlet pressure adjustment
The spray gun is powered by compressed air. The higher the pressure, the better the painting effect. For each tool model, the manufacturer indicates the corresponding standardized pressure values. It is at this pressure that it is recommended to paint with a pneumatic spray gun. To set the pressure, many people use a pressure gauge, which is located on the compressor. This is incorrect because this pressure gauge gives the air output pressure value. Air comes to the instrument at a different, lower pressure. Losses are observed in the high-pressure hose, and the longer its length, the greater the difference at the outlet of the compressor and the inlet to the spray gun.
To eliminate the possibility of using a spray gun with approximate pressure, you should use a special gearbox with a pressure gauge. Next, let's look at how to correctly set the pressure on a spray gun with different types of pressure gauges:
- The removable pressure gauge-regulator is a gearbox that connects to our paint gun. To adjust the inlet pressure, you will need to unscrew the air and torch size adjustment screws to the maximum. After this, press the trigger and look at the pressure gauge needle. If the value is more or less than the norm, then use the adjusting screw on the pressure gauge to achieve the desired value. For most standard pneumatic spray guns the standard setting is 2 atmospheres
- Built-in pressure gauge - the principle of adjusting the inlet pressure is that you need to fully open the torch size regulator and pull the trigger. Using the air supply screw on the gun, the required pressure is set, controlled by the tool’s digital pressure gauge
- The pressure gauge does not have a regulator. To do this, you need to fully open the air supply and torch size regulators. Next, you need to pull the trigger and adjust the pressure using the pressure gauge connected to the spray gun
- When the pressure gauge is not connected to the spray gun, most often the operator uses the spray gun without using an additional pressure gauge. How to set the optimal pressure for painting in this case? A pressure gauge on the compressor is used for this. The pressure setting for it is set as follows - unscrew the adjusting screws for air and torch size. We pull the trigger and rotate the regulator on the compressor, setting the appropriate pressure. It is important to remember that the pressure drop in the hose is up to 1 atmosphere
If the inlet pressure is not adjusted, the efficiency of paint application will be reduced, which will certainly affect the quality of application of the paint and varnish material. Air is the basis of the painting process, so if you do not pay special attention to pressure, the entire process will be carried out with serious violations.
Continued assembly
When assembling a spray bottle with your own hands, you need to connect an air injection tube to the receiver. Hoses of the appropriate size are also used for this. They are connected using a fitting and sealant. You need to install a diesel fuel filter on the receiver. This will prevent moisture from the air from entering the system. In this case, the spray gun works more efficiently.
Both the receiver itself and the compressor need to be mounted on the board. Next you need to check how the system works. If everything is fine, you can start working. During the inspection process, it is also worth practicing working with such a unit.
It is worth considering that the compressor must be installed in the same position in which it worked in the refrigerator. If this is not done, the equipment simply will not work. Also, when using such a spray gun for a long time, you need to periodically change the oil in the compressor. To do this, you need to find the third tube in the unit body. If all steps are performed correctly, the device can be used for spraying thick water-based paint, as well as whitewash or other types of materials.
Using factory injectors
By spending a little money on a sprinkler for watering, you can assemble a more complex system for spraying water over a large area. To water lawns with an area of 5 to 25 square meters, rotary sprayers are used that supply chaotically rotating jets of water. Fan sprayers spray water out in a stream.
When connecting a factory nozzle with a homemade water supply device, the spray will be of better quality and timely.
| Inexpensive, but very reliable device with a container made of high-strength plastic. It has an adjustable brass nozzle with a filter and an ergonomic handle with a lock. Sold in a bag with a pendant. | Lightweight, chemical-resistant sprayer with an adjustable plastic nozzle that can be rotated to cover hard-to-reach areas. It is equipped with a fairly powerful pump that builds up optimal pressure in a couple of strokes. | Reliable pump sprayer with a relatively wide neck for easy pouring and draining of liquid. As standard, it has an adjustable nozzle and a locking button. | Professional sprayer made of durable, chemical-resistant plastic. Designed for long-term use and has a serious margin of safety. Does not have a lock. | The most expensive indoor plant sprayer on the market. Made of durable plastic and has a reliable design. Adjustable plastic nozzle, filter, locking button, wide neck and high-quality pump. There is a safety valve to relieve pressure. It may last a little longer than others, but the price tag is several times higher. Here the decision is up to the buyer. |
Holder
You can make a holder for the spray bottle. For this you need a board 10 mm thick. A square 250 x 250 mm is cut out of plywood or wood. A hole in the shape of a circle is cut out in it with a jigsaw. It must match the paint tank of the unit. The pistol handle is inserted into the groove. It is cut out from the edge of the plywood to the hole. The structure must be installed on a support of 3-4 legs.
Having considered the options for creating a spray bottle with your own hands, you can design a suitable type of structure. This will allow you to apply paint and whitewash quickly and efficiently.