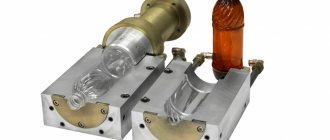
Molding sand for aluminum - Foundry
The following requirements apply to molding sands for casting:
- mechanical strength;
- thermal conductivity;
- gas permeability;
- fire resistance;
- heat capacity.
Molding and core mixtures have the same properties. But higher demands are placed on the rods because the molten metal exerts more pressure on them.
Composition of various mixtures
Molding sands are divided into three types:
- united;
- facing;
- filler.
A single mixture is intended to fill the entire volume of the casting mold. It is fully used in machine molding when producing castings in large quantities. A large amount of previously unused materials is used for its preparation.
The facing mixture is designed to produce a mold layer in direct contact with the melt. Its thickness depends on the type of mixture and the severity of the casting and ranges from 20-100 mm. In order to supplement the remaining volume, a filler mixture is used.
The composition of the molding sand directly depends on the shape and method of its manufacture. The formation of sand-clay forms occurs in two ways, resulting in dry and wet forms.
To make them pliable during formation, combustible fillers - peat or sawdust - are introduced into the mixture.
In addition to clay and sand, the composition of the dried forms includes fasteners, crushed asbestos and stillage.
In addition to them, they are used:
- quickly curing;
- self-curing;
- hardening by chemical transformation;
- liquid glass compositions.
In quickly curing mixtures, liquid glass acts as a binder. If warm blowing is required to dry liquid glass, then in this case hardening occurs due to ferrochrome slag.
Classification of molding sands
Self-curing compounds are liquid in their initial state. Then surfactants and sand filler are introduced into them. This composition remains fluid for no more than 10 minutes. Therefore, they are prepared in the molding areas.
Chemically curing mixtures have a short lifespan. As a result, caustic soda is added to the mixture.
After formation, liquid glass varieties are dried by blowing with carbon dioxide. During the drying process, chemical reactions occur: the formation of silicic acid and sodium carbonate.
To make a rod, for example, first class, the mixture consists entirely of quartz and fasteners. To form large rods, 1/3 of the used and reconstituted composition is used.
The melting point of non-ferrous metals is much lower than that of steels and cast irons. Because of this, molding mixtures have less fire resistance.
For casting bronze and copper alloys, molding compositions are prepared using class P clay sand.
Fillers such as boric acid, sulfur, or fluoride are used to cast aluminum. They prevent active oxidation of the melt.
Types of alloys
Bronze contains copper and alloying additives (beryllium, lead, aluminum, silicon and tin). All its alloys also contain components such as zinc, phosphorus, etc. In addition to bronze, the modern industrial industry is engaged in the production of other alloys from copper - constantan, copel, nickel silver, cupronickel, brass, etc.
The amount and type of alloying components in a bronze alloy determines its chemical and physical characteristics, as well as the color of the material.
Brands of bronze alloys, the melting point of which lies in the range from 930 to 1140 degrees Celsius, have their own markings. , bronze-based alloys
People learned to combine tin with copper to produce bronze a long time ago. Tin makes the material stronger and also reduces its melting temperature.
A striking example of this type of alloy is bell bronze. It contains twenty percent tin and eighty percent copper.
However, products made on the basis of bell bronze are characterized by high fragility.
Read also: Press from two corners
Tin-free bronzes, as the name suggests, do not contain tin. Such alloys today are classified into separate categories of bronzes:
- Beryllium is the strongest and has many characteristics superior to steel;
- Silicon-zinc - have increased resistance to abrasion (the advantage of such bronzes of this group is that when molten they have high fluidity);
- Based on aluminum and copper, they have high anti-corrosion protection and excellent anti-friction properties.
Currently, the most common bronzes are those containing tin. For the purposes of marking the material, regardless of the composition, the designation “Br” is used, after which the additives used and their content in the material are indicated.
For example, you can decipher the bronze “BR OTSSNZ-7−4−2-. This tin alloy contains tin, zinc, lead and nickel. The numbers indicate their percentage in bronze.
The composition of any brand of bronze may contain other elements having the following designations:
- A - aluminum alloys;
- B - beryllium-based alloys;
- F - ordinary iron;
- K - silicon element;
- Mts - ordinary manganese;
- F - phosphorus.
Required Properties
To obtain a high-quality casting, you need a casting mold made from ingredients selected for casting a specific metal. The molding sand for casting must have a certain moisture content. At low humidity, the mold is prone to crumbling, which makes molding difficult.
Poor gas permeability provokes the formation of defects in the casting - gas pores and cavities. This is why coarse sand (more than 50%) is needed.
The properties of molding sands are characterized by hardness. It depends on the uniformity and degree of compaction. Compaction of the mold beyond the norm provokes the appearance of such defects as:
Casting in sand-clay mold
The high strength of the mold and core does not allow changing the geometry of the casting. To obtain it, special binding materials are used.
Aluminum casting in sand-clay molds
Good day, pikabushniks and pikabushnitsy. In this post I would like to talk about one of the methods for making metal castings. Specifically, address signs. These are the ones.
Furnace and crucible for melting metal. Since we use low-melting aluminum, we need a temperature of at least 660 degrees. We did all this in a cleared warehouse on a homemade stove and “by eye.” So, there was no specific temperature regime.
I didn’t photograph the stove itself, but its design was simple: an outer layer of refractory brick, inside a layer of kaolin wool. A gas burner is directed underneath the crucible. The crucible is roughly welded from a piece of metal pipe. They burned out often and cheerfully, regularly creating beautiful silvery puddles on the floor around the stove.
The aluminum itself. I bought it in the form of various scrap materials, from scraps of aluminum profiles for compartment doors to twisted cables (the coolest raw materials, by the way).
Composition of molding sand for aluminum casting
› Aluminum
Articles Loading...
- BonnFactory May 9, 2017
- DIY and metal crafts with your own hands
Hi all! I want to share with you my experience of sand and clay casting.
Last time (you can find this article in my profile) I poured aluminum using a burnt model, i.e. I cut out a model from polystyrene foam and simply covered it with sand. And some of you noticed that I was rather careless about the process.
That's right, the goal was just to test the technology and I didn't bother at all with the quality of the casting. I admit it. This time I will try to do everything more carefully. The whole process with explanations is on video, but I will also describe everything now in text format.
Therefore, enjoy watching and reading!
Many homemade sources write that you need to mix this and that “to taste,” i.e. They suggest finding out everything experimentally. This is a good process to understand, but a long process to get results.
Therefore, I found a good textbook on artistic sand casting (“Artistic casting: a textbook for students of secondary vocational schools”, Boris Nikitich Zotov, 1982). I don't pretend to be any kind of professional. No no! This is actually my first casting using the technology from this textbook.
I’m still a craftsman, therefore, I will accept all advice and justifications for mistakes from you with honor and will be glad if you correct me! And I only read up to the part about molding the mixture. After casting, I found out a couple of points about the melt and heat treatment of the casting...
From tools and other things we will need:
- container for mixing anything and everything;
- stirrer (you can do this with your hands, but if you have one, good);
- pre-made frames for molding so that the halves of the mold fit smoothly without displacement;
- stove;
- sieve for sifting sand and clay;
- measuring cup or diamond eye;
- brush for applying talc and cleaning the mold;
- the model that we will cast;
- a couple of pieces of pipes or cans or anything with a diameter of 80-100 mm and a height of 50-80 mm (for molding sprues, you can also get by with your hands - make a donut, but with cans it will be neater and easier =)
- thin-walled tube with a diameter of 20+- mm. for molding sprues;
- metalworking tools for processing castings; (the list is quite comprehensive, but all the tools are trivial and most of them can be found around the house).
Materials required in the process:
- the metal itself for pouring (in my case, aluminum);
- quartz sand (river sand will also work, but the shape will be less durable);
- bentonite clay;
- water;
- talc coal dust graphite.
To make the molding sand we will need:
- sifted quartz sand in quantity to fill our mold and sprues. Let's take sand as an integer part - unit (1) or 100% for ease of calculation;
- bentonite clay. We will need 0.15-0.20 (15-20%) of the total mass of sand;
- water. The moisture content of the mixture should be about 0.06 (6%) of the total mass of sand + clay (yes, I took sand as a whole part, and now the whole part is sand + clay).
First, mix sifted sand with sifted clay
Mix well and dry. Otherwise, if you do this at the same time as water, you will suffer trying to break up lumps of raw clay.
It is convenient to use a spray bottle to moisten the mixture. It will allow the moisture to be evenly distributed, but if it is not there, then just add water a little at a time.
Allow sufficient time to stir the mixture. It should turn out homogeneous and be completely moistened with water (those 6 percent are more than enough for this)
Once everything is funny, our mixture is almost ready to be molded! You just need to let it brew so that the moisture is distributed evenly. Leave the mixture alone for 1 hour or even 2. This is what is good about this mixture - it is easy to make and there is no need to rush anywhere, and if the proportions are not met, this can always be corrected by adding the missing part of sand or clay.
After an hour, the mixture significantly changes its properties for the better - it sticks less to your hands and retains its shape well if you squeeze a handful into a fist (This, by the way, is a popular way to check the quality of the mixture - take a handful of the resulting mixture in your hand and squeeze it. And when When you open your hand, the mixture should follow the curves of your fingers and palm. Then try to break it in half. If the lump breaks exactly in half and does not crumble, that’s what we need)
Now let's move on to the molding process
Place the prepared frame on a flat surface and pour the mixture into the mold. Don't rush to fall asleep all at once. Add a third and compact it so that the sand fills all corners of the mold.
First I make a sandy bottom - I fill it with sand, tamp it, and then I fill the entire mold without tamping and press the model into the loose sand. Before installing the model, it would be a good idea to sprinkle it with talcum powder so that it does not stick to the mixture. I compact it with my fingers along the perimeter and add more mixture as needed.
It would be easier if the model was divided in half, but that's another story. We have a specific example. Therefore, the sequence is exactly like this. It is convenient to tamp with a small wooden block - it is strong and heavy enough for a comfortable process. Then use the same block to level the surface.
The model should be filled exactly in the center, as it has roundings. To prevent the form from collapsing when removing it, I had to strain a little, but I managed. You can do it too!
When the first half of the mold is compacted and leveled, tap the mold with the same block to loosen it slightly and try to remove it.
Everything came out well, and did the form print as it should? Okay, then it’s time to return the model to the mold and use a brush with talcum powder or graphite over the entire surface area of the mold, including the model.
This is necessary to ensure that the second half of the mold does not stick to the model and the lower half of the mold.
The second part is easier to tamp - just add sand and tamp evenly until the whole thing is filled.
It is important to remember that if the compaction is insufficient and the mixture remains loose, it will collapse before casting or during the pouring process. If you tamp too hard, the sand will be compressed and the gas permeability of the mold will be poor, which can lead to casting failure, since vapors and gases will be poorly removed from the mold during the casting process.
Carefully remove the top half and see what we got. The model should come out well from the first half (after all, we already took it out). From the other half, we take out the model in the same way, with tapping. We examine the result and if it suits us, then we succeeded and have very little left before casting.
Now you need to make filler holes in the mold. A thin-walled tube will do this perfectly (I used a tube from a vacuum cleaner). The height of the frames was a little short and part of the model was visible from the outside. This place became one of two sprues.
It is also important to make sand funnels through which the metal will flow into the mold. They are needed for ease of casting, as well as to feed the casting with metal during shrinkage when cooling. On some alloys, shrinkage is especially noticeable.
Funnels can be formed either by hand or using improvised molds (I used coffee cans and the same tube from a vacuum cleaner).
The molding process has ended. And the mold is suitable for casting. We remove the model, blow out any grains of sand that may get into the casting and assemble the mold to the place where the pouring will take place.
All that’s left to do is light the stove, melt the aluminum and pour
Since the bulk of the article is devoted specifically to molding, I will go over it very briefly. In the video I said that you need to add soda and salt, this is what all artisans do. But one of the viewers on the channel corrected me and justified his answer. Therefore, I’m in a hurry to get better, soda in the melt is not needed.
In subsequent castings I felt the difference. Without soda, the metal was poured with fewer pores and was processed much better (it did not clog the cutters). Therefore, when the aluminum melts in the crucible, you need to add salt so that the metal is cleaned of slag. I collected all the dirt that had collected on the surface with a spoon and poured the metal into the mold.
After a short period of time I took out the casting.
Since my experience is limited, as opposed to laziness, there were a couple of places on the casting where the mold collapsed and the metal spread slightly. But nothing more, no less - you can cut it down. So my laziness during molding was remembered the entire time I was processing the part.
Remember that the molding compound is suitable for molding for a long time, so feel free to start molding again if the mold suddenly collapses slightly or you find other jambs. It is better to do all this at those preparatory stages. Save time.
Author of the article “Sand casting + clay at home” Bonn Factory
Molding sands for casting
Foundry production is a fairly simple and widespread technological process for producing castings of various sizes and shapes.
The production of parts by casting is practiced in the automotive industry, machine tool industry, carriage building and many other branches of mechanical engineering.
To produce hollow or multi-hole castings, core and molding mixtures of various compositions are used. The use of sand-clay forms in mass production is economically justified.
Material
Aluminum casting molds, depending on the method, can be produced using different technologies. There are several simple options. For open pouring into a simple mold, sifted earth (silica) is often used. It is laid in layers and compacted. After removing the forming element, the earth holds its shape and withstands pouring. This material is simple and cheap to use.
There are craftsmen who pour aluminum into sand. When mixing, use liquid glass (silicate glue). There is information about the use of cement. The mixture is mixed, oddly enough, with brake fluid. Knead with your hands and rub through a sieve to avoid lumps. The consistency should be such that when clenched in a fist, a lump forms. When tamping, sand and cement are well held inside the flask and even repeat small details of the workpiece shape.
Molding sands for casting
Foundry production is a fairly simple and widespread technological process for producing castings of various sizes and shapes.
The production of parts by casting is practiced in the automotive industry, machine tool industry, carriage building and many other branches of mechanical engineering.
To produce hollow or multi-hole castings, core and molding mixtures of various compositions are used. The use of sand-clay forms in mass production is economically justified.
Molding sands for casting
The composition of the mixtures depends on:
- molding method:
- metal type:
- steel;
- cast iron;
- non-ferrous metal and its alloys;
- type of production:
- single;
- serial;
- mass;
- casting type;
- technological equipment.
The materials used to produce molding sands are divided into the following groups:
- sandstone;
- various types of clay;
- auxiliary: binding materials;
- non-stick lubricants and coatings;
- fireproof;
- special.
Clay sands can contain up to 50% clay. They are divided according to the amount of clay content into:
- skinny – up to 10%;
- bold – up to 20%;
- fatty – up to 30%;
- very fatty – up to 50%.
Quartz sands are also used. The silicate base allows you to take a melt into shape, the temperature of which reaches 1700C.
Producing high quality castings requires the use of non-stick coatings and fine materials to prevent the formation of pores in the form.
Types and composition of mixtures
The following requirements apply to molding sands for casting:
- mechanical strength;
- thermal conductivity;
- gas permeability;
- fire resistance;
- heat capacity.
Molding and core mixtures have the same properties. But higher demands are placed on the rods because the molten metal exerts more pressure on them.
Composition of various mixtures
Molding sands are divided into three types:
- united;
- facing;
- filler.
A single mixture is intended to fill the entire volume of the casting mold. It is fully used in machine molding when producing castings in large quantities. A large amount of previously unused materials is used for its preparation.
The facing mixture is designed to produce a mold layer in direct contact with the melt. Its thickness depends on the type of mixture and the severity of the casting and ranges from 20-100 mm. In order to supplement the remaining volume, a filler mixture is used.
The composition of the molding sand directly depends on the shape and method of its manufacture. The formation of sand-clay forms occurs in two ways, resulting in dry and wet forms.
To make them pliable during formation, combustible fillers - peat or sawdust - are introduced into the mixture.
In addition to clay and sand, the composition of the dried forms includes fasteners, crushed asbestos and stillage.
In addition to them, they are used:
- quickly curing;
- self-curing;
- hardening by chemical transformation;
- liquid glass compositions.
In quickly curing mixtures, liquid glass acts as a binder. If warm blowing is required to dry liquid glass, then in this case hardening occurs due to ferrochrome slag.
Classification of molding sands
Self-curing compounds are liquid in their initial state. Then surfactants and sand filler are introduced into them. This composition remains fluid for no more than 10 minutes. Therefore, they are prepared in the molding areas.
Chemically curing mixtures have a short lifespan. As a result, caustic soda is added to the mixture.
After formation, liquid glass varieties are dried by blowing with carbon dioxide. During the drying process, chemical reactions occur: the formation of silicic acid and sodium carbonate.
To make a rod, for example, first class, the mixture consists entirely of quartz and fasteners. To form large rods, 1/3 of the used and reconstituted composition is used.
The melting point of non-ferrous metals is much lower than that of steels and cast irons. Because of this, molding mixtures have less fire resistance.
For casting bronze and copper alloys, molding compositions are prepared using class P clay sand.
Fillers such as boric acid, sulfur, or fluoride are used to cast aluminum. They prevent active oxidation of the melt.
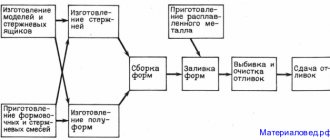
Preparation of mixtures
The process of preparing molding and core mixtures is carried out in three stages. The first stage is preparatory. Here the preparation of as yet unused materials takes place. Drying, crushing and subsequent sifting are carried out.
At the second stage, the spent composition is prepared. This allows you to save on materials. The process begins on the cooling drums. Knocking, crushing, cooling occurs.
Molding sands for casting are prepared at the third stage in mixers. Roller models are widely used. They are used to prepare such compounds as:
- united;
- core mixtures;
- facing;
- with additives: viscous;
- liquid;
- dusty.
For large production volumes, production is automated. Mechanization of processes is reflected in the reduction of production costs.
Peculiarities
The essence of sand casting technology is to create parts by pouring molten metal into a disposable mold made from sand-based molding sand. The technological process of creating castings consists of a chain of actions required for the manufacture of an injection mold and its assembly.
The production of foundry molds is called molding, and involves several necessary elements:
1. Molding sand required to create a casting mold. As a rule, this is quartz sand and a clay or resinous substance that has increased thermal resistance. When making an injection mold, the wet molding mixture is compacted by compression or shaking to maintain the required shape.
2. Foundry flask, or molding container. Serves to fix the mold mixture during its transportation and pouring with metal. When casting in sand molds, holes are made in the walls of the flask to facilitate drying and release of gases during the process of pouring metal.
3. Foundry model. With its help, when casting in sand molds, cavities are created with shapes and sizes corresponding to the design of the casting being created.
Step-by-step instructions for casting aluminum at home - materials and procedure
There are several aluminum casting techniques that are used in production on an industrial scale. But if we are talking about work at home, then the most acceptable way is to pour liquid aluminum into homemade molds. This is the technology we will talk about.
Before understanding the nuances of casting, it is advisable to remember some of the characteristics of this metal. Aluminum melts at a temperature of about 660 ° C (depending on its purity), and boils at 2,500. Another feature that needs to be taken into account is rapid oxidation upon direct contact with air.
There are quite a lot of different “engineering solutions” that can be implemented when casting aluminum yourself at home. “Craftsmen”, knowing its characteristics, select the necessary devices and materials themselves.
One of the main problems is what and how to make a mold for pouring. This is where people who have no practical experience most often stumble.
Therefore, we will consider only one of the simplest options, since it is unrealistic to cover all the methods in one article.
Let's start with what you need to prepare for casting:
Aluminum scrap
Each of us has encountered this metal. But has everyone noticed that, for example, aluminum wire can be different? One bends easily, like plasticine, and the other is harder, less pliable. For casting, it is advisable to choose the one that is softer, since such a material, relatively speaking, contains less oxides and more “pure” aluminum.
Gypsum
The easiest option for working from home. Its best brand is sculptural (marked “G – 16”). But it has yet to be found, and the cost of such a high-quality product is quite high. Therefore, in domestic conditions, white gypsum (designated “G - 7”) is more often used, which is not in short supply. It can be purchased at any specialized store that sells building materials.
It is very similar in appearance to alabaster, and the two can easily be confused. In addition, the seller, not knowing why the buyer needs plaster, may offer this “analog” instead. In the construction industry, materials often replace each other, since many of their characteristics are similar. But alabaster is definitely not suitable for making molds! This needs to be taken into account.
Wax
This material is mentioned in almost all recommendations for do-it-yourself metal casting. Indeed, this is the best option, but only if we are talking about the manufacture of small parts. Pure wax is quite expensive, and there is no point in buying it in large quantities. Moreover, it is unlikely to be used again.
In practice, you use ordinary candles, which are found in any household goods department. Whether they are stearic or paraffin is not important. The quantity depends on the dimensions of the required part, the “blank” of which will be prepared from them.
You'll need a few more things as you go along. This will become clear when considering casting technology, and the choice of specific materials depends on the ingenuity and capabilities of the craftsman.
Melting containers
You can also melt candles in a regular tin. But for aluminum, the cookware needs to be stronger, since it will have to be heated quite strongly.
Heat source
What can I use? Muffle furnace or homemade crucible/gas forge. The main thing is to achieve the required melting temperature. As for the last “device” (crucible), it is clear from the picture how it works. You just need to take into account that the brick must be fireproof.
When using a sufficiently powerful stove to heat materials, it is necessary to include some kind of temperature regulator in its power circuit (if it does not exist). Such modernization will save time, nerves and electricity. It is enough to install a simple rheostat or an adjustable transformer (LATR). Otherwise, you will have to constantly turn on/off the device so as not to “drive” the temperature.
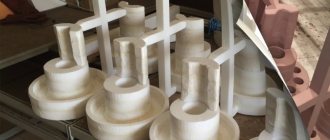
Making a blank
The task is to melt the paraffin and pour it into a mold with certain linear parameters. After it has cooled, it is easy to cut out an exact copy of the required part from the hardened mass. The easiest way is to take a shoebox. In principle, such “formwork” can be easily made from cardboard or plywood, securing the entire structure with adhesive tape.
Features of work
- The poured mass cools down for a very long time, and this process should not be forcibly accelerated. Hardening should occur naturally, then the structure of the blank will be uniform throughout its entire thickness. You will have to wait at least a day, since the top hard crust is not yet an indicator that the paraffin inside has hardened.
- The material used is characterized by significant shrinkage. In other words, in the central part of the mold the mass will “sag” somewhat during the cooling process. When calculating the dimensions of the required workpiece, this should be taken into account and paraffin should be poured with some reserve in volume.
Since you will have to manually cut out a part from a finished sample, it is clear that in the absence of experience (and perhaps even ability), it will not be possible to do everything accurately the first time, especially if you need to cast something of a rather complex configuration. But a rejected “blank” has only one path – to be melted down.
In order not to waste time, it is advisable to prepare two of them. If the first one is spoiled, then with the second one, taking into account the experience gained, the work will go more successfully. Considering that candles cost pennies, this will not “hit your pocket.”
Mold making
There are enough recommendations for its preparation. One simple way is to make it from plexiglass. This “aquarium” is assembled by fastening cut pieces of hardboard using plasticine. They also seal all joints.
Making a part template
A “blank” is placed at the bottom of the “aquarium”. To prevent it from moving during the process of pouring the solution, it is fixed with the same plasticine.
It should be taken into account that all other work is done quickly, since the plaster sets well. But this material is not used in its pure form. Its mixture with sand of the smallest fractions (50 to 50) is used. Otherwise, water will remain in the gypsum mass, which will begin to evaporate after pouring aluminum. This will cause pitting in the finished part.
The mixture is diluted to a medium-thick sour cream, after which the solution is loaded into the mold. You need to cook it so much that the “blank” is completely covered with it. In this case, it is not worth saving on material, especially since its price is low. To remove air bubbles, if there is no vibrating table, the mold must be shaken thoroughly by hand.
After the poured mass has hardened, the “aquarium” is dismantled. All that remains is to remove the paraffin from the plaster. It's easy to drown it out.
For example, place a plaster template, bottom up, on a sheet of iron, and place it on an open fire. But this does not guarantee the “cleanliness” of the insides of the form.
If the part is not just a metal plate or something similar, but has protrusions, cutouts, and so on, then a different method is used.
An unnecessary metal container is taken, into which a plaster template is placed and water is poured. The dish is placed on the fire, and when the liquid boils, the paraffin will begin to collect at the top (float). But it’s unlikely that you’ll be able to wash the container afterwards.
After the melting process is completed, the gypsum is dried. The temperature should be low, otherwise the material may “burn out” and become deformed, especially thin parts of the template.
Pouring aluminum
There is nothing complicated about this, just one nuance. It is necessary to keep a stainless steel spoon ready, which will immediately remove the resulting oxide film.
A few notes
- The “aquarium” shape can be made from any available materials. The main thing is that it does not fall apart during plaster pouring, and that it can be easily disassembled later.
- It is not necessary to look for a muffle furnace or install a crucible as a heat source. You need to try whether the prepared aluminum scrap will melt, for example, from a gas burner. Perhaps argon welding will be sufficient. Everything that is on the farm is sampled.
When casting yourself, it is necessary to experiment, since the essence of all operations is presented quite clearly, and the examples given on equipment and materials are not dogma.
Using a stove
Piece casting of aluminum can be organized without the manufacture of a special furnace. The required temperature is achieved using domestic gas. The smelting process itself takes about half an hour if the volume of aluminum does not exceed 100-150 grams.
A tin of condensed milk, for example, is used as a container. Cleaned and crushed aluminum scrap is poured into it. But you won’t be able to melt it by placing a tin can on the grate over the burner - there won’t be enough temperature. To reduce the loss of thermal energy, the inventors came up with a clever design.
A can of raw materials for smelting is placed inside another tin and placed on spacers so that there is a gap of 5-10 mm from the bottom to the bottom and from the sides to the walls. The second jar, accordingly, should be of a larger diameter. A hole (3-4 cm in diameter) is made in it from below to supply a jet of flame. The divider is removed from the gas stove burner.
The flame is ignited. The structure is installed strictly above its wick. The flame should go inside and heat only the tin with the crowbar. A larger diameter jar acts as a shell and retains heat inside. The opening is covered from above, leaving only a gap for the combustion products to escape. The combustion intensity is adjustable.
How to make an aluminum casting mold
There are several aluminum casting techniques that are used in production on an industrial scale. But if we are talking about work at home, then the most acceptable way is to pour liquid aluminum into homemade molds. This is the technology we will talk about.
Before understanding the nuances of casting, it is advisable to remember some of the characteristics of this metal. Aluminum melts at a temperature of about 660 ° C (depending on its purity), and boils at 2,500. Another feature that needs to be taken into account is rapid oxidation upon direct contact with air.
There are quite a lot of different “engineering solutions” that can be implemented when casting aluminum yourself at home. “Craftsmen”, knowing its characteristics, select the necessary devices and materials themselves.
One of the main problems is what and how to make a mold for pouring. This is where people who have no practical experience most often stumble.
Therefore, we will consider only one of the simplest options, since it is unrealistic to cover all the methods in one article.
Let's start with what you need to prepare for casting:
Non-stick coatings
To improve the surface cleanliness of castings, non-stick coatings - paints - are applied to the working surfaces of the molds and cores. The coating is a mixture of dust-like refractory material with water and binders. The applied layers of paint reduce the roughness of the forms and close the pores between the grains of sand. As a result, the surface of the casting is smoother and cleaner, without burning.
Iron casting molds are coated with carbon-containing coatings consisting of graphite, bentonite, water and other substances.
Non-stick mixtures for steel castings include dusted quartz, zircon, magnesite, and for castings made of non-ferrous metals, fine talc. Coatings are applied to both hot and cold molds. Coatings are also used for surface modification and alloying.