Every builder has to periodically measure the angles of inclination of various planes, since it is known that absolutely smooth walls do not exist in nature.
The traditional bubble level is familiar and reliable, but you can’t work with it if your hands are full. A more modern and convenient solution is to purchase a laser level, the distinctive features of which are high accuracy and stability in operation. Choosing the right laser level is not so easy. This requires certain knowledge regarding the technical characteristics and operating principle of the laser level.
Operating principle of a laser level
The principle of operation of the device is very simple - it projects a laser beam onto any surface. A straight line is obtained in space, relative to which objects can be aligned.
The line can be horizontal, vertical or oblique. In this case, the line error will be only a few hundredths of a millimeter.
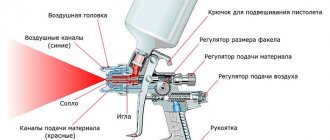
All laser levels, regardless of their options, consist of the following main parts:
- Light source
- Optical system
- Self-leveling devices
- Setting mechanism
- Power supply
- Housing and device control buttons
When choosing a laser level, special attention should be paid to the light source. This is usually a semiconductor diode that provides bright light without getting hot.
Most often these are diodes of the following types:
- Red with a wavelength of 635 nm. Such diodes are cheaper, and the red color is better visible in cloudy weather. This is the most common type of laser in levels.
- Green with a wavelength of 532 nm. This color is most convenient for perception by the human eye; it is better visible in bright sunlight. Thanks to the peculiarities of perception by the human eye, marking from green lines is easier, which means it is more accurate.
There are also multifunctional, expensive models, where there are several types of diodes that produce rays of different colors. Using such levels is much more convenient.
Useful tips for creating homemade levels using laser pointers
Despite the convenience, compactness and low price of self-made devices, they have two main disadvantages: relatively low accuracy and a short period of operation with constant use of laser emitters. The first issue is solved by setting up the device. To eliminate the second drawback, experts advise replacing the coin-cell batteries in laser pointers with an external power source. It is important to select a source with the required voltage. Typically it is 4.5 V, but may vary for different models.
When buying a laser pointer for a level device, you should carefully select its power and the color of the emitting diode. The best option is a green beam, it is less harmful to vision and is better visible even in relatively bright rooms.
By slightly increasing your budget, you can purchase a simple laser level with or without a tape measure. In this case, you can attach a ready-made device to any base, rather than a combination of a bubble level and a laser pointer.
Often these devices already have places for mounting on a tripod or tripod.
You can also use a laser tape measure as a source of laser radiation.
One more nuance: if a ready-made tripod (tripod) is used to install the laser, a useful addition to it will be a strip with markings or an ordinary metal (wooden, plastic) ruler. This will allow you to raise or lower your homemade level to a certain height without additional measurements. By the way, it is convenient to make the tripod itself from PVC pipes.
Types of laser level
Depending on the number of rays and the type of projection, several types of levels are distinguished. This criterion will be fundamental when choosing a laser level, since the number of functions of the device depends on it.
Types of laser levels:
Spot
These types of levels project a simple point. The most budget option. To mark, you need to set several points on the surface and connect them with a line. The operating range is usually 10-20 meters. The cost of such tools is 600-700 rubles.
Linear
Also budget, but more convenient options. They are already projecting a whole straight line. They can easily help you make simple markings for laying tiles, laminate or other materials. The number of rays ranges from one to three. The most powerful devices can project beams in 2 planes. However, they do not have the ability to fire multiple beams at once and cost angles. The projection range is about 50 meters. Such devices cost about 800-1500 rubles.
Rotary
Easily project beams 360 degrees. They can easily rotate the beam or project it in multiple directions. The beam range is 500 meters. There can be several rays here; they can be projected in different planes at the same time. This allows you to build entire shapes next to the surface. These levels can be used to measure different angles or precise directions relative to objects. The action of such instruments is based on the work of several diodes and prisms at once. The range of the light flux is up to 500 meters. The cost of such levels starts from 2,000 rubles and reaches 100,000 rubles.
When choosing, it is important to take into account the maximum operating angle of the laser. The simplest models work in one plane and have a maximum beam release angle of 120 degrees.
More complex models can fire a beam from one point in directions up to 180 degrees. Professional options fire several beams at once in all directions up to 360 degrees.
Important! The larger the angle of operation of the laser, the less you will have to move and rearrange the device for measurements.
For a laser device, the beam error is also important, which can range from 0.5 mm/m to 0.01 mm/m. It is worth choosing levels with an error of less than 0.3 mm/m. This gives straight lines without slopes in ordinary rooms.
How to use an optical level
The optical device is very easy to use. Knowing how to use it correctly, you will be able to mark the heights of buildings on your own summer cottage yourself quickly and accurately. And this will allow you to save on the services of specialists. To make it easier to familiarize yourself with the operating algorithm of an optical level, it is worth considering the entire process using an example. Let's look at the basics of the Leica Jagger 20.
How to install
The first thing to do is set up a tripod. It must be placed in such a way that the level’s fixation area is level. To do this, you need to adjust the height of the tripod legs. If there is no tripod, then you can place the device on a relatively flat plane.
Tripod setup
After the level is installed on a tripod, adjustments must be made. There are special screws for this. It is necessary to ensure that the device is located exactly in the horizontal plane. The indicator should have an air bubble in the center.
How to measure the height of Leica Jagger 20
Let's say you need to set the height of the foundation for the construction of a building. It is necessary to place a batten on the corner of the foundation. If it is not there, then a regular tape measure will do. It is better to do the work with an assistant.
The rail must be positioned strictly vertically. This affects the accuracy of measurements. After aligning the staff, you should point the level lens at it. If the staff is not clearly visible, then you need to adjust the focus by turning the screw until a clear image is obtained. The staff divisions should be clearly visible in the eyepiece. The crosshair lines should also be visible. If they are unclear, then the eyepiece needs to be adjusted.
Each time the staff is moved, it is necessary to record the readings of the scale divisions on the horizontal crosshair line on paper. Let's say we get the following data:
- first peak – 288.4 cm;
- second peak – 292.9 cm;
- third peak – 289.8 cm;
- fourth peak – 291.2 cm.
The lowest peak is the second one, equal to 292.9 cm from ground level. Next you need to calculate the difference between the first, third, fourth vertex and second:
- first peak = 288.4 – 292.9 = 4.5 cm;
- second vertex = 292.9 -292.9 = 0 cm;
- third peak = 289.8 – 292.9 = 3.1 cm;
- fourth peak = 291.2 – 292.9 = 1.7 cm.
In order to mark the foundation, it is planned to pull the cord at a height of 20 cm from the building zero or the second peak and set the horizon. At the tops, the height from the ground level will be as follows:
- first peak = 20 – 4.5 = 15.5 cm;
- second vertex = 20 – 0 = 20 cm;
- third peak = 20 – 3.1 = 16.9 cm;
- fourth peak = 20 – 1.7 = 18.3 cm.
As a result, an accurate horizontal plane was obtained for pouring the foundation.
How to measure distance
There are two small lines on the vertical line of the crosshair. Let's determine the distance to the installed rail. To do this, you need to multiply the difference in readings by a constant value. For the Leica Jagger 20 level, as for other optical instruments, the constant is 100.
Video instructions for working with an optical level
Power supply and mounting of the laser level
The ease of operation and possibilities for use depend on how long the level works without recharging and how it is attached to surfaces. Often you have to work with the level all day, so it will be very inconvenient to take breaks several times to buy batteries.
Simple levels are powered by small batteries and have a run time of 5-8 hours. More powerful devices are designed to operate for 8-10 hours. Professional devices operate from built-in batteries for 10-20 hours without recharging. However, such devices are quite massive.
The level mount can be:
- Wall-mounted with Velcro or suction cup
- On a tripod
- On the bracket
- On a magnet
More convenient are those levels that have both types of fastening, which allows you to measure lines from any surface. It will also be convenient to mount it on brackets; this option will allow you to fix the level on the wall and move it in a certain direction.
Advice. A small tripod no more than 1 meter high is suitable for a household appliance. It is convenient to store and carry.
Additional features of the level
Using a laser level can be made easier due to a number of features that manufacturers offer.
Among them:
- Compensator lock. The compensator is a small set of prisms that allow the device to be automatically leveled. Under normal conditions, a self-leveling laser level is a convenient device. If it is not placed horizontally, it makes a sound or turns off. The problem, however, is that this type of device cannot display slanted lines - this requires the use of a compensator locking mechanism. It is worth adding that the self-leveling range of high-quality lasers is approximately 10% (5-6°).
- Wall bracket. This accessory can be an alternative to a regular tripod. There are many models available, the simplest of which are wall corners, while the most complex ones can be used as low tripods. Selected holders have a magnetic insert that allows them to be attached to metal surfaces.
- Dustproof and waterproof. Certain modern types of levels differ quite significantly in this regard. Before purchasing, you should check the IP class of the device to see if it is relevant for future use.
- Turning off lasers. Cross-level is a power-hungry device, so the ability to turn off some lines is an important additional option.
- Transport packaging. Many manufacturers offer the same models of levels and cross lasers in different transport packaging: soft “bags” or hard cases. This is worth paying attention to because there are sensitive elements inside the devices that are most easily damaged during transportation if the level is not secured properly.
Laser Level Options
In addition to the regular beam, laser levels can have additional options that make your work much easier:
- Minimum distance from the beam to the plane of the device. With the minimum distance, the line can be built almost on the floor or on the ceiling itself. The smallest distance can be even 1 cm from the edge of the device.
- Protection from dust and moisture. Repair work usually generates a large amount of dust. It can clog the prism and the optical system will fail. Moisture protection is required for outdoor work.
- Scanning irregularities. This option can check how smoothly the wall is laid out or the floor screed is made.
How to use the device
Let's look at the basic rules for using laser levels, which differ for different types of devices.
Point level
Before starting work, install the device on a flat horizontal platform. If it is possible to automatically adjust the position, the debugging mode is turned on and the horizontal adjustment is made. If this function is not available, a regular bubble level is used. Points are marked on the surface, which are either the centers of future holes, or define straight lines for subsequent work.
Crossliner
The device is installed and leveled horizontally. Lines are projected onto vertical or horizontal surfaces that determine the level of installation of various elements, the axis of laying tiles, etc. If necessary, two perpendicular lines are used, or one horizontal and two vertical, defining the dimensions of the opening or other element.
Rotary
Rotary models are used when installing planes - suspended ceilings, floor screeds, when gluing wallpaper and other work that requires the formation of a flat horizontal plane. The device is installed on a flat surface with the required height; if necessary, it can be suspended from the ceiling. The height of the rotation plane is set, aligned with the light line of the device, after which marking of walls or direct work is carried out.
The operating technique of the laser level is described in more detail in the user manual included with the device. It reflects all the subtleties, specific work methods, and safety requirements. In particular, it is necessary to avoid getting the beam into the eyes, since there is a serious danger of burning the retina or damaging the lens.
Video: review of laser levels
Video: how to use a laser level
Using a Laser Level
Before starting to work with the laser, it must be leveled relative to the ground. This is done using the self-leveling function, which is available in any level.
The self-leveling range can be from 1 to 5 degrees.
- It will also be useful to have a self-leveling lock. This will allow you to flip and move the level relative to the ceiling and walls. Blocking will be useful when installing stairs.
- The operating temperatures of different devices may vary. Inexpensive levels operate at positive values from 5 to 40 degrees.
- Devices designed for outdoor work can withstand a range from -20 degrees to + 40 degrees.
Important! For any device, sudden changes in temperature should not be allowed, which can lead to fogging of the optical system. If the device was brought from the street or from a cool place, then it should be allowed to independently adapt to room temperatures for several hours.
When interacting with the device, you should also use special safety glasses. The laser, or even its reflection, when entering the eye can damage the retina.
With the right choice and correct use of the device, it will greatly facilitate repairs and allow you to enjoy neat and precise work.
Purchasing levels from a reliable company
The Metronx company offers the purchase of modern high-precision levels of various configurations for all types of work. The presence of additional accessories and technical documents will ensure ease of use of the device. Our store's assortment includes both a budget device with a minimum number of functions and professional levels at a relatively high price.
If you have any difficulties making a choice, you can always contact our managers who will help you buy the best model for you. We deliver goods throughout Russia. We provide a guarantee for all our products, we have our own service center where you can return the equipment. Check out the range of MetronX's own levels
Photo of laser level
Description of the technique
Electronic levels are popular because they allow you to automate the measurement process. Today, only foreign manufacturers produce them. Modern models are divided into the following types:
- Digital electronic goniometer. This is a device that has a built-in LCD display. On it you can see measurements of surface inclination angles. The data is displayed on the screen without additional settings.
- Digital electronic level. Such devices are also equipped with a display. Additionally, the level can have a laser beam or a built-in water level.
- Combined digital device. This device combines the functions of a protractor and a digital level. The level provides more efficient and faster measurements.
The operating principle of the levels is based on recording readings using slats that are installed at different heights. Accordingly, the difference in readings shows the excess between the points.
The devices themselves, according to GOST 10528-90, are divided into technical, precision and high-precision.
Review of Leica devices
Electronic levels from Leica (China) are presented in a wider range than their analogues. They are designed for different types of work. Each device is equipped with a processor and capacious memory. The disadvantage is the weak body of the device; the level requires careful handling.
Their feature is to minimize human participation in the measurement process and maximize productivity.
Detailed characteristics of the devices are presented in the table below.
| Parameter | Sprinter 50 | Sprinter 150/ 150M | Sprinter 200M/250M | DNA03/10 | LS15/10 |
| Increase | 24x | 24x | 24x | 24x | 32x |
| Accuracy, mm | 2.5 | 1,5 | 1,5/0,7 | 0,3/0,9 | 0,2/03 |
| Min. focal length, m | 0,5 | 0,6 | 0,6 | ||
| Lens diameter, mm | 36 | ||||
| Operating temperatures | -10 … +50 °С | -20 … +50 °С | |||
| Weight of assembled device, kg | 2,55 | 2,55 | 2,55 | 2,85 | 3,7 |
| Working time in hours | unlimited, 4 AA batteries, 1.5V | 12 h | |||
We can say that the electronic level is an indispensable assistant for the modern builder. These are high-precision, automated instruments that have their own software and help the owner take the necessary measurements in a short time.
Review of Sokkia devices
Sokkia electronic levels are professional devices for effectively determining elevations. They are distinguished by proprietary coated optics and high operating speed. All measurements are made automatically and saved in the device memory.
They also use a special Wave-and-Read device stabilization technology. The following features are available in the levels:
- carrying out single measurements;
- carrying out repeated measurements;
- using the rack tracking mode;
- turning on the stabilization mode;
- Calculation of the average value.
Detailed characteristics of the devices are shown in the table below.
| Parameter | SDL50 | SDL30 | SDL1X |
| Increase | 28x | 32x | 32x |
| Accuracy, mm | 1,5 | 1,0 | 0,3 |
| Min. focal length, m | 1,6 | ||
| Operating temperatures | -20°C … +50°C | ||
| Weight of assembled device, kg | 2,4 | 2,4 | 3,7 |
| Measurement time, sec | 3 | 3 | 2,5 |
| Working time in hours | 16 | 8,5 | 9-12 |
Specifications
When choosing an electronic level, builders pay attention to the technical parameters of the device. According to GOST 23543-88, Appendix 2, the list of main characteristics of levels includes:
- Indicators of the purpose of the device (error and measurement range, operating temperature, number of functions, time to obtain a reading, magnification and pupil diameter of the telescope, dimensions).
- Indicators of device reliability (installation of a service life calendar, full service life, technical utilization coefficient, and others).
- Efficiency indicators (weight of the device and power consumption).
- Angular field of view of the pipe.
- Level division price.
- Diameter of the pupil of the telescope.
- Range of work and error during self-installation of the compensator.
- Quality of protective and decorative coatings.
- Range finder (altimeter) coefficient.
Review of Trimble devices
Levels from the American company Trimble are designed to accurately determine the level of elevation and height differences on the ground. The devices have a reinforced body, which allows them to be used in almost any weather.
They are also equipped with many additional functions and spacious internal memory. The display backlight allows you to work even in low light.
The devices are distinguished by long-term operation without recharging, maximum productivity and high accuracy. Measurements are taken automatically using powerful software.
Detailed characteristics of Trimble electronic levels are presented in the table below.
| Parameter | DiNi 03 | DiNi 07 | DiNi 22 | DiNi12T |
| Increase | 32x | 26x | 26x | 32x |
| Accuracy, mm | 0,3 — 1,5 | 0,7 | 0,7 | 0,3 |
| Min. focal length, m | 1,3 | |||
| Lens diameter, mm | 40 | |||
| Weight of assembled device, kg | 3,5 | 3,5 | 3,2 | 3,7 |
| Operating temperatures | -20°C … +50°C | |||
| Working time in hours | 72 | |||
Overview of the TOPCON device
Topcon is a Japanese leader in the production of surveying equipment. All devices can be divided into optical and digital levels.
Digital options provide bright images and accurate measurements. The devices are resistant to vibrations and shocks. They are equipped with a magnetic compensator, which allows measurements to be taken on site where heavy equipment is operating.
Reviews of electronic levels are presented in the table below.
| Parameter | DL-102С.N | DL-101С | DL-502 | DL-503 |
| Accuracy, mm | 0,4 | 0.6 | 1.0 | |
| Lens diameter, mm | 45 | 36 | ||
| Min. sighting distance, m | 1 | 1 | 1,5 | 1,5 |
| Telescope magnification | 30x | 32x | 32x | 28x |
| Weight of assembled device, kg | 2,8 | 2,8 | 2.4 | 2.4 |
| Operating temperatures | -20°C … +50°C | |||
| Working time in hours | 10 | 10 | 16 | 16 |