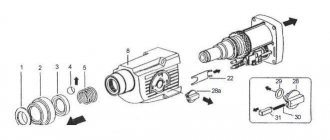
Home workshop: how to repair a screwdriver gearbox?
Any tool, regardless of model and brand, will sooner or later break down.
A screwdriver is no exception: individual parts and assemblies wear out over time, and without proper care or under force majeure circumstances they may fail. The main functional load when operating the tool is distributed through the gearbox between the engine and the chuck, so if something happens to the gearbox, the work will stop. In order not to spend money on repair services, it is enough to use the advice of specialists to restore the operation of the unit yourself.
Service Features
If you find severe wear, the tool must be replaced. The electric motor also requires some maintenance. It should be treated with care to prevent water and oil from entering the windings. After work, the machine should be blown out with a strong stream of air. It is important to ensure that the ventilation openings are clean and open.
Sources:
https://arbolit.org/materialy-i-instrumenty/drel-shurupovert-interskol.html https://c-triada.ru/instrumenty/sborka-reduktora-shurupoverta-interskol.html https://fb.ru/ article/311618/shurupovert-interskol-daerobzor-harakteristiki-osobennosti-i-otzyivyi
Design and principle of operation
The gearbox is a complex mechanical transmission unit through which the axis of the motor-power unit transmits torque to the cartridge.
Two or three transmission stages are installed in the gearbox.
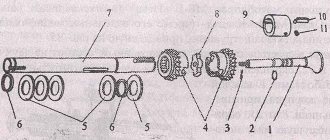
The design of the “household” dual-mode screwdriver assembly includes:
- The plastic case is a small drum that is mounted on a cartridge. The body itself is fixed motionless, and the chuck shaft is inserted into a clamp on one of the transfer plates;
- 2 or 3 transfer plates (carrier) - a round metal plate, on one side of each there are 3 protrusions for small gears. On the other side of one of them there is a clamp for the chuck shaft, and the other (or 2 others) has another so-called. a “planetary” gear that rotates three small gears;
- 6 or 9 small gears (three each: they can be of the same or different thicknesses) are the so-called “satellite” gears, which are installed and rotate freely on the projections of the transfer plates. With their teeth they interact with the sun gear located between them and with the ring gear, which is located on the inner surface of the housing;
- ring gear - a metal ring with teeth on the inside and small protrusions on one of the rings on the outside. It is placed on these protrusions and ball bearings on the inner surface of the housing.
The parts are lubricated, assembled in series and installed inside the ring gear, which lies inside the housing drum (it has a seal with recesses for ball bearings and gear lugs). After this, the surface of the open satellites is covered with a metal washer, in the center of which there is a hole into which the engine shaft enters with another gear attached to it.
During operation of the screwdriver, the gear wheel on the motor shaft rotates the upper satellites, and they, spinning around their axis and, along the ring gear, respectively, transmit movement to the next carrier. Depending on the number of plates and small gears, the rotation speed will decrease proportionally.
As can be seen from the design of the gear unit, they are divided depending on the number of transfer plates into:
- two-stage.
- three-stage. In this case, another plate with a “planetary” gear and 3 satellites is added to the design.
Reference. The number of speed modes of the device depends on the presence of stages, and this, in turn, will affect its cost.
Another indicator by which gearboxes are divided is the material from which their parts are made.
In the production of satellite gears the following is used:
- plastic. Such structures are relatively lighter, but their reliability is lower than that of their metal counterpart;
- metal. They are durable and with proper care and lubrication they will work like a clock.
Important. The disadvantages of metal parts are a continuation of their advantages - they are heavier than plastic ones and are more expensive. Moreover, if a screwdriver is used without violating the operating rules 2-3 times a year, the master most likely will not feel the difference in what material the gearbox parts are made of.
Either I got a defective one, or this is its real service life
For a long time I wanted to share with you my opinion about my first Interskol . At that time, I was not very well versed in this type of technology, so my friends recommended me to buy this particular brand. For more serious work, I still only use a drill. I only use a screwdriver for repairing roofs, for drilling thin metal, or for assembling some structures where a drill is not convenient, and so I do repairs around the house. The device is convenient, replaces a screwdriver and saves your time.
I chose something that was not too powerful, the seller offered me a twelve-volt option for the house. That the price is not high and it works well. The package is excellent, 2 batteries. I put one on charge, the second one works.
I was certainly happy with the purchase for the first couple of months. Then my opinion literally began to change when the time came for major renovations inside and outside the house. I began to notice that at least there were two batteries, but they were discharged quickly. The screwdriver itself turned out to be rather weak; it could not tighten the screw 100 even into a pine board. Where you could tighten it with a screwdriver. Some screws also had to be tightened by hand, since it did not have enough power. A little over a year later, the screwdriver burned out and never paid off. I concluded that I didn’t have to work with this tool very often.
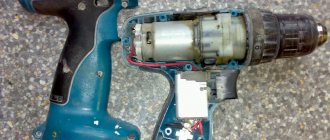
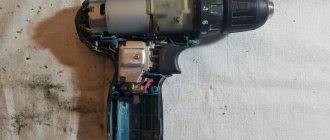
Now the screwdriver is disassembled, I will show you the motor itself and some of its parts. It’s not profitable to buy a new motor; it’s been exactly a year since I bought a screwdriver that turned out to be better than this brand.
The instrument and documents were in a plastic case. On the one hand, it is convenient. but on the other hand not. Personally, the case got in the way at home, it takes up a lot of space. It was only convenient during transportation.
One plus of this case. that you can neatly arrange everything in it. Take bits or drills with you; they came up with cells for that.
Operating instructions for this device. The book is very thin, it contains a description of the screwdriver, safety precautions and warranty obligations.
This is also a useful “leaflet”, in it you can find the Interskol service center nearest to you.
I have the opportunity to show the model not only externally but also some internal
details. For example, a complete motor and trigger. The first time I saw them, I was surprised that such a small motor.
This is a battery. Outwardly it is not big, but in weight it is heavier than the screwdriver itself.
The battery is inserted into the bottom of the screwdriver until it clicks.
The charger is also a bit heavy. We see what the green indicator means and what the red one means. It also shows how long it takes to charge one battery and the incoming voltage.
The charger plug fits our sockets. The device cable is long, about one and a half meters.
These are already the characteristics of a screwdriver. In addition to the fact that it is weak, it also has a low-revving engine. No speed adjustment.
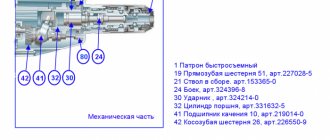
Screwdriver in disassembled form. The cartridge is all collapsible, all the mechanisms and gears in it are metal.
Externally, the model does not seem bad and the color is pleasant gray, not too easily soiled. The case is not large. The center of gravity is entirely in the battery. My batteries didn’t hold up well and kept coming loose. It would not hurt to rubberize the handle here, and not just paint it black.
Causes of failure
Like any mechanical unit, when the gearbox operates, the parts are affected by frictional forces, causing them to gradually wear out or wear out and lose their “adhesion.” In order to avoid this, all parts of the assembly must be properly lubricated.
Therefore, the first reason for gear unit failure is a lack of lubrication (but there may also be an excess of it).
Also, the gearbox is affected by such a “scourge” of mechanics as dust. It settles on the parts and during operation heats up along with them. This is especially dangerous for plastic gears, since under the influence of heat from dust they are subject to deformation - which leads to failure.
Finally, another nuisance for the gearbox is the ingress of foreign particles into it. Clogging between the teeth, they jam them. Because of this, when the motor shaft rotates, an excessive load is created on other structural elements, which leads to their destruction.
Reference. If one of the reasons or force majeure has led to damage to an element of the gear unit (gears, bearings or shafts), it is often necessary to install a new gearbox as a whole, since not all manufacturers have on sale individual gearbox parts to make a replacement.
Preparing to change the lubricant
Having studied the options for how to anoint the grinder gearbox. it is necessary to delve into the process of applying a new composition to the elements of the mechanism. This procedure is carried out according to the power tool maintenance plan established by the manufacturer. This must also be done when replacing gearbox parts or rotor bearings.
The waste will have a dirty color. This is due to the ingress of metal particles and dust into it. Before lubricating the gearbox, it is necessary to remove old oil from the surfaces of the mechanisms. The waste is removed completely.
To perform this procedure, automotive engine cleaning products are suitable. You can also use kerosene or gasoline. Using these products, traces of old lubricant are completely removed from the surfaces of all parts. After treatment, the gearbox must be thoroughly dried. Only after this you can start refueling.
DIY repair
In a home workshop, repairing a gearbox is not so difficult. Repair comes down to disassembling the unit into individual parts, checking the integrity of their structure, purging and lubrication, followed by reassembly. The process is divided into the following stages:
- Separating the gearbox from the engine and removing it (usually together with the chuck) from the screwdriver housing.
- Unscrewing the housing and removing the locking washer.
- Sequential removal of satellite gears and transfer plates (2 or 3, depending on the design).
- Removing the ring gear and checking the ball bearings (they can roll around the entire seal, but should not roll out beyond it).
After removing all the parts, they must be cleaned of “old grease,” wiped dry and made sure that they are not damaged.
Then the craftsmen recommend folding them in the reverse order “dry” and making sure that when the satellites rotate, the chuck spindle also rotates. If the rotation is carried out without twisting, then it can be assembled back.
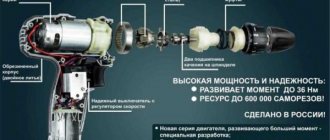
Specifications
It is no coincidence that products are very popular among modern consumers. DA- 12ER -02 is a screwdriver that is of high quality and reasonable cost. In addition, it has outstanding technical characteristics. For example, the maximum torque is 28 Nm. The battery capacity is 1.3 Ah. The battery voltage is equivalent to 12 V. The equipment operates using a brush motor. It has a reverse option, but there is no shock function in the design.
The maximum diameter of the screw used is 5 mm. The spindle speed can vary from 0 to 1400 rpm. The device weighs only 0.96 kg. It has a spindle lock, and the chuck is fastened with parameters equal to 3/8 inches.
What and how to lubricate?
During assembly, each part is lubricated with synthetic (semi-synthetic) or mineral lubricating paste (grease). These substances differ in viscosity and durability. The smaller it is, the more often the parts have to be coated again. After the gear unit has been disassembled, it is recommended to coat each element with lubricant separately, gradually assembling the unit together. The lubricant is applied with a brush and distributed over the entire surface of each part.
Another way is to use specialized gear oil. Oils have a liquid consistency. They are used in the same way as lubricant, or sometimes they are poured into the gearbox without disassembling it, if a special hole is provided for this in the design of the screwdriver.
Thus, having understood the structure of the gear unit of an electric screwdriver, removing it from the tool, checking all the parts and, if necessary, changing the lubricant on them will not be difficult even for a novice craftsman. If you carry out this operation regularly 1-2 times a year, the risk of screwdriver failure will be minimal.
Algorithm for disassembling the Interskol screwdriver
Among the many manufacturers of hand-held power tools, Russian products can be distinguished. The screwdrivers produced by it have a good price-quality ratio, which is why this tool is popular among Russian consumers. In addition, it is reliable and has a long service life.
But in the process of using a screwdriver, various troubles can occur. One of them is tool failure. The cause of failure may be failure of the electrical circuit of the device or destruction of the mechanism itself. In any case, repairs begin with disassembly. This will help identify the underlying problem.
The Interskol Da-18ER screwdriver is disassembled using the following technology:
- Disconnect the battery.
- Remove the cartridge from the spring, then the rotary cone. The procedure should be performed carefully so that the balls do not fall out or roll.
- Unscrew the screws securing the housing parts and remove the contents.
- Disable the start button.
- Remove the speed switch.
- Remove the adjusting coupling.
- Disconnect the electric motor. If the failure occurs in the electrical part, then check the power source and the DC motor. If the gearbox is to blame, then continue disassembling.
- Remove the shift bracket. In this model it is located in the guide, so you need to apply some force.
- Dismantle the guide and begin disassembling the gearbox. It consists of a ring gear with internal teeth, drive (sun) gears, a carrier and two stages of satellite gears.
Important ! When disassembling the gearbox, check all actions with the assembly diagram presented in the product passport.
- The metal plate is snapped out and the contents of the first stage of the gearbox are poured out.
- After unscrewing the connecting bolts, it is disassembled into two halves.
- The second stage gears are removed from the housing.
- They inspect parts, identify defects and either eliminate them or replace the unit.
- After troubleshooting, the screwdriver is reassembled in the reverse order.
Interskol DA-10/12M3 – professional
A screwdriver classified as a professional tool must have the following functions and consumer qualities:
- increased operating time;
- ergonomics (ease of use, light weight);
- mechanical strength of the case and mechanism parts;
- ability to work under negative temperature conditions;
- high degree of torque, increased range of rotation speeds.
Among other models, based on the combination of price, quality, and configuration, you can consider purchasing the Interskol DA-10/12M3 product. This product is equipped with a rechargeable battery.
The plastic handle and body have rubberized inserts for easy holding of the screwdriver when performing work manipulations. The single-coupling chuck with spindle lock makes it easy to change accessories during operation.
In addition to the functions of a screwdriver, it performs the functions of a drill.
- maintains operating functions at sub-zero temperatures and is not afraid of sudden temperature changes thanks to the nickel-cadmium battery;
- The presence of a replaceable battery allows you to maintain the functionality of the tool during the working day;
- longer service life of stopping parts due to the use of double rolling bearings (instead of a sleeve) on the main shaft of the tool;
- high torque – 32 Nm;
- low price compared to models of other brands with similar functions;
- illumination of the work area allows you to perform work in poorly lit areas;
- drilling on steel up to 10 mm, wood – up to 20 mm.
- Nickel-cadmium batteries require complete discharge before the next recharge; when stored for a long time, they self-discharge;
- the weight and ergonomics of the screwdriver, which is very controversial due to the subjectivity of assessing these qualities.
- power supply – 2 pcs;
- fixing cartridge – 1 piece;
- charging electrical device – 1 piece;
- case for storage and transportation;
- instructions for use and safety;
- guarantee.
Accessories: When choosing accessories, you must take into account the fact that this model is a professional instrument. Sets of bits and drills must also meet higher requirements for strength properties and a wide range of functional uses.
Repair of the electrical part of the tool: charger
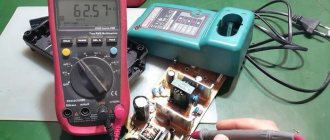
Let's consider repairing the Interskol Da-18ER screwdriver due to a charger failure. The breakdown manifests itself in the fact that when turned on, not a single indicator lights up, and the device itself heats up. Where to begin? And you need to start, as always, with disassembly and measurements:
- To determine the cause, you need to unscrew the screws connecting the halves of the charger housing. It consists of a transformer and an electronic board. In addition, a temperature sensor is included in the transformer circuit, which burns out and turns off the device when the coils heat up above 130◦ C.
- First of all, it is necessary to measure the resistance on the primary winding of the transformer. If the indicator is zero, then there is a break in the network.
- After this you need to proceed to checking the fuse. It is located under the transformer insulation.
- If the integrity of the fuse is not broken, the network cable is checked for breaks.
- If there is no damage to the supply wire, it is necessary to ring the transformer windings. If a breakdown is detected, the transformer must be replaced.
- The resistance on the secondary winding should be minimal, this indicates its integrity and performance.
- After this, you need to check the diode bridge - alternately apply the black probe of the tester to the minus, and the red one to the plus of each diode. If the measurement value is zero, then the diode must be replaced; if the zero mark is exceeded, the diode is considered working.
Repairing the charger of the Interskol DA-12ER-01 screwdriver differs little from the previously discussed DA-18ER, but some modification will significantly improve the operation of the charger. What needs to be done? Install the fan. It will significantly reduce the heating of the device, and during intensive work it will serve as a discharge for the inserted battery. To do this, it is connected from two sources. In the first case it is a battery, in the second it is a transformer.
Frequent malfunctions
Having understood how a modern cordless screwdriver works, you can safely move on and consider what problems are typical for such a tool.
If at any moment you notice that the tool simply does not start, then perhaps it was struck by a certain malfunction. In practice, the situation is that a tool may not work for two main reasons:
- breakdowns in which such devices stop working are in many cases caused by problems associated with their electronic “stuffing”;
- Many breakdowns of modern screwdrivers occur due to mechanical damage.
If we understand directly the objective reasons for the breakdown of such tools, we can identify a number of characteristic signs:
- at some point the equipment stops turning on;
- the speed controller stops functioning normally (it may even stop working altogether);
- reverse stops working.
As for the mechanical problems of such devices, there is often significant wear on parts located in the internal part of the instrument. For example, a screwdriver may produce the characteristic crackling sounds of a mechanism. In most situations, a broken screwdriver begins to make unusual noises in places where the bushing has seriously worn out, or the bearing has fallen apart. Quite often, Hammer tools encounter these problems.
The most common problems with screwdrivers include the following problems:
malfunction of the battery (the charger may stop charging it, or the device may no longer hold a charge);
If repairing the motor or gearbox of a screwdriver seems like an impossible task to you, then these parts can be completely replaced or sent to a workshop, where these elements to be repaired will quickly be returned to working condition.
Repair of the electrical part of the tool - battery
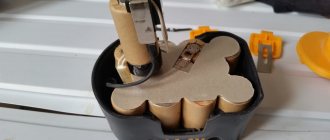
A common failure in the operation of the Interskol Da-18ER screwdriver is battery failure. It is very easy to identify this malfunction. If you put both screwdriver batteries on charge, and one of them charges, but the other does not, and testing the charger shows no deviations, then the reason is in the power source itself.
It is necessary to open the battery case and remove the battery of galvanic cells from it. After this, you need to check the voltage on each bank. It should be 1.2–1.4 volts. If there is no voltage on at least one element, or it is below this value, it must be replaced. Since the battery banks are connected in series, the increased resistance of the damaged cell prevents the others from charging.
9 Interskol DAU-10/18 L2
Best Impact Driver Country: Russia (made in China) Average Rating (2019): 4.4
The Interskol range of screwdrivers includes one impact model, which allows you to expand the capabilities of the tool and perform drilling in concrete. The frequency of reciprocating vibrations is 17550 vibrations per minute, which makes it easy to make holes in concrete and brick walls with a diameter of no more than 10 mm. The increased safety margin also ensures efficient drilling in wooden products up to 30 mm.
Otherwise, this is an excellent screwdriver, with a correctly selected center of gravity and fits comfortably in the hand. The engine is blocked when overloaded, therefore, no matter how hard an inexperienced user works, he will not be able to “burn” the tool quickly. In addition to modern protection, owners like the performance of the tool. It is quite high for such a battery (1.5 Ah), but many would like to have a battery with a larger capacity. However, such an assessment is subjective and not substantiated in any way - the battery is restored faster than it runs out from intensive work (it takes about an hour to fully charge).
READ How to Convert a Cordless Screwdriver to Lithium
Repair of the electrical part of the tool - start button
Another malfunction of the Interskol Da-14.4 ER screwdriver may be a breakdown of the start button. It manifests itself in the absence of switching on of the tool, instability of operation, or spontaneous switching on. The cause may be metal dust formed, burnt contacts and a failed transistor.
To make sure that it is the button that is to blame for the failure of the screwdriver, you need to:
- Connect the battery and, after pressing the button, measure the voltage at its output. If it is missing, the button is faulty.
- Connect the engine and battery directly, bypassing the start button. For this purpose, remove the power source and remove the upper wire of the electric motor from the button. After this, two wires are connected at one end to the battery, and at the other to the motor housing and the wire going to the button. Turning on the screwdriver means that the trigger button is to blame.
Repair, as a rule, consists of replacing the old button with a new one. You can try to troubleshoot a used button. To do this, it is disassembled and, as necessary, the chips are removed, the contacts are cleaned, or the transistor is changed.
Features of operation: safety recommendations
Electrical machines must under no circumstances be used in explosive atmospheres. This applies to dust, gases, and flammable liquids. This feature of the equipment is due to the electric drive of the machine, which acts as a source of sparks. They can cause vapors or dust to ignite.
Interskol DA- 12ER -02 li-ion should not be trusted by children or unauthorized persons. The master must use personal protective equipment, including:
- glasses;
- mask;
- gloves;
- special shoes and clothing;
- ear protection.
When working with equipment, you should not try to reach anything; you should maintain a stable position. The unit must be powered only from batteries that have a special designation. Using other batteries may cause fire and damage. If the operation is incorrect, the liquid electrolyte may leak from the battery, but it is important to avoid contact with it. If this does happen, the electrolyte must be washed off with water.
Due to the fact that the equipment has an autonomous power source in the form of a battery, it is always ready for use. That is why it is necessary to eliminate the possibility of accidental pressing of the switch key, as this can lead to injury and damage. If you purchased Interskol DA- 12ER -02 li-ion, the battery must not be opened under any circumstances. This may cause a short circuit and an explosion or fire. It is important to protect the battery from high temperatures, fire and sun. Otherwise there is a danger of explosion. If the battery is improperly used or damaged, gas may be released. It is important to ensure air flow, because gases can act as irritants to the respiratory tract.
Repair of the mechanical part of the tool - self-clamping chuck
Another component that requires attention is the screwdriver chuck. This is not to say that it often fails, but breakdowns do happen. At this point, the main task becomes dismantling the cartridge.
At first glance, it is difficult to get close to him, but in reality everything is simple:
- using a Phillips screwdriver clockwise, since the thread is left-handed, you need to unscrew the locking screw of the cartridge;
- Insert a hex key No. 8-No. 10 into the chuck with the short side and sharply hit the long side of the key in a counterclockwise direction.
If for some reason the screw does not come out, anti-corrosion liquid is first poured into the cartridge. Then repeat the procedure. If this does not help, disassemble the screwdriver and remove the gearbox. Then, using a 198 pipe wrench, hold the spindle and unscrew the chuck.
The chuck is changed completely, because the jaws and flare nut can only be selected from a similar chuck. To buy spare parts for a quick-release device, you need to have a screwdriver and an old chuck.
After reading the presented article, a craftsman will be able to repair a simple Interskol screwdriver, and he will not have to spend extra money in service centers.
How to disassemble an Interskol screwdriver
The tool includes many working elements. Among the most important are the following:
- Electric motor. The electric motor includes brass bushings and a steel armature. Several turns of winding and a gear are attached to the armature. At the bottom of the armature there are graphite brushes, through the use of which current is transmitted to the collector.
- Gearbox. Designed to transmit rotation using mechanical transmission. Can be presented in the form of a 1 or 2 stage gearbox. As a rule, screwdrivers use 2-stage gearboxes. You can repair the Interskol screwdriver gearbox yourself, taking into account the recommendations of experienced craftsmen.
- Accumulator battery. Consists of several small batteries. They are connected in series. Different models may have different compositions, which affects the power and duration of operation without intermediate charging. In order to extend the life of the battery, it must be charged correctly, which depends on the composition of the element. Experts recommend that after purchase, perform 3 full battery charging cycles, each of which is performed after the battery is completely discharged.
- Cartridge. Screwdrivers use quick-release chucks. It can be attached in several ways (threaded, screw, Morse taper). This indicator determines the quality of the tool attachment clamp and the method of its dismantling.
Elements
Bulgarian
converts electronic energy into mechanical action of the tool on the subject of processing. Therefore, its design consists of electronic and mechanical parts. The bevel gear represents the main element of the mechanical part of the angle grinder. It consists of the following components and parts:
- gear housing;
- spindle on which the working tool is located;
- drive bevel gear located on the rotor of the electric motor;
- driven bevel gear located on the spindle;
- rolling and sliding bearings that act as supports for transmitting rotation.
Bosch
A review of one of the household models of the Bosch angle grinder is presented below. It involves disassembling the gearbox, after which a visual inspection of the bevel gear is possible. The presence and condition of the lubricant is determined. It may be possible to find the degree of gear wear. In this case, because the Bulgarian
new, you can only make sure that there is one support on the spindle in the form of a plain bearing and a bevel gear - it is spur-cut. The creator classifies these design features of this Bosch angle grinder model as shortcomings. Indeed, the service life of such an angle grinder and the noise level will not differ from good indicators.
Subsequently, after disassembling the gearbox of another model of a Bosch angle grinder, significant contamination of the lubricant with abrasive particles is observed. Conclusion: the internal cavity of the gearbox should be inspected frequently to avoid early failure of the power tool.
The creator suggests replacing expensive lubricant from Bosch with another cheaper and more accessible Russian one. Fundamentally: the postulate that there is no such thing as too much lubrication does not apply here. A huge amount of lubricant will lead to its squeezing out through the seals on the gearbox housing, for example, through the retainer seal. Therefore, a strictly defined amount of lubricant should be placed in the gearbox.
How to repair a screwdriver gearbox
The tool reducer consists of a housing in which its working elements are located. For example:
Depending on the manufacturer and model of the device, its internal elements may be made of metal or plastic. The first option ensures a long service life and reliability of the tool.
Disassemble the gearbox
The body of household screwdriver models is made of plastic, while professional models are made of alloy steel. After dismantling the metal plate, we gain access to the inside of the gearbox: teeth and gear shift ring. If the crown has no defects, it is enough to clean it from dirt and lubricate it.
Now it’s time to start inspecting the outer crown, the inner part of which is equipped with teeth along the perimeter. The efficiency of the gearbox depends on their condition. If the teeth are worn out, it is not possible to replace them with new ones. But there is a way out of the situation.
Drill holes in the gearbox housing
First you need to take the smallest diameter drill and drill 4 holes in the gearbox housing. It is important to pay attention to the fact that the holes must be located in the very center of the tooth.
Screw in bolts instead of new teeth
In place of the worn teeth, you can install bolts of suitable diameter. Each bolt is carefully screwed into a hole pre-drilled in the body.
Use a drill
The heads of the installed bolts do not have the required geometric shape. To correct the situation, you can use a drill. With its help, we carefully trim the heads and legs of the bolts, giving them the desired shape.
When working with a drill, it is important to make short and smooth movements. Otherwise, it is possible that the plastic housing of the gearbox will overheat, which will lead to its melting.
Assemble the gearbox
Before starting to assemble the gearbox, experts recommend checking that the new teeth are installed correctly. To do this, take natfil and clean the surface of each worn gear tooth with it. If this is not done, the crown may not fit tightly into the housing groove or will spin.
Then a metal crown is inserted into the body. If it does not scroll and sits tightly, then all operations were performed correctly and you can continue assembling the gearbox. At the same time, do not forget about the mandatory lubrication of all working elements of the gearbox.
Water got into the screwdriver and it stopped working
In order not to bore you with reading the text for a long time, we suggest watching a video that clearly shows how you can repair a screwdriver yourself if moisture has gotten into it.
How to disassemble a screwdriver
Don't rush during disassembly. First you need to unscrew the screws connecting the housing
Then carefully open the case, being careful not to damage the plastic elements that hold it together.
When disassembling, be careful; there may be hidden fasteners in the case, for example, a bracket. If the screwdriver body does not open, carefully inspect it for additional fastening. Watch a video of a complete disassembly of a screwdriver, including the electric motor and gearbox. This will give you some idea of what it consists of and how to start disassembling correctly so as not to break the case.
After you remove the housing cover, all working parts of the screwdriver will open in front of you.
The planetary gearbox is the muscle of the screwdriver; the more powerful and reliable the gearbox, the easier it is for the electric motor to operate.
The electric motor is the heart of the screwdriver. The less it heats up, the longer it works. Try to avoid prolonged loads on the engine.
The force regulator is an important element in a screwdriver; it controls the set force during operation. If the tool is jammed, the force regulator will simply turn, thereby protecting your hand from dislocation and the electric motor from overheating due to increased excitation of the winding.
The tool attachment point (chuck) is something like a human hand. Reliably fixes the tool and prevents the drill from turning in the chuck.
And now you are at your cherished goal, the screwdriver is disassembled and all its components are in front of you. What's next? Where to start the inspection?
We check all wires and soldering. The soldering may be broken or the wire insulation may be damaged. Pay attention to green spots in the form of oxides on the current-carrying parts of the screwdriver. Here we will need a brush, alcohol and a hair dryer. For cleaning from oxidation and further drying of cleaned elements. Let's say the screwdriver was disassembled, the soldering and wires were checked, any oxidation present was removed, and the screwdriver still does not work.
How to fix the Interskol screwdriver button
If charging from the battery is normal, but the tool does not turn on, you need to check the condition of the screwdriver power button.
To do this, after disassembling the device’s body, we gain access to its button. At the terminals that come from the button, you need to measure the voltage level using a multimeter. In this case, the battery must be in an active state. If voltage is supplied, the button contacts must be short-circuited using clamps. In this case, the multimeter switches to Ohm mode. If the voltage is close to zero, this means that the button is in working condition. Otherwise, the button needs to be repaired.
Unsolder the old switch
First you need to disconnect the old switch from the screwdriver body. A soldering iron is used for this. We must not forget about the need to fix the polarities on the sealed contacts of the old button.
Solder a new switch
If you had to buy a new button, you need to pay attention to the fact that it must be completely identical to the old one, have the same dimensions and fit tightly into all the grooves of the tool body. If there are small errors, you can correct them with a file and sandpaper.
Observing the polarities, solder the new button to the contacts of the electric motor. To make sure that all operations were performed correctly, experts recommend checking the button for turning on and the smooth rotation of the screwdriver. Only after this can you begin assembling the case.
How to assemble an Interskol screwdriver
After checking the functionality of the screwdriver, you can begin assembling it. To do this, you need to follow the reverse sequence of disassembly:
- Replace the tool motor.
- Install the device's power button into the groove of the housing, checking its strength and correct fit.
- Install the clutch for switching the speed of rotation of the nozzle and chuck.
- Put the gearbox in place, having first cleaned and lubricated all its working elements.
- Tighten the bolts connecting the 2 halves of the housing. It is important not to squeeze them too hard. This can lead to cracking of their seat.
- Reinstall the chuck and rotary housing. All balls must be lubricated and in place.
- Connect the battery.
You can extend the life of the tool by following the rules of its operation. For example, do not start work without checking the battery charge level, do not use the device at high speeds for a long time, when using a nozzle, take into account the size of the cartridge seat, and before starting work, check that the nozzle is properly fixed.