Knowledge of how to select a drill for a dowel is relevant in situations where it is necessary to drill a hole to fix this fastener in it. Dowels are used in cases where it is necessary to fasten various objects to the wall surface - furniture elements, photographs, paintings, etc. The reliability of the fastening will largely depend on how correctly the drill is selected to create the hole in which the dowel will be placed.
First, we select a dowel depending on the wall material and the weight of the object, and then we select a drill based on the wall material and the size of the dowel
Types of fasteners
Construction stores offer a wide range of dowels.
Photos of products clearly demonstrate the diversity of their designs, materials of manufacture and purpose. The most common product is the universal polypropylene dowel. It has a traditional design in the form of a sleeve, into the cavity of which a self-tapping screw is screwed. This element is suitable for concrete, brick and stone foundations. The design of the product is equipped with special spacers, with the help of which the element is securely fixed in the hole.
To perform complex external work, a spacer construction dowel with a locking edge is used, which eliminates the possibility of fasteners falling into the hole.
Nylon dowels are equipped with fastening antennae, thanks to which the products are securely fixed in the holes. They can be used on any surface.
Drywall dowels are used for mounting them into porous concrete and sheets of gypsum fiber and plasterboard. They can be made of plastic or metal. The last option is called dowel molly. Before hammering in a dowel of this type, there is no need to first prepare the hole, since its tip has the appearance of a sharpened drill.
Dowel for plasterboard walls
Facade dowels are made of polypropylene or nylon. They have directional antennae for secure fixation at the base. Such fasteners can be used for any surface. They are produced without sides, which eliminates the possibility of shedding or cracking of the facing plaster.
The frame dowel is intended for installation of door and window frames, cladding through layers of thermal insulation and plaster. The products are made of metal. They are often called thermal insulation dowels, which can be of two types: for working with hard and soft materials.
Types of dowels with special design
Dowel nails are made of polypropylene, nylon or stainless steel. Thanks to the presence of knurling in the form of reverse cones, reliable retention of the product in the base is ensured. They are widely used for quick and extensive installation of skirting boards, sheathing, windows, timber, metal profiles, cable ducts, plywood to concrete, brick or stone surfaces.
Butterfly dowel for hollow structures
The butterfly dowel is characterized by increased wear resistance and the ability to withstand high loads even in hollow surfaces. Such products are made of metal.
The adjusting dowel is used to install the sheathing under the sheathing. It has a special design containing a certain element that allows you to adjust the position of the product relative to the surface to which it is attached.
The dowel-clamp has the shape of a loop with characteristic tendrils for fastening along the edges of the product. Such elements are designed for mounting electrical wiring to the base. The wire is inserted into the clamp, and its edges, in turn, are inserted into holes previously created in the wall and fixed with tendrils.
A special type of fastening element is an umbrella dowel, which is designed for installing thermal insulation made of polystyrene or mineral wool. This product has a wide round cap that holds the insulation. They produce plastic and metal dowels.
An umbrella dowel is often used to hang ceiling chandeliers
The Molly umbrella dowel is a nail with metal arms that provide reliable fastening of structures to hollow surfaces with uniform load distribution.
Profile hangers
Using hangers, profiles are attached to walls or ceilings. Any suspension is designed so that its length can be changed. In total, there are 5 options for hanging plasterboard profiles.
Direct suspension. Suitable for fastening profiles to both walls and ceilings.
Direct hanger for profile
Straight hangers are sold unfolded and during installation are easily bent by hand to form a U-shape. It is attached to the wall with threaded dowel nails. In rare cases, if the wall or ceiling is crumbly, a wedge anchor is used.
Vibration suspension. This is the same direct suspension, but with a special rubber insert that prevents direct contact between the metal suspension and the solid wall.
Vibration suspension for profile
The rubber insert dampens sound vibrations, increasing the sound-insulating properties of the room's finishing. Together with the vibration suspension, soundproofing material is laid in the cavity between the wall and the drywall.
Like a simple direct suspension, a vibration suspension is used for both walls and ceilings.
Suspension with clip. This fastener is also called an anchor or sliding suspension. Used for mounting the frame on the ceiling.
Profile hanger with clamp
This suspension consists of two parts - a rod and a suspension with a spring clip. The pull length can reach 1 meter. This type of suspension is used if you need to lower the ceiling significantly or make it multi-level.
Due to their design, hangers with a clamp are used only on the ceiling.
Vernier suspension. It is similar to an anchor suspension with one difference - the fixation is stepped. Instead of a rod, this suspension has a bar with holes into which a cotter pin is inserted for fixation.
Vernier profile hanger
Vernier suspension is also used only on the ceiling.
Attaching to an unstable surface
Modern houses have many surfaces made of not very durable materials. These include drywall, old brick, wooden boards or slabs of pressed sawdust. When working with them, it is better to use nylon fasteners with a diameter of more than 10 mm; the installation depth should not be less than 6 cm. It is better to choose a gimlet that is several sizes smaller.
The drilling process should be shock-free, as excessive load can damage the surface. Using the impact mode may not leave visible damage, but the internal structure of the wall may be damaged. If the diameter of the drill is too large, the fasteners will move freely in the hole, gradually increasing its diameter, especially if the work was carried out with aerated concrete.
For plasterboard walls, it is not necessary to use a drill of a smaller diameter, the main thing is not to put pressure on the drill and not to use the impact mode. Drywall is a very delicate material, even a small load can lead to the destruction of a section of the wall. Drill the hole with light force so that it matches the size of the plastic dowel with self-tapping screw.
It is worth understanding that there is no need to attach heavy structures to such surfaces, even if the material initially copes with the load, over time, collapse may occur under heavy weight.
If you take into account the material from which the wall is made, choose the right dowel and drill for it, and also have a high-quality tool on hand, you can make a high-quality installation and not worry about the safety of your furniture or household appliances. By following the recommendations, even an inexperienced craftsman can handle such installation.
If you find an error, please select a piece of text and press Ctrl+Enter.
What are the basic principles for choosing a drill for a dowel? How should the diameter of the dowel and drill correspond?
There are several options for selecting a drill for a dowel. This point of choice should depend on the type of work expected and the quality of the working surface.
if the wall is reinforced concrete or brick, of solid masonry and you intend to hang a light object, then it is best to choose an impact dowel with a diameter of 6 mm and a Pobedit drill of the same diameter. In this case, the dowel must extend into the wall by at least 40 mm, and into the ceiling by 60 mm. The minimum number of dowels is 2 pcs.
If you are going to attach medium-weight objects (5–10 kilograms) to a reinforced concrete or brick wall, then it is recommended to use an impact dowel (8 mm in diameter) and an 8 mm Pobedit drill. In this case: the dowel should extend 60 mm into the wall, and 80 mm into the ceiling. The number of dowels used should not be less than 4 pieces.
if you plan to attach a heavy/oversized (static) object to a reinforced concrete or brick wall, you should choose an impact dowel and a 10 mm diameter Pobedit drill bit. In this case, the dowel should extend 60 mm into the wall, and 80 mm into the ceiling. The minimum number of dowels is 6 pcs.
When fastening heavy objects, including those with a large dynamic load (for example, steps of a ladder, horizontal bar, etc.), it is advisable to use anchor bolts with a diameter of 8 mm and a Pobedit drill of the same diameter. The bolt should go 60 mm into the wall, and 80 mm into the ceiling. The number of bolts for this type of work should not be less than 4 pieces.
In old houses and buildings, when choosing a dowel-drill pair, it is recommended to adhere to the following rule:
1) for fastening you need to use nylon dowels with a diameter of 10 or 12 mm. It should fit into the wall approximately 60 mm.
2) you need to drill a hole with a Pobedit drill, the diameter of which will be 2 mm less than the diameter of the dowel used. This is done because the drill strongly “breaks” the hole in the soft material of the walls of old houses/buildings.
Securing heavy objects
Heavy furniture or household appliances that are mounted on the wall carry significant physical stress. Even if the fastener looks reliable at first, it can fail over time. Installation of heavy objects should only be carried out on walls made of durable materials, concrete or brick. Loose material can collapse under the influence of heavy weight. The normal diameter of the fastener is 10 mm, and the depth of the hole is more than 6 cm; you need to rely on these indicators to determine the diameter of the drill. For reliability, the recommended number of mounting points is at least 6. When choosing which drill to drill with, you can safely choose victorious ones.
To ensure that the attached structure can withstand about 100 kg, it is better to use anchor bolts.
They are more reliable, even given their smaller size. You should make a hole up to 6 cm deep and install the selected bolt.
There are 3 types:
- A bolt with an outer nut that is tightened with a regular wrench.
- Self-locking nut that can be tightened with a screwdriver.
- Double-expansion anchors, which are used for fastening the most massive furniture.
Dowels for fastening products on a plasterboard wall
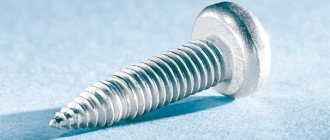
For fastening objects on plasterboard walls, a special dowel is used, the end of which is equipped with cutting edges that act as a drill. To install such a dowel in a plasterboard wall, you do not need to pre-drill a hole in it, which allows you to fix the object on the wall in the absence of a drill or auger.
After installation, a self-tapping screw is screwed into the dowel without changing the geometry of the dowel. The dowel can be easily unscrewed from the drywall and reused.
There is another special dowel for attaching products to a plasterboard wall called Molly. Builders call it “Butterfly” because when screwing in the self-tapping screw, the spacer part of the dowel spreads out to the sides behind the inside of the drywall, taking the shape of the wings of a butterfly. This is due to the fact that at the end of the spacer there is a thickening into which a self-tapping screw is screwed, folding the spacer part of the dowel in half, firmly fixing the dowel in the plasterboard.
This dowel allows you to secure a product weighing up to 10 kg on drywall. Here, using a Butterfly type dowel, a large mirror on a plasterboard wall.
Peculiarities
Concrete structures are highly durable, so drilling them yourself is quite difficult.
This is due to the fact that crushed stone is used to create concrete products, and when you come across it while drilling, the process becomes very difficult.
The need to drill a concrete wall arises quite often; this is necessary for installing shelves, cabinets, air conditioning, gluing wallpaper, attaching a lamp, when attaching insulation, or when plastering walls to attach beacons.
There are several ways to solve this problem:
- using a hammer drill or a powerful impact drill;
- an ordinary electric drill or screwdriver;
- diamond drilling.
It should be remembered that for walls made of relatively soft materials, it is impossible to use pobedit drills, since the holes will be uneven and the wall will collapse. It is also impossible to work with metal with such a tool.
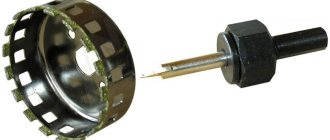
To create large-diameter holes or cut through a doorway, diamond-coated annular drills are used. To use such a tool, it is necessary to use special installations; they allow you to make holes with a diameter of up to 250 mm.
Since the cost of such equipment is high, it is easier to hire specialists or you can rent it.
Installing a Butterfly Dowel in Drywall
The work of installing butterfly dowels in drywall is not particularly difficult; you can easily handle them yourself, without the involvement of professional craftsmen.
The most popular size of such dowels is 10x50. Most plasterboard structures are secured with a butterfly dowel of this size.
The installation sequence is as follows:
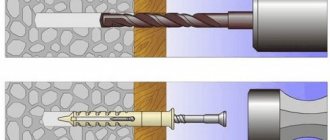
First of all, the required markings are carried out; Using a drill or hammer drill, a hole of the required diameter is drilled in the base
It is impossible not to note the extraordinary versatility of this anchor fastener - with equal efficiency it can be used for fastening both drywall and chipboard, plywood, MDF and other materials.
When choosing the optimal self-tapping dowel, you should take into account not only the diameter of the head and the length of the leg, but also the material from which the base is made.
As for the maximum permissible load that such dowels can withstand, it is 28 kg.
Trade marks
Butterfly dowels for drywall from the following manufacturers are in greatest demand on the domestic market:
Butterfly dowel and its advantages
Butterfly dowels for drywall are characterized by a number of undeniable advantages that make them stand out among many competitive offers.
The most valuable among them are:
- Convenience and ease of installation work;
- Easy screwing of the fastening screw;
- Possibility of reuse without reducing the quality and reliability of the connection;
- The presence of longitudinal ribs that prevent the element from turning;
- Long period of effective use;
Increased connection strength, achieved by expanding the contact area of the dowel to the base by straightening additional supports.
The use of butterfly dowels under drywall allows you to securely fix the sheets with a minimum of effort, regardless of the configuration of the base and the complexity of the structure being formed.
Working with such fasteners is characterized by its simplicity; the main thing is to choose high-quality screws and strictly follow the instructions for their use.
Video on installing a butterfly dowel in a plasterboard wall
Wall material
In order to make the right choice, you need to know one rule. The tool must be harder than the material being processed. That is, everything is logical and predictable. If you have a wall made of wood, soft or hard plastic, metal, chipboard, a drill made of high-strength steel (ordinary) will suit you. If it’s brick, concrete, stone, we take Pobedit.
What is it that will win? This is the name of hard alloys (90% tungsten + 10% cobalt) with a high degree of strength, the name came to us from the 20th century. Armor-piercing bullets for anti-tank rifles, for example, were made from this material. Over a long period of use, the composition of the alloy was modernized, improved, and the proportions of the constituent elements were changed.
Now the alloy can be used for peaceful purposes. There are also its varieties for different types of processed materials. A pobedite drill is an element whose cutting part is tipped with pobedite.
Application of the tap
Before you start threading, you need to determine the diameter of the preparation hole and drill it. To facilitate this task, a corresponding GOST was developed, which contains tables that allow you to accurately determine the diameter of the threaded hole. This information makes it easy to select the drill size.
To cut metric threads on the inner walls of a hole made with a drill, a tap is used - a screw-shaped tool with cutting grooves, made in the form of a rod, which can have a cylindrical or conical shape. On its side surface there are special grooves located along its axis and dividing the working part into separate segments, which are called combs. The sharp edges of the combs are precisely the working surfaces of the tap.
Tap: design and parameters
In order for the turns of the internal thread to be clean and neat, and for its geometric parameters to correspond to the required values, it must be cut gradually, by gradually removing thin layers of metal from the surface being treated. That is why for this purpose they use either taps, the working part of which is divided along the length into sections with different geometric parameters, or sets of such tools. Single taps, the working part of which has the same geometric parameters along its entire length, are needed in cases where it is necessary to restore the parameters of an existing thread.
The minimum set with which you can sufficiently perform machining of threaded holes is a set consisting of two taps - rough and finishing. The first one cuts a thin layer of metal from the walls of the hole for cutting metric threads and forms a shallow groove on them, the second one not only deepens the formed groove, but also cleans it.
Types of thread taps and their differences
Minimum set of taps
Combination two-pass taps or sets consisting of two tools are used for tapping small diameter holes (up to 3 mm). To machine holes for larger metric threads, you must use a combination three-pass tool or a set of three taps.
To manipulate the tap, a special device is used - a wrench. The main parameter of such devices, which can have different designs, is the size of the mounting hole, which must exactly match the size of the tool shank.
Some types of tap drivers
When using a set of three taps that differ both in their design and geometric parameters, the sequence of their use must be strictly observed. They can be distinguished from each other both by special marks applied to the shanks and by design features.
- The tap, with which the hole for cutting metric threads is processed first, has the smallest diameter among all the tools in the set and cutting teeth, the upper part of which is heavily cut off.
- The second tap has a shorter fence and longer combs. Its working diameter is intermediate between the diameters of the other tools in the set.
- The third tap, with which the hole for cutting metric threads is processed last, is characterized by full ridges of cutting teeth and a diameter that must exactly match the size of the thread being formed.
Set of three taps
Taps are used primarily for cutting metric threads. Much less often than metric ones, taps designed for processing the internal walls of pipes are used. In accordance with their purpose, they are called pipe, and they can be distinguished by the letter G present in their markings.
Types and parameters of concrete drills
The peculiarity that distinguishes concrete drills is that their cutting part is equipped with tips made of a special alloy, the hardness of which is very close to the hardness of diamond.
Due to its unique characteristics, this alloy is called “win.” Pobedit concrete drills are the most durable tool for processing this material. Among concrete drills, there are two main categories:
- concrete drill bit for a drill, the design of which has a cylindrical or multifaceted configuration;
- a tool for working complete with a hammer drill, having a cylindrical shank, on which the designation SDS-plus or SDS-max is placed.
Drill shanks for concrete
Home craftsmen often have questions about how to choose equipment and tools for making holes in reinforced concrete structures. To solve this problem, a hammer drill with concrete drills for an impact drill is optimally suited. Drill bits of this type are often called drills and are divided into three main types:
- auger, with which you can drill holes of considerable depth;
- spiral-shaped (they can make holes of large diameter);
- flat, which allows you to obtain holes with small diameters and depths.
Drill bits for rotary hammers with different spiral shapes for dust removal
Thanks to such a design feature as a thickening on the shank, the drills are installed in the tool chuck by simply snapping into place. As a rule, they are chosen by professional builders and installation specialists to obtain holes with a diameter in the range of 4–30 mm.
In the event that the question arises about how to drill concrete, obtaining a hole of a larger diameter, choose a crown-type tool. It forms holes with a diameter of up to 12 cm. Core drills for concrete are also divided into several categories:
- diamond drills for concrete in the form of a tube or crown, which are fixed on a solid-section rod (diamond coating is applied to the working part of such a tool, which is why it is called a diamond drill);
- Pobedit drills, which have a similar design to diamond ones, but differ from them in the material used to make the teeth on the cutting part (these teeth are made of Pobedit).
Crowns for concrete
The need for a core drill for concrete arises if it is necessary to prepare seats for electrical sockets and switches, conduct communications and perform other work related to the need to obtain large holes and recesses.
The choice of drill for brick and concrete is also determined by the diameter and depth of the holes being formed. A diamond or pobedit drill can have the following diameter and length ratios:
Diameter to length ratio
In the table below you can see a simple pattern: the larger the diameter, the longer the length of the concrete drill. This is explained by the fact that a long and thin tool cannot withstand the perceived loads.
How to choose a drill for a dowel?
To prevent the dowel from turning in the wall, you need to start drilling with a drill of a smaller diameter, for example a ten-point dowel, start drilling with a six, then an eight. After this comes an “interesting moment”, an important one, to be more precise. If the wall is concrete, then insert a six into the hammer drill and drill with a blow, then an eight with a blow. After all this, we insert the drill ten millimeters (this is the size of our dowel), but we drill without impact.
This is the only way we will get a hole of the required diameter, because a blow (drill in hammer drill mode) breaks the hole.
Everyone who says that a drill of a smaller diameter is needed is wrong; a plastic dowel simply will not fit into such a hole. Plaster walls are drilled in exactly the same way, but from the very first drill, without impact, plaster walls are too capricious; if you drill with a hammer drill, whole pieces may fall out, then there will be no place to hammer the dowel.
There is nothing simpler, there is a marking on the dowel, the thickness and length are written there, for example 8 X 50 or 10 X 100, often they even indicate that it is millimeters.
When you buy dowels, they are in boxes labeled, if you really can’t find out the thickness, then you need to take a measurement, it is measured with a caliper under the crown or at the very beginning, where there are no extensions or slots yet.
The drill is chosen exactly the same thickness, no more, no less, the drills are also signed (marked), if the marking is not visible, then you need to measure the diameter - Attention! You need to measure the width of the pobedite soldering, it is this that gives the diameter of the hole, the drill itself is thinner!
More questions on your topic:
leave a comment
Builder's Dictionary :: Repair questions :: Calculators :: Special equipment :: Miscellaneous
2006 - 2022 user agreement :: contact with the site administration
How to drill a brick wall
Drill into brick with a drill. simple process. An impact drill is used for work. If drilling is unstressed, the drilling process may take a long time.
It is very important that the tool operates at high power. Quantitative indicators of revolutions per minute are also important.
Indicators of more than 2,000 revolutions are considered the most acceptable.
Of course, to perform better work, a hammer drill is used. If it is not at hand, then use high-power drills. You don't need any tools to drill a hole. then special knowledge. The main thing is to follow a number of simple recommendations mentioned above. Sometimes you can stumble upon a burnt stone. It will be quite difficult to form a cavity in it. Such a brick is identified by the dust generated during operation. It becomes a pronounced black shade.
To create holes in burnt rocks, you need to turn on the drill at low speeds and set the impact function. You need to press very hard on the tool for the hammer function to work correctly.
It is also important to ensure that the drill does not overheat during operation. A severely overheated drill causes the edges of the drill to wear out quickly
For such purposes, a diamond-coated drill is most often used. This way the clutch is most effective. This leads to significant savings in physical effort and energy.
Sometimes situations arise when the hole made needs to be made of a significant diameter. For example, this could be a ventilation outlet. Such work will be very difficult to organize with ordinary tools. You will need powerful equipment and large crowns.
Types of dowels
In stores you can find a large selection of different dowels. But each of them is created for one purpose or another.
| The simplest, but suitable for most types of work, including stone, concrete and brick. When screwing in the self-tapping screw, the dowel material is wound onto the metal, thereby securing the structure |
| It is also made of polypropylene, but has special spacers, due to which it is held inside the hole |
| Allows you to quickly and efficiently fasten windows, sheathing, skirting boards, beams, cable ducts, metal profiles, as well as plywood into concrete, stone or brick surfaces. Made of nylon or polypropylene, nail made of steel |
| Designed for mounting various elements into sheets of plasterboard or gypsum fiber, as well as porous concrete. This fastener is made of plastic or metal. The second option (also called a “molly” dowel) does not require pre-drilling holes, since the tip of the metal dowel looks like a feather drill |
| As the name suggests, it is made of nylon. It can be used in almost any situation and on any surface. Due to the presence of fastening antennae, the nylon dowel is securely held in the wall. Self-tapping screws for such a dowel usually have a diameter of 0.02-0.16 cm |
| Designed to perform serious installation work. This fastener can withstand enormous loads even if there are hollow walls. Made from metal |
| With its help, the sheathing is attached for future cladding. The main feature of this type of fastener is the ability to regulate (adjust) the position of the elements relative to the base to which they are attached |
| A special type of dowels designed for installing thermal insulation made of mineral wool and polystyrene. The appearance of the fastener fully explains its name: a wide round cap, the main purpose of which is to hold the insulation against the wall. “Umbrellas” are made of both plastic and metal. But “umbrellas” are also called another type of dowels designed for working with drywall, mostly with hanging structures. This metal “umbrella” Molly is a nail with metal shoulders that are securely attached to a hollow structure, evenly distributing the load. Using this type of dowels you can easily hang any chandelier in a suspended ceiling |
| It looks like a loop made of plastic (nylon), with “antennae” along the edges, due to which the fastener will be held. Clamps are designed for mounting electrical wiring to the wall. Working with this type of dowel is very simple: first, a hole of the required diameter and depth is drilled, and then the required wire is simply pressed with a clamp, the edges of which are inserted into the previously drilled hole. They can also be used to attach small-diameter corrugated pipes |
Frame dowelIt is made of metal, since its area of application is very specific. Designed for installation of window and door frames. A metal frame dowel is also suitable for fastening the sheathing through a layer of plaster and thermal insulation. |
Installation of dowel nails using a special gun
All the previously described options for driving dowel fasteners imply that the nail is driven into the dowel. But there is another way to install the mount in question, which involves using a construction gun. This modern installation device allows you to “shoot” the structure being fixed to the base using a dowel-nail.
In this case, a special dowel fastener is used, which by and large does not involve the use of the dowel itself. The presence of a special washer on the nail ensures a tight fit of the fastener into the solid material.
The essence of the technology for operating the gun is that after shooting the dowel-nail, the washer on its tip moves to the head of the fastener and is tightly fixed there.
This dowel-nail is used when fastening metal structures to solid bases made of natural stone, concrete, steel with low carbon content, and brick. The gun and the described type of fastener are very often used when installing canopies on the balconies of buildings.
They produce “nails with washer” with a length of 30 to 80 millimeters, a cross-section of 4.5 and 3.7 millimeters from steel coated with zinc. It is extremely rare to find nails with a cross-section of more than 4.5 millimeters on sale.
I think you already understand how to use a dowel-nail. Humans do not encounter any particular difficulties with this fastener.
In this case, it is very important to choose the right type of fastener, since dowel-nails, which, for example, perfectly connect the surface and the concrete base, are absolutely not suitable for fastening chipboard or plasterboard
It is enough to contact the consultants (sellers) of a hardware store that sells various types of fasteners (for example, slate nails or finishing nails) to obtain comprehensive information about the types of dowel devices.
They will also advise you on how to use dowel nails. However, after carefully reading the article we have prepared, you will probably no longer need this information. You can easily mount fasteners into any type of surface without outside help!
How to choose the right Victory drill bit for a dowel?
The answer to the question: which drill largely depends on what tool you will use to drill the wall. And also - what kind of wall: concrete, brick, plasterboard...
If you have a drill, then the drill should have a cylindrical shank.
Shank types
For a hammer drill you need an SDS type shank. It allows you to quickly insert the drill into the hammer drill with reliable fixation. SDS – in turn is divided into several types. sds plus is the most common. It has a diameter of 10mm and a length of 40mm. It is most often used for domestic needs.
Drill with SDS-plus shank and flat double flute
A drill bit for a hammer drill is called a “drill.” In addition to the SDS shank, it has another feature - a special groove for removing drilling products (simply dust) from the hole. There are three types of drills: auger, spiral and flat. The first two are a serious tool and are designed for drilling relatively deep or large holes. If you need to drill a wall for domestic needs with a load of up to 10 kg, then you should choose flat drills.
The pobedite drill tip has various forms of sharpening. Straight configuration - flat triangle - this is a classic sharpening. There are single and double - with two edges. If you look at it from the end, there will be a cross - two pobedit plates are soldered crosswise... And a tip with a centering spike. This is the best option available to the population. The tenon is designed to align the drill inside the hole. As a result, an unbroken hole emerges.
Pobedite drill tip with classic sharpening
The type and size of the dowel - length and diameter, are selected in accordance with the expected load and the nature of the wall.
The diameter of the drill should ideally be equal to the diameter of the dowel.
The length of the drill is at least 3-5mm greater than the required depth of the hole, otherwise the dowel will not go all the way.
However, often a drill or hammer drill has a transverse runout, so the hole is slightly wider. – Especially when drilling with a hammer drill in chiselling mode. – Due to the impact, the wall is slightly destroyed. And the dowel may not fit tightly as a result.
Concrete wall. The density of concrete is high. The drilling process is carried out in two stages. Initially, we use a drill with a diameter 1-2 millimeters smaller than the nominal value. We drill in impact mode. Then we take a drill at nominal value - with a diameter equal to the diameter of the hole. And we drill in shockless mode.
After drilling, be sure to clean the hole from dust, which somewhat narrows the hole. Otherwise, it may seem that the dowel does not fit. And if you score, it will hold worse, because it will slip in the hole. To do this, first you need to use the same drill to drill a hole - forward and backward movements with the hammer drill (drill) turned on. I additionally blow with a rubber bulb (!)
Brick wall or wall made of gas silicate, plasterboard. They have a tendency to chip, especially when the brick is old
Drilling in such cases must be done with extreme caution. And always in shockless mode. The primary drill is then taken with a diameter 2-5mm smaller than the nominal value - depending on the strength of the wall and the depth and diameter of the drilling
If the wall is particularly weak, then you can drill in 3 stages. Thus, we make a gradual transition to the desired result. Each time we check whether the dowel fits. After all, this can happen after the first stage
The primary drill is then taken with a diameter 2-5mm smaller than the nominal value - depending on the strength of the wall and the depth and diameter of the drilling. If the wall is particularly weak, then you can drill in 3 stages. Thus, we make a gradual transition to the desired result. Each time we check whether the dowel fits. After all, this can happen after the first stage.
And in all cases, try to hold the hammer drill so that the drill enters the wall at a right angle. Remember to keep an eye on this as you drill. Otherwise you will get an even bigger “hole”.
So, the hole turned out such that the dowel fits in freely - with a light blow with a hammer or pressure with a finger... Usually this is normal. The turning screw will open the walls of the dowel, and the latter will be well fixed. But if in the end the hole ends up being significantly larger, then first try inserting a dowel one size larger. If it turns out to be large, then the fit of the dowel can be sealed: tile adhesive, PVA, Rotband... Let it dry for a day and only then tighten the screw. In the end, just wrap the dowel with something: electrical tape, paper... – Just so that it doesn’t bulge when driven in. However, it is risky to put a lot of weight on the “wrapped” quality.
Advice from professionals
It is better to select a drill for a dowel in accordance with the recommendations described above. If you have to punch a hole through a hard surface, a good option would be to take a nozzle 2-4 mm smaller, turning on the impact mode on the drill. This will avoid chipping and deviating direction to the side.
- Remember - perforation always expands the area of impact of the drill.
Afterwards, a cutting mechanism is installed according to the size of the insert tenon. The equipment is switched to standard mode. The hole widens, maintaining smooth edges. Experts recommend blowing out the resulting hole, removing dust and residues that have accumulated after drilling. This will ensure reliable adhesion of the element to the base.
An important detail - even if a hole is made in soft surfaces, you need to use 2 drills - first 1 mm smaller, then according to the diameter of the dowel. This will allow you to get a perfectly sized hole.
What are the basic principles for choosing a drill for a dowel? How should the diameter of the dowel and drill correspond?
Components and design features
Regardless of the material used, the working bushings, all types of dowels consist of the following structural parts:
- a working sleeve, which is driven into a hole pre-drilled in the building material;
- fastening element, in the form of a self-tapping screw, threaded bolt or screw, screwed into the plug.
The body of the sleeve itself includes two sections:
- the upper part, which maintains the diameter when screwing the hardware. The non-expandable section of the plug retains its original shape, directing the fastening element deep into the channel;
- the working part, which is also called the spacer. A screw-on self-tapping screw pushes the sleeve segments apart. They are pressed against the building material, creating a persistent knot.
Metal butterfly dowel for plasterboardThe size of the non-expandable section is determined by the fastening features:
- the reduced length is used if it is necessary to ensure the operation of the collet mechanism over the entire channel area;
- the enlarged non-expandable section allows you to install fasteners through cavities or a layer of thermal insulation.
Structural parts of the spacer mechanism:
- locking elements in the form of spikes, bosses or corrugations. They make it difficult to rotate the sleeve when screwing in a screw or bolt;
- spacer teeth and spikes. They increase the efficiency of contact with the channel walls, preventing the sleeve from falling out;
- slots located parallel to the longitudinal axis. They divide the body into separate segments that alleviate deformation and equalize pressure.
Choosing a tool and working with it
When choosing a tool to drill a hole, you should understand that your work depends on it. A good drill accurately drills into a concrete wall or other required material, simplifying the drilling process, while a bad one will require a lot of time, may not cope with the task, or will complicate it. What you need to pay attention to when choosing a drill:
- Is it possible to change the drilling speed? - this point is important, since correction of the speed mode will ensure accurate operation of the drill, helping it not to damage the surface.
- Is it possible to hammer drill and adjust the depth? — impact drilling can be used on problem areas, softening them.
- Is it possible to hold the drill with both hands? — a drill is not a light tool and therefore preference should be given to models that are equipped with handles.
- Is the tool's power sufficient for your job?
Having decided on a drill, before starting work you need to get the hang of holding it. To do this, you should take the drill in one hand, like a pistol, and place the other hand on the handle of the tool (if it is not intended by the design, the hand is placed near the chuck). It is necessary to hold the drill in your hands strictly horizontally, so that the hole does not turn out distorted or at the wrong angle. Wait until the drill reaches ambient temperature before turning on the drill. Sudden temperature changes can cause condensation. If you decide to rest while working, unplug the tool.
Selection rule
This rule is simple and sounds like this: the diameter of the drill is equal to the diameter of the dowel. Relative to its length, it is 3–5 mm longer than the fastening element. This ratio will be optimal. All instruments are marked accordingly. If you want to measure manually - with a caliper, for example - remember that you need to measure the soldering from pobedit, the tool itself is narrower.
Read also: How a semiconductor diode works
Why do we take a drill longer than the fastener? It's simple - we leave space for dust and crumbs formed during drilling. You also need the screw or self-tapping screw to go beyond the dowel. Then the grip will be maximum and your skill will be at its highest level.
In the video you can see how to insert the fastener into the wall and remove the dust generated during the work.
Choosing a drill
When solving a problem, you need to take into account the diameter and length of the part. Take a closer look at the basic rules:
- About the diameter: a drill with an identical circle is used. It is permissible to use a cutting tool 1 mm smaller. In this case, you will need to widen the hole in a circular motion so that it is no smaller than the key used;
- About the length: the hole is usually made 5-14 cm longer. The margin is required for dust and the tip of the screw extending beyond the tenon. An example of how to choose a drill for a dowel:
- Length 25 mm = Depth 30 mm;
- 40 mm = 46 mm;
- 65 mm = 73 mm;
- 70 mm = 84 mm;
Using the above table, you can easily calculate the required parameters. Minimal deviations are acceptable.
We attach to an unreliable surface
Concrete monolith and solid brick are increasingly giving way to materials that do not have the same strength and hardness. Plasterboard partitions and tongue-and-groove slabs, cellular and aerated concrete, although they provide quick construction of buildings, are greatly inferior in reliability. When drilling holes, such a wall can crumble or crack, especially when it comes to hollow elements. To prevent this from happening, you must act according to certain rules.
- Choose lightweight fasteners made of nylon and other polymers, giving preference to a diameter of at least 10 mm. This will allow you to better secure it to the wall. For very porous walls, metal molly dowels are intended.
- Select a drill 1-2 mm smaller than the dowel. The pobedit version is suitable - quite versatile and reliable. When drilling tiles in a bathroom on a plasterboard partition, it is better to replace it with a diamond drill.
- Carry out work in 1 stage. You need to drill in a non-impact mode, choosing the entire required length per pass.
- Prefer dowels specially designed for hollow walls and weak foundations. First of all, these include “butterflies”, which, when installing a self-tapping screw or self-tapping screw, reveal their side edges. It is much more reliable to fit a dowel with already cut edges directly into the drywall - no preliminary drilling is required for it, you just need to wrap the product into the wall. The load-bearing capacity of such fasteners is small, but it is enough to hang a watch or a small picture.
- If the drill diameter is incorrectly selected, it is recommended to change the dowel. If this is not possible, compounds such as “liquid nails” will help strengthen the fixation. They are also used when turning the installed fastening. 30-120 minutes are enough for the dowel to be ready for installation of the self-tapping screw.
- If the fastener rests against a partition or other obstacle, and part of the sleeve remains outside, it can be carefully removed. When working on walls with a decorative coating, they are first protected with a circle of sandpaper, putting it on a dowel. Then the excess edge is simply filed off, a self-tapping screw or screw is installed as usual.
The following video describes the rules for choosing dowels and anchors.
Installation of objects with significant weight
To fasten heavy objects (furniture cabinets, shelves, TV stands, etc.), you must choose a dowel, also of the impact type. In this case, the diameter of such a dowel, as well as the transverse size of the drill, must be at least 10 mm. Such dowels are buried 6 cm into the walls, and 8 cm into the ceiling. For reliable fastening of heavy objects, as a rule, at least 6 dowels are used.
To fasten the horizontal bar and ladder, anchor bolts are used, the diameter of which must be at least 8 mm. Such bolts are buried 6 cm into the surface of the walls, and 8 cm into the ceiling.
The procedure for installing an anchor in a concrete wall
Types of anchor bolts
Anchor bolts used to secure various objects are divided into three main types:
- anchor bolts with a nut, which, after installing the fastener, is tightened with a spanner or open-end wrench (with the help of such bolts, hidden fasteners are performed);
- anchor bolts with a self-locking nut, which is tightened using a Phillips-type screwdriver (such bolts can be used for fastening in places that are visible);
- double-expansion anchor bolts are the most reliable fasteners that are used to fix even very heavy objects.
Main types of anchors
What drill to use for dowels | Notes of a Free Master
Quite often the question arises: “Which drill to drill for a dowel?” Despite the fact that, it seems, the answer to it is obvious (for a dowel 6 - a 6 mm drill, for a dowel 8 - an 8 mm drill, and so on), some experts argue that the diameter of the dowel and the diameter of the drill, as well as and the holes for it are actually different. Because supposedly in the process of tightening and subsequent placement in the material, the fastener undergoes terrible loads. Let's try to figure out where these myths come from.
1. It is argued that in order to fit a self-tapping screw into a foam concrete partition, it is necessary to reduce the diameter of the hole, since with a normal diameter the self-tapping screw begins to rotate in the hole together with the dowel, and does not attract anything. To stop this effect, various fascist methods are used, such as wrapping dowels with electrical tape, putting cambrics and heat-shrinkable tubes on them, and so on.
Probably, these specialists are simply unaware of two things: a) in fact, there is a special dowel for aerated concrete; and b) if you don’t have it, and it’s not possible to get it, then you should use an elongated “size” (such as 8 x 60), into which you need to screw (carefully!) a long and thick self-tapping screw, for example, 5 x 60 mm. And nothing will scroll anywhere. Since the need for such structures usually arises when installing cornices, a similar method has been tested on this type of installation many times, and it works quite well.
2. If the diameter of the drill for the dowel is equal to its diameter, then when tightening the screw, the dowel will break, and everything will have to be done again. In fact, cases of “breaks” are usually associated with the following factors: a) you tighten the screw that is too long and/or thick; b) you twist the dowel-nail instead of driving it in; c) the material from which the dowels are made is of poor quality; d) the weather conditions under which you are working do not correspond to the operating conditions for this material; e) the hole is not cleaned (this reason usually “works” when the hole is deep, say, 100 mm).
However, when you install fasteners in concrete or reinforced concrete, sometimes it would be a good idea to move the hole a little (by no more than 20 - 30% of the diameter), and not only at the surface, but throughout the entire depth. This is if the dowel does not fit into the hole at all, but when you try to hammer it in there, it bends or breaks. For short (shorter than 100 mm) self-tapping screws, “swinging” is usually not required at all.
3. Many people think: how to clean the hole? They use screws, steel or copper wire, and even vacuum cleaners for this. In fact, you just don’t need to stop the drill inside the hole, but stick it in and out several times while rotating (yes, that’s right), and all the dust will be carried outside, where it can be easily collected with a vacuum cleaner. If the hole is directed downwards, then you can also use a vacuum cleaner.
Well, in conclusion: when drilling holes “for dowels,” it is best to use a drill (and a hammer drill) rather than a drill and an impact drill, because productivity will be much higher. When precision drilling, it is best to use a hammer drill with a horizontal engine, since it usually has much less vibration and the degree of drill swing, and therefore it “grabs” the hole more accurately at the beginning.
Drilling for dowels
The hole for the dowels is made with an 8 mm drill.
Also, in order not to drill through the part, it is advisable to equip it with a depth limiter. At the end we drill with the same drill to a depth of 20 mm. Do not forget that during any work the drill must be strictly perpendicular to the plane of the part.
Of course, if you picked up a drill for the first time in your life, you won’t do very well. But this activity can be learned quite quickly.
In construction, there are many fasteners, for example, screws, nails, self-tapping screws. Sometimes it is difficult to understand from their name what they are talking about. For example, let’s take a fastening element such as a confirmat.
The word is unusual, but the meaning is simple. This is a furniture screw. It got its name from a German company. In our country, this fastener has become popular since 1990. The confirmat has its own characteristics and varieties, which we will discuss below.
Flaws
Disadvantages include load restrictions. But this is due to the properties of the drywall for which they are created. The dowel itself will withstand much more than drywall can withstand. In this regard, Driva has a multiple margin of safety.
Sometimes the disadvantage is the excessive length of the product. If behind the soft drywall there is a structure made of hard material (concrete, brick, metal), the dowel cannot be screwed in completely. Then there are 2 options:
- use fasteners for hard materials;
- screw the dowel in as far as possible, unscrew it, cut it to length with a metal file exactly to size and return it to its place.
Definition of MOLLE and PALS
You may have heard the term “MOLLE compatible” when it comes to gear carrying systems, but this is very incomplete information. MOLLE is an acronym that stands for Modular Lightweight Load-carrying Equipment. This is a military technical standard that relates to the design of load-bearing equipment used by NATO military forces. This versatile design allows smaller bags and cases to be attached and detached as needed using the attachments provided on the equipment.