Changed and forgot | 09.09.2017
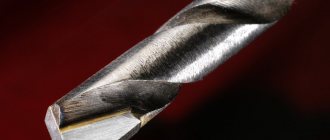
The Lewis drill is designed to produce deep, small-diameter holes in wood of various species with any degree of humidity. The screw-shaped cutting edge of the drill begins with a sharp tip, with the help of which preliminary centering of the future hole is performed. And the spiral itself removes chips from the working area.
How to sharpen a wood drill at home: step-by-step instructions
From the author: Hello, dear masters! Many people who are often involved in construction work deal with a variety of drills that sometimes require sharpening. This element can be used for a long period of time, but sometimes there comes a time when it begins to work worse. Then a person may have a question about how to sharpen a wood drill.
People who have never done such an activity find it difficult. But those who have repeatedly resorted to sharpening tools know that this process is quite simple.
Features and types of wood drills
So, first you need to figure out what this item is. Many people know that high-quality work with any material requires a special type of construction tools, this also applies to drills.
This item is divided into several types, each of which is used for different categories of work. The following modifications are distinguished:
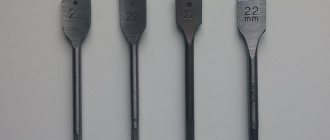
- feather ( feather). This type of drill is used for drilling holes of medium diameter - up to twenty-five millimeters. Typically, this element is used when the accuracy of the geometric parameters and the quality of the hole made are not important. It is not very expensive and, on top of everything else, is very easy to use,
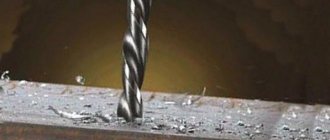
- spiral ( screw ) - the working part of such a drill is somewhat reminiscent of an auger; it is used for drilling holes of small diameter. The design is practical in that the process removes wood chips very well. And, in addition to the above, the screw drill accurately and efficiently fulfills its role,
- screw - a variation of the previous option. Designed for working with wood, but the peculiarity is that it drills against the grain,
- Lewis drill is a subtype of auger drill. It has a serpentine shape. The diameter of the drilled holes is from ten to sixty millimeters,
- crown - designed for making holes of larger diameter,
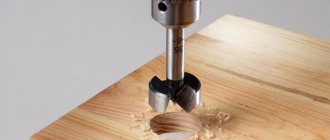
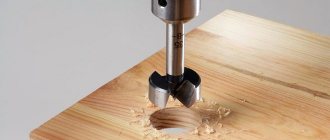
- Forstner drill - this item helps to make a hole with a bottom. This is its difference from previous types - it is not intended for through drilling. When working with such an element, the bottom turns out to be perfectly flat.
Simplicity of the device and wide possibilities: ballerina on wood
If it is necessary to make a large-diameter hole in the material, a drill can be used, which in everyday life has received a very euphonious name - ballerina (due to the external similarity of the separated cutting elements of the device with the image of a dancer). Such a device consists of a centering drill and cutters, which move apart along the guide in different directions at the same distance, thereby outlining the dimensions of the diameter of the future hole. Most ballerinas have two incisors, but there are also models with three.
The operating principle of this type of drill bit:
- the central drill makes a hole in the material;
- the incisors mark a circle line, which determines the size of the future recess;
- The device is set in motion manually (using a rotary tool) or using a rotary power tool.
Most ballerinas have two or three incisors
With a ballerina, you can make holes in wood, wood materials, drywall, ceramic tiles, and plastic. This attachment is inexpensive and quite suitable for non-professionals.
What you need to know before you start sharpening
Sharpening is a fairly important process that affects the subsequent operation of the tool. But it's important to know that you don't need to sharpen it if you don't need to. This is a waste of time and effort (especially when sharpening by hand). That is why it is necessary to familiarize yourself with the signs that the tool has become dull.
Firstly, it quickly heats up during operation, becomes deformed and interferes with its normal use. This is one of the signs that it is time to sharpen.
Secondly, if during the process it feels like the holes are taking much longer to drill than before, then it is worth examining the drill for dullness.
And finally, thirdly, the hole made is too uneven. This is probably one of the most important signs indicating the need for sharpening.
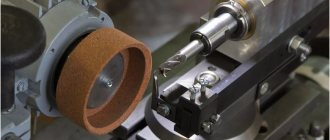
Use of special equipment
One should take into account the fact that it is impossible to sharpen a drill without special equipment. This is due to the unusual configuration of the cutting edge. As a rule, a special machine is used for sharpening. While sharpening the surface, the metal may become hot. That is why it is necessary to provide for the possibility of timely cooling of the surface.
A device for sharpening drills at home.
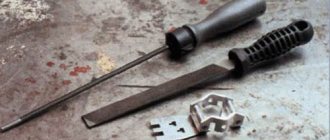
Note! If you do not have the required machine, you can sharpen it with a regular file. However, a regular file will not allow you to do the job quickly.
It is worth considering that if the shape of the drill is changed, it cannot be used in the future.
Sharpening methods
It's time to get closer to the main question - how to sharpen a drill correctly? There are two available ways to do this:
- using a file,
- electric machine.
Carrying out the procedure with a file is more problematic and time-consuming, so many people prefer an electric machine. But some are conservative and use exclusively manual methods.
The disadvantage of the machine is that the tool will have to be cooled frequently (during sharpening it will heat up too much, which can lead to deformation). With a file this problem will not arise, but as mentioned above, the process will take much longer.
Using an electric machine
To begin with, it is worth clarifying that this process will be quite complicated for those who have never sharpened before. If you are one of these people, then try to practice and sharpen an already worn out tool that you have not used for a long time. Only after a little training will you get an idea of how things are going with the process. You can get down to business directly.
The work is painstaking - one extra movement can ruin the instrument, which, of course, you don’t want. Therefore, it is very important to follow the instructions below, it will help you complete the procedure most correctly.
During execution, you need to follow several rules that will ensure you a good outcome:
- place a container of cold water nearby - it will be useful for cooling an overheated drill,
- 45 degrees - this is the most correct angle. Therefore, try to keep the element in this position,
- the drill is installed on the edge of the machine disk - this is the most correct option,
- if you want sharpening to be carried out most accurately, then place the element in the washer - this way you will be confident that the work will go smoothly,
- the rear edges of the drill must be turned a few millimeters and then ensure their evenness,
- the tool bridge should be thin, this will provide you with the greatest ease of operation,
- after the process is almost complete, slow down the machine speed a little and continue sharpening,
- After finishing, cool the finished item with water, make sure it works properly. If this is not the case, then continue the process until the instrument is in optimal condition.
Sharpening on a sharpening machine
At home it will not be difficult to use a regular sharpening machine. The only thing is that it is desirable that the machine be equipped with a tool rest, i.e. a small platform located in front of the working surface of the sharpening disc. The distance between the tool rest and the end of the circle should be no more than one millimeter.
If the nozzle is very dull, i.e. the cutting edges with the rear surfaces have become asymmetrical; in order to properly sharpen the tool, it is advisable to make a simple device by following these steps:
- Draw a straight line on the tool rest at an angle of 60 degrees relative to the working surface of the abrasive disc. The line should be located opposite the working surface;
- Attach a piece of metal corner to the tool rest, aligning it along the intended line, as shown in the photo below. Those. the corner should also be located at an angle of 60 degrees in relation to the working surface of the circle. You can use a clamp to secure the corner. If you sharpen frequently, you can drill holes and secure the angle with bolts.
Thanks to this device, you can attach a drill to the back of the corner with your own hands and thus ensure a back surface angle of 60 degrees. Now that everything is ready, you can get to work. First of all, you need to install the coarse abrasive disc and turn on the machine. Then you need to pick up the drill correctly. To do this, place two fingers of your right hand on the rest, and place the tool to be sharpened on them. As a result, the fingers will serve as a support. With your left hand, grasp the shank of the tool you are sharpening. Turn the drill itself so that the cutting edge that you will sharpen is strictly horizontal.
Now place the tool with its side plane against the back of the angle and bring it with your hands to the working surface of the sharpener. The right hand should remain motionless, and the left hand, which holds the tool by the shank, should move slightly in a vertical plane, rocking the drill. Thus, sharpening should occur from the cutting edge to the end of the flank surface.
Using this pattern, make several rocking movements with your left hand up/down
There is no need to strain your hands too much, as the drill will not be pulled out, so just be careful. Having sharpened one back surface, you should rotate the drill 180 degrees with your left hand and sharpen the second back surface in the same way.
Upon completion of the work, make sure that the sharpening angle of the drill, i.e. The apex angle is 120 degrees, which is optimal for a metal tool. Also, make sure that the edges and backrests are symmetrical. If the tool is far from ideal, it needs to be sharpened further.
It must be said that as a result of moving the shank in a vertical plane, the rear surface is rounded. Therefore, such sharpening is called conical. It is used for drills with a diameter of more than three millimeters. Correctly sharpening a thinner metal drill is even easier - its cutting part is pressed against the plane of the sharpener and sharpened without any rocking. As a result, the back surface acquires one flat plane. Therefore, such sharpening is called single-plane. The grip of the drill during this processing is shown in the photo below.
After sharpening is completed and the tool has acquired the correct shape, you need to fine-tune it. The fact is that the surface after sharpening with a coarse abrasive is far from ideal. Therefore, you need to install a disk with fine abrasive on the machine and remove all roughness. As a result, the surface should be perfectly smooth.
To make sure that the job is done correctly, try drilling a hole, maybe not even a deep one, and make sure that the edge is smooth and even. This is the main indicator of a sharpened tool.
Drills for wood can also be sharpened in exactly the same way. The only thing is that their angle at the apex is made more acute - 140 degrees. Accordingly, the tool is brought to the sharpener at an angle of 70 degrees.
Practical training
If you feel that you are unable to sharpen the tool correctly, then you should practice more. This can be done through a lot of practice - take a few drills that you no longer use and try to sharpen them correctly. Through trial and error, you can learn to perform the procedure perfectly.
Sharpening a tool is not a difficult process, although some people think otherwise. Many online resources describe in detail and even show the steps of this process. Here you can watch a video that very accurately shows exactly how to sharpen a drill.
Saturday, July 25, 2015
Workshop 1.2 How to sharpen a center drill for wood.
Hi all.
Feedback is gradually appearing on the blog, and it makes me happy