17.03.2020
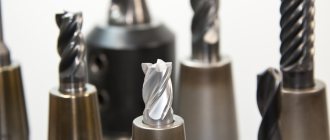
- Types of cutting elements
- Milling cutter material
- Cutter tooth geometry
- Application area
- Technical characteristics of the sharpening machine
- Design Features
- Advantages and disadvantages of using the device when sharpening spiral, disk and other cutters for wood and metal
- Process on the machine: how to properly sharpen cutters for wood and metal
- The process of manual sharpening according to the type of cutter
- Sharpening cylindrical cutters
- Work quality control
In the production process, when working with metal or wood workpieces, machines are an important part. They are equipped with cutting elements. There are many varieties of tools - several thousand items, different in purpose, shape, size. And purchasing new equipment every time at the moment when the edge becomes dull is economically unprofitable. And working with a dull cutter means either breaking it completely, or damaging the equipment itself, ruining the sample. Therefore, regular sharpening of cutters for metal or wood is necessary, and we will tell you how to sharpen tools of different types (end, end, conical, disk, etc.) and at what angle in this article.
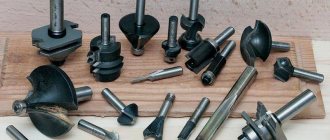
Types of cutting elements
Milling is a delicate process that requires a special approach, so craftsmen very carefully select equipment, focusing on different needs. Depending on the material being processed, there are:
- for metal;
- on wood;
- for plastics;
- on glass.
The second important feature is the purpose; cutters are distinguished:
- angular (for corners);
- shaped - depending on the part being processed;
- keyed - to create a special groove with the appropriate name;
- for recesses in the material in the shape of the letter “T”;
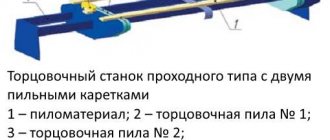
- cutting machines for dividing the sample into parts, etc.
Also, when purchasing products, the first thing that is usually called is the shape of the cutter; it can be:
- cylindrical;
- conical;
- disk;
- terminal;
- worm, etc.
It is difficult to list all the types, since for each milling procedure you can buy or even grind your own tool. There are several tens of thousands of items in total, and their range is constantly growing along with increasing production needs. In each variety, the cutting base is quite large in length, regardless of how it is located. Therefore, it is very difficult to ensure correct and uniform sharpening. Sometimes this requires special tools, in other cases meticulous sanding by hand is more suitable. Lack of experience or work done poorly for other reasons can lead to chips, scratches and cracks on the surface on the cutting edge.
Auxiliary Tools
The process of selecting additional equipment for a fruitful work process is as complicated as choosing the main means of production (especially when it comes to purchasing a household router). The home handyman will definitely need to choose:
- parallel stop for straight cutting (a good manufacturer comes with it included with the main device);
- the guide rail (for straight milling) determines the movement stop;
- a compass will be needed for radial milling and cutting circles;
- To make a groove, a functional device is used, which can be purchased at a special store or made independently (more details in the video);
- a copier (pantograph) is used to transfer a complex pattern onto a wooden surface (an exact copy from the sample is guaranteed);
- a template, copying rings and a bushing are needed for different purposes (the bushing will protect the template, especially a homemade one, and the ring will transfer the shape of the part to the cutter);
- a device for cutting grooves (processing bodies of rotation) is clearly demonstrated here;
- When working on wood, tenon-groove and tenon-cutting devices will be useful.
You will also have to take care of the table for the household router. It can be purchased ready-made, but most craftsmen prefer to make it with their own hands, especially since you can use available materials (chipboard or thick plywood) for this, and at the same time provide additional platforms and drawers for tools. Sharpening supplies—cleaning fluid, variable abrasive stones—can't hurt, but a specialist workshop is the best option for this process.
Tools and accessories for milling in the video below.
Milling cutter material
Before you start sharpening, be sure to find out what the tool was made from. This may be the following materials:
- Diamond is the strongest mineral of natural or artificial origin, leaves an even cut, is not used so often due to its high cost, and is highly efficient in production with a high class of accuracy.
- Metal ceramics. The advantages include high wear resistance, as well as the fact that the ceramics practically do not heat up (metal with a low melting point does not deform), and also does not actually become clogged with chips.
- Alloys of increased hardness. Their advantage is obvious - they are very hard, so they can process metals with high strength.
- High speed steel. Typically made with high tungsten and/or molybdenum content. The durability grades P9, P12 and P18 are used.
- Carbon instrumental. It is not used very often, since the operation of this type of cutter is possible only at low speeds to prevent deformation.
- Alloyed. It is also allowed infrequently - for shaped cutters that need to process the workpiece at low speeds.
- Hard alloys. They can be used at speeds that are 5-10 times faster than high-speed cutters. At the same time, they do not lose the quality of the cut and can be used even at temperatures above 80 degrees. This can be achieved by titanium, cobalt, tungsten and other elements in the composition. Sharpening of carbide cutters is carried out according to the usual principles; moreover, one tool is enough for a larger amount of work.
Drawing of a full-fledged device
A fairly simple way to make homemade sharpening equipment, which is practically no different from the factory product. To assemble it according to ready-made drawings it takes about 1.5-2 hours.
To make a device for sharpening drills with your own hands, you must provide the following consumables, equipment and tools:
- welding machine;
- electric drill;
- Bulgarians;
- standard locksmith tool kit;
- a corner, the size of the shelves is 30x30, and its length is 100-150 mm;
- metal plates of different thicknesses (3-5 mm);
- pins or a piece of steel rods, the diameter of which is 10-12 mm;
- washers, screws, bolts and nuts of various sizes.
First of all, the manufacturing of the bed is carried out, which will be the base in the sharpening device. To do this, use a steel plate onto which a steel rod (12 mm in diameter) is welded at an angle of 75 degrees. It will be the axis.
After that, a washer should be placed on the welded rod, which will act as a support bearing. The amount of angle and rotation of the bed when sharpening the drill will be insignificant, so there is no reason to use a standard ball bearing.
The bed where the sharpened tool will be placed is made from a prepared corner. The one side on the corner profile that faces the whetstone side needs to be ground at a 60 degree angle. On the stock, according to the drawing, a bracket is welded, through which the rotating unit of the device will be fixed. As a result, a structure will be made, the corners of which, in the case of a parallel position of the bed and frame, should be located to the surface of the abrasive stone in accordance with the angle of the drill being sharpened.
The sharpening machine, which is shown in the drawing, has fixed tilt angles, but for greater possibilities it is desirable to provide the ability to adjust the angles. In such cases, there will be a greater chance of using the device if it is necessary to restore tools with different sharpening angles, for example, if it is necessary to sharpen drills for metal, concrete, etc.
To create a more functional unit, you can use drawings of other designs that can adjust the angles:
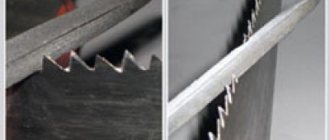
The peculiarity of sharpening cutters is the relatively large length and curvilinearity of the cutting edges of their teeth. When sharpening, it is necessary to ensure that the surface of the wheel moves exactly along the edge. Particularly difficult in this regard is the sharpening of shaped cutters that have a backed corner. To maintain the shaped profile of the cutter and simplify sharpening, the backed teeth are sharpened only along the front surface (where the front and where the back surfaces are, see below). Sharpened teeth, having a straight or standardized curved shape, are sharpened along the back surface. Slotting and parting cutters are sharpened along the front and back surfaces of the teeth. Read about sharpening them in the article Sharpening circular saws.
Sharpening is carried out on specialized and universal machines for sharpening cutters, or less often manually.
Milling cutter material
The types of tool steels used are U7A, U8A, U9A, KhG, KhV5, 9KhS, KhVG, etc.
High-speed tool steel used for the manufacture of cutters is divided into steel of normal productivity (R6M5, R9, R12, R18, etc.) and increased productivity. The last category includes steels alloyed with cobalt, vanadium, tungsten and molybdenum (R6M3, R18F2K5, R9F2K10, R9F2K5, etc.).
The hard alloys from which cutter teeth are made are produced in the form of plates of standard sizes and shapes, attached to the cutter body by high-temperature soldering (for example, PSr-40 silver solder) or using threaded connections (prefabricated cutters). They consist of tungsten, titanium and tantalum carbides bonded with cobalt. Cutters made from tungsten-cobalt alloys (VK2, VK3, VK6, VK6M, VK8, etc.) are used for processing cast iron, non-ferrous metals, and non-metallic materials. Titanium-tungsten-cobalt alloys (T5K10, T15K6, T14K8, T30K4, etc.) are less durable than alloys of the VK type, but they have higher wear resistance when processing parts made of various types of steel. Three-carbide alloys, consisting of tungsten, tantalum, titanium and cobalt carbides (TT7K12, etc.), are also mainly used for processing steels.
Cutter tooth geometry
Even the most complex metalworking tasks can be solved using a special configuration - this ensures the cutting of end elements of different shapes, for example, the letter “T”.
The geometric solution of the spiral cutter is interesting. The inclination of the teeth can be different, this determines the essence of the operation (finishing or roughing), as well as the cutting step. A small angle is considered to be up to 35 degrees, and a large angle is considered to be more than 35. The standard version is a tilt of 38°.
Application area
Metalworking and woodworking are such common procedures that there are practically no industries where machines are used to some extent. Now the best equipment is CNC. They are the most accurate, fastest and energy efficient. You can purchase them on the website.
Areas of use of milling:
- equipment production;
- production of pipes and rolled metal products of other packaging;
- aerospace factories;
- furniture and interior items;
- fasteners and hardware;
- auto industry and much more.=
They differ in scope depending on the purpose, look at the image:
Dale Oct 19, 2010
You can buy cutters. If that's the question. I allocated the amount and bought a decent supply of cutters. But if you don’t have it, then it’s much more interesting to have a machine on hand that can correct the cutter and save the order. And as usually happens, the order should have been placed the day before yesterday, but now the tool is “full”; who will wait for the delivery of the required cutter in this case?
So it’s both right and so. I would prefer a machine. Like the respected Cascad, I always take a tool with some redundancy. Instead of a home drill, a good hammer drill, etc. Practice shows that not a single piece of hardware has ever been purchased in vain. Although I’m lying. Is there one who needs a new 4 in 1 heat press? I worked for two days (and will) The technology didn’t work... although I might get there... oh, offtopic
How to properly sharpen a cutter for metal: several ways
The main task is to process a curved surface of great length on both sides. In this case, the cutting tool is an abrasive substance. It should be directed directly along the edge (at the correct angle).
How to sharpen using a machine
Technologically, this process occurs in several stages:
- Securing the tool in the desired position in the moving part of the bed.
- Bringing the cutting element to the rotating abrasive wheel until uniform sparking appears.
- Trimming a metal layer up to 50 microns wide.
In this case, the following recommendations must be followed:
- Each tooth needs individual sharpening.
- The movement should occur from the beginning of the furrow to the outer edge.
- All cycles must be carried out in the same way to achieve complete uniformity in the cutting edge.
How to sharpen cutters using sharpening wheels
This is special equipment, the nozzle of which is made of an abrasive substance and is a closed belt:
The peculiarity of turning lies in the correct choice of material. What abrasives do they sell:
- White or classic electrocorundum. It is most often used for ordinary wood or metal cutters.
- Elbor – processes high-speed steel well.
- Silicon carbide or diamond (natural, synthetic) copes well with carbide products.
Recommendation: use cooling lubricants to reduce the thermal effect of friction force.
Using improvised means
To do this, you need a homemade device or a table for a hand router.
Algorithm of actions:
- Using a special liquid, it is necessary to clean the surface of the tool from carbon deposits. To do this, you need to place the cutter in a container and leave it there to soak for 3 minutes, then clean it with coarse bristles.
- Using a diamond stone, grind the edge at the front to ensure longitudinal movement.
- Wipe the finished equipment with a soft cloth to remove metal dust.
Advantages of quick replacement
The highlight of this device is the adhesive method of attaching grinding wheels to the support disk. Thanks to a layer of polymer adhesive applied to
the reverse side of each circle, they can be repeatedly and at the same time firmly attached to the surface of the support plate, and, if necessary, easily
replace one with another. The abrasive blade fits tightly to the support disk, forming a working surface for grinding the cutting edge
tool. If the blade needs to be treated first with a coarse grit and then with a fine grit, the second wheel can be attached directly on top
first.
The adhesive method of fixing the grinding wheel allows you to install it not only on the support disk, but also on a previously fixed wheel. This is very convenient when working with wheels of different grain sizes. The surface adhesion (adhesion) of the elastic polymer-based adhesive composition is designed so that the circle is firmly held in the device during operation and can be easily peeled off at the end of operation. In this case, the glue does not stain either the surface of the support disk or the abrasive layer of the circle located below.
The thickness of the support disk (more than 10 mm) allows you to forcefully press the tool to its surface, and the tight and uniform fit of the emery
circle to the reference plane eliminates runout and eccentricity during rotation, ensuring the formation of a smooth, burr-free cutting edge. Wherein
The side (end) surface of the disk made of durable polymer is used for polishing the tool.
Technical characteristics of the sharpening machine
When purchasing special equipment, you need to carefully consider the following indicators:
- Power supply from 220 V or 360 V.
- Consumption from 200 to 5000 W.
- The spindle rotates without load at speeds from 900 to 3000 per minute.
- Required accuracy class.
- Abrasive wheel feed speed.
- The drive mechanism can be manual or electric.
- What angle can be achieved.
- Are there containers for water or other coolant?
- Availability of a fan.
- The noise level that the machine creates.
- The quality of the protective casing, its strength.
- Floor or tabletop variety.
Pros of core drills
- the ability to produce holes with a diameter of up to 200 mm in one installation of the tool;
- high productivity and, as a result, a significant reduction in cutting time;
- energy saving;
- less wear of cutting edges due to their larger number;
- work at high feeds and low speeds;
- effective cooling of the working area.
Design Features
Classic equipment set:
- drive – electric motor;
- belts and other elements of V-belt transmission, with which you can regulate the rotation speed;
- circle, ring with applied abrasive;
- a shelf or other stand for attaching equipment;
- automatic start box and gear shift.
Safety regulations
Follow the recommendations:
- work exclusively on well-established equipment;
- ensure good grounding to avoid possible electric shocks;
- think about fire prevention (no flammable objects near the sparks) and fire extinguishing;
- use personal protective measures.
Process on the machine: how to properly sharpen cutters for wood and metal
Take a close look at both chucks, one is designed to accommodate a two- or four-flute cutter, and the other is designed for a three-flute cutter. When processing, pay attention to accuracy and uniformity; proper operation will ensure an increase in service life.
Sharpening on a ribbon
First, select a collet chuck that matches the diameter of the tool and the required cup socket. The collet should be inserted into it and tightened with a nut.
Then use the screws to adjust the distance of the metalworking strip. The size can be changed by moving the bottom of the nest down. And at the right place just tighten the screw connections.
Next, the cutter is placed in the chuck, and the required sharpening angle is set. Fastening is done using grooves and pins.
After turning on the feed, you can regulate the movement and layer of metal removal.
Sharpening a cut-off cutter along the end
The machine has a special separate socket for these purposes; we place the tool in it. Moreover, the choice of cartridge depends on how hard the material is - the higher the strength, the larger the socket. The element is processed until the noise stops completely. The item is then transferred to another metalworking fixture from the ends and back.
Drawings of simple devices
The simplest devices for sharpening can be bushings, the internal diameter of which corresponds to the transverse dimensions of the drills. The sleeve is rigidly fixed into a reliable base, taking into account a certain angle
When selecting a bushing for such devices, you should pay attention to the correspondence of its internal diameter with the transverse size of the tools being sharpened. It is prohibited for the tools being processed to dangle in the sleeve, since even with a deviation of 1-2 degrees along the axis from the required values, the quality and accuracy of sharpening can significantly decrease
In some cases, the task can be simplified by installing a wooden block on this structure, in which holes must be drilled with a diameter corresponding to the tool used. One of the most important elements of such a product is the presence of a tool rest, which is necessary for:
- ensuring correct fixation of the drilling tool and the possibility of precise movement in relation to the surface of the abrasive stone;
- creating a stop point for the drill being sharpened.
Such products made from oak bars, which have holes of different sizes, are the most reliable. Thanks to them, high-quality and precise sharpening of tools is performed. The main task that must be solved by a homemade machine or similar device is the correct orientation of the cutting part of the tools being processed to obtain the accuracy of the required sharpening angle.
The process of manual sharpening according to the type of cutter
Now let's briefly talk about the features of the tool depending on its configuration. The main problems are that it is not always easy to ensure uniform processing along the entire length of the cutting edge.
The peculiarity of manual sharpening is that the emphasis is provided not by the vice of the machine, but by a special device.
End
The cutting elements are located at the end and side. This allows you to make grooves along the edges. Processing takes place according to the following algorithm:
- Fastening of the cutter is horizontal in relation to the rotating one.
- Tilt it enough to achieve the required angle.
- The circle rotates with high amplitude.
- During installation, note the position of the cutting part upwards.
Sharpening end (finger) cutters
This is an elongated tool whose shank has a cylindrical or conical shape. Due to its appearance it has also been compared to fingers. Actions:
- Select a diamond stone to place on the edge of the table.
- If the tool has a large enough recess, then it should be secured along the tabletop.
- As you sharpen, the edge will become sharper and the diameter will decrease.
Recommendation: if the package includes a bearing, then it must first be dismantled, and in any case it would not be superfluous to clean the surface with a specialized solvent.
Disk
Essentially, it is a disk with teeth around its circumference that must be directed upward. If it is simple (unidirectional), then the cutter itself should be positioned vertically. And in the case of a versatile direction, the sharpening angle is the same as the angle of the cutting teeth.
Prefabricated
Their design assumes the presence of removable plates. Each one should be sharpened separately. It should be taken into account that they have several elements for processing - these are rear, main and auxiliary corners, as well as a transition edge.
Cutters with backed teeth
Such an instrument has a flat front surface, and the back is made in an Archimedes spiral. In order to sharpen the product, you must use a disc wheel. Each tooth must be ground down along its outer base, and it is also important to ensure that the same layer of metal is constantly removed.
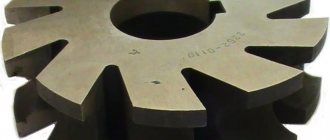
Varieties
Conventionally, you can use the following classification:
- A universal machine for sharpening not only cutters, but also other cutting tools.
- A specialized machine is used to process only one type of tool, for example, milling cutters.
The universal machine is equipped with normal and special devices suitable for securing and installing the tool, additional measuring mechanisms that allow maintaining the sharpening angle of the cutters.
Universal sharpening machine with accessories for sharpening cutters
Specialized sharpening machine for sharpening end and cylindrical cutters
Sharpening cylindrical cutters
The cylinder shape is the most commonly used. Cup circular abrasives are used. You need to attach the equipment to the machine in the center. It should be positioned relative to the rotating circle horizontally and slightly below the axis. Be sure to secure the position with a stop.
Carbide
Grinding is used first; microcracks may form during the process. To eliminate them, finishing is used with the task of removing the layer that was damaged. For this, cast iron discs are used that rotate at a speed of 1.5 meters per second. Finely dispersed carbide paste is used as an abrasive.