The word “forge” is usually associated with a dark room with anvils, forges, hammers and blacksmith’s tongs. However, creating a forge with your own hands is much simpler than it seems at first glance. In addition, the forge can be made quite compact without adapting special premises for it.
The forge itself is a room with equipment for blacksmithing. In the forge, metal blanks are heated and processed using hammers and other forging tools. Less commonly, melting metals and alloys for casting some elements.
In fact, the forge does not necessarily have to be located indoors. In our case, the forge is an open space (or a space under a canopy).
The forge contains a forge - a source of open fire. Small particles of coal are often blown out of it. In addition, the metal is processed hot at about 800-900ºС. Therefore, the floor in the forge should not be made of flammable materials and there should be no electrical wires in the vicinity of the forge and anvil, since hot workpieces often drop onto the floor.
How to make a forge with your own hands: forge structure
The word “forge” is usually associated with a dark room with anvils, forges, hammers and blacksmith’s tongs.
However, creating a forge with your own hands is much simpler than it seems at first glance. In addition, the forge can be made quite compact without adapting special premises for it. The forge itself is a room with equipment for blacksmithing. In the forge, metal blanks are heated and processed using hammers and other forging tools. Less commonly, melting metals and alloys for casting some elements.
In fact, the forge does not necessarily have to be located indoors. In our case, the forge is an open space (or a space under a canopy).
The forge contains a forge - a source of open fire. Small particles of coal are often blown out of it. In addition, the metal is processed hot at about 800-900ºС. Therefore, the floor in the forge should not be made of flammable materials and there should be no electrical wires in the vicinity of the forge and anvil, since hot workpieces often drop onto the floor.
Blacksmith anvil
It can be almost any one that can be found. The main thing is that the edges and working surface of the anvil are not knocked down (the edges must be smooth). When you hit a real blacksmith's anvil with a hammer, it should bounce off it, and the anvil itself should ring loudly.
The anvil can be installed either on a large wooden stump or on a frame welded from a corner. The second option is more functional; in addition, it allows you to turn the anvil and install it anywhere in the yard or room without any problems.
Installation on a stump, as a rule, secures the anvil in one place “forever”.
The height of installation of the anvil is determined by the level of extension of the blacksmith’s arm: so that when struck with a hammer, its surface is approximately parallel to the ground.
Forge
The furnace can be welded from sheet metal with a refractory brick inserted inside. In order not to cook the forge, you can use a cut old cylinder for this. The forge, like the anvil, is also installed on a frame welded from reinforcement at approximately the height of the blacksmith’s belt. The frame of the forge is less massive than that of the anvil, consisting of 12-14 reinforcements.
You can also weld a grate (a grate on which burning coal or firewood is located) from fittings at the bottom of the hearth.
But the spaces between the grate rods should be as thin as possible (no more than 1-2 mm), since flaming forge coal, when burned, breaks up into very small particles and will spill out through large holes.
The air stream should be supplied from the side, slightly at an angle downwards, and not from below, like in stoves. This is due to the fact that the jet is strong and, when fed from below, will blow small particles of coal from the forge, which will scatter quite far.
Old vacuum cleaner
Necessary for blowing air into the forge during blowing work.
Hammer
This is an ordinary hammer. But not like a locksmith's, which has one end that is thinner. A hammer is a hammer that has both ends equally flat. Unlike a sledgehammer, the hammer has a lighter weight (from 800 grams to 2 kg) and a short handle for working with one hand.
You should choose a hammer based on your own physical capabilities in order to work with it for a long time and not get tired. It is very important that the hammer is made of good steel; it is better to use an old Soviet one.
Chinese hammers can crack after several blows, and some develop grooves on the working surface during use, which indicates the low quality of the metal.
Chair forging vice
The main difference between a blacksmith's vice and a metalworker's vice is the metal from which they are made. The forging vise is made of tool steel and can be struck without fear of splitting the vise.
Blacksmith pliers with long handles
Long handles are necessary for working with small workpieces. A plus will be a locking ring that fastens the handles into a lock, which allows you to avoid squeezing them with force when working with a workpiece.
Other tools are non-specialized or ordinary plumbing tools.
Recommendations for setting up a forge
This equipment for a full-fledged forge can be placed in a corner, in an area of less than 1 square meter, since the anvil and forge can be moved.
If you plan to work indoors, then an additional hood should also be made at the place where the forge is installed.
If the forge is located in the yard or under a canopy, then an exhaust hood is not needed; during active combustion, the forge emits little smoke.
Coal for forging needs “fiery” coal. You can distinguish it by its weight. Pieces of this coal, even very large, are very light. It flares up strongly, burns quickly and gives the high temperature necessary to heat the workpieces to forging temperature. You should choose large and medium pieces. Small ones burn out quickly and do not give the desired temperature.
Equipment in garage workshop
If you are going to make a real workshop in your garage, first of all you need to think about the necessary equipment. If you have a good set of tools and all kinds of devices, your garage will turn into a real modern automotive service. And you will be able to carry out repair work.
Crafting table
It is best to store tools in a large workbench with special drawers. You can make such a workbench yourself using a metal frame and wooden plates. In this case, the working area is usually covered with a metal sheet to protect the wood from wear. If you want to conveniently arrange many tools, make the workbench multi-level.
Water-oil separator
This device will definitely come in handy if you want to update the paintwork on the body of your car. The device allows you to clean the air from small particles, water and vapor, and oil droplets. It is used just in the process of painting a car. This allows for uniform distribution of the paint layer over the entire surface of the metal.
Welding machine
To properly repair a car, of course, you need a welding machine. If you are planning a standard body repair, you can get by with a conventional welding machine with electrodes made of tungsten. You can also have a carbon dioxide machine that welds metal with wire.
Washing
You don't have to do a professional wash. However, it is better to organize the water supply system in the garage. This way you can always maintain cleanliness without effort. To do this, you will need to make a sewer drain and also supply water. A simple rubber hose will come in handy
Note! If you have installed a water supply in your garage, you will need to strengthen your security measures to protect
lighting system from humidity. This is necessary to prevent short circuits.
How to make a forge with your own hands at home
It is possible to create a forge with your own hands. This work will take a minimum of time, money and effort. We will reveal the subtleties of manufacturing, based on different price categories.
Forging is an activity chosen by hardworking and creative men. Such a workshop can become a place of work that brings serious income. A forge with your own hands is a dream that can easily be realized, and today we will tell you how to do it.
Basic Rules
There are many men who equipped a small room in a residential building as a forge. Most often they used the bathroom for this, which is completely wrong! A forge is a place where basic fire safety rules must be observed.
Before you start talking about how to make a forge yourself, you should determine a place for it. To do this, the following conditions must be met:
- Premises: separate, located away from a residential building.
- Room area: from 15 m2 and above, depending on the purpose of the work.
- Forge walls: built of wood or brick, covered with plaster.
- Forge floor: any non-combustible material.
- Door opening: outward.
- Additionally: good lighting with insulated electrical wiring, ventilation.
A forge located at home may interfere with the sleep of household members, which should be taken into account before constructing or allocating premises. If the work is planned to be carried out only in the warm season, you should think about equipping a canopy. All the recommendations described above are followed regardless of the type of forge.
Necessary equipment
Building your own forge at home requires certain knowledge. The heart of the workshop is the equipment; without it, the master cannot work. Below is a list of required equipment.
- The forge is the most important element. It is in it that the fire burns, and the metal reaches a certain temperature. Place it opposite the front door against the wall.
- Racks for metal workpieces and tools are installed on the right or left wall. Their size depends on the owner’s requirements.
- Containers in the form of metal barrels are installed next to the forge. They are designed for storing coal, slag, oils and water.
- A welding station that won't take up much space.
- A metal cutting machine is one of the main elements of the workshop.
- An anvil that is placed closer to the forge.
- A workbench with a steel vice is equipment without which it is difficult to imagine a forge.
- The molding machine is indispensable in work.
If it is possible to install a mechanical hammer, this will speed up the work process.
Fuel for the forge
The main difference between forge hearths and each other is the use of different fuels. It happens:
- gaseous;
- liquid;
- hard.
The most common option is solid fuel in the form of coal. Professional blacksmiths use shiny charcoal in the shape of a walnut. Charcoal is the most expensive type of fuel. It is in short supply in some areas. We recommend using pulverized coal, the temperature and duration of combustion of which are optimal for forging work.
The optimal liquid fuel, corresponding in price and quality, is fuel oil. A gas forge should be equipped only where this type of fuel has a low cost. Compliance with fire safety rules is a top priority.
Required materials and tools
A homemade forge is equipped with tools that are available to its owner. Gradually, the old tools are being replaced with professional ones. The list of required devices includes:
- hammer or mallet;
- sledgehammer;
- pliers with long handles;
- fan for blowing;
- cast iron grate;
- flexible aluminum sheet;
- steel rulers of three types (30, 50, 100 cm);
- poker;
- metal scoop;
- broom;
- peak.
The materials you will need are brick (preferably heat-resistant), sand, cement, a large stump, and a pallet. Now you can start construction. Let's take a mini-forge on a small budget as an example.
Mini forge device
A mini forge with your own hands is an excellent option for a novice creator. Having tried yourself in business, after a year you can expand the space, purchase additional equipment and shelving.
We'll tell you step by step how to build a forge yourself.
- Away from home, directly in the open air, a cement mortar is prepared by mixing cement, sand and water. It should have a creamy consistency. Mortar is required for brickwork of the furnace.
- The forge is assembled in the simplest way, based on the principles of its operation: the blowing comes from below, as a result of which the coals flare up. The brickwork is fastened in the form of a rectangle with ready-made cement mortar. The result should be three brick walls in the shape of the letter “P”. Provide space for cast iron grates.
- Having laid out 4-5 layers of brick, you need to install cast iron gratings, and then raise three more layers of masonry. They will protect the coal from the wind during operation.
- An old pipe with a diameter of 15 cm, but without mechanical damage, is placed down under the grilles. This is an element of the blowing system.
- Away from the finished furnace, on a pallet, a structure from an aluminum pipe and a fan is assembled. This system will be connected to an air supply pipe. Many homemade products of this type are assembled from a pipe and a vacuum cleaner; everyone chooses the best option for themselves.
- The stump is installed next to the forge. If it wobbles, it is fixed and an anvil is placed on top of it. If it is not possible to purchase it, use a channel, part of a rail or other device.
Note that this mini design is suitable for forging small-sized products, for example, knives and decorative elements.
If you have a separate room, and also a desire to build a professional workshop, you should take the matter more seriously. The forge is the main, central element of the forge, it consists of:
- air supply tuyeres;
- cast iron grates.
Previously, bellows were used to supply air; today, almost any device can be used for this. Car blowers are a great option. The walls of the forge are raised from any material available to the master (brick, concrete, metal).
An umbrella is provided above the forge, in a closed room, to remove smoke. It is made of metal, 0.5 cm thick, in the shape of a pyramidal hood.
When purchasing an anvil, make sure it is made of carbon steel. The form that is considered universal is with two horns.
Making a forge with your own hands is quite simple. It is available to every master, and the progress of work depends on the final goal. A professional approach involves significant costs, but a mini forge in the open air will be an ideal solution for men who value their hobby.
Hanging shelves: fast and practical
Not in all cases there is a need to create a rack, since it will take up a lot of space. On the other hand, in a garage of any size there is always unused upper space, which can easily be used for hanging shelves.
Structurally, it is quite possible to make any version of such a device for the garage with your own hands:
- Wall shelves can be equipped in both open and closed versions. They are convenient due to their spaciousness, as well as ease of construction. They can be hung on a loop or using an anchor. In the first case, a collapsible structure is obtained, the location of which can be conveniently changed at any time. In the second, the shelf gains additional strength due to the reliability of its installation with the wall.
Hanging shelves are attached to the ceiling. Due to the peculiarities of their location, they occupy exactly that part of the space that is not used and do not interfere with the car at all. The disadvantages of the design include its lack of reliability - it can sway a little upon contact. However, for small items (hammer, pliers, screwdriver, paint, etc.) it will do just fine.
An interesting option for storing tools is to make one wall or a fragment of it in the form of a shield. The shield is attached using anchors, and then small shelves are selected and mounted on it.
You can also build a shield yourself from wooden beams, as shown in the photo.
ADVICE. It is better to place such a shield on the same side on which the workbench will be located, so that all the tools are literally at hand.
To store large items of small weight, you can design hanging shelves that are attached to the ceiling using studs.
To make these devices for placing useful items in the garage with your own hands, you will need the following materials and tools:
studs and shelf base - most often plywood or chipboard is used, the thickness of which depends on the expected loads;
large anchors (at the rate of 4 units per 1 shelf);
hexagonal and regular nuts;
flat washers and special Grover washers (at the rate of 4 units per 1 shelf.
The tools you will need are the standard set described above. The sequence of actions is as follows:
- Shelves of appropriate sizes are calculated and cut out. It is better to immediately treat them with primer and varnishes and let them dry completely.
- Markings are made on them for fastening. If the shelf is long, the supporting supports should be placed at a distance of no more than 60 cm.
- It is better to reinforce the ends of the plywood with a metal profile to ensure maximum reliability of the structure.
- The edges are marked with grooves into which the studs will be mounted. They should be placed at least 5-7 cm with a margin from the edge so that the wood does not crumble during prolonged loads.
- All grooves and holes are drilled, then future fastening locations are marked along the wall and/or ceiling.
- The holes on the wall are also drilled, after which the anchors are inserted into them all the way.
- The studs are connected to the anchors, as shown in the photo.
- Finally, the shelf itself is put on and secured using regular washers and Grover washers.
- The level checks the correct location and makes adjustments if necessary.
If the shelf is mounted to the ceiling, you can strengthen its connection to the wall using metal corners - then the product will not swing and will last much longer.
The entire technology is shown schematically in the figure.
Making a shield shelf
The DIY technology for making such a device for a garage has its own differences compared to installing conventional shelves:
- The shield itself is made of durable plywood, the parameters of which are selected according to the situation. Visually, the shield should completely cover the surface of the desktop.
- Space is allocated on the board for all shelves and appropriate notes are made.
- Next, all the holes into which the dowels fit are made in the surface of the structure. It is on them that the hooks will be attached, on which all the tools will be placed.
- The shield is secured to the wall using brackets. The corresponding holes are made using a hammer drill.
All steps are shown schematically in the figure.
How to build a forge with your own hands - Metals, equipment, instructions
For a passionate craftsman, a forge is not just a place of work, but a creative workshop where he spends a lot of time and where real masterpieces are born. A do-it-yourself forge is a tool for turning an artistic idea into a forged product.
Key points for creating a forge
According to fire safety requirements, the forge must be located separately from the living space and have an area of at least 16 m², if we are talking about artistic forging and not large items.
Ideally, this should be a separate building made of brick or wood with plaster, where the doors open outward. A floor made of non-combustible material is an important condition in creating a forge.
The covering should be brick, concrete, stone, or compacted clay and sand. It is also important that there are no flammable materials or electrical wires nearby.
Good lighting, high ceilings, and effective ventilation are recommended.
When choosing a place for a forge, make sure that the smoke and the sound of the hammer do not disturb your household and neighbors, because in the old days it was not without reason that the blacksmith worked on the outskirts of the village.
Setting up a home forge with your own hands is also possible in the open air, the main thing is the presence of a canopy and a fire-resistant floor. Much of your work, however, will depend on weather conditions.
There are no strict rules in organizing a workplace, there is only the experience of the craftsmen, and we will consider it.
Forge equipment
If the forge is an organism, then the heart in it is the forge. This is where rough steel is transformed into a ductile material.
The principle of operation of the forge is quite simple. Coal burns on the working surface, into which a steel billet is placed and heated to the desired temperature. There are countless designs of forges, but their main difference is the type of fuel.
Let's imagine that the forge is a room measuring 6x6 m, with an entrance in the middle of one of the walls. What should be in it and how best to place it to make a forge?
- the forge is located at the far wall opposite the entrance;
- containers for water, oil, coal and slag are installed next to the forge;
- on the left is a raised tool rack, and on the right is a hand tool and tool stand;
- if you stand facing the forge, there will be a metal rack along the right wall;
- after the rack you can install a cutting machine;
- a welding station is located in the corner to the right of the entrance;
- A bench is placed along the left wall, on which a vice is attached;
- It is better to place an electric sharpener behind the workbench;
- in the center, there should be a freely accessible assembly table, a chair vice, and an anvil closest to the forge;
- All kinds of cabinets and drawers will be useful for storing other equipment, paints and varnishes, brushes, etc.
The basis for a stationary forge is a table on which a fireplace is arranged for heating the workpieces. Its height is determined depending on the height of the blacksmith - it should be convenient for him to transfer workpieces from the table to the anvil. Typically this is 700-800 mm.
The optimal dimensions of the working surface are 1x1.5 m or 1.5x2 m, however, they are also determined based on the dimensions of the parts to be forged. If the workpieces are voluminous, such as grates, gates, or forges, they should be placed at some distance from the wall of the forge.
The surface of the table is made of sawn stone, brick or reinforced concrete. The body is constructed in the form of a box and is built from brick, logs, stone, and the inside is filled with crushed stone, clay or sand.
As an alternative to stone, you can also make a tabletop from 4 mm steel sheet.
Hearth in the forge
There is a fireplace in the center of the table, and for some types of work there are two.
A forge for artistic forging usually has a central location of the hearth, which consists of a grate and a tuyere - these elements provide the air supply for burning coal.
The size of the nest depends on the purpose of the forge and the size of the workpieces that will be heated in it. In plan, this is a round or square recess, with sides, say, from 200x200 to 400x400 mm and 100-150 mm in depth.
You can make a cast iron grate yourself, from an old thick-walled frying pan with a diameter of about 300 mm, drilling 1 cm holes in it, or use a steel car disk.
First, a hole of the required diameter is made in the surface of the table so that the fit is as tight as possible, and the workpiece is inserted into it.
If the initial plane is made of brick, it is carefully cut out, moistened with water (wet brick is easier to process).
The shape of the holes in the grate affects the creation of different types of flame. For example, uniform round holes create a cylindrical flame combustion, while elongated slotted ones make the flame narrow and long.
Tuyere in the forge
The main mechanism in the forge is a fan, which is responsible for supplying air for combustion. In earlier times, mechanical leather bellows were used for this purpose. They were especially effective when working with charcoal as fuel, whose combustion was activated by blowing - its temperature increased with just a few movements of the bellows.
Today, snail-type fans are used, which supply air with strong pressure. In principle, you can use everything as a blower - from car blowers to old vacuum cleaners, and even configure them with different air supply modes - from active combustion to smoldering.
Air from the fan is supplied through a pipe to the tuyere body and it penetrates through the cast-iron grate into the combustion area. The amount of supplied air is regulated using a damper, and to clean the tuyere from ash, a lid is provided in its lower part.
Umbrella in the forge
To remove smoke, an exhaust hood is installed above the forge, shaped like a pyramidal hood. It is made of iron sheets 0.5–1.5 mm thick and in some cases equipped with lowering wings.
In the lower section, the umbrella usually corresponds to the dimensions of the table and is fixed at a height of 500–600 mm above the working plane. This distance cannot be considered a reference distance, since much in the removal of carbon monoxide depends on the characteristics of the forge and the blowing force, and is therefore determined experimentally.
The disadvantage of metal umbrellas is that they burn out quickly. Those made of refractory brick are much more durable, but they are heavier than metal ones and their construction requires supports or a metal frame.
Anvil in the forge
This honored guest at the forge cannot be ignored. Being the main assistant to the blacksmith, it should be located not far from the forge.
The instrument comes in three types: hornless, two-horned and one-horned, and weighs from 100 to 250 kg.
Anvils are made by casting from tool carbon steel. Its most practical form is two-horned.
The horizontal platform on top is called the face, and the bulk of all work is performed on it.
This surface must be carefully sanded and be in perfect condition: free from potholes, nicks and dents. Do not hit the surface with a bare hammer or use a chisel on it.
On the right side of the anvil there is a conical horn, which is designed for bending rods and strips, welding and rolling out rings. On the face next to the conical horn there is a hole with a diameter of about 15 mm, which is used to give the rods a circular shape.
Storing keys with tools on the garage wall
The most rational way to store tools in the garage is to use free space on the walls.
So, wall-mounted containment systems:
- shield (stand);
- shelf;
- retractable panels;
- railing;
- magnetic tape;
- horizontal bracket;
- screwdriver holder;
- pockets made of plastic plates;
- holders.
The above methods can be used both on their own and in the overall system.
What do we need?
Since the structure of the storage area is quite easily modified, here is a general list of materials:
- perforated sheet of fiberboard or chipboard;
- wooden beams;
- screws, self-tapping screws, dowels, brackets;
- metal loops;
- washers;
- hooks;
- drill/screwdriver;
- drill;
- hacksaw;
- sander;
- level, square, ruler, tape measure;
- boards.
Instructions
A step-by-step plan for some storage ideas.
Stand (shield/pegboard):
- We assemble a frame of a certain size from wooden slats.
- We cut out a rectangular base with the same parameters from the sheet and place it on the frame.
- We lay the washers and secure the stand with self-tapping screws.
- We fix two loops on the back side of the frame.
- We attach hooks, magnetic tapes, wire loops, fabric pockets, glasses for brushes, special mounts for devices, etc. - we organize the space inside.
Shelf:
- Design drawing.
- Preparing fabric for side walls and shelves.
- Processing with a grinder.
- Coating the workpiece with fire retardant impregnation.
- Assembling the structure: the bottom sheet is placed on a flat surface, the same distance is measured on it and parallel lines are drawn.
- A smaller distance is measured at the top and bottom of each line and marks are placed.
- A hole is drilled at each of the 4 points.
- The same thing is done with the top sheet.
- The left end part is attached to the bottom shelf, connected with self-tapping screws. Then install the right end board.
- The upper shelf is placed in the created structure and fixed through the holes.
- Brackets are mounted to the back surface of the end boards from above.
- The shelf is aligned with the wall and the dowels are screwed in.
Distances and proportions depend on the parameters of the materials.
Railing system:
- The brackets are attached to the wall with self-tapping screws.
- A crossbar is inserted into the holes of the brackets and secured with a screw.
- Caps are placed at the ends of the cornice.
Wall-mounted screwdriver holder:
- Strengthening a piece of plywood with an elastic band or metal spring stretched over it on the wall.
- Additional fixation of the base with staples, the formation of “loops” for storing available tools.
Pockets made from disposable plates:
- We create the blank: cut the plate in half.
- We mount it on the wall using self-tapping screws.
For strength, you can stack several plates.
Inventory holders:
- We make oblique cuts on the plastic pipe.
- We polish.
- We fix it to the wall with screws.
Universal horizontal bracket:
- Mark points for installation on the surface.
- We fasten the dowels.
- We install the brackets.
- Supports with hooks are screwed onto the screws of the brackets.
- We fix them in the required position with a key.
Undoubtedly, you will find a suitable location for everything functional and for what is left “in reserve”, without becoming Plyushkin.
Feel free to share your comments about your know-how on this topic!
DIY forge at home
A forge is a workshop for the manual processing of metal blanks, primarily by heating and forging. Handicraft blacksmith shops are maintained by passionate masters of simple and artistic forging, who, through their hobby, preserve the traditions of the craft.
Forges are equipped with a hearth (forge) and an anvil. A huge amount of metal processing work is carried out in the forge: smelting, pouring molten metal into molds, forging, welding, soldering copper and brass, hardening, stamping, drawing, bending, torsion, embossing and others. Ready-made melting furnaces in this store.
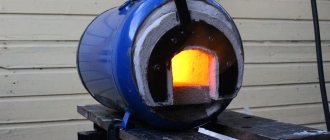
One of the previous articles describes a method for making a knife from a drill by a talented craftsman. Here we will look at what kind of forge this master made with his own hands for the forge. Creating a homemade forge at home, practically in the yard, he used, as one of the forums aptly put it, a “minimalist-primitivist approach.” However, it should be noted that this approach turned out to be very effective.
The basis of the forge was a portable forge made of a pipe 1 cm thick, weight approximately 60 kg, bottom 1.5 cm. Cuts were made on the bottom surface with a grinder. Under the bottom there is a hollow part, to the base of which a pipe for supplying boost air is welded. The air is supplied from the vacuum cleaner. The furnace has a door to reduce heat loss.
An anvil is a piece of rail welded to the channels. On the side of the anvil there is a fastener for a vice, which can, if necessary, be installed for torsion and other work. The distance between the forge and the anvil is approximately 1 m, making it convenient to work.
Testing a coal forge shows how efficient the device is. The video shows that using a small amount of charcoal for testing, you can accelerate the oven to 1200 degrees.
Further explanations about the optimal adjustment of airflow using a vacuum cleaner for the forge
Next is an even simpler and more mobile blacksmith's forge, made by the same master
Brief introduction:
About three years ago I decided to make a forge - I was tired of making handles and wanted to forge myself. I scoured the literature, the Internet, and asked old blacksmith friends. In general, to be honest, everything is unclear. Fans even make (!) a forge in the bathroom (!). They recommend vacuum cleaners, saucepans... But I need something small, but really “not on my knees”.
I already have experience, I make very good knives: I mainly use bearing steel, as it is cheap and accessible. Basic principles of building a forge:
• As cheap as possible. • Maximum available materials.
• Maximum convenience.
So, first, what is needed for a forge.
Materials
1) Ordinary brick, either white or red - about thirty of them, I took from landfills and ruins 2) Metal grating. Metal pallets are best, cast iron is better. I was able to buy cast iron trays for the stove at a village store (hardware store).
If desired, you can simply lay down the fittings, or weld the grate. Functionally, the coals will burn on it, so the thicker the better. Holes - accordingly, no more than one to one and a half centimeters (otherwise the coals will fall through. 3) Anvil. Of course, a piece of rail will do. But the anvil is better.
This is not only one of the most “costly” parts, but you won’t find anything. But I was lucky, I found it again in a village store. But if you sharpen for knives, then the rail is quite enough. 4) Fan. The most important thing is blowing.
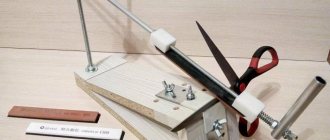
I bought thousands at the construction market for two and a half rubles - this is the second most expensive part, but quite affordable. 5) A sleeve made of aluminum foil - put it on the fan, and stuck a pipe from the water supply into it. 6) Water pipe, one and a half meters, diameter - about the size of a pea can.
7) A can of peas - there is a hole on one side, on the other it is cut and bent, it acts as a structure that guides and reflects the air stream - to blow into the right place.
 Large stump for installing an anvil.
All. Total budget costs (for 2010):
Anvil – 900 rubles Fan – 2,500 rubles Flexible aluminum hose – 80 rubles Pallets 2 pieces – 160 rubles Bricks – free, everything else – free.
Total: we fit into 4000 rubles easily.
How does a forge work?
The forge is simple. You need to: blow air from below, through the grill onto the coals. The workpiece lies on the coals and is heated. You can poke it into the coals. The sides are covered with brick. Dot. All.
Therefore (see Photo 1.) – first we lay out a rectangle of bricks. I did NOT worry about the topic “cement, refractory clay, etc.” - just PUT the bricks. If it moves, I’ll fix it. If it bursts, I'll replace it. I don’t need to forge gates, I need blades. Quite.
You can see in the top photo two rows of bricks... then we continue to lay them out. In the photo you can see that a rectangle is made of bricks of different colors.
True, it rests on an iron box - below left - but it was just a box, I used it too. Essentially these are two walls of bricks in two rows in the shape of a “P”. Width – to accommodate pallets.
You can clearly see how I stupidly burned one of the pallets - I was trying to achieve a “white glow”. I achieved it. Is it necessary?
I put larger blocks at the head - I just found these, you can just make them out of bricks. Here is a front view of where to insert the blower pipe from.
Now - blowing
The next photo shows a fan on a wooden pallet (quickly put together) with an aluminum sleeve on.
A fan costs money - but even if it’s an old vacuum cleaner, or even a homemade bellows - it’s important that the air is supplied where it’s needed and conveniently. The pipe does not heat up.
Fan, purchased at the construction market.
It is important that the air supply should be from bottom to top; I placed a crushed tin can on the end of the pipe, which turns the air flow from horizontal to top - this is more than enough.
Cans are free. The sleeve is put on and wrapped around the fan with wire. There is no tightness, everything is stuck, just to hold on. I'm not worried. In the next photo on Sun. case – fan output data.
The crumpled end of the aluminum sleeve is clearly visible, where I put the pipe while working.
Fan output data.
As I said, next we take a tin can of peas. We put it on the pipe. The bent lid is a reflector, we point it upward and we put the pipe under the pallets.
We put the pipe into an aluminum sleeve, crumple it and tie it with wire. We turn on the blower.
You need a switch, step on it with your foot - turn it off and on, so that it doesn’t blow in vain when you don’t need it - your hands are busy.
Next, a stump placed in the wheel disk is covered with sand. In principle, any such foundation should not be shaken. Place an anvil on a stump (a piece of rail or more massive pieces of iron) and off you go. All.
This is what anyone already has - I managed to buy an anvil - together with the fan, these are the two biggest expense items. If I didn’t have the money, I would take a thick piece of channel or rail. The main thing is that everything is working.
And here is a general view of the forge in operation. If you need shelter from the wind, I add a brick wall. I need a long gauge (for example, I forged a one and a half meter spit from rebar) - I remove the bricks from the end - etc.
Everything can be rebuilt in a minute.
Forge at work.
Good luck, guys! The forge is great. I forged knives for myself - the main thing is that your hands are free, and you really don’t have to lick your lips at other people’s records - but make your own things. But that's a different story!
I forgot to add about safety: sprinkle sand around, ALWAYS have a bucket of water nearby when forging (but don’t drink during or after forging for about 20 minutes - your teeth will crack, I’m serious) - because pieces of cut off hot metal can fly far and burn painfully. Covered clothing is a must - I'm wearing a rain jacket and an apron - glasses won't hurt either. Shoes - boots, pants outside, otherwise if a piece of metal gets thrown in, you'll have to dance!
The main rules for maintaining order in the workshop
- Adhesive labels help you quickly find out what's in the container. They will force you to sort fasteners by type and size. If you can't decide where an item will be stored, first ask yourself whether it is needed.
- If you don't like entering a dirty room, clean it before leaving.
- Divide the workshop into work areas. It’s better to start cleaning one of them than to try to tidy up the whole room, especially when you don’t have enough time.
- Follow the principle of division into zones and keep all things in their place.
- Don't take on several things at once. If you have parts for two different projects on your workbench, one of them may end up unfinished.
- Beveled planks make it easy to move wall cabinets, panels and holders to reposition them to suit a new layout.
Don't start a project without a detailed plan. Keep plans in separate folders, dividing them into categories such as “furniture,” “boxes,” “frames,” or “toys.” - Keep only the materials needed for the current project in your workshop, or find a place to store them outside the workshop. Let the rest lie in the store's warehouse.
- If clutter begins to take over your entire workshop, try to deal with it by developing the habit of throwing away three items at a time from different storage areas.
Premises requirements
For a small scale, it is quite possible to start producing forged products in your personal garage. But keep in mind that even on a small scale, you need a place to store material and finished products. It is also necessary to provide access roads, a place for loading/unloading, and devices that assist this process. Therefore, even at the start, experts in this field do not recommend starting with a garage.
Also note that the forge is not a quiet sewing workshop, so residents of the selected area may be unhappy with the noise. That is why many people move their production premises out of town or to a neighboring village.
If you are going to engage in this type of work professionally, you need to meet the following requirements:
- ceiling height – from 3 meters;
- area – from 80 m²;
- electrical supply;
- availability of water supply and sewerage;
- convenient access roads;
- compliance with fire safety standards;
- ventilation system.
It is convenient and inexpensive to rent former production workshops or forges.
Top 10 working ideas
1. Opening a retail outlet.
It is quite possible to open a grocery store in the garage
In accordance with current legislation, a garage is classified as a stationary retail facility, which means that a store can be organized in it. Before creating a business plan, it is advisable to analyze the demand for certain groups of goods. For example, in a large garage complex you can sell auto parts or consumables.
To organize a store, the premises need to be insulated and equipped with high-quality equipment, which will require quite a lot of money, time and effort.
2. Auto repair shop.
By opening a car repair shop, you can help your garage neighbors with repairs for a fee
If you are an experienced car enthusiast and are able to quickly fix even the most serious breakdown, then opening a car repair shop will be an ideal option to start earning money for yourself. To do this, you will need hand tools (spanner sets, screwdrivers, jacks, etc.) and a welding machine. Before starting work, it is advisable to also take care of the safety of the workplace and arrange the premises.
3. Forge in the garage.
Forge - a promising and low-competitive option
Artistic forging is an extremely popular activity. This idea may seem quite expensive at first due to the need to purchase expensive materials, but, in fact, due to insignificant competition in the market, with the right approach it quickly pays off.
4. Car wash.
For a car wash inside a garage, there is no need to thoroughly re-equip the premises
A car wash can be organized in almost any garage; you just need to arrange the room and the area around it. Provide water and prepare a sewerage system, take care of fire safety and decide on equipment. Additionally, you can organize interior cleaning and engine washing services.
5. Production of decorative sculptures.
Making garden sculptures from plaster and concrete will require minimal costs, but will be an excellent way to create a profitable business. A beginner in this business will need to learn how to prepare a solution and buy molds for casting: foam, wood or cardboard.
6. Laundry.
By opening a laundry, you can attract the attention of students from dormitories who have problems with washing
In small towns it is very difficult to find a public laundry, so such a business, provided there is no competition, can pay for itself very quickly. First you need to acquire the necessary equipment and cleaning products, as well as conduct a competent advertising campaign. The best option would be to organize a laundry room in a garage near student dormitories.
7. Tire fitting.
If the garage is located next to a gas station or roadway, then it would be advisable to organize a tire service. The room must be heated, ventilated and well lit. You will also need expensive equipment (compressor, vulcanizer, jack, tire changer), which is better to rent at the initial stage of the business.
8. Car tuning.
Car tuning gives room for creativity, but is only relevant for big cities
Those who love creativity will love the prospect of creating something original and specific out of ordinary cars. But, unfortunately, this type of business will be relevant only for residents of megacities. In small towns, it will not be easy to find consumers for this service, which means, in addition to purchasing expensive materials, you will have to spend a lot on advertising.
9. Glass cutting.
In areas with a large concentration of industrial premises, the garage can be converted into a glass cutting workshop. The operating technology is quite simple, and even a beginner can master it if desired.
10. Fault diagnosis service.
Like its owner, the car also needs regular diagnostics.
This service is very popular among car enthusiasts, so you can make good money by diagnosing car problems. You will need to purchase special software, an adapter and a scanner to determine the machine block code and report errors. Remember that the computer program must be updated regularly, since new car brands appear every season.
Personnel and advertising
Another aspect on which the success of a future enterprise depends is a professional blacksmith with experience. It will be useful if you manage to find an experienced artist-designer whose services you will need to periodically contact. There is no need to hire him as a permanent staff - it is better to pay one-time for each design idea.
Naturally, at first little will be known about your blacksmithing enterprise. Therefore, you will have to work hard to find potential customers. A good idea in this case would be to create your own website, which would be filled with information and illustrations of finished product samples. In general, it would be a good idea to prepare your own portfolio, business cards, and flyers.
How to properly arrange a viewing hole
Inspection pit diagram
The question of the presence or absence of an inspection hole is quite individual. First, you need to decide how high the need for arranging such a pit is. There is no point in equipping it if you often use the overpass on the street.
If you decide that you need such a pit, then you must take into account that the walls and bottom must be concrete. The edges of the pit must be reinforced with iron corners. It is also worth considering what and how you will cover the inspection hole when not in use.
A drainage hole is needed in the corner of the pit; all the water that accidentally falls down will be collected in it. The hole must be made of such a size that it is convenient to scoop out the accumulated water. To avoid accidentally stepping into a hole while repairing a car, it must be covered with a grill.
In the pit you can place small equipment that may be useful for repairs; you can prudently make niches in the walls so that it is convenient to put the tools you are using. Also take care of lighting the inspection hole, install a lamp or arrange a place for a portable lamp.