Articles
All photos from the article
Manufacturers now produce many types and sizes of cutters designed for processing different materials, including wood. You can sharpen a dull device with your own hands on a universal or special machine, or also manually.
Cutters need to be sharpened from time to time.
The process of manual sharpening according to the type of cutter
Now let's briefly talk about the features of the tool depending on its configuration. The main problems are that it is not always easy to ensure uniform processing along the entire length of the cutting edge.
The peculiarity of manual sharpening is that the emphasis is provided not by the vice of the machine, but by a special device.
End
The cutting elements are located at the end and side. This allows you to make grooves along the edges. Processing takes place according to the following algorithm:
- Fastening of the cutter is horizontal in relation to the rotating one.
- Tilt it enough to achieve the required angle.
- The circle rotates with high amplitude.
- During installation, note the position of the cutting part upwards.
Sharpening end (finger) cutters
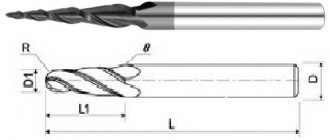
This is an elongated tool whose shank has a cylindrical or conical shape. Due to its appearance it has also been compared to fingers. Actions:
- Select a diamond stone to place on the edge of the table.
- If the tool has a large enough recess, then it should be secured along the tabletop.
- As you sharpen, the edge will become sharper and the diameter will decrease.
Recommendation: if the package includes a bearing, then it must first be dismantled, and in any case it would not be superfluous to clean the surface with a specialized solvent.
Disk
Essentially, it is a disk with teeth around its circumference that must be directed upward. If it is simple (unidirectional), then the cutter itself should be positioned vertically. And in the case of a versatile direction, the sharpening angle is the same as the angle of the cutting teeth.
Prefabricated
Their design assumes the presence of removable plates. Each one should be sharpened separately. It should be taken into account that they have several elements for processing - these are rear, main and auxiliary corners, as well as a transition edge.
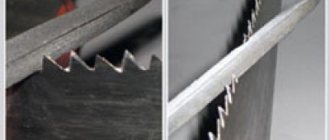
Cutters with backed teeth
Such an instrument has a flat front surface, and the back is made in an Archimedes spiral. In order to sharpen the product, you must use a disc wheel
Each tooth must be ground down along the outer base, and it is also important to ensure that the same layer of metal is constantly removed
Manual sharpening of end mortises designed for processing tough materials
To sharpen an end mill designed for processing tough materials (such as wood), you will need the following tools, equipment and materials.
- Table or workbench.
- Diamond beam.
- Soap solution.
- Solvent.
The end mill is sharpened according to the following scheme.
- Soak the diamond bar in soapy water and secure it to the edge of the table.
- Remove the guide bearing (if equipped) from the cutter.
- Clean the cutter with solvent.
- Sharpen all cutters.
Image No. 3: cutter sharpening diagram
Please note the following features.
- Before sharpening, be sure to make sure that the diamond stone has the correct shape.
- To achieve uniform sharpening of the cutters, make the same number of movements with approximately the same pressure.
- If you don't have a diamond wheel, you can use sandpaper to sharpen it. Glue it to a solid piece of wood or strip of steel.
Varieties
Conventionally, you can use the following classification:
- A universal machine for sharpening not only cutters, but also other cutting tools.
- A specialized machine is used to process only one type of tool, for example, milling cutters.
The universal machine is equipped with normal and special devices suitable for securing and installing the tool, additional measuring mechanisms that allow maintaining the sharpening angle of the cutters.
Universal sharpening machine with accessories for sharpening cutters
Specialized sharpening machine for sharpening end and cylindrical cutters
Design and characteristics of core drills
Despite the features of individual models, the basic designs of all metal crowns are approximately the same. All of them consist of a shank, a guide part with spiral grooves and a cutting crown consisting of an even number of teeth (see figure below).
The guide part of such a tool is hollow. When drilling, a metal core is advanced into its internal space, which is knocked out with a special pusher at the end of the operation. The central channel runs through the entire body. A pusher pointed at the end (often spring-loaded) is inserted into it, which, in addition to pushing out the metal core, serves to center the bit on the metal before drilling begins. Also, a centering drill can be attached along the axis of the central channel. In addition, on some models, coolant is supplied to the central channel through a side valve. Due to the large number of cutting teeth, a core drill requires significant cutting force to operate. Therefore, such tools, as a rule, have shanks with flats or grooves for reliable fixation in the chuck. Metal bits designed for conventional drills have a small diameter and cylindrical shanks.
How to sharpen cutters?
You can sharpen it by hand or using a router bit sharpener.
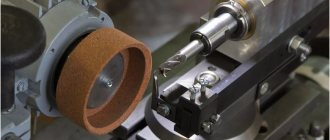
Rice. 1. Sharpening cutters using a sharpening machine
The machine ensures synchronization of different types of movement and fixation of the cutter. For example, to sharpen an end mill, it is necessary to combine translational and rotational movements while maintaining uniform pressure on the tool against the grinding wheel. The speed of rotation, the grain size of the abrasive, and its material are of great importance.
- Abrasive wheels made of electrocorundum are suitable for sharpening cutters for metal and wood (manufactured material is high-speed or tool steel of the “Standard” class).
- High-performance high-speed steel cutters are sharpened with CBN wheels.
- Diamond (PCD) and silicon carbide wheels are used to sharpen the teeth of carbide cutters.
It is important to consider that strong heating reduces the hardness of abrasives and leads to a partial loss of cutting properties. Below is a table of the thermal stability of the main materials used for the production of abrasive wheels
Rice. 2. Table of thermal stability of basic materials
To cool the sharpening tool during operation, water alone will not be enough - the machine will rust. Experts advise adding soap and soda ash, nitrite, sodium silicate, etc. to the water. — electrolytes create a protective film on the surface of the grinding wheel.
There are more than 20 grinding wheel configurations for sharpening milling tools. The back planes of the incisors are ground with disk-shaped or cup-shaped wheels, the front ones - flat or disk-shaped.
Rice. 2.1 Basic forms of grinding tools made from STM in mechanical engineering
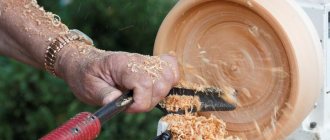
Methods for sharpening "wooden" end mills
Wood end shaping tools can be sharpened by hand using a fine diamond stone. The cost of performing this operation by a specialist is also low.
Manual work
This is what a diamond block looks like.
- The block should be placed on the edge of the workbench. If the cutter has a deep recess, it must be fixed. The cutter should be driven along the already secured sandpaper.
- During operation, the bar must be cooled with soap or clean water.
- The front part of the cutter is gradually ground down, its edge becomes sharper, and the diameter decreases slightly.
Note! When the jig has a removable guide bearing, it should be removed before sharpening. In an attempt to save time, you can ruin it and the entire cutter.
Sharpening process.
- The bars must be used in different grain sizes, based on the thickness of the metal layer to be ground and the required surface cleanliness.
- Before starting work, make sure that you have used the correct shaped sandpaper.
- As you sharpen each tooth, try to maintain the symmetry of the cutting edge. To do this, do the same number of movements and with one pressure.
Before you sharpen a wood cutter, you should take into account that this can also be done using mechanical sandpaper. It should have a low rotation speed and a circle of appropriate grain size and shape.
Grinding wheels
Grinding disc made of white electrocorundum.
Based on the material of the cutter, its sharpening can be carried out with circles made from:
- regular or white electrocorundum;
- elbor (CBN);
- green silicon carbide;
- steel with diamond chips (PCD).
Electrocorundum products efficiently sharpen wood cutters made from tool or high-speed steel of normal performance. CBN discs are used for high-speed metal cutters with increased productivity.
When using abrasive discs, it is recommended to use coolant cooling technology. When sharpening, the thermal resistance of the cutter and grinding wheel should be taken into account. If you select a disk with the wrong value for this parameter, you risk burning the tool or sandpaper. Below is a table of such values.
| Material | Heat resistance limit in degrees |
| Industrial diamond | 700-900 |
| Electrocorundum | 1300 |
| Silicon carbide | 1200-1300 |
| Boron carbide | 500-600 |
| Mineral ceramics | 1200 |
| Elbor | 1300-1500 |
| Tool carbon steel U-12 | 200 |
| High-speed steel R-18 | 600 |
| Hard alloy VK-8 | 900 |
With an increase in sharpening temperature to +1000 degrees, the hardness of abrasive wheels at the micro level drops by 2-2.5 times. Up to +1300 degrees – 4-6 times.
The use of water as a coolant leads to the occurrence of corrosion on the elements of the grinding machine. To prevent this from happening, soap and electrolytes (sodium carbonate, soda, trisodium phosphate, nitrite and sodium silicate) are dissolved in the liquid. They create protective films.
For basic grinding, use a soda and soap solution. When finishing - low concentration emulsion.
Cooler for grinding machine.
Note! To increase sharpening productivity and reduce specific wear, it is necessary to select the largest abrasive disc grain size allowed for a given type of cutter. It will provide the required level of cleanliness of the tool surface.
The speed (circumferential) of the disk when sharpening cutters made of tool steel should be 10-14 m/s. If we translate into more familiar values, then when using emery with a diameter of 125 millimeters, the rotational speed of the drive should be approximately 1300-2200 rpm.
The configuration of the disk for turning the angle of the rear incisors on a cylindrical plane should be cup-shaped (marked CHK or ChTs) or disc-shaped (marked 1-T, 2-T, 3-T), and the configuration of the front corner should be flat or disc-shaped.
Using a Sharpening Machine
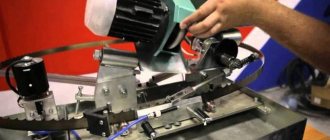
The photo shows the device of the E-90 sharpening machine.
Taking into account the most complex design - spiral teeth, special sharpening equipment must provide both translational and rotational movement to the cutter being processed. This is the sharpening machine for wood cutters E-90 “Darex”. This will serve as our example to describe the process.
The essence of the operation of sharpening end cutters is that during their longitudinal movement relative to the disk, the cutter is simultaneously rotated around its axis. As a result, the surface being treated is constantly in contact with the wheel at the same height.
This ensures the same turning angle. Rotational and translational movements are synchronized using a special element - a needle copier. It rests on the sinus on the front side of the tooth.
By pressing the tooth against the needle and smoothly moving the cutter along the axis, the master sharpens the cutter along its entire length in one movement.
In a schematic form, the processing of lateral teeth, including helical teeth, is carried out as follows.
The process of sharpening the cutter.
- The cutter is mounted in a collet.
- The needle copier is positioned so that it is located in the highest position. The tip should rest against the outer edge of the cutter groove.
- The cutter is then placed in its original (extended) position. In this case, the copier needle is placed next to the shank and touches the groove of the tooth.
- Using the lateral movement handle, the sharpening disk is moved to a position in which its outer edge is aligned with the copier.
- Next, you should turn on the machine motor and, using the direct feed handle, slowly move the disk towards the cutter until it begins to spark.
- Next, on the feed scale, you should set the thickness of the metal being ground. As a rule, this is 25-50 microns.
- You need to sharpen the cutter along its entire length by retracting the spindle with the cutter installed until it comes off the copier.
- During work, it is necessary to ensure that the cutter is in contact with the copier needle at all times. This will ensure the rotation of the cutter necessary to ensure that the face being processed is in contact with the disk at the same relative position.
- To ensure clean turning, the passage of the cutter should be repeated without changing the thickness of the steel being removed on the scale.
- After this, turning of one tooth can be considered complete. You can move on to the next one.
To ensure that the sharpening of all cutters is symmetrical, do not change the thickness of the steel being ground, set using the direct feed handle, during the work. (See also the article Wood sander: features.)
By changing the position of the copier needle so that its end touches various points of the tooth groove (for example, the center, edge), you can change the values of the rear angles a and a1.
Now about sharpening the end cutters.
Sharpening the end edges of the cutter: a – single-cutting edges, b – double-cutting edges.
- For this purpose, the shaped cutter should be placed in a position in which the tooth being sharpened will be in an exactly horizontal position.
- The sharpening system of the E-90 machine has a graduated ring. It makes it possible to very simply position the end cutters strictly horizontally.
If the machine does not have a graduated ring, you have to use improvised means.
- When using a sharpening machine that does not come with such a device, you can use a square to set the teeth.
- When the cutter has reached the desired position, work can begin. It is carried out by shifting the edge of the sharpening disk along the edge of the tooth.
- The turning angle value can be changed by moving the wheel vertically or tilting the spindle with the cutter.
Types of tools used
Large enterprises use various types of tools:
- Cylindrical - for processing workpieces on machines equipped with a horizontal spindle.
- Face - for milling workpieces on machines with a vertical spindle.
- End - for driving ledges, recesses, contours (curvilinear). Used on installations during vertical milling.
- Disc - for driving grooves and grooves on horizontal machines.
- Keyed - for making grooves on machines with a vertical spindle.
- Angular - for milling planes (inclined), grooves, bevels.
- Shaped - for processing shaped surfaces.
To process workpieces, equipment designed for the following work is used:
- for metal;
- on wood.
Milling cutters with appropriate equipment are produced as sets with mounting dimensions of the fastening part of different diameters. In order for a cutter to be used for a long period, it must always be sharpened, and when carrying out work, a temperature regime is required that does not allow overheating, which reduces their strength characteristics.
Sharpening core drills
This is quite expensive and complex equipment and it makes sense to purchase it only if you intend to provide tool sharpening services. And in order to return the cutting edges of a metal crown to their original sharpness, it is enough to contact a service company with the appropriate competence. The price of such a service is not very high. For example, sharpening a Karnasch GOLD-LINE series core drill with a diameter of up to 25 mm will cost 500–600 rubles. Sharpening work for Anchor metal crowns and Hilti and Makita bimetallic annular drills will cost slightly less.
When sharpening a crown for metal, the protective coating of the cutting edges is completely removed. The price of sharpening work for such a tool is openly published on the websites of specialized enterprises. But we couldn’t find out how much a new titanium nitride coating would cost. If anyone has such information, please share it in the comments.
Main characteristics
Since finger cutters are designed for processing any surface, each of them has its own characteristics. These include:
Wood end mill
Milling tools for wood processing are made of steel, which has increased strength and has the exact shape of the pattern of the working part. But it is worth noting that depending on the surface being processed, it is necessary to select the appropriate type of cutter. For example, to work with plywood you will need a cutting part made of harder alloys, which increases the work process.
In addition, they also have several varieties, namely they are solid and prefabricated. The latter have quite a significant advantage, since they have the ability to set the knives to the required size and are very easy to replace if necessary.
One of its advantages is that it can be used to insert door hinges. First of all you need:
- To mark the loop, to do this, you need to attach it to the location and mark it, best with a paint knife. But it is recommended to attach the hinges to several self-tapping screws so that there is no displacement.
- Then you should press two small bars against the door, thereby making a place where the soles of the cutter will rest.
- After this, a slot cutter with a straight attachment is loaded into the tool. In this case, the work must be carried out carefully so as not to go beyond the marked marking lines.
- To establish the required hinge cut on a hand cutter, it is necessary to set the appropriate depth. The correctness can be checked on any wooden block, and only then carry out actions on the surface of the door.
- After cutting out the door hinge, it is necessary to process the made recess with a chisel, if necessary.
- When all the grooves for the hinge are made, you can install the doors.
For PVC and aluminum
This variety is intended for processing these materials and is used for:
- milling drainage surfaces;
- milling a groove for a lock;
- processing of PVC and aluminum profiles;
- cleaning grooves for seals.
As for the milling cutter for aluminum, it has a specific structure, since this material has certain features, namely the adhesion of chips, which complicates the process. Due to its specificity, such a tool eliminates the possibility of inaccuracies or distortions in relation to the specified parameters.
For metal
Basically, such equipment is used in production and is considered simply an indispensable tool. Its main purpose is:
- Milling grooves for locks.
- Cleaning the grooves and special grooves into which the seal will then be placed.
- Creating drainage holes.
- In addition, it is widely used in the automotive industry for work requiring milling.
Diamond cutters
Any work on surface treatment requires compliance with GOST, which, in turn, improves quality
Particular attention is paid to actions related to concrete and stone surfaces, both internal and external.
Therefore, diamond cutters are ideally suited for grinding operations. Thanks to this tool, work with such surfaces is carried out with the highest quality possible, while spending very little time.
Among the varieties of this type, the diamond finger cutter is used for work on granite and marble. This material is quite strong in structure, and with the right selection of tools, you can work not only on granite and marble, but also on other stones. In addition, the diamond cutter is quite durable, which allows you to save money on frequent replacement of the worn-out working part of the tool.
Regardless of the work performed, it is worth considering the fact that for each type of material used, an appropriate cutter is required. The thing is, depending on the structure and hardness of the material, it is necessary to select the appropriate diameter of the tool
In addition, it is very important to take into account the speed of its revolutions. This is due to the fact that the higher the speed, the more the tool heats up.
For example, if steel with a strength of HRC 38-47 is processed, and the metal cutter has a size of 3 or 6 mm, then the speed of rotation should be 25-25 m/min. But if it is necessary to produce on heat-resistant alloys with a strength above HRC 47, and the diameter of the cutter is similar, then the speed must be reduced to 10-15 m/min.
Video: sharpening finger cutters for a hand router.
Features of core drills
Today, tool manufacturers offer drills:
- various shapes and sizes;
- Areas of use;
- type of coating.
It is worth noting that depending on the coating, the characteristics of drills may vary. Even the heavy-duty coating of a core drill sooner or later becomes dull, and in order not to throw away the part, it can be sharpened again.
Depending on the material used, the number of sharpenings of the tool can vary from 5 to 12 times. Of course, after the twelfth sharpening, the drill should be thrown away, since its quality and design will not give the expected result.
Advantages of quick replacement
The highlight of this device is the adhesive method of attaching grinding wheels to the support disk. Thanks to a layer of polymer adhesive applied to
the reverse side of each circle, they can be repeatedly and at the same time firmly attached to the surface of the support plate, and, if necessary, easily
replace one with another. The abrasive blade fits tightly to the support disk, forming a working surface for grinding the cutting edge
tool. If the blade needs to be treated first with a coarse grit and then with a fine grit, the second wheel can be attached directly on top
first.
The adhesive method of fixing the grinding wheel allows you to install it not only on the support disk, but also on a previously fixed wheel. This is very convenient when working with wheels of different grain sizes. The surface adhesion (adhesion) of the elastic polymer-based adhesive composition is designed so that the circle is firmly held in the device during operation and can be easily peeled off at the end of operation. In this case, the glue does not stain either the surface of the support disk or the abrasive layer of the circle located below.
The thickness of the support disk (more than 10 mm) allows you to forcefully press the tool to its surface, and the tight and uniform fit of the emery
circle to the reference plane eliminates runout and eccentricity during rotation, ensuring the formation of a smooth, burr-free cutting edge. Wherein
The side (end) surface of the disk made of durable polymer is used for polishing the tool.
How to sharpen a drill for metal
A correctly selected device will significantly reduce time costs and perform the job as accurately as possible. Find out below how to sharpen a metal drill using a sharpener.
In addition to the main unit with an electric motor and a wheel, you will need to purchase special devices that hold the drill in a stationary state. Such stands allow you to control the angle of inclination and feed of the tool during turning.
Many devices allow you to debug metal cutting products with a diameter of 3 to 19 mm. To turn twist drills, you can use special machines that have a built-in electric motor and a feed mechanism.
Unlike using a conventional sharpener and holder, professional equipment can cost tens of thousands of rubles. Therefore, if sharpening drills is not a profession, then you can get by using the above-described tandem of a sharpening wheel and a holder, or straighten the tool manually.
You can sharpen a drill with a file without experience. The main thing is to choose the right file. Considering the fact that even cheap drills are made of high-quality cutting steel, you will need to select a diamond-coated needle file. In addition to the file, you need to prepare a vice in which to fix the tool.
In order not to waste time and energy on the manual method, you can use a grinder with an abrasive wheel.
Sharpening a drill with a grinder
Almost every home workshop has a grinding machine, so the method will be one of the most budget-friendly.
In addition to the grinder with the grinding wheel installed, you need to prepare a vice in which to hold the drill during sharpening. The room where the tool is being adjusted should be light so that the process of removing metal from the cutting surface can be controlled.
Debugging is carried out in the following sequence:
- the drill is installed in a vice in a vertical position;
- a grinder is used to remove part of the trailing edge to completely eliminate signs of wear;
- The cutting edge is sharpened at an angle of 120 degrees.
To prevent the drill from overheating during the turning process, the contact of the emery wheel with the metal should last no more than 2 seconds. By repeatedly removing a small amount of metal from the working edge, it is possible to adjust the tool to the required angle.
For measurements, it is recommended to make a template from plastic that will help control the sharpening angle.
It is more convenient and safer to carry out work using a grinding wheel and a special holding device.
Sharpening a drill with a sharpener
Determining the amount of damage to a cutting product and debugging by eye is possible after many years of practice.
In other cases, you can install a special drill holder in close proximity to the emery wheel. The fastening must be strong so that the clamp does not move during work. If the sharpener is fixed to a wooden base, installation of the clamp must still be done using a bolted connection.
To perform sharpening: the tool is securely fixed in the holding device, the sharpener motor is turned on and the drill comes into contact for a short time with the grinding wheel at a pre-selected angle.
- If nicks have formed on the surface of the cutting product, then before debugging it, it is necessary to remove the damage evenly on both sides.
- Caution should be exercised. Products of large diameter are heated from contact with the abrasive wheel to high temperatures, which leads to a decrease in the mechanical strength of the metal.
Sharpening using a drill attachment
Without an emery machine, using a special attachment for a drill, you can perform the operation efficiently and with less time.
You can purchase the attachment at any specialized store, but the device can only be used for sharpening medium-diameter products. Most of these attachments allow you to effectively turn tools with a diameter of 4 to 10 mm.
For beginners, the method is the most preferable. Drill sharpening is performed as follows.
- install the attachment on the drill;
- the drill is inserted into a hole of a suitable diameter;
- the drill is turned on and the product is sharpened on one side;
- By turning the drill 180 degrees, the opposite edge is sharpened.
To use the device effectively, consider the following features:
- Only slightly dull tools can be sharpened using a drill attachment. If there is deep damage to the cutting surface and the drill is overheated, it will not be possible to restore the product.
- The sharpening angle in such devices is fixed. Therefore, to restore drills for working with non-ferrous metals, you will need to purchase an original device, or modify the products with a file.
Despite some disadvantages of this design, its use simplifies and speeds up the process of restoring cutting edges, and its low cost explains its popularity.
How to sharpen small items
Unfortunately, it is unlikely to be possible to sharpen a thin drill using mechanized methods, including drill attachments. All work to restore a small-diameter product will need to be done manually.
The first attempt may fail, so you should first select an inexpensive thin drill that needs restoration and perform the operation on it. To work, you will also need a small diamond file and glasses with 4x magnification.
The process occurs in the following sequence:
- the drill is ground down to about 1 mm;
- The file is used to consistently sharpen the edges of the tool to the required angle.
The entire operation is performed “by eye”; it is important to use magnifying glasses and a powerful lighting device when working.
If your first attempt is unsuccessful, you should know that any skill can only be developed over a certain period of time. If you fail, don’t give up trying to learn a useful skill, like sharpening thin drills with your own hands.
Sharpening tool
To sharpen cutters on the outer surface - the backing - use cup-shaped finely shaped wheels. They are installed on a sharpening machine, which ensures the direction angle of the edge and the movement of the sharpening tool along the entire length of the part being sharpened. The machines operate automatically according to the specified settings. Devices for manual adjustment are driven by a person. They only help maintain the desired angle.
Sharpening of turning tools for metal is carried out on sharpening wheels with medium and fine grain wheels. Finishing is carried out on polishing diamond wheels and whetstones. The correctness of the angle is checked with a special template.
Sharpening of disc cutters is carried out on 2 planes. First, the inner cutting edge is processed with a thin circle moving perpendicular to the plane of the disk. Then the back side is sanded. In this case, the cutter rotates by 2–5 teeth after each pass of the circle. This ensures uniform sharpening. The number of teeth in one step of the tool should not be a multiple of their total number. For example, for a disk with 20 cutting edges, a step of 2 to 3 protrusions is selected.
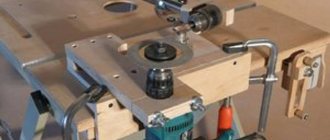
Milling cutter sharpening machine
Sharpening products of other designs
In addition to twist drills, tools of other designs are used for metal processing. You can debug the following tools at home.
Cone gimlets
You can sharpen a step drill using a regular file. The cutting edge of the product is sharpened at a right angle.
If a cone drill becomes dull in a limited area, then sharpening should be done without going beyond the damaged area.
Crowned
When debugging hole saws, a special device is used and you need to know at what angle the metal should be removed from the cutting surface. Considering all the difficulties and time spent on performing the procedure, it is better to turn to experienced craftsmen for sharpening.
Sharpening technology
There are a number of parameters that affect the sharpening angles of cutters, primarily the shape of the tooth: sharpened or backed. Characteristics of each cutter:
- front angle, formed by the tangent to the front surface and the plane of the axis;
- rear angle, formed by a tangent to the rear surface and a tangent to the circle of rotation of the reference point;
- the size of the area that is processed when sharpening along the back surface;
- the angle of inclination of the teeth relative to the central axis.
The sharpening angles of cutters for metal depend on the material and brand of the product; they are indicated in special reference books and GOSTs. When processing workpieces made of high-alloy steel, they are practically zero or negative. Failure to comply with the recommended parameters will lead to rapid destruction of the cutting edge without the possibility of restoration.
During the sharpening process, the area of the teeth decreases, so it is extremely important to perform all operations in the same way for everyone. Distortions will lead to a change in the shape of the cut and strong beating, which is critical when working with viscous materials - you can simply break the cutter
After sharpening, a check is necessary: visual inspection for cracks, chips and deformations using a magnifying glass; for angles, a deviation of 1 degree is acceptable, determined by a pendulum inclinometer.
Using the machine
You can restore the cutting properties of almost any tool. Sharpening of carbide cutters is carried out only on machines. For example, for the end, the first stage will be circular grinding to remove possible chips and defects of the cutting edges; after this operation, the diameter will change depending on the degree of wear of the surfaces. Then, for the pointed side teeth, sharpening is done along the back. For this, a special device in the form of a needle is used, which ensures a uniform sharpening angle throughout the entire length of the tooth during translational movement along the abrasive
By adjusting its position, you can change the clearance angle, and this is important for reducing friction and increasing service life. Sharpening of the end teeth begins with their installation horizontally, the wheel is fed at the required angle
Using the machine, it is easy to update tools for a manual router.
Also, with increasing temperature, the hardness of abrasive materials decreases, which increases the processing time of workpieces and provokes rapid wear of expensive wheels. For sharpening, abrasive wheels of cup and disc shapes are used to grind the back corners of the teeth; for the front corners, flat ones can be used.
The abrasives used are:
- electrocorundum (well suited for tool steel);
- CBN (standard and high-performance high-speed steel);
- diamond and green silicon carbide (for carbide cutters).
When processing hard alloys on a wheel, the surface is heated unevenly, microcracks form, leading to deformation of the teeth. For finishing, you can use cast iron whetstone, use boron carbide as an abrasive, and it can also be used to quickly eliminate irregularities without removing the cutter.
Industrial machines are expensive, but for a home workshop you can make one yourself by combining an electric sharpener and a feed mechanism for the cutter being sharpened. It is impossible to make a universal device in this way, but it is quite suitable for performing several operations with acceptable quality.
Using sharpening wheels
With experience, you can sharpen cutters of simple shapes on a conventional sharpener, but you should understand that a large number of curved surfaces and the need to comply with angular parameters can negate all efforts. It is necessary to work at low speeds, otherwise there is a risk of overheating the cutting edges - the ejection cutter.
Using improvised means
All that is required is the presence of abrasive materials of different grain sizes. During work, the bars must be moistened with soapy water, rinsed and dried when finished. Sharpening cutters for wood with your own hands is possible, but it requires a lot of practice - the main difficulty lies in uniform processing of all the teeth, for this it is necessary to control the pressure and the number of movements. All costs are covered by the word “free”, and the cost of the sharpened items is low if the attempt is unsuccessful. The quality of such work is usually not very high, but within the framework of a home workshop it is acceptable.
Sharpening quality control
After sharpening, you need to ensure its quality. There are various technologies and devices for this.
- You can make sure there are no marks, cracks or chips using a magnifying glass. When monitoring the quality of sharpening carbide cutters, kerosene is additionally used. If there are cracks, it protrudes. This makes it easier to detect defects.
- Pendulum and special protractors are used to measure front and rear angles.
Image No. 7: measurement technology with a pendulum inclinometer
Note! It is not recommended to leave nicks on the surfaces of the teeth. Milling cutters with defects quickly fail. When sharpening, strive to ensure that the surfaces are perfectly smooth.
How to assemble correctly
The quality and speed of tillage depend on the correct installation of cutting elements. Before assembling the motor-cultivator cutters, you must carefully inspect the included elements. On them we will see the stamped letters L and R. This means “left” and “right”. To avoid confusion, let's divide them into 2 identical groups. The hubs on which the knives are mounted can be based on a round pipe or a hexagon. It depends on what shaft the cultivator has.
On one side there is a small protrusion with a hole for a cotter pin and a seat for the first link of knives. Let's take one of the semi-axes. It will be located on the left, in the direction of travel. We assemble the first link, starting from the gearbox. We position the cutting edges so that they circle counterclockwise. Alternately place the right and left knives. If there are 4 elements, 2 knives lie below, 2 - on top of them. Where there is a hole for a cotter pin on the axle shaft, the knife in front of the hole should lie higher. Otherwise, there will be difficulties with installing and removing cotter pins.
We screw the element so that the base plate is between it and the gearbox. Otherwise, the knife may catch on the gear housing. When the first link is ready, assemble the second.
We look at any of the screwed knives, on the next plate we find a position so that the new knife looks in the same direction, but is shifted a few degrees counterclockwise.
Drawings of simple devices
The simplest devices for sharpening can be bushings, the internal diameter of which corresponds to the transverse dimensions of the drills. The sleeve is rigidly fixed into a reliable base, taking into account a certain angle
When selecting a bushing for such devices, you should pay attention to the correspondence of its internal diameter with the transverse size of the tools being sharpened. It is prohibited for the tools being processed to dangle in the sleeve, since even with a deviation of 1-2 degrees along the axis from the required values, the quality and accuracy of sharpening can significantly decrease
In some cases, the task can be simplified by installing a wooden block on this structure, in which holes must be drilled with a diameter corresponding to the tool used. One of the most important elements of such a product is the presence of a tool rest, which is necessary for:
- ensuring correct fixation of the drilling tool and the possibility of precise movement in relation to the surface of the abrasive stone;
- creating a stop point for the drill being sharpened.
Such products made from oak bars, which have holes of different sizes, are the most reliable. Thanks to them, high-quality and precise sharpening of tools is performed. The main task that must be solved by a homemade machine or similar device is the correct orientation of the cutting part of the tools being processed to obtain the accuracy of the required sharpening angle.
How to sharpen core drills for metal
When processing metal, it is often necessary to make holes of various diameters in the material.
For such work, only durable tools are used, one of which is a metal core drill. The product produces holes perfectly, but only when sharpened. If, after using a drill for a long time, its performance has decreased, then it’s time to sharpen it again. We will discuss how to properly sharpen a core drill in the proposed material.
Tips for use
When performing work, first of all, the following safety conditions must be observed:
- the wheel for sharpening cutting tools must undergo a preliminary rotation test;
- compare whether the permitted disk rotation speed will exceed the value indicated on the marking;
- do not use a fork-shaped tool - it does not allow you to adjust the gap on the sides of the disk;
- Before starting work, it is necessary to balance the abrasive disc.
You also need to remember the rules.
- When installing tools, they must be thoroughly secured in a vice or sharpening device. If the cutter is poorly secured, it can be torn out, which threatens the failure of the disk.
- When sharpening, do not lean towards the tools to control the process.
- You can determine the quality of sharpening by moving the tool being processed from the abrasive to a safe distance.
- If the unit begins to vibrate during operation, it must be immediately switched off and the moving connections inspected.
Sharpening cylindrical cutters
The cylinder shape is the most commonly used. Cup circular abrasives are used. You need to attach the equipment to the machine in the center. It should be positioned relative to the rotating circle horizontally and slightly below the axis. Be sure to secure the position with a stop.
Carbide
Grinding is used first; microcracks may form during the process. To eliminate them, finishing is used with the task of removing the layer that was damaged. For this, cast iron discs are used that rotate at a speed of 1.5 meters per second. Finely dispersed carbide paste is used as an abrasive.
Wood cutter: basic rules for sharpening
The teeth of the product can be completely different. The inclination of these elements can be different and is characterized by the main part of the edge. The parameters for determining the appropriate teeth depend on the tool, as well as the features of the product you choose.
The process of sharpening a cutter can be done without special expensive equipment, since thin diamond stones can be used. In this case, you need to use plain water or a liquid with a soap solution. When the sharpening process comes to an end, you should wash and dry the tool.
First, the cutter must be dismantled. The main thing is that you do not forget to clean it of resins and wood. An ordinary solvent can cope with these tasks.
To effectively solve these problems, you must choose quality materials. If you do not do this, then the work will not bring the desired result.
Technical characteristics of the sharpening machine
When purchasing special equipment, you need to carefully consider the following indicators:
- Power supply from 220 V or 360 V.
- Consumption from 200 to 5000 W.
- The spindle rotates without load at speeds from 900 to 3000 per minute.
- Required accuracy class.
- Abrasive wheel feed speed.
- The drive mechanism can be manual or electric.
- What angle can be achieved.
- Are there containers for water or other coolant?
- Availability of a fan.
- The noise level that the machine creates.
- The quality of the protective casing, its strength.
- Floor or tabletop variety.
Drawing of a full-fledged device
A fairly simple way to make homemade sharpening equipment, which is practically no different from the factory product. To assemble it according to ready-made drawings it takes about 1.5-2 hours.
To make a device for sharpening drills with your own hands, you must provide the following consumables, equipment and tools:
- welding machine;
- electric drill;
- Bulgarians;
- standard locksmith tool kit;
- a corner, the size of the shelves is 30x30, and its length is 100-150 mm;
- metal plates of different thicknesses (3-5 mm);
- pins or a piece of steel rods, the diameter of which is 10-12 mm;
- washers, screws, bolts and nuts of various sizes.
First of all, the manufacturing of the bed is carried out, which will be the base in the sharpening device. To do this, use a steel plate onto which a steel rod (12 mm in diameter) is welded at an angle of 75 degrees. It will be the axis.
After that, a washer should be placed on the welded rod, which will act as a support bearing. The amount of angle and rotation of the bed when sharpening the drill will be insignificant, so there is no reason to use a standard ball bearing.
The bed where the sharpened tool will be placed is made from a prepared corner. The one side on the corner profile that faces the whetstone side needs to be ground at a 60 degree angle. On the stock, according to the drawing, a bracket is welded, through which the rotating unit of the device will be fixed. As a result, a structure will be made, the corners of which, in the case of a parallel position of the bed and frame, should be located to the surface of the abrasive stone in accordance with the angle of the drill being sharpened.
The sharpening machine, which is shown in the drawing, has fixed tilt angles, but for greater possibilities it is desirable to provide the ability to adjust the angles. In such cases, there will be a greater chance of using the device if it is necessary to restore tools with different sharpening angles, for example, if it is necessary to sharpen drills for metal, concrete, etc.
To create a more functional unit, you can use drawings of other designs that can adjust the angles:
The peculiarity of sharpening cutters is the relatively large length and curvilinearity of the cutting edges of their teeth. When sharpening, it is necessary to ensure that the surface of the wheel moves exactly along the edge. Particularly difficult in this regard is the sharpening of shaped cutters that have a backed corner. To maintain the shaped profile of the cutter and simplify sharpening, the backed teeth are sharpened only along the front surface (where the front and where the back surfaces are, see below). Sharpened teeth, having a straight or standardized curved shape, are sharpened along the back surface. Slotting and parting cutters are sharpened along the front and back surfaces of the teeth. Read about sharpening them in the article Sharpening circular saws.
Sharpening is carried out on specialized and universal machines for sharpening cutters, or less often manually.
Milling cutter material
The types of tool steels used are U7A, U8A, U9A, KhG, KhV5, 9KhS, KhVG, etc.
High-speed tool steel used for the manufacture of cutters is divided into steel of normal productivity (R6M5, R9, R12, R18, etc.) and increased productivity. The last category includes steels alloyed with cobalt, vanadium, tungsten and molybdenum (R6M3, R18F2K5, R9F2K10, R9F2K5, etc.).
The hard alloys from which cutter teeth are made are produced in the form of plates of standard sizes and shapes, attached to the cutter body by high-temperature soldering (for example, PSr-40 silver solder) or using threaded connections (prefabricated cutters). They consist of tungsten, titanium and tantalum carbides bonded with cobalt. Cutters made from tungsten-cobalt alloys (VK2, VK3, VK6, VK6M, VK8, etc.) are used for processing cast iron, non-ferrous metals, and non-metallic materials. Titanium-tungsten-cobalt alloys (T5K10, T15K6, T14K8, T30K4, etc.) are less durable than alloys of the VK type, but they have higher wear resistance when processing parts made of various types of steel. Three-carbide alloys, consisting of tungsten, tantalum, titanium and cobalt carbides (TT7K12, etc.), are also mainly used for processing steels.
Types of crowns for metal
The classification of core drills for metal is made according to the following main characteristics:
- material of the cutting teeth of the crown;
- type of shank;
- working part designs;
- geometric size (including maximum drilling depth).
There are two basic types of cutting parts for metal bits: with teeth made of high-speed steel and teeth made of carbide materials. The former are cheaper and less productive, but nevertheless much more efficient than conventional drilling tools. The latter operate at higher cutting speeds and, as a rule, are used when drilling high-chromium steels and hard alloys. The cheapest are bimetallic crowns for metal, in which the cutting part is made of high-speed cutters, and the main body is made of ordinary structural steel.
For core drills, the most common type of shank is Weldon. In addition, tools are produced with Nitto shanks, which are compatible with Weldon, as well as according to the standard of the German company Fein, whose shanks are suitable only for power tools from this company. The working part of metal crowns is characterized by the number of cutting teeth and, accordingly, the number of spiral grooves and ribbons, which can be from four to sixteen or more.
Many manufacturers include a separate group of tools with an extended working part, designed for deep drilling, as well as bits for drilling railway rails.
Carbide bits for metal
Features of cutters
Different materials are used to produce cutters. Tool steels suitable for wood are: high-speed, alloy and carbon. For processing metal, plastic, ceramics, and stone-like materials, hard alloys, diamonds, CBN, and mineral ceramics are used.
Steel for wood cutters
- The following grades of tool steels are used for cutting wood: U-9-A, U-8-A, U-7-A, KhV-5, 9-KhS, KhG, KhVG.
- High speed steel can be of normal performance. These are brands R-18, R-6-M-5, R-9, R-12, etc. The high-performance metal is alloyed with vanadium, cobalt, molybdenum and tungsten. These are brands R-6-M-3, R-18-F-2-K-5, R-9-F-2-K-10, R-9-F-2-K-5, etc.
Teeth geometry
According to their design, the cutters of milling cutters are divided into sharpened (pointed) and backed.
- For sharpened teeth, the section of the rear surface (width n) adjacent to the cutting part is a plane. Such incisors are sharpened along the back surface. However, if necessary, you can sharpen them along the front edge.
- In backed cutters of shaped cutters, the back surface has the appearance of an Archimedes spiral. Processing it is technically very difficult. Therefore, such teeth are sharpened exclusively along the front edge.
Each tooth is a separate incisor.
It has standard parameters: back (a) and front (y) angles, area of the sharpened surface (n), slope angle (l).
- Platform n is a section of the rear surface of the cutter that is ground during turning. This is where the teeth wear out the most; their size affects the friction force between the cutter and the workpiece. Because of this, this surface should be maintained within the normalized range.
- The leading edge angle (y) is measured between the tangent to the leading edge and the radius of the cutter.
- The main back angle (a) is measured between the tangent to the back edge at the normalized point of the main sawing edge and the tangent to the rotation circle of this point. When this angle decreases, it reduces friction between the workpiece and the cutter.
- Not all cutters have an additional clearance angle (a1). It describes the expanded gap between the cut surface and the body of the cutter. The instructions indicate the need to sharpen this gap with a certain wear of the cutter and expansion of the area n. The purpose of the operation is to reduce friction between the tooth and the workpiece.
- Based on the direction and configuration of the cutting edge, helical or straight teeth are distinguished. Their slope describes the angle (l) between the axis of the tool and the deployed helical edge.
The size of the angle depends on the type of cutter, the grade of its material and the type of workpiece being processed. When cutting wood, the main rake sharpening angle is selected in the range of 10-20 degrees, sometimes more. The back angle also fluctuates within a wide range of values.
Detailed information about metal crowns
Review of metal crowns: types, design and main characteristics. Main types of shanks (for drill, machine, etc.). Marking and most important parameters of bimetallic and carbide tubular drills. Differences and main advantages. Selection and sharpening.
The metal bit is designed for drilling large-diameter through holes in sheet and profile metal products. This is one of the few cutting tools that has several parallel names not only in everyday life, but also in professional literature. In GOST 17013-71 it is called a ring drill. But since it has a tubular design of the working part, it is often referred to as a hollow or tubular drill in metalworking textbooks and catalogs of Russian manufacturers. When drilling with such a tool, the cutting process is carried out by teeth located evenly around the circumference of its working end. In appearance, this configuration of the cutting part resembles a crown, so another name for a metal crown is a core drill. And since in its appearance and operating principle it is more similar to a milling tool, you can also find another name - annular cutter.
Auxiliary Tools
The process of selecting additional equipment for a fruitful work process is as complicated as choosing the main means of production (especially when it comes to purchasing a household router). The home handyman will definitely need to choose:
- parallel stop for straight cutting (a good manufacturer comes with it included with the main device);
- the guide rail (for straight milling) determines the movement stop;
- a compass will be needed for radial milling and cutting circles;
- To make a groove, a functional device is used, which can be purchased at a special store or made independently (more details in the video);
- a copier (pantograph) is used to transfer a complex pattern onto a wooden surface (an exact copy from the sample is guaranteed);
- a template, copying rings and a bushing are needed for different purposes (the bushing will protect the template, especially a homemade one, and the ring will transfer the shape of the part to the cutter);
- a device for cutting grooves (processing bodies of rotation) is clearly demonstrated here;
- When working on wood, tenon-groove and tenon-cutting devices will be useful.
You will also have to take care of the table for the household router. It can be purchased ready-made, but most craftsmen prefer to make it with their own hands, especially since you can use available materials (chipboard or thick plywood) for this, and at the same time provide additional platforms and drawers for tools. Sharpening supplies—cleaning fluid, variable abrasive stones—can't hurt, but a specialist workshop is the best option for this process.
Tools and accessories for milling in the video below.
Sharpening of cutters for metal: end, worm
A milling cutter is a tool used to process various products. Milling cutters of various types are used, which allow changing external and internal surfaces with the required accuracy. To achieve high productivity, the cutter must be of high quality - be sharply sharpened. Sharpening of end mills for working with metals, wood, plastic, glass is carried out using special machines and equipment.
Rice. 1 Sharpening the tool using an emery disc.
Tool sharpening
Sharpening is carried out to restore cutting ability, with operations performed contour-wise and separately.
Cutters received for sharpening are usually pre-ground on a cylindrical surface using a cylindrical grinding machine to eliminate damage, followed by further sharpening of the back or front of the teeth.
End mills with pointed teeth are sharpened along the back surface with a special disk- or cup-shaped wheel. To do this, the circle is installed with respect to the axis at an angle of 89°, which makes it possible to achieve the required contact between the contacting surfaces. When sharpening the back surfaces of end mills, 2 main methods are used:
- polyelement;
- contour.
When using the multi-element method, the cutting edges are sharpened separately. First, the main surfaces of all teeth are sharpened, then the auxiliary and transitional ones. With the contour method, sharpening is performed sequentially on each tooth in one operation. A single-turn sharpening method is also used, when the cutting edges are processed in one operation. All teeth are sharpened in one revolution and the allowance is removed using a grinding operation.
How to sharpen a drill important points
If you decide to sharpen a core drill, then it is important to know that it is impossible to do this work at home. The tool is transferred to competent specialists who sharpen it using appropriate equipment.
If, for example, a regular drill can be sharpened on any type of emery or sharpening machine, then in the case of core drills, special technology is required.
Sharpening a core drill is carried out in three stages, where the first is a visual inspection and a preliminary sample of the material. Based on the initial check, you can obtain complete and reliable information about the product.
At the second stage, the sharpener must select the shape of the carved tooth, the number of edges and other points. This moment is considered one of the most painstaking, since special equipment and knowledge are used for the work.
Correctly sharpening a drill will extend its service life and operation. All sharpening work with core drills must be carried out on a special machine, which is impractical to maintain at home.
Today, in order to sharpen drills, there are special companies that use modern equipment and professional staff. By turning to our experts for help, everything will be done quickly and efficiently.