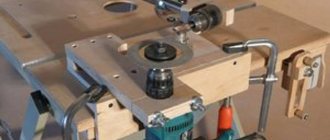
By purchasing a hand router for your home workshop, the happy owner of such a new thing gets at his disposal a very functional tool that can take the processing of wooden parts to a completely different level of quality. No other “representative” of household-grade woodworking equipment has such wide capabilities. In skillful hands, a hand router fully lives up to its name as a universal, multifunctional tool that opens up the broadest horizons of creativity.
Wood cutters
But this tool will only become truly multifunctional if the necessary equipment is purchased for it. And first of all, these are, of course, wood cutters. They are available for sale in a very wide variety, and a novice craftsman needs to learn how to navigate it and choose the right cutter for a particular type of work.
Let’s make a reservation right away: it is simply impossible to talk about all types of cutters in one publication. Yes, it’s probably not necessary, since with the arrival of work experience, a constantly improving master will have a complete understanding of this issue. So this publication is just a “start” in this field.
Purpose of the tool
The axis of rotation of the end mill is directed at right angles to the penetration plane. In this case, its main cutting edges are located on the side cylindrical surface, i.e. cutting occurs along the line of their contact with the processing plane. At the end end there are also cutting edges located at an angle to the axis of rotation, which perform an auxiliary function. The cutting surface of such a router is made in the form of spiral or inclined teeth, and the angle of inclination can be 30-45°.
General information about cutters
The cutter is the main replaceable element of the equipment of any router. In fact, it is the cutting tool that is used to process a wooden part. The quality of the resulting product largely depends on the quality of the cutter.
The principle of the structure of cutters
The variety of cutters according to their “geometry”, and therefore according to their purpose, is extremely wide. But in any case, if we consider these components specifically for a manual router, the general principle of their design remains the same.
General structure of wood cutters for a manual router
In fact, there are only two mandatory basic design elements.
First of all, this is the shank (item 1), which is clamped in the milling cutter chuck and through which, accordingly, torque is transmitted.
The working area or head (position 2) is the one in which the blades (knives, cutters - they are called differently in different sources) are located. The cutting edge can be straight or have a very intricate configuration, which determines the capabilities of a particular cutter.
The variety of configurations of cutter heads will mainly be discussed below - this is the main selection criterion.
Finally, the cutter may have additional elements (in this illustration it is a support bearing - item 3), either simplifying the milling work or expanding the capabilities of the cutter. For example, bearings are very helpful in the manufacture or processing of wooden parts according to existing templates - the result is literally copying the contours. In addition to bearings, these can be locking couplings, calibration bushings or washers, screws that allow you to sort out the collapsible cutter and place its cutting parts in the desired sequence.
Prices for a set of Bosch cutters
set of cutters "Bosch"
Cutter Shank Dimensions
Milling cutter shanks are characterized by two sizes - diameter and length.
The length largely depends on the purpose of the cutter. But sometimes situations arise when, when choosing, for example, deep grooves, the length is not enough. A similar problem can be encountered if a manual router is installed under a special milling table, and the thickness of the tabletop also “eats up” some of the length of the shank.
Manual milling cutters are often built into special milling tables (ready-made or homemade). In any case, this may slightly reduce the free vertical passage of the cutter, and for cutting deep grooves, equipment with an extended shank is often required.
This is one of the points to keep in mind when choosing
The second parameter of the shank is its diameter. Naturally, it is selected according to the chuck of an existing or purchased router.
There is an important nuance here. The fact is that both the tool itself and milling cutters of inch and metric standards can be found on sale. For example, in metric notation it might be 6; 8; or 12 mm. In inch, there are two sizes: ¼ and ½ inch. If we convert this into millimeters, we get 6.35 and 12.7. It seems to be very close...
But exactly what “seems to be.” Milling cutters are equipped with a collet chuck, which, unlike, for example, a drill chuck, does not tolerate “liberties” with diameters. And a cutter with a half-inch shank can become tightly jammed in a 12-mm chuck, so much so that you have to resort to some extreme measures. And vice versa - a 12 mm cutter can be fixed in a ½ inch chuck unreliably, which is extremely dangerous, as there is a possibility of very serious injury.
The shank diameter can be metric or inch. Despite the seemingly insignificant difference in millimeters, they are not interchangeable!
The difference between a diameter of 6 mm and ¼ inch is not so significant. But even in this case, it’s better not to take risks, but to purchase what is written in the router’s passport.
You shouldn’t give in to the persuasion of sellers - they say, everyone does it, and it’s okay, it will “settle down”, etc. With such connivance, there is a possibility of simply ruining your instrument, if the worst does not happen.
What if you need either a longer shank or a milling cutter of a certain configuration, but for a collet of a different diameter, and the store doesn’t have those in its assortment? Sometimes extension adapters help in this regard. They themselves have a shank of a certain size, and at the end there is a collet chuck. So you can purchase similar equipment for different diameter transitions, which, if necessary, will help out in both cases.
Using an extension or adapter, you can solve the problem of both the insufficient length of the shank and the discrepancy between its diameter and the collet chuck of the router.
But, of course, even when choosing a manual router, it is recommended to have an idea in advance about what work it is supposed to perform, and what equipment should be primarily used in this regard. You should not overuse additional adapters - this is always an extra “weak link”, undesirable at high speeds and high loads.
Choosing a hand router is a responsible task!
If you decide to acquire this very useful power tool in order to independently or under someone’s guidance master the technology of milling processing of wooden parts, you should at least have a general idea of the structure of a manual router and the criteria for evaluating it when purchasing. Read more about these issues in the special publication of our portal “Which manual wood router to choose” .
Differences in the structure of the cutting part
Even if we put aside the configuration of the cutting head for now, we can notice possible differences in the design principle itself.
Prices for a set of cutters “FIT”
set of cutters "FIT"
- The most common are prefabricated cutters. The essence of their design is that during the production process, a cutter blank with a shank is first made. And then metal cutting edges are attached to it in the right places. The connection is made using soldering technology using special refractory solders.
It is clearly noticeable that the cutting edges are soldered onto the cutter heads.
This technology has been well mastered, and therefore such cutters are most common. True, sometimes it is the solder joint that becomes the “weak link” - this happens on inexpensive models or on cutters of unknown origin. You usually don’t have to worry about the quality of edge soldering on models from leading brands.
- Recently, cutters with replaceable blades have become increasingly popular. Their cutting edge is attached to the blank with one or more screws.
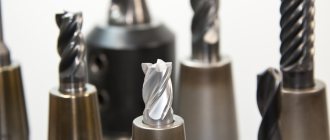
Examples of wood cutters with replaceable knives
Such blades, if necessary, can be easily dismantled in order to sharpen them or replace them with new ones. The cost of new ones, of course, in any case will be lower than the cost of a whole cutter of similar quality. But, as they say, we still “have to live to see a complete replacement.” The fact is that such blades, as a rule, have a double-sided sharpening, and some (as, for example, shown in the illustration above in its left fragment) even have a four-sided sharpening. That is, if the cutting edges are dull, you can not waste time on sharpening them yet, but simply remove the mounting screws, turn the blades the other side out and continue working.
Of course, the cost of such cutters is quite high, but this is fully justified by the convenience and long service life of them. Therefore, an increasing number of professional craftsmen are switching to this type of equipment.
- The third type is monolithic cutters. Their cutting edge is formed by sharpened protrusions on the blank itself, approximately in the same way as is done on conventional drills.
Monolithic type cutters
With such cutters, the possibility of the cutting edge being torn off from the “body” is almost completely eliminated, which, of course, is an undeniable advantage. However, such blades are more difficult to sharpen, and in addition, as they are sharpened, their geometry gradually changes, which shortens their service life. And you have to throw away the entire cutter completely.
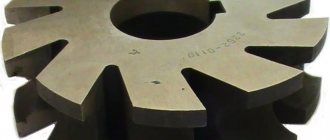
- Separately, you can select attachment (or typesetting) cutters. Their cutting parts are not tightly connected to the shank - they can be removed and installed in the required sequence, alternating spacers, couplings or bearings. This changes the “geometry” of processing the wooden part or the number and relative position of simultaneously selected grooves.
An example of an attachment cutter - you can choose one cutting head or install several, varying the distance between them using the included couplings.
However, this is more equipment for professional craftsmen. For a beginner, it would be more prudent to start mastering milling technology with the usual most common prefabricated cutters with a soldered cutting edge.
Differences in material and method of sharpening the cutting edge
When choosing cutters, pay attention to the material of the cutting edge itself . There are two main options here.
- High-speed steel blades are usually designated by the abbreviation HSS (from English “High Speed Steel”). This is an excellent solution for processing soft wood. As is clear even from the name, such cutters are usually used at high milling speeds - it is under such conditions that they show their advantages, giving very clean processing.
True, it doesn’t take much effort to blunt such edges. When encountering a solid medium, they quickly overheat, lose their qualities and require correction.
- If you have to process hardwood or dense composite materials based on it, then preference should be given to cutters with carbide tips. The accepted designation for such equipment is NM. The most commonly used edge material is tungsten carbide, known for its strength. But this does not mean that such cutters are eternal. No, and they become dull and also require periodic editing. It’s just that with their help it is quite possible to process very dense wood, but at lower milling speeds.
But for soft rocks, this is perhaps not the best option, since, in theory, it can be quite difficult to achieve ideal cleanliness of processing with them. However, this largely depends on the quality of the cutting edges - there is also considerable variation in this matter. Hard alloys can seriously differ in grain size: the smaller it is, the better and more durable the cutting tool is. So the quality of the surface after passing through NM edges of products from leading manufacturers is no worse than after passing through high-speed cutting edges. And in fact, such carbide cutters are universal equipment for any type of wood.
On the packaging of the cutter it is indicated that the cutting edges are carbide. In addition, the maximum permissible rotation speed of the spindle of a hand router when working with such a cutter is indicated.
There may also be differences in the configuration of the cutting edge relative to the axis of rotation of the cutter.
- For the most part, there are cutters in which the cutting edge of the blades is located vertically or, if it is a figured cutter, in the same plane with the axis of rotation. That is, in the lateral projection it still becomes vertical.
Typical examples of cutters with vertical cutting edges.
It should be noted that such edges are the most unproductive and wear out quickly. In fact, they work by chipping a thin layer of wood, so soon nicks appear on them, which worsen the quality of the parts.
But such cutters have a relatively low cost, and are easier than others to edit and sharpen (up to certain limits, of course).
Prices for a set of cutters “Bison”
set of cutters "Bison"
- More advanced are cutters whose cutting edges are located at an angle to the axis of rotation. For the most part, they already work exactly like knives; they provide not chipping, but a neat cut of wood fibers and, accordingly, increased quality of processing of workpieces.
Mills with inclined cutting edges
Such cutters, of course, are more expensive, but the “motor life” of high-quality products of this type is already much longer. That is, the blade will require sharpening or even complete replacement less often.
- The cutting edge can also have a spiral configuration, as is usually done on conventional drills. But, unlike them, the working part of the cutter is not only the end sharpening, but also the entire edge along its length from bottom to top.
Spiral cutters.
There may also be a difference in the type of sharpening of the cutting edge - straight angular, trapezoidal or radial sharpening is used. But it is still too early for a beginner to delve into these “wilds,” and understanding of this issue comes only with sufficient experience in milling, when reaching a qualitatively different level of skill.
Features and Application
Structurally, metal end mills are divided into two types: all-metal (made of hard alloys) and with inserted cutting elements. The most common are solid carbide end mills. They are characterized by high rigidity, stability of parameters and an optimal ratio of price and technological capabilities. Milling cutters with inserted cutting elements made of special alloys with sputtering are used for special cutting modes, for example, milling on stainless steel, titanium alloys and other complex materials.
The main application of end milling is longitudinal machining of planes parallel to the tool's rotation axis. A typical example of such a technological operation is the milling of linear and contour grooves and grooves, the formation of stepped planes, as well as the selection of straight and shaped recesses of various depths. In this case, for deep surfaces, end mills with a cylindrical or conical shank, extended to the required size, are used. The main types of products processed by end milling are:
- plates with linear and T-shaped grooves;
- stamps and molds;
- flat surfaces and gears with grooves and notches;
- templates, dies, punches;
- shaft with keyways;
- body parts with through windows.
The size ranges of end milling machines are determined by state standards. Products made of high-speed steel with a cylindrical shank have a size range of 3-32 mm and are installed on equipment using chucks and collets. Medium and large diameter tools are available in sizes ranging from 14-63 mm with a cone shank and are used on industrial equipment. Milling cutters for CNC machines have their own size range - 14-50 mm.
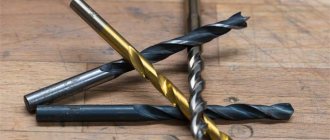
Twist drills
The ubiquitous twist drill was probably the first cutting tool that each of us once began to use, well, for example, in a hand-held electric drill.
While end mills are only available to machinists, twist drills are found in the home of almost every DIYer. But everything is not as simple as it seems at first glance. Statistics show that holes make up the vast majority of all operations performed on CNC machines. In addition, the material removal rate of twist drills is very high and is usually superior to that of end mills. Sometimes it may make sense to drill a lot of holes and then machine the grid between the holes using an end mill.
Like end mills, twist drills come in a variety of sizes, finishes, materials and lengths.
Twist Drill Dimensions
Twist drills come in a greater variety of diameters and sizes than end mills.
However, this is not surprising given the prevalence of hole making operations and the difficulty of using a single drill for holes of different diameters, whereas end mills are much more flexible in this regard. In addition to metric and imperial sizes, there are also special sizes such as numbers and letters.
High Speed Steel, Cobalt and Tungsten Carbide + Coated or Uncoated
If you need the strength and toughness of tungsten carbide to quickly process tough materials, there is no alternative. Otherwise, just buy a full set of HSS or cobalt drill bits.
Coverage or lack thereof is a matter of taste. Coatings can be useful, although not as much as in end mills, perhaps because most twist drills are not made of tungsten carbide.
Screw cutting machine and short series length
The length of the twist drill can vary. Most non-professionals use short series twist drills. Here's how they differ:
The long series screw drill has the same diameter, but is much shorter than the short series drill. It is also more durable.
Because they are shorter, they are also much stronger. The hole produced by such a drill will be more accurate, and you will be less likely to break the drill. Most machinists prefer to use twist drills for screw tapping machines precisely because of these advantages.
Special types
In addition to cylindrical end mills, a large range of milling tools is produced, which belong to the same group, but have different shapes and composition of cutting surfaces. This also includes small-sized end mills, which are usually mounted, but with small diameters they are made of all-metal and are classified as end mills.
All special types of end mills are available with both tapered and cylindrical shanks.
The most common types are:
- Keyed. They have two cutting surfaces at the end, which allows cutting in both longitudinal and perpendicular directions. Used for milling keyways on shafts and longitudinal grooves on flat workpieces.
- Angular. Their characteristic feature is inclined cutting edges at the end. Designed for removing rectangular edges (chamfers), processing inclined planes and corner grooves.
- Quarter round concave. Their cutting teeth are shaped like a reverse arc. Used for milling rounded edges.
- For T-shaped and dovetail slots. The cutting part is disk-shaped and has a larger diameter than the shank. Used for milling long slots of the appropriate configuration.
- Copiers with a cylindrical or conical working surface and a rounded end. They are used in the manufacture of stamping tools, molds and various models.
In addition, there are many types of shaped end mills that are capable of forming multi-stage rectangular and round profiles in one pass. This type of milling tool is mainly used in carpentry and plastic processing.
End mill design
In general, an end mill is a monolithic metal cylinder consisting of two parts: a driver (shank) for installation in equipment and a milling part with cutting elements (teeth) arranged in a spiral. Its main geometric parameters are the overall length, the diameter of the cutting part, as well as the diameter, type and length of the shank.
Shanks
In accordance with GOST 53937-2010, end milling machines, depending on their purpose and area of application, can be produced with the following types of shanks of various sizes:
- smooth cylindrical;
- cylindrical with thread;
- cylindrical with several types of flats;
- with Morse cones, complemented by threads and flats;
- with 7:24 cones for manual and automatic tool changing;
- with HSK hollow cone for manual and automatic tool changing.
To secure the end milling cutter into spindles and chucks with other mounting holes, adapter bushings are used. In practice, abbreviations are often used in the designation of shanks, for example, “end mill cutter” means “with a tapered shank,” and “KM2” is a tool with a Morse taper N2.
Download GOST 53937-2010
Cutting part
The design of the cutting part is of two types: all-metal and with inserted cutting elements. The cutting planes and the grooves separating them for removing chips bend around the cylindrical surface in a spiral in the right direction (the tool is also available with left-hand rotation). On their upper part there is either a sharp cutting edge, or closer to its end there are inserted cutting plates. All-metal milling cutters are usually made from high-speed steel. Coated carbide teeth are attached to the end mill body in the following ways:
- soldering;
- eccentrics;
- screws;
- special bolts with a wedge-shaped head.
The number of cutting planes determines how many metal cuts the milling tool makes in one revolution (approach). The most common are one-, two- and three-flute end mills (they are also called “single- (two-, three-, etc.) flute end mills”). High-pass end mills are used for finishing and milling hard and brittle materials.
As mentioned earlier, small end mills belong to the group of end mills. In this type of milling tool, the side cutting surface is supplemented with auxiliary cutting edges located at the end of the cutter.
Grooving, copying and key milling cutters also have additional cutting surfaces.
Classification of end mills
There is no special extended classification for end millers, therefore they are classified according to lists common to milling tools with the addition of their characteristic features. Below are the main sections of the classification used for various types of metal end mills:
By production purpose
In this section, the main feature is the type and shape of the surface being processed. Based on this, the following types of this tool are distinguished:
- general use;
- with end cutting part;
- for keyways (including for slots of segmental keys);
- for figured grooves;
- for shaped flat profiles;
- carbon copies.
By design
GOST obliges manufacturers to produce end mills of two types of lengths: normal and long and determines the ratio of the dimensions of the shank and the cutting part. But in addition to this, there are end mills on the market, both elongated and very short (popularly called “finger”). In addition to the types and length ratios, GOST defines the types of shanks (various types of conical and cylindrical), as well as size ranges of diameters. Most often in industrial production, an end mill with a conical shank is used.
State standards define only general requirements for milling tools. At the same time, global manufacturers offer various innovative designs. An example of these are modular end mills, in which the cutting part is attached to the shank using a high-precision screw connection. Another interesting development is a six-flute overrunning end mill with top and bottom bearings for finishing slots using a template.
According to the shape of the cutting surfaces
To form specific surface profiles of workpieces, in addition to general-purpose tools, a large group of shaped end mills was created. Among them, the main ones are radius and shaped groove milling tools, as well as milling cutters for 2D and 3D processing. The main types of end milling machines, classified according to the shape of the cutting surfaces, are:
- cylindrical;
- end;
- keyed;
- radius end mill;
- radius concave cutter;
- T-shaped cutter;
- cutter for dovetail groove;
- corner end mill;
- Conical and cylindrical end mills with straight and rounded ends.
By the number of cutting edges and direction of rotation
The process of burying a cutting edge into the metal and removing one layer of allowance with it is called “setting in.” The more cutting surfaces a router has, the more passes it makes per revolution. An end milling tool with one cutting surface is single-cut. If there is more than one surface, then the tool is multi-start (single-, double-start cutters, etc.).
In addition, there is an extensive classification of end mills based on the geometry and shape of the cutting surfaces, teeth and edges.
Types of cutters by material processing method
Finally, we move on to considering the variety of cutters, which allows us to select equipment for certain types of work with wooden workpieces.
End mills
Such cutters can, in principle, be classified simply as groove cutters, but they are distinguished from the general background for their similarity to a conventional drill. In fact, they were just discussed when talking about equipment with a spiral arrangement of cutting edges. And an illustration that clearly shows the structure of such cutters is already posted above.
End mills have a sharpening of the end part that differs from a conventional drill, but this does not prevent them from plunging well vertically into the material being processed. And the hole obtained with their help gets an almost flat bottom.
Example of end mills and their capabilities
But drilling holes is just one of the functions of end mills, which have considerable versatility. Spiral edges ensure high-quality sampling of material even during horizontal movement of the tool. As a result, this allows you to cut grooves, for example, for installing locks, for tongue-and-groove joints of parts, select quarters, process the ends of workpieces, etc.
In a word, end mills in skillful hands become quite multifunctional equipment. By the way, many of them are often used, in the absence of a hand router, with an electric drill - for example, when cutting grooves for locks.
With some degree of convention, the so-called burrs, which are often called cutters, are also classified as end cutters. This is a rather unique piece of equipment, sharply different in appearance from other attachments.
Burrs or cutters
Using roller cutters, you can give holes or the edges of cut grooves a certain configuration and fine-tune them. They are also used for decorative design of planes - for a kind of “engraving” on wood.
Slot cutters
The functionality is clear from the name. Such cutters are usually used to select grooves for various purposes, both for creating connecting parts of parts and for, for example, decorative design of products.
The grooves can be selected either from the edge of the part to its middle, or anywhere on the plane - the sharpening of most groove cutters allows vertical immersion of the cutting part into the material (although, unlike end cutters, this function is not prevalent).
The entire large group of groove cutters can be divided into several subgroups
Groove straight, fillet and fillet V-shaped
| One of the simplest cutters is a straight groove cutter. It is often referred to in everyday life as “finger”. The selection is similar to cylindrical plunge-cut end mills. After the passage, it forms a groove of a specified width with a perpendicular arrangement of walls and bottom. It may differ in the width of the selected groove and the depth of the cut (the length of the working part of the cutter). If necessary, the width of the groove can be increased by additional passes with the tool offset to the required distance. | |
| A groove fillet cutter selects a groove with a rounded bottom (fillet). Depending on the depth of immersion, the walls of the groove can be an arc up to 180 degrees, or initially have a section perpendicular to the surface with subsequent rounding. The cutter is often used for decorative design of products. | |
| V-shaped fillet. Unlike a regular fillet, it has a pointed tip and selects a groove with a downward angle, similar to the Latin letter V. Its application is similar to that discussed above. The width of the groove and the angle at the apex may vary. |
Slotted structural
| A cutter for making a dovetail groove - one of the most reliable connections of wooden parts. | |
| A cutter for making a T-shaped groove, often used as a guide for moving moving parts. Can also be used to cut out hidden loops for hanging items on the wall. | |
| A cutter similar to the previous one, but selecting a hidden trapezoidal groove. |
Grooved shaped
These cutters are available in a wide variety - they allow you to choose cuts of complex symmetrical shapes. In addition, they can, if necessary, process the end edges of the workpiece.
Very often, if these cutters are used for decorating surfaces, they are used after passing with a straight groove cutter. Because otherwise the cutting edges are subjected to too much load, leading to rapid failure.
Examples of common shaped phase cutters are shown in the table:
Edge cutters
This is a very large group, which can also, with some degree of convention, be divided into several subgroups. A distinctive feature of most edge cutters is the presence of support bearings. This makes it possible to process the end sides of workpieces not only using the guides of the milling table, but also using templates, including complex curved shapes.
Edge straight
The cutters are designed to produce smooth edges perpendicular to the planes of the workpiece. The support bearing can be located at the bottom or at the top. The diameter of the bearing can be equal to the diameter of the cutter, but others are also used, larger or smaller, which even somewhat expands the capabilities of the equipment, for example, for proportionally increasing or decreasing parts relative to the template.
Edge molding
Milling cutters make it possible to give the end sides of the workpiece a convex or, conversely, concave, rounded or wavy shape of various configurations. Widely used for finishing workpieces to give them decorative qualities. They can also be used to create complex artistic ornaments.
Edge molding also includes a cutter that rounds the end of a workpiece on both sides in one pass, for example, when making a table top. Such cutters often provide the ability to change the distance between the upper and lower cutting edges, located symmetrically.
Prices for a set of cutters “STAYER”
cutter set “STAYER”
Composite edge molding cutter (attached) – the craftsman is given the opportunity to change the distance between the cutting edges depending on the thickness of the workpiece.
Edge rebate cutters
Designed for making rectangular grooves along the ends of the workpiece or for cutting quarters. If two passes are used, that is, on both sides of the workpiece, then a straight tenon is formed in this way.
Seam edge cutter
Often, such cutters are equipped with a whole set of support bearings of various diameters. This greatly simplifies the selection of grooves of different depths.
Edge half-rod
By processing with such a cutter, a semicircular profile is formed at the end of the workpiece. But its use is not limited to this. For example, when used together with a fillet cutter, you can create a hinged connection of parts. Besides. A double pass on both sides of the narrow piece allows the wood core to be formed.
Edge fillets
A rounded groove (fillet) or chamfers rounded inward are formed at the end of the workpiece. As already mentioned, when used together with half-rod cutters of the same diameter, they provide the opportunity to create hinged joints.
A fillet end mill is often equipped with two support bearings located at the top and bottom. This way it is possible to avoid distortions when making a groove.
Edge taper cutters
It is clear from the name that when the cutter rotates, its cutting edges describe a cone, and sometimes even two with an opposing or divergent angle. This type of processing is often used to precisely fit parts when joining them into a large-area panel. It can also be used to form chamfers or recesses of non-standard shape. The angle of the blades may vary.
Edge curly
This is the largest subgroup of edge cutters. Such equipment opens up wide possibilities for giving the ends of workpieces a wide variety of shapes, including quite intricate configurations.
Such cutters are usually quite large in size, very heavy, and not any handheld router can handle working with them. They are designed for professional-class equipment with a power of at least one and a half kilowatts.
You can sample along the entire plane of the workpiece, that is, using the entire length of the cutting edge of the cutter, or using only certain sections of the equipment. This expands the possibilities even further, which is why, incorrectly, such cutters are often called multi-profile.
Their variety is very wide, and not all models are presented in the table below as an example.
Combination cutters
The purpose of combined cutters is to form “locking” profiles for connecting wooden parts. For example, this is the installation of frames when connecting blanks at the corners, or gluing panels from individual boards (lamellas) - in this case, the locking profiles are cut along the entire length of the end part. This approach allows you to very accurately fit the parts to one another, as well as significantly increase the contact area, which is extremely important for high-quality gluing.
Some cutters from this group are used to create dismountable tongue-and-groove joints, for example, for lining or tongue-and-groove boards.
Here, too, several subgroups can be distinguished.
Tongue and groove cutters
The name itself speaks about its purpose.
This can be a set of two cutters, each of which is “responsible” for its own section - one creates a groove on one side of the board, the second creates a tenon on the opposite side. This use allows you to do without precise adjustment, since the cutters in the kit are already perfectly aligned according to their “mutual geometry.”
A set of two cutters designed to create a tongue-and-groove joint. It is convenient, for example, to quickly prepare tongue and groove boards.
Another option: a set-mounted cutter, which in one position will select a groove, and in another, with the installation of two cutting heads, will form a tenon.
And this cutter can be “reset” either for cutting tenons or for making grooves.
Another representative of this subgroup can be considered a set of two cutters for preparing lining. As they pass, the cutting edges not only form grooves and tenons, but at the same time also remove chamfers that are characteristic of lining.
Set of cutters for self-production of lining
Combined frame cutters
As a rule, these are mounted (set-up) cutters, which provide the master with the opportunity to change the relative position of the cutting edges and the distance between them. Often it is even a set of two cutters of this type.
By the way, reassembly of such cutters can be carried out even without removing the shank from the collet of the router - this allows you not to disturb the set position. It is enough to unscrew the locking screw and change the arrangement of the cutting heads, separating couplings, bearings, and then secure the assembly with the screw.
Several examples of frame combination cutters are in the table below:
Combined universal cutters
Another subgroup of tongue-and-groove combination cutters, original in design and very easy to use. The fact is that by changing the position of the cutter, you can form edges in one pass that are strictly inversely symmetrical to each other. That is, when the parts are rotated 180 degrees, they ideally fit together at the edges, becoming completely ready for assembly into a single structure.
A few typical examples of such universal cutters and the edges they create are in the table below:
The illustration below shows the principle of using one of these universal combination cutters.
Processing edges with such a universal cutter allows you to make frame joints (at an angle of 90 degrees)
Figurine cutters
Figurine cutters are usually used for the manufacture of large parts that require either precise adjustment for assembly, or/and a complex external configuration. Typical examples are panels for doors or furniture, wooden baseboards, decorative strips and other similar interior details.
As a rule, cutters have very impressive dimensions and weight, so they should only be used with powerful cutters, at least 1500 W.
Figurine horizontal cutters
Designed to form the edge of the panel. It should be noted right away that the edge of the panel cannot be obtained in one pass - additional processing of the tenon on the opposite side is required.
A few examples are in the table:
Curly double-sided horizontal
These are usually attachment cutters that allow one pass to both form the face of the panel and cut a tenon for inserting the frame grooves. The cost is certainly higher, but the productivity also doubles.