Over time, even the best-quality drill becomes dull, penetrates the metal less and less well, and does not allow making an even hole of the required accuracy. In most cases, there is nothing left to do but sharpen a metal drill without leaving your workplace. Sharpening drills allows you to fully restore their characteristics and performance. Of course, purchasing a new product is much easier than fixing the problem yourself. To sharpen it correctly, it is not at all necessary to have special equipment: you can restore the drill using a simple tool.
How to determine the need to sharpen a drill
The need for drill sharpening is determined when one of the following signs appears:
- increased noise during immersion into metal;
- the appearance of small chips;
- strong heating of the product.
When rubbed, a dull twist drill produces a high-frequency sound that is unpleasant to the ear. Therefore, you should immediately stop work and proceed to sharpening the tool, otherwise it will overheat too much and will not be repairable.
Deterioration in drill sharpness can also be noticed by the cessation of the formation of spiral-shaped continuous chips and the appearance of small metal particles.
When to sharpen a drill
A sharp creaking sound during operation is a sign of grinding, since this sound occurs when the drill rubs strongly against the workpiece. It’s also time to sharpen the tool if, when drilling, the chips look like crumbs rather than spiral strips. After use, you need to touch the drill; if it is too hot, the cutting edges are dull and excessive friction occurs.
If any sign is detected, you should immediately stop working and sharpen the drill. After all, during friction, the metal heats up greatly. At the same time, it changes its physical and mechanical properties and becomes soft. Moreover, even after cooling it will not return its qualities, since the hardening is “released” with such heating.
As a result, the tool becomes unusable. Therefore, it is better to sharpen drills too often than too rarely. There is no need to be afraid that a lot of metal is removed from them. Reducing the length of the tool when sharpening will not harm its operation, but heating during friction will damage it very quickly.
Sharpening accessories
To reduce work time and improve its quality, it is important to choose a device that allows you to hold the cutting tool motionless. Normal sharpening of drills for metal largely depends on the accuracy of setting the required angle and the ability to regulate the feed during the turning process.
Most devices allow you to sharpen cutting tools measuring 3–19 mm. To restore spiral-shaped products, both specialized and ordinary machines with an electric drive and a feed system are used, which you can assemble yourself and install in a garage or utility room.
To work at home, there is no point in buying expensive professional equipment: you can limit yourself to a grinding wheel paired with a holder, or even straighten the product manually.
Using a grinder
In addition to the machine itself, the work also requires a vice in which the cutting tool to be adjusted is fixed.
To sharpen metal drills with a grinder, you must follow the following sequence of work:
- clamp the product vertically in a vice;
- first treat the rear edge until signs of wear are removed;
- grind the working edge to 120°.
To prevent overheating of the drill, its contact with the grinding disc should last no more than 1–2 seconds. The effect is achieved by repeatedly removing a thin layer of metal from the working edge.
To establish the sharpening angle, you can use a plastic template that is periodically applied to the surface.
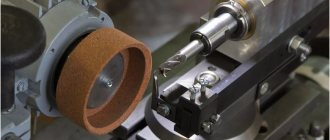
Sharpening on a grindstone
Sharpening on a grinding wheel is considered a more convenient and safer method compared to a grinder.
If experience does not allow you to determine the level of wear of a metal drill and adjust it on a sharpener “by eye,” you need to use a special device - a holder installed near the working disk. To prevent movement, the clamp is securely attached using a bolted connection.
On a turning machine, sharpening drills for metal is not difficult at all.
The tool is secured in the clamp, the sharpener is turned on, and the working edges are lightly pressed against the wheel at the desired angle. If there are small nicks before turning, they should be removed evenly from all sides.
The machine should be operated with caution. Drills of large diameters can heat up to significant temperatures, which leads to a decrease in the strength characteristics of the metal.
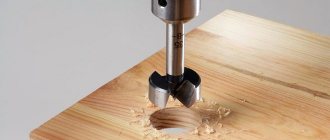
Using a drill attachment
It is possible to sharpen drills of medium diameters (4–10 mm) efficiently and quickly without a sharpening wheel, using standard drill attachments.
Sharpening is done in this order:
- a nozzle is placed on the drill;
- a drill is installed in a hole of the required diameter;
- the drill is turned on, the product is turned on one side;
- To adjust the opposite cutting edge, the tool is rotated 180°.
The use of the nozzle has some features:
- High-quality and effective sharpening is possible only for slightly dull drills. If there are deep damages, usually caused by significant overheating of the metal, it will not be possible to restore the instrument.
- Fixed sharpening angle. The attachment is only suitable for drills used for working with certain materials.
Despite the existing design flaws, the use of attachments can significantly speed up and simplify the restoration of the working edges of a metal drill. The popularity is also due to the low cost of the devices.
Sharpening with a file or needle file
It is impossible to sharpen a drill used for metal processing with a file or needle file for two reasons:
- Hardness of the material. Even the best file will wear out before it can fix the cutting tool.
- When using diamond or abrasive stones, it is impossible to manually maintain the desired angle.
Sharpening with a grinder
This is a less convenient method, since the grinder does not have a tool rest and, in general, is not intended for sharpening drills. However, if you have a steady hand and some dexterity, you can perform the operation successfully.
The method has many disadvantages that should be mitigated:
- The grinder must be placed on a smooth surface. In addition, the tool must not be moved during operation. It is advisable to ask someone to hold the grinder or fix it so that it does not wobble due to accidental touching.
- When sharpened, it is very difficult to maintain the desired degree. It is also impossible to make a handhold that would help control the desired angle. This problem can be minimized by frequent practice, but only if you have a supply of drills.
- A grinder can only sharpen small-diameter tools. Processing large drills is extremely inconvenient. However, this problem can be solved if 2 people participate in sharpening. One holds a grinder, the second brings a drill.
- A grinder's grinding wheel cannot make the back surface even and smooth. Unfortunately, this problem cannot be solved, so the final refinement must be done manually.
Video: How to sharpen a drill yourself
To sharpen, follow the following instructions:
- For these purposes, it is better to choose a low-power grinder. With it you can control the process more effectively. In addition, the drill will heat up less.
- The grinder is placed on a flat surface with the disc facing up. It is necessary to fix the tool so that the disk is horizontal.
- The device is turned on at minimum speed.
- The drill is brought to the disk at an angle of 60°. Then, with an even and short, but not fast movement, the tail part is lowered so that when pointed, the rear surface is rounded.
This is what sharpening on an angle grinder looks like:
The safety rules for using an angle grinder are the same as when processing on a sharpening machine. The grinding disc must not be touched during operation; after switching off, it must not be touched until it has completely stopped. You need to sharpen the tool while wearing a mask and gloves.
Drill sharpening procedure
To ensure a high-quality mandrel for a dull drill, it is recommended to use additional devices.
At its simplest, a bushing can be used, the inner diameter of which corresponds to the transverse size of the cutting tool, rigidly fixed at the required angle. When selecting such a bushing, special attention is paid to the accuracy and tightness of the drill entry into the template, since a deviation of even a few degrees will significantly reduce the quality of edge restoration.
The device can be equipped with a set of aluminum or copper tubes corresponding to standard drill diameters. Craftsmen often complement the product with a wooden block in which holes of various diameters are made.
The main element of such a template for sharpening metal drills is a tool rest, designed to solve the following important tasks:
- ensuring the exact position of the tool and its movement relative to the sharpener;
- acting as a stop that prevents the workpiece from moving backwards.
Sharpening drills using an oak block tool allows you to accurately set the required angle.
Also, the cutting tool can be easily restored using a homemade sharpening machine.
Correct angle
For high-quality and accurate sharpening of the drill, it is important to choose the correct angle.
There is a dependence on the workpiece material of the sharpening angle of a metal drill, the table of which is given below.
Thus, the softer the metal of the workpiece in which the hole needs to be made, the blunter the angle.
Finishing after sharpening
The work is carried out on special finishing wheels, combining rough metal processing with finishing.
The discs are made of a relatively soft material that allows you to remove scratches, sagging and other minor surface defects. They are eliminated without changing the geometric parameters of the cutting edges. Typically, such wheels are placed on a hammer drill or grinder, fixed and clamped securely, making it possible to process a drill clamped in a vice or other device.
In addition to finishing discs, cutting surfaces can be brought to perfection using an emery machine mounted on a drill or grinder.
Checking the sharpness
To quickly check that the tool is sharpened correctly, use a special template with which you can control:
- lengths of working edges;
- position of the corner vertices;
- helical groove inclination angle;
- angle of the longitudinal edge.
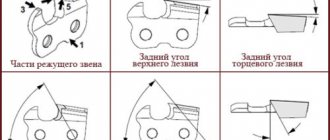
Drill point
For metal drills with a diameter of 10 mm or more, additional sharpening of the leading edge is required.
The meaning of this operation is to increase the angle of the cutting edge and reduce the inclination of the leading edge. The goal is to give the metal resistance to crumbling and increase the working life of the cutting tool.
In addition, the point allows you to narrow the transverse edge, which is why the workpiece material is scraped off in the center of the hole, which makes drilling easier. Additional processing of drills with a small clearance angle reduces the friction force inside the hole.
Sharpening on special equipment
As you can see, it is very easy to make mistakes when sharpening. For example, disrupt the horizontal position of the cutting edge or the parallelism of the central axis to the line drawn by the marker. Therefore, it is better to use special devices. Safety measures during processing are the same as on a sharpening machine or grinder; all these rules have already been described above.
There are two types of devices for sharpening drills. Let's take a closer look at both devices separately.
Sanding attachment
This is a cylindrical device that is placed on a drill (like an attachment). This is required to rotate the abrasive disc. On the other side, the device has holes of different diameters. Drills are inserted into them.
Appearance of the installed nozzle:
When using the attachment, you need to be especially careful to ensure that the drill is positioned correctly. Only then will its surfaces be processed to the required degree. After installation, you need to turn on the drill and wait 5-10 seconds. After this, you need to rotate the shank 180°.
A significant disadvantage of the nozzle is the diameter limitation. A larger or smaller tool cannot be inserted into the device. Most nozzles have holes ranging from 3 to 10 mm. However, a significant part of the drills fit these parameters. A significant advantage of the device is its low cost - from 600-1000 rubles , but there are also expensive models.
Stationary device
It has a movable plate that can be used to set and fix the desired angle during processing. On this platform there is a turning rod. A drill is attached to it; it also needs to be turned and brought to sharpening the tool to the abrasive disc.
Appearance of the stationary device:
This device is much more convenient to use. It is much easier to set the desired angle and control the processing process. It is also easy to operate as it contains no electrical components. To process a drill, a stationary device must be used in conjunction with a sharpening machine with an abrasive wheel.
The disadvantage of the tool is its complete non-portability. An interesting advantage is the simplicity of the design, in which most of the components are represented by blocks and screws. Therefore, many craftsmen are able to make such a device on their own. To do this, you just need to follow the dimensions in the drawing.
Checking the correct sharpening of the drill
The correctness of the drill restoration can be determined using a template made from sheet metal 1 mm thick. It is used to control:
- the angle between the jumper and the cutting edge;
- apex angle;
- lengths of working edges.
A similar protractor can be made from an ordinary metal protractor. The excess part should be cut off, because when turning drills for metal, angles up to 30° are not used.
Control of the clearance angle is carried out indirectly through determination of the point angle.
To make a template yourself, just transfer the required angles to a sheet of metal. A new, unused product can be used as a standard.
To check the correctness of the factory sharpening, a workpiece made of any soft metal is drilled to a depth of 1 cm, after which the diameter of the resulting hole is measured. It must exactly match the declared standard drill size.
Incorrect restoration of the working edges, if their wedges are disproportionate to each other or they are sharpened at different angles relative to the tool axis, will cause the drill to run out. As a result, the hole diameter will be large.
Also, the correct sharpening can be easily determined by the type of chips that come out when drilling metal. When moving around corners, the tool will fit tightly, and you will have to make much more effort to immerse it in the metal.
How drills are sharpened depending on the material being processed
For a better understanding, we suggest you consider the table recommended for working with a variety of metals.
| Processed raw materials | Vertex angles (°) | Relief angle in degrees |
| Some types of wood, rubber, plastic | 60 | 12-15 |
| Harder analogues | 90 | 12-15 |
| High strength and anti-corrosion alloys, nickel composition | 127 | 13-14 |
| Tool steel | 118-150 | 7-15 |
| Copper | 100-118 | 12-15 |
| Bronze | 119-150 | 12-16 |
| Durali | 90-140 | 12-17 |
| Magnesium alloys | 70-118 | 12 |
| Titanium-containing materials | 135-140 | 12 |
These values make it possible to obtain the optimal recess under loads that the cutting tool can stably withstand. If you use a device designed for soft elements to process substances with high resistance, then it will fail prematurely, often accompanied by complete destruction. Conversely, efficiency will be sharply reduced and heating will increase if a hard abrasive is used on loose substances.
Important Rules
Turning drills for metal does not cause any difficulties for experienced home craftsmen. But there are still several important rules:
- The main requirement that should be adhered to when developing the design of a turning machine: the product must remain stationary and not rotate around its axis. If it turns even a degree, the alignment will have to be repeated again.
- The surface of the wheel or sharpening disk must be perfectly flat. Therefore, it must be adjusted periodically with CBN nozzles.
- At the end of the work, the restored tool for drilling metal should be allowed to cool in natural conditions and only then check the geometric parameters using a template.
The lengths of the cutting edges should differ from one another by no more than 0.1–0.3 mm. This rule is especially important for small diameter tools.
How to make a sharpening machine
The stationary sharpening device described a little earlier can be made by a good craftsman. To make some elements (stands and others), you can even use wooden blocks. The main thing when assembling the structure is to strictly follow the parameters in the drawing, one of the options is presented below.
Diagram of a rotary sharpening machine:
In addition, you need to carefully control all the necessary angles. Pay special attention to the part in which the drill is attached, remember that it should not rotate when sharpening. First, you can make the device completely wooden. And only then, after making sure that the drawing is correct and you have completely followed it, you can make a full-fledged machine.
Is it possible to restore a Victory drill?
A metal drilling tool with a pobedit steel tip can also become dull over time. To restore its working properties, only a diamond wheel rotating at low speeds is suitable. But before you try to sharpen pobedit drills, you need to make sure that such work is possible: the height of the working part must be at least 1 cm.
A tool with soldered hard metal is sharpened in the same ways as a regular one of small diameter - by sharpening the surface of the rear part. The material must be removed completely, right down to the soldering. If the plate has worn down to the surface of the rod, it is advisable to also sharpen the front part until the soldering thickness in the center decreases. The work must be performed with the utmost care so as not to cut off excess valuable metal.
During processing, it is necessary to monitor the heating of the cutting tool, since an excessive increase in temperature can lead to cracking or breaking of the plate along the solder contour. For cooling, you can use any liquid, such as clean cold water. But if the metal is already hot and has acquired a reddish tint, it cannot be forcibly cooled: the tool will definitely crack.
Parameters to be restored when regrinding drills
Let's assume that the equipment has retained its geometry, the side strips are not worn out and no tarnishing colors are observed. In this case, you need to provide the following properties:
- Form an angle between the working edges within 115-120 degrees. This value is relevant for working with steels and most other alloys. However, in many cases this value may be different and vary from 60 to 180°.
- Slope between edge and center. It should be 55-60 degrees. The symmetry of both parts is important.
- Compliance with the second condition will ensure the same size of the edges. Both edges will work, and no beating is observed.
- The rear surface should have deviations of 5-7° from the cone of rotation. This ensures optimal tensile properties and absence of friction on the part.
If the front end is significantly damaged, the substandard area will need to be removed first. The most common injuries are:
- Change in color (blue discoloration).
- Side tape wear.
- Skol.
Features of sharpening step drills
Step drills for metal are produced in several designs, each model is designed for making holes with a diameter of 4–32 mm. This is an expensive, but very high-quality tool that can last up to 2 years even with intensive use.
According to the manufacturer's recommendations, it is possible to sharpen step drills for metal, but only some models. The rest cannot be restored or subsequently reused.
Unlike conventional drills, cone drills are not easy to sharpen: if the job is done incorrectly, the cutting edge of the tool may become unusable.
To bring the stepped cutter back to life, sandpaper is used, which is wrapped around a special rotating disk. In this case, processing can be carried out either using an end milling machine or by hand. The first option is used for products with spiral grooves, the second - for tools with straight cavities.
Have you ever encountered the need to sharpen a metal drill at home? Did everything work out for you or did you encounter any difficulties? Please share your own experience in the comments.
What tools do you need to have for checking?
If, when editing a small-sized actuator, it is difficult to assess correctness without the use of magnifying optical equipment, then checking the sharpening of large-diameter drills is carried out using pattern devices. They exist in different modifications, both with changeable values and in the form of templates. However, this does not relieve you of the need to visually assess the integrity of the surfaces, the absence of chips and burrs.
The most common inclination is 120 degrees, so it is quite possible to use improvised means, for example, three combined nuts. The angle between the edges clearly shows both the length of the edges and their fit to the pattern structure.
How to extend the life of a cutter
To avoid having to edit it for as long as possible, you should:
- avoid overheating, which leads to rapid softening of the metal, and therefore dulling of the edge;
- lubricate with machine oil - this will help reduce such a dangerous friction force and prevent a sharp increase in temperature in the contact zone;
- control the rotation speed - limit it, focusing on the hardness of the material and the desired hole diameter, but do not chase speed, remember that operating conditions should be gentle;
- remove chips in a timely manner so that they do not clog the recess, otherwise the tool may get stuck and even break;
- also process the jumper with a ribbon - this way you will improve the durability and quality of the plunge, which will allow you to weaken the feed while maintaining proper performance;
- make several passes, giving pauses between each of them - so that the device has time to cool down.
We told you how to properly sharpen a drill for metal, we also provided a video of this process, now you can safely start processing damaged rods. And if you need to purchase a machine for this, you will find it in the plant’s catalogue, contact us and order high-quality and modern equipment.
Stages of work
According to the rules, sharpening should be done in a utility room, in a garage or, in extreme cases, on a balcony. Under no circumstances should you perform work in the kitchen. Metal shavings and dust will fly around the workplace. It must not get into the eyes, digestive organs, or respiratory tract. You should wear glasses, and after finishing sharpening, vacuum the room and do wet cleaning.
READ Band saw for wood how to sharpen
Sharpening a drill consists of several stages:
- Preparing the sharpening tool.
- Determining the exact angle and method of sharpening.
- Sharpening. First, the back surface of the drill is ground off, then the cutting edge is straightened and the jumper is reduced (if necessary).
- Finishing until smooth.
- Cleaning.
Assistive devices
Now it's time to make a device for sharpening drills. It is suitable for 2 types of masters:
Beginners who are unable to maintain a suitable inclination evenly. This results in an uneven edge and reduced drilling efficiency. Sometimes the drill starts to work even worse than before, and this reduces the speed of work. The devices will be useful for craftsmen who have to constantly sit behind the emery. In these cases, homemade tools for sharpening drills are a necessity.
Varieties
On the modern market you can find twist drills, flat and center models:
- spiral elements, according to their name, are distinguished by the spiral shape of the edges;
- flat products are designed for making deep holes of large diameters;
- Center drills are used to center elements.
All types of drills presented become dull over time. Reduced sharpness of the cutting element interferes with construction work. This means that the product must be restored.
To date, 5 types of drill sharpening have been developed. Each individual method corresponds to the type of material of the cutting element and the specifics of its operation.
- “N” – this type of sharpening is universal. However, it is used for restoration of drills with a maximum diameter of 12 mm.
- “NP” – in this case, short crossbars are sharpened.
- “NPL” - a type of sharpening involves lengthening the transverse edge and width of the tape.
- “DP” - in the professional sphere, this type of sharpening is called “double”. In addition to the transverse edge, 4 more edges are formed in the form of broken lines.
- “DPL” - the description is similar to the 4th sharpening method, only sharpening of the tape is added.
Tool Requirements
In industrial conditions, sharpening is carried out using specialized equipment while observing safety regulations. However, several other devices have been invented and developed for domestic purposes:
- mechanism equipped with a grindstone;
- a machine connected to the electrical network;
- grinder and drill (however, they are used only in the absence of strict requirements for the sharpening angle);
- sharpening tips for drills.
Each individual device is distinguished by a high level of performance, accuracy of angle setting and ease of use. They have a very convenient control system that even an amateur can handle. Another additional advantage of the presented options for home devices is their low cost and miniature size.
Ideally, drills should be sharpened with a sharpening machine. However, if this equipment is not available, you can only use a disc from it. The main thing is that the grit of the sanding wheel meets the requirements. The round emery should be fixed on a drill or sander. It is recommended to use an angle grinder only as a last resort.
READ How to Make a Miter Saw from a Grinder
Sharpening a drill is the simplest device.
How to properly sharpen a metal drill according to the number of bevels with your own hands
One of the points most susceptible to damage is the cutting zone, which is furthest from the center. To avoid cutting, it is possible to form another edge at a sharper angle. The operating parameters change slightly. This type of regrinding is required when performing specific actions, for example, when countersinking, when the size of the cone on the outer surface of the hole is important. Reducing the distance of the most problematic area from the body allows for the most optimal cooling of this area due to the own thermal conductivity of the working element.
How to sharpen with a sharpener
This “home” method has its own characteristics. The manual sharpening mode is available only to experienced mechanics who have extensive experience allowing them to restore any dull tools “by eye.”
Device for sharpening drills on an angle grinder
All other home craftsmen will have to purchase or borrow a special holder from a neighbor. This device must be installed next to the sandpaper (about 1 mm). In this case, it is necessary to make sure that the bolted connection is stable in order to prevent the clamp from moving during the work.
Only after this can you proceed directly to sharpening the tool:
- fix the drill in the holder (the sharpening angle is set in advance);
- turn on the sharpener;
- remove damage from the cutting surface;
- We sharpen the cutting surface by short-term - no more than 2 seconds - contact with emery.