The Homius editors receive not only articles from our readers about various repair methods. Some reviews are striking in their ease of performing unusual work, which at first glance is impossible to do at home. And today we present to your attention one of these articles, which was sent to the “Stories” section by Sergei Borisovich Kasatonov from the city of Yakutsk. In it, he talks about the simplest method of transferring a design onto a knife blade and etching metal without any chemicals.
Recently I became interested in such an activity as etching various designs on metal. After all, even a kitchen knife can be made exclusive if you put in just a little effort. However, if etching of a highly artistic drawing is required, drawing experience and a steady hand will not hurt. The initial application of it will not be a problem, but preparation for engraving by electrolysis will be quite problematic for some people. But, in order not to frighten in advance those who want to understand the whole technology, I will begin my report on the work done.
What you need to apply a design to metal
Everything is quite simple here. In addition to the knife itself, it is enough to have a regular laser printer and some other tools and materials in the apartment, namely:
- a small amount of alcohol;
- ice water in a basin;
- iron.
Naturally, the blade of a kitchen knife should be thoroughly washed and dried. The best way to cool water is to use ice.
Everything you need to apply a design to the blade
We begin to apply a pattern to the steel blade of a kitchen knife
First you need to find a drawing on the Internet that can be placed on the blade. In any graphic editor, it should be reduced to such a size that it fits on the blade and printed. Use scissors to cut out the image.
Next, a small amount of alcohol is poured into the saucer, sufficient for the printed image to be completely immersed in it. The drawing should lie in the alcohol until the paper is saturated. This will be noticeable in the image that appears on the back of the sheet. Don’t be afraid to keep it in alcohol - nothing bad will happen to the drawing, even if it sits in a saucer for a day, it won’t flow or blur.
The drawing must be thoroughly soaked in alcohol before transferring it to the blade.
Using an iron: this requires caution
The part of the blade to which you plan to transfer the image must be poured generously with alcohol. After this, carefully take the piece of paper with the image and place it on the knife blade with the printed pattern facing down. At this time, you can still correct it without fear of smearing it. What you should take into account here is that once you start working with the heating device, you won’t be able to correct anything.
We place the drawing in the right place on the blade, correct its position
When the pattern is laid out as needed, we begin to warm it up with an iron turned on at maximum temperature. When performing this work, you should be extremely careful not to move the sheet. The fact is that even slightly heated paper, if you move it, will smear the image, ruining it.
Warming up is carried out for 3-4 minutes until the sheet is completely dry. In this case, it is better to overdo it, warming up the blade longer than to stop working with the iron when the paper is still half-raw.
Heat the drawing with an iron until the alcohol dries completely
Cooling the blade and removing unnecessary paper
When the alcohol has completely evaporated and the blade has warmed up, it is necessary to cool it as quickly as possible. It was for this purpose that I had a basin of water, which was cooled with ice. The knife blade is lowered into ice water for 20-30 seconds. It is necessary to monitor the paper, waiting until it is completely saturated, now with ordinary water. After this has happened, we begin to slowly move our finger along it. The paper rolls and peels off.
In this case, there is no need to rush - there is a high probability that the blade has not cooled completely and the design will be damaged.
The blade is cooled in ice water, after which the paper is carefully removed from it
Knife bluing process
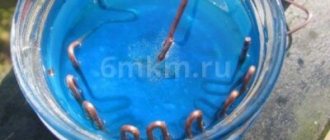
We take glassware the size of the knife blade so that it can be completely immersed in the solution.
Boil water in a kettle. Then we take and carefully pour boiling water into the jar. You have to be careful here, as the can may burst. To prevent this from happening, you can first pour a little boiling water on the bottom and let the jar warm up, then add the rest of the amount.
Next, add citric acid to the water and stir thoroughly until completely dissolved.
Before immersing the blade in the solution, it is advisable to wipe it with alcohol to remove all excess grease and dirt.
We plunge the knife blade.
After 1-2 minutes, a reaction will begin, which will be noticeable by numerous bubbles.
Burnishing will take you approximately 30 to 60 minutes. Everything again depends on your requirements for the color of the coating and the grade of steel of the knife.
During the entire bluing process, you must do the following:
- – Every 10 minutes, take out the knife and wipe the blade with a soft paper or cloth napkin, removing black deposits from the surface.
- – Approximately every 1-2 minutes it is necessary to move the blade in the solution, thereby discarding large gas bubbles from the blade. This will ensure even coverage.
After the time has passed, if you are satisfied with the color of the coating, you need to wipe the blade with sunflower oil one last time. This will stop the reaction and make the coating uniform and strong.
This completes the bluing of the knife blade.
At the end I would like to add: – Do not inhale the pore gases when bluing, as they are harmful. And it’s better to use ventilation if you have it, or at least open a window in the room. – For a stable process, the water must be hot. Blueing does not take place in cold water. Boiling water is not necessary, but it should be 80 degrees Celsius.
If you get small stains, don’t worry, they will go away after the first or second use.
This coating is quite durable and will last for many years.
What will happen in the end: how high quality will the drawing be?
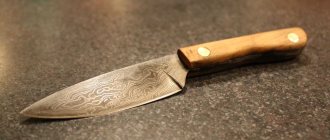
If everything was done correctly, the drawing will be no different from the one on paper. At the same time, the quality of the image does not depend on its complexity and the number of small details. If etching is not important, then you can leave the drawing as it turned out. Of course, such an image is not very resistant to aggressive cleaning agents and high temperatures, but in the absence of such factors it can last up to six months. I decided to leave this image of a tiger as a simple drawing.
Industrial Applications
Usage:
- Cleaning from oxide film.
- Before painting or treating with special protective compounds.
- Before the galvanizing operation.
- To detect corrosion in stainless steel.
- Applying a pattern to small parts of microcircuits that facilitates the conduction of electrical charge.
This is an incomplete list of tasks that the procedure allows you to solve.
What you need to etch a design on metal
To etch any image on metal you will need:
- water with table salt dissolved in it (3-4 tablespoons per 0.5 l) in a glass jar;
- power supply (charger) from any phone or other gadget;
- 2 pieces of wire;
- nail polish, preferably colorless;
- a regular bolt or metal plate that will fit in a jar.
It should be noted that the speed of electrolysis, and therefore the appearance of the pattern on the metal, will depend on the output current of the charger. The higher the adapter current, the less time it will take to operate.
Preparing metal for applying a relief pattern
First, the entire blade must be varnished. It doesn’t have to be nail polish; a composition for coating wood is quite suitable. But here it is worth remembering that feminine chemicals dry out almost instantly. Considering that the metal will need to be coated in 2 layers, this is a serious reason to use a quick-drying composition.
The design, if it is not too complex, can be applied after the varnish has dried. But, if it is necessary to etch an image similar to what I applied to the previous knife, it is better to use the transfer method using an iron and alcohol, and then coat the steel with colorless varnish.
For etching on one of the kitchen knives, I chose not too complex Arabic script. It was applied after the varnish had dried, after which the coating along the lines was removed. In other words, I just scratched it with a needle. I note that the edges of the strips need to be carefully trimmed - during etching, electrolysis will eat away unprotected areas, which means that all irregularities will remain on the metal without the possibility of subsequent correction.
The Arabic script has been applied, the varnish coating has been scratched across it with a needle, you can start etching
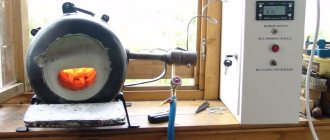
How to get a faded color?
To achieve a faded color on the surface of your product, you need to know very well at what temperature it appears and what duration of heating is necessary to fix it on the metal. The main condition: firing with a flame must take place for a strictly defined time . Therefore, if you want to enhance your product with a tan color, choose a small item, because it will be almost impossible to heat a large area of metal evenly on a gas stove or blowtorch.
Once you have achieved the desired color, immediately remove the product from the heat and let it cool. Then rub it with oil to set the color.
Power connection: electrolysis etching principle
Power is supplied to the elements as follows. A wire with a bolt at the end is lowered into salt water and connected to the negative output of the charger. A positive charge is applied to the blade itself. The principle of electrolysis is as follows. The varnish coating does not transmit electricity, but the area of the metal where it is absent reacts with salt water under the influence of voltage. As a result, the metal is corroded exactly where there is no varnish.
The bolt is wound to the wire and lowered into the water
Many will be interested to know that in this way you can even apply a pattern with copper. To do this, a similar preparation of the blade is performed. The difference is that the polarity of the connection will be reversed - plus on the bolt, and minus on the knife. Instead of salt, you need to dissolve copper sulfate in water. In a similar way, you can either apply an image or completely cover the part with copper.
Everything is ready, you can apply voltage by plugging in the adapter
Etching: some nuances to consider
When power is applied to the wires, it will become clearly visible how electrolysis occurs. Gas bubbles will begin to emerge from areas of the blade unprotected by varnish. It is this process that “gnaws out” metal particles. It is necessary to carefully monitor the temperature of the charger - it can rise sharply. To avoid failure of the adapter, do not keep it turned on for more than 15-20 seconds, giving a break of at least 10 minutes. This way, the work will be extended, but at the same time you will maintain the functionality of the charger. In total, etching a small design takes about a minute of constant work. It turns out that in 3 passes the image will be ready.
The photo example shows how the inscription appears on the metal under the influence of the electrolysis reaction. After the work is completed, all that remains is to clean the unnecessary varnish coating and polish the blade.
The process has begun - it can be observed with the naked eye
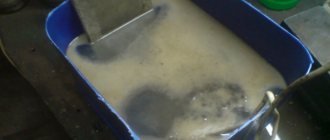
During operation, a dirty-brown oxide layer will form on the surface of the jar. This should not scare you; the process involves such deposits.
Pickling of stainless steel: acids, pastes, ferric chloride
Stainless steel pickling procedure
Chemical and electrochemical treatment or etching is considered one of the best ways to clean the top layer of stainless steel.
This procedure perfectly cleans the steel surface from welds, eliminates various types of deformations, and also helps strengthen the structure of the alloy after heat treatment.
In addition to cleaning properties, the procedure ensures the restoration of the passive layer of steel, which is necessary to protect the alloy from structural destruction at elevated temperatures.
The essence of cleaning 12x18n10t steel is the chemical interaction of the top layer with a concentrated acid solution.
Typically, hydrochloric or sulfuric acid is used, after which a mixture of molten alkali is used.
The acid cleaning process has two stages: first of all, the metal is treated with a basic acid composition, and finally the alloy is kept in a bath with a solution of nitric acid.
When processing stainless steel, you should strictly follow the stages of the technological process. The container with the solution in which the alloy is placed should process only the upper layers of the metal, further eliminating existing damage. It is not recommended to allow changes in the macrostructure of stainless steel, as iron may lose its original properties.
Application of etching
The etching process is widely used in production during the cleaning of the upper layers of steel from welds, scale, oxides and rust. It is used when searching for internal defects by removing the top layer of the workpiece or to study the structure of the metal.
This procedure cleans the material, thereby increasing the adhesion of the top layer. This is necessary for the successful connection of a metal workpiece with another surface, after which a paint, enamel, galvanic layer or other protective coating is applied.
This type of processing not only ensures quick cleaning of the workpiece, but also creates a specified pattern on the top layer of metal. Using etching, you can cut out a channel of any thickness or create a complex image.
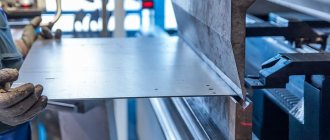
Processing of large workpieces and rolled products is also possible. You can easily adjust the processing depth down to microns, making it possible to process surfaces with complex areas and small grooves.
The procedure is used to carry out analysis that determines the formation of intercrystalline corrosion in stainless steel.
In addition, this process is widely used during the processing of carbon, low-alloy and high-alloy steels, non-ferrous metals and titanium. This technology is indispensable when processing small metal parts, watch gears.
It is used to manufacture semiconductor chips and printed circuit boards in electronics. This processing method ensures the formation of a conductive channel on the microcircuits.
In aircraft manufacturing, etching plays an important role, since through this process the thickness of metal sheets is reduced, thereby reducing the weight of the aircraft. This operation also plays a big role in applying drawings and inscriptions.
Etching produces a relief image created by destroying a metal surface according to specific patterns. In everyday life, the operation helps clean the pipeline.
Etching methods
The following types of processing are used at home and at production sites:
- Acid cleaning;
- Electrolytic cleaning;
- Cleaning with pastes.
Acid etching
The best results when processing stainless steel are obtained by keeping the top layer of stainless steel for a long time in a container of acids made from sulfur and nitrogen. How this process happens:
- The initial stage is considered to be degreasing the top layer of steel, followed by cleaning of burrs and burns;
- Next, etching occurs in sulfuric acid baths. During the process, the acid composition eats away surface roughness, scale and burrs. The best temperature during corrosion is 60-80 degrees Celsius. It is important to control this parameter during the process. The duration of etching depends on the acid concentration (10-12%) and the marking of the steel. It is worth being more careful, since depletion of the acid bath leads to the formation of pitting corrosion on the metal surface. For example, steel containing chromium (18%) and nickel (8%) will require 20-40 minutes of treatment in a sulfuric acid bath. It is possible to reduce the time of this procedure several times. To do this, you need to control the atmospheric level.
- The next step is to wash the workpiece in a large amount of liquid.
- Next, you should immerse the workpiece in a bath filled with nitrate solution. The procedure takes from 5 to 15 minutes, taking into account the bath temperature of 50-70 degrees Celsius.
- The final stage is repeated rinsing with running water.
The etching method described is considered standard and includes several processing options. For example, holding in a container with a nitrogen solution, which is enriched with hydrofluoric acid elements, increases the procedure to half an hour.
If you raise the concentration level of the fluoride impurity to 15%, you will be able to carry out the processing process at a low temperature, while avoiding the preliminary lowering of the workpiece into acid. Another available treatment option is steel cleaning using phosphoric acid.
To complete the procedure, you should follow the following steps:
- Degrease the steel workpiece using any available means;
- Rinse the part in running water and dry;
- Fill the treatment bath with orthophosphoric acid in a proportion of 150 mg per liter of water;
- Place the alloy in a container and wait for an hour;
- Remove and rinse the cleaned part in running water.
You can reduce the processing time in a sulfuric acid bath by adding sodium chloride at a rate of 5%. Thanks to this, the process takes 15 minutes, but you should adhere to the appropriate temperature regime (80 degrees).
It is important to remember that in a room with poor aspiration, the composition for the second stage of treatment should be replaced. The problem is the release of harmful vapors from the acid, so it is better to replace the solution using 8% ferrous sulfate and 3% hydrofluoric solution.
The oxide film located on the top layer of stainless steel can help in determining the etching method. The advantage is that the external state indicates the composition of the film layer.
If the color of the scale is green, this indicates a high level of chromium in the composition.
As a result, the interaction between the steel and the acid bath may be more difficult, resulting in longer processing times.
Electrolytic etching
The essence of electrolytic cleaning is the uneven anodic treatment of various structural elements, as well as the selective coloring of the metal due to the appearance of films. A distinctive feature of this processing is the presence of external current sources.
Electrolytic processing is most effective when determining the macrostructure of metals, alloys that have undergone deformation, as well as high-alloy steels that are characterized by high chemical resistance. Electrolytic processing has three etching variations:
- Cleaning by anodic dissolution;
- Anodic film sedum;
- Cathodic film cleaning.
The most common method of electroetching is considered to be anodic dissolution, due to which a relief on the surface is formed as a result of individual grain boundaries or phases.
Etching with ready-made pastes
At the moment, the modern market is provided with a huge assortment of different pastes for pickling stainless steel. The purpose of the paste is to change the unevenness of the painted surface as a result of high temperature changes, as well as to clean welds.
The process of using etching paste is quite simple and can be used even at home. After welding, stainless steel can be easily cleaned with a thick paste, because its effectiveness begins to manifest itself at a temperature of 80 degrees.
Before etching, the metal surface must be cleaned of corrosion and other defects.
The paste etching process consists of the following steps:
- Processing the top layer of the workpiece with a layer of paste up to several centimeters;
- Exposure for one and a half hours;
- Rinsing under running water.
Etching paste is ideal for processing welds on stainless steel grades. Once properly treated, the surface is able to withstand corrosive attacks in the most adverse conditions.
The final stage of the process, cleaning and polishing the blade
Upon completion of the process, the power is turned off and the wire is unhooked from the knife. To remove the varnish coating, you can use a stationery knife or regular acetone, which will easily do this job. Polishing is carried out on a sharpening machine with a felt wheel. Of course, this work can be done manually, but in this case it will take much more time.
As for the unevenness of the drawing strokes, they do not always interfere. For example, when applying Arabic script, as in my case, they even give a certain charm to the inscription, as if it was made several centuries ago. But if the image requires precision, like the tiger previously transferred to a knife, you should scratch each line extremely carefully. Of course, this work cannot be called simple; attention to detail and perseverance are required, but the owner will be sure that the design will not be erased from the blade, regardless of the aggressiveness of cleaning agents or temperature.
Why is the procedure for etching a metal surface required, where is it used?
The processing method is used both in industry and for private purposes. The main task is to increase the adhesion of the material, that is, adhesion to another substance. Often used before painting surfaces, for example in the automotive industry.
At home, you can use the method for household purposes. In this way, for example, you can actually make a new one out of an old steel bucket. But before we understand the technology, we will highlight the varieties that the method has and where it is used.
Final part
Do-it-yourself engraving like this will add an unusual touch to kitchen knives. They will turn from ordinary consumer goods into exclusive products that will surprise your friends and acquaintances. And given the fact that not a penny will be spent on performing such work, the owner is guaranteed satisfaction from the drawings applied by electrolysis.
I would like to hope that readers will adopt the methods of working with metal that I have described. If any of the above remains unclear, I will be happy to explain. You just need to write about it in the comments to the article. There you can also express your opinion about what you read. I will be glad to hear anyone - I treat criticism quite adequately, of course, if it is justified. I will try to respond to every review as quickly as possible.
The Homius editors invite home craftsmen and craftsmen to become co-authors of the “Stories” section. Useful first-person stories will be published on the pages of our online magazine.
The process of metal etching has been known to people since the 16th century. The most famous masters lived in Italy and Germany. Today, anyone in the world can do knife etching at home. The availability of reagents and many methods allows you to do this without special experience. But it’s definitely worth studying the topic of knife etching.
The essence of the method
The key factor is the effect of acidic environments on the metal. Due to the interaction of the aggressive environment and the product, a chemical process called etching occurs. To apply a pattern to the blade, areas of the surface not intended for etching are covered with a protective layer.
It must be resistant to the etching substance. The depth of metal dissolution depends on the time of exposure to it. Since the 16th century, several effective methods for etching knives have been identified. They will be discussed below.
Actions during a chemical reaction
During the reaction, a plaque forms, which will become more and more numerous. It slows down the whole process, so you need to periodically wash it off with water. You should not do this using various brushes, brushes and other tools, because you can damage the paint. But it seems to hold the entire design, and it would be a shame if, while etching a knife, for example, you inadvertently damage the design on it. This is a very delicate work that requires a steady hand and patience.
Read also: What to make a wick for solar gas
The depth of the pattern directly depends on the time during which the metal remains in the solution. There are no exact criteria, so each master must observe the progress of the chemical reaction himself. And only after doing this several times will it be possible to say with confidence how much time is needed to develop the desired pattern to the intended depth.
Metal etching methods
Acids in the etching technique are used depending on the type of metal. A certain alloy requires its own aggressive substances. The speed and quality of the process depends on this. There are several ways:
- a process involving the use of an electrolyte with current passing through it. They call it electrochemical. Its features are: precise drawing, saving time and working fluid solution. No harmful fumes;
- a process that does not require complex equipment and is incredibly simple - chemical. But the use of liquid acidic solutions is characterized by emissions of fumes harmful to human health into the air;
- A production method that requires expensive equipment is the ion plasma method. Used in dry environments in the field of microelectronics.
The first two methods are widely used for etching knives at home. The components are commercially available and do not require complex manipulations.
Preparing metal for drawing
It is necessary to prepare the blade for drawing and for the etching process itself. If the knife is collapsible, be sure to disassemble it. Freeing the blade will make it easier to work. In a one-piece product, the handle must be insulated.
It doesn’t matter what material it is made of, an acidic environment will harm anyone. Electrical tape as an insulator will work perfectly. The surface of the blade to be treated must be thoroughly wiped with acetone. The intended design will fit well on a degreased surface. We try not to touch the workpiece with our fingers.
Drawing methods
A pattern made from various materials serves as a protective layer; the metal not covered with it will be etched. There is a similarity to a film negative when a photograph is developed. There are plenty of options for protection: electrical tape, stickers, nail polish, vinyl, metal marker and many other polymers.
Nail polish
A popular material among amateurs. But professionals don’t disdain them either. Good resistance to aggressive environments makes it a leader in use. After applying it to the product and letting it dry, it is possible to correct the design with sharp cutting objects. Achieving a clear pattern and smooth lines.
Primer or bitumen varnish
The product is completely covered, then the contours of the design are transferred over the layer with a marker or brush. Having sharpened a thin wire, you need to scratch the sketch down to the metal. The primer is used GF 021 or XB 062. When scratching a sketch, there is a risk of chipping off the dried primer or bitumen varnish. This is a disadvantage of this method.
Glossy paper
It is a good method that is gaining momentum among masters and has many positive aspects. The required sketch is printed in real size on glossy paper using a laser printer. Applying the side with the pattern to the surface of the blade, you need to iron the paper.
After the product has cooled, it is placed in water. Having brought the paper to a soft state, it peels off, and the toner from the printer remains on the product. You just need to treat the surface around the design with nail polish. The method allows you to transfer the smallest details of the image.
The principle of etching using electrolysis
For metal products, two methods are used: acid (liquid) and electrochemical. They are used to remove scale and oxide films. Compliance with the etching rules: holding time and solution concentration are the key to a successful process.
It is important to thoroughly degrease the part. A small greasy stain will render all the work of the master unusable. When working with varnishes, you must be careful; they are highly flammable. This also applies to the process itself. In any form, it is unsafe. It must be treated with caution and care.
Solutions used for pickling steel
The process for different alloys requires different etchants. Based on the atomic structure of the metal lattice, a specific solution is selected:
- alkaline solutions etch aluminum and its alloys well;
- nitric, sulfuric, hydrochloric and phosphoric acids are used in the etching of copper and its alloys. To increase the reaction rate, chromium and nitrogen are added;
- For durable titanium, a double etching method is used. Initially processed in alkaline solutions, then in high concentration acidic solutions;
- an aqueous solution of hydrogen peroxide and formic acid is ideal for nickel and tungsten;
- for other solid metal compounds, mixtures of nitric and acetic acids are used;
- A mild sulfuric acid solution works well on cast iron.
Pickling steel with ferric chloride
A series of technologies for controlling the removal of the surface layer of a metal part using specially selected chemical reagents is called metal etching. It allows you to remove scale, rust and oxides from products under the influence of acids, salts and alkalis in solutions.
In this way, additional preparation of metal products is carried out for joining or coating, which improves the adhesion of the parts or the applied layer to the base.
The most commonly used method is chemical etching of metal, carried out by immersing the workpiece in a bath of dissolved chemical reagents.
Methods of chemical etching of metal
There are also types of it that provide for additional activation of toxic substances using physical factors.
This is metal etching electrochemical (or galvanic) under the influence of an electric field or ion-plasma through the ionization of reagent particles.
If the word “etching” is used without indicating its type, then we are talking about chemical etching in an aqueous electrolyte. It is also called “liquid”, in contrast to “dry” ion-plasma.
When etching metal with an acid, usually sulfuric or hydrochloric, the workpiece is immersed in its solution. In this case, both the oxides existing on the surface of the part and the base metal enter into an acid reaction. As the acid content increases, the dissolution operations are accelerated simultaneously for the oxides and the base metal.
In addition to the acid concentration, the speed of the metal etching process is also influenced by its temperature regime, as well as the chemical composition of the oxides. The most optimal combination of these factors allows etching to be carried out so that, with the fastest possible dissolution of the oxides, it affects the base metal as little as possible.
In addition, in artistic etching, when it is necessary to keep part of the surface of the product intact, it is covered with a special protective layer.
To clean iron from surface oxides, the optimal solution is 10% hydrochloric acid at a temperature of 40 °C (for using sulfuric acid - 60 °C). As this temperature increases, the speed of the process also increases. The salts obtained during metal etching can also affect the speed of the process. Some of them, for example FeCl2, increase it, while others, such as FeSO4, decrease it.
The etching of metal with ferric chloride is complicated by the production of hydrogen during reactions of iron and acids. It interacts with the top layer of metal, forming “etching bubbles” in it and making the product more fragile.
In order to prevent this effect, special additives are added to the bath with the etching solution to slow down the reactions. By creating a special shell, they protect the metal from the negative effects of hydrogen.
Tanks made of concrete or wood, coated inside with acid-resistant materials, serve as the main equipment for pickling metal. For the convenience of immersing small workpieces in baths with etching solution, special trays with baskets are used.
When it is necessary to clean not the entire surface, but only part of it, for example, a soldered seam, then a brush is used to apply etching solutions to its surface. The part is then carefully washed with water. Etching pastes are necessary for cleaning rusty metal parts.
The area affected by rust is covered in two stages with different layers of pastes, followed by rinsing.
To treat the surface of a part made of copper or its alloy, metal etching with nitric, hydrochloric or sulfuric acids is used. Aluminum parts should be etched with alkaline solutions. Nickel and alloys must be cleaned with sulfuric acid solutions with the addition of chromic anhydride. Cupronickel parts are also cleaned with a solution of sulfuric acid, adding chromium to it.
In this case, they need to be washed after the etching procedure with warm water, dissolving a little cream of tartar in it. In the form of etching of iron or steel products, ammonia solutions or iron sulfate are used; bronze and brass parts require etching of the metal with copper sulfate, and zinc products - with zinc sulfate, as well as a solution of zinc chloride oxide.
Features of the electrolytic etching process
Electrolytic or galvanic etching of metal is used to speed up the cleaning of parts by immersion in a bath of solution, which usually takes a lot of time. This process is much faster if metal parts are placed in an electrolytic bath in the form of cathodes or anodes. Hence the division of electrolytic etching into cathodic and anodic.
For the anodic method of metal etching, alkaline solutions of metal salts and acids are used as an electrolyte. The cathode is usually lead or, less commonly, iron as materials that do not dissolve in the electrolyte.
Given the speed of the process of metal etching by electrolysis, when cleaning products using this method, it is necessary to strictly follow a certain regime so as not to expose the metal to the risk of excessive electrolytic dissolution.
The characteristics of the anode current are selected based on the state of the surface layer of the product, as well as the required speed of the process. Etching is carried out at room temperature. The duration of the operation is determined empirically.
The cathodic method of metal etching involves the use of lead or its alloy with antimony as an anode. When mixed with acid solutions, alkali metal salts act as an electrolyte. This technology is based on the action of hydrogen produced at the cathode.
It promotes the reduction of metals from oxides located on the part, and hydrogen in the form of gas separates them from the surface of the metal. This etching option is not suitable for workpieces made of hardened steel due to the possible hydrogenation of the surface layer of the metal part.
Instructions for liquid etching of a knife
The chemical method is simpler and does not require batteries. A strong aggressive environment is required. It has already been stated that the method is dangerous due to its gaseous emissions. Opening a window or getting a good hood is a must. Safety equipment:
- latex gloves;
- respirator;
- protective glasses;
- smock.
Avoid contact with mucous membranes of the body. Washing with water will not do. A chemical burn is a terrible thing. We've sorted out the equipment, now it's a matter of materials:
- insulating tape;
- nail polish, marker;
- grinding machine;
- distilled water in a container;
- Plastic container;
- solvent, acetone;
- ferric chloride supply;
- cotton swabs and disks, toothpick;
- sandpaper of various grains.
The knife must be prepared in advance. On a solid product, protect the handle with electrical tape; on a collapsible product, disassemble it and work with the blade separately.
Creating a protective layer
The pattern that needs to be transferred to the product must be outlined with a protective layer. Considering that in the coated area, the reaction will not take place, and the metal will remain light. Initially, make a sketch with a marker and then cover it with nail polish. This is the best option. The varnish can then be adjusted to ensure evenness of the lines and the pattern itself.
Don’t be shy about fantasizing; the uniqueness of the work performed also depends on the personal qualities of the master. Use varnishes of various shades; they are clearly visible on the surface of the product.
Preparation of the solution
We make sure to use personal protective equipment. When working with acid, you need to have a solution of soda on hand; it will come in handy if an aggressive substance gets on your skin. The rule of all chemists is to pour acid into water, never in the reverse order:
- The ratio of ferric chloride and water should be 50/50. This is the best option, but to speed up the reaction, other proportions can be used.
- The plastic container should not be filled entirely; be careful when placing the product there. After pouring a little distilled water, pour in the same amount of ferric chloride.
- Label the container with the words "Acid" and be careful with it. A metal container is not suitable; there is a possibility of it reacting with the solution.
Please note that the diluted liquid will serve more than once; you can actually process a dozen blades in it. Once dilution of the solution is complete, proceed to the next step.
Etching stainless steel with ferric chloride
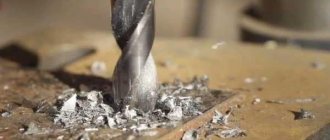
The quality and accuracy of drilling depends on the sharpness of the working tool. In addition, unlike a table knife, the drill must be sharpened correctly.
Experienced mechanics can straighten the cutting edge on a regular sharpening machine by simply holding the drill in their hands (at least according to them). But this method requires skill and many years of experience.
Even if you have a steady hand and an excellent eye, without understanding the process, you will simply ruin the instrument.
A few basic rules for sharpening (using the example of twist drills for metal):
For a better perception of the material, let’s remember the structure of the drill.
- Do not press the tip against the sandpaper for more than 2-3 seconds at a time. The metal heats up and the so-called “tempering” occurs, that is, deprivation of hardening. Accordingly, the necessary hardness of the metal is lost. The first sign is the presence of temperature discoloration on the edge.
- For drills with a diameter of up to 4 mm: each time the sandpaper plane touches the drill, the drill is held in one position: rotation around its axis is not allowed. For larger diameters, the sharpening geometry is slightly different.
- On twist drills, only the back surface of the cutting part is sharpened.
- The cutting edge should be directed towards the rotation of the sharpener (for mechanical sharpening).
- The main angle (2φ in the illustration) depends on the type of material being processed.
Which drills should I sharpen and how often?
Feather and other special wood drills cannot be repaired at home, and they do not become dull so quickly. Pobedite tips for concrete cannot be sharpened in principle. The most popular tool remains - twist drills for metal. Of course, they are also used for processing wood (plastic, rubber and even stone), but this is not relevant to the topic.
Twist drill. The cutting edge is small in size, so during operation it quickly heats up due to friction (there is no dissipation area). The main reason for dullness is overheating. When used correctly, wear does not occur as intensely. Characteristic signs of a blunt drill:
- A creaking sound is heard during operation.
- Instead of curled shavings, sawdust comes out of the hole.
- Instant heating of the tool without moving deeper.
Important: Do not use a dull drill; wear from overheating will only progress.
So, it's time to sharpen the tool. You don't want to ruin the drill and want to mechanize the process.
Mini sharpening machines are at your service:
All devices are divided into two types: attachments or stops for universal tools, and independent devices of narrow specialization. Let's look at the most popular of them, from simple to complex:
Hand holder
This is just the device for those who have a steady hand and a diamond eye. In fact, it only allows you to hold the drill in a given position without fear of injuring your fingers.
Angle control is visual, according to the position of the “wings” relative to any landmark. There are few advantages: instant readiness for work, compactness and price.
The disadvantages are obvious: manual control of the process does not add accuracy.
Stop for electric sharpener
In fact, this element is not a special device for drills. It simply allows you to fix the tool at a certain angle. The accuracy will be higher than in the previous version. Most stops allow you to set the angle of inclination, and even have a marking scale. And yet you have to rely on firmness of hands.
There are also more advanced stands: with replaceable elements and adjustment of not only the angle, but also the height. The devices are mounted not on the emery body, but on the workbench: which makes them more versatile.
In fact, such a stop can be adapted to any electric sharpener. An additional bonus is that with the help of such a stand you can sharpen knives, cutters, screwdrivers, chisels, etc.
Semi-professional guides for all types of drills
This is a fairly advanced tool that allows you to control sharpening characteristics with micron precision. All linear parameters are securely fixed, the values are set according to the markings. The drill is mounted in the groove, accidental displacement or rotation around its axis is excluded.
For sharpening, the possibility of both linear movement and movement of the edge along the arc path is provided (for conical sharpening of large diameter drills). Linear movement (along the axis) can be controlled by a master, or a limit stop can be installed.
From the point of view of processing quality, the device has practically no shortcomings. But for proper sharpening, the operator must know the parameters of the drill. That is, there is no automation: therefore the tool belongs to the professional category.
As a development of the line - a guide with its own sharpening unit. There is no need to install a stop on the workbench and change discs. In fact, you have a semi-automatic tabletop sharpening machine.
Important note: All listed devices are designed to work with standard electric sharpeners. Therefore, before starting to process drills, it is advisable to install a special emery disc.
Electric sharpening machines
They are specialized power tools for performing a single task: sharpening twist drills.
Even a person who is far from technology can use the machine (although why does he need sharp drills?). The operator only needs to determine the diameter of the drill and immerse it in the appropriate hole.
It is convenient to work, errors are practically excluded. However, all drills are sharpened with the same comb. The price to pay for ease of use is the lack of flexibility in settings.
For home use - the best choice: especially if there is an additional attachment for sharpening knives and scissors.
There are versions for masters. The drill is installed taking into account the sharpening parameters, the process can be controlled by the operator.
The sharpening angle, the method of edge processing (linear or conical), and the depth of metal removal are selected. The drill is not located in a common holder, but in an individual cartridge.