What are dowels for?
On the market you can find dozens of types of fasteners, which differ in size, materials, and scope of application. The most popular dowels are: universal dowels, expansion dowels, spiral dowels, frame dowels, insulating dowels, heavy-duty dowels, nail dowels and others. Each of them is designed for specific purposes and has its own advantages and disadvantages. Let's look at the key differences and come to a conclusion in what situations certain types of fasteners are used.
How to hammer dowels into a wall
When carrying out repair work, it often becomes necessary to drive a dowel into the wall. This may be required, for example, when installing suspended ceilings or in other cases. Even hanging a simple shelf or picture on the wall without this procedure is extremely difficult. In this regard, it will be very useful to know how to drive dowels into a wall.
Before starting to describe the technological aspects of the work, it would not be superfluous to decide what a dowel is and what it can be.
A dowel is usually called a device that serves to firmly hold fastening elements in any surface. In other words, simply screwing a self-tapping screw into concrete will not be enough. Besides the fact that this is quite difficult, it is also pointless, since such a connection will be fragile. It will be impossible to rely on such a fastening. To increase reliability, a plastic sleeve is inserted into the prepared hole in the wall, into which a self-tapping screw is then screwed. This sleeve is the dowel.
Based on the design features and application options, we can conditionally distinguish at least two types of these fasteners.
- Expansion type dowels, which are usually used to attach something to walls made of solid material. They are plastic bushings that are fixed inside the hole due to the protruding elements of their design.
- Universal dowels. They can be used when fixing elements on walls made of hollow materials. The essence of their action is that when the screw is tightened, the dowel expands and becomes deformed, filling the voids and providing a strong fastening.
It is worth saying that it is not enough to simply install a dowel into the wall, but you need to know how to do it correctly.
- First you need to determine the required location. This is necessary so as not to drill into the wall several times. Therefore, you need to mark the exact location of the hole with a pencil. It is better to spend more time on the necessary measurements and markings than to later look for ways to fill unnecessary holes.
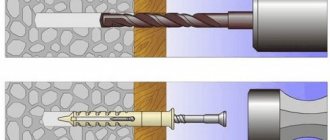
- Once the wall is marked, you can start drilling holes with a special drill. This is best done using a hammer drill or an electric drill with a perforation function. The tool must be positioned strictly perpendicular to the surface to be drilled. Otherwise, the drill is likely to break. Next, with slight pressure on the tool, a hole of the required depth is drilled, which must correspond to the length of the dowel.
- When the holes are ready, you need to insert the dowels themselves into them. To do this, you need to lightly push the fastening element with its end into the hole, after which, with light blows of a rubber or wooden mallet, hammer in the dowel over its entire length. With correct calculations and work, the dowel should be tightly and firmly fixed in the hole, level with the wall.
It is worth saying that in order to properly fix the dowel in the wall, you need to choose a suitable drill. In addition, the dowel should be driven into the hole. It should be equal in diameter to the dowel. This is the only way to avoid worrying that a mirror suspended on such a fastener, for example, will not fall.
Video
In this video tutorial you will learn how to attach dowels to a concrete wall:
www.stroitelstvosovety.ru
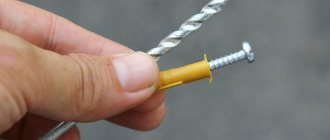
What is a dowel-nail
A dowel-nail is a special product used to perform fastening work. It consists of two elements - a special nail and the dowel itself, and is used for mounting objects to concrete, brick, stone, and other solid, dense materials. There are also types of the described fasteners designed to work with chipboards and drywall.
The design of the dowel-nail is very simple. It is made in the form of a cylindrical rod, which consists of a spacer part (it expands during installation and allows for reliable fastening) and a nail that is familiar to everyone.
In some cases, the fastener we are interested in may be additionally equipped with a special cuff that acts as a limiter that does not allow the fastener to fall into the hole made. The shape of this cuff can be different, for example, cylindrical or hidden.
Also, modern industry produces dowel fasteners with a thread applied to the nail and a slot, which is located on the head of the product. This element can be mounted using a screwdriver. Working with it is quite simple, since the process of inserting a nail into a dowel is made easier due to the presence of a “smoothed” thread in the product. Let us add that the top of the thread of this mounting device is directed towards the head. Purely externally, the dowel-thread is no different from the standard thrust thread.
Most often, dowels are made from polyethylene, polypropylene or polyamide. But the dowel-nail itself is made from steel alloys with a zinc coating. To be fair, we note that there are many fasteners of the described type on the market without additional coating. Standard dowel diameters are 5, 6, 8 and 10 millimeters, and their length ranges from 30 to 160 millimeters.
Step-by-step instruction.
1. Before driving a nail, check whether it is in “working” condition: there are no kinks or bends, or rust. If any, measures should be taken to eliminate these shortcomings.
The bent nail must be leveled with hammer blows, and the rust must be removed so that it does not subsequently spoil the surface into which the nail is planned to be hammered.
Next, you need to choose the right hammer.
If your nail is up to 4 cm long, then choose a hammer weighing 250 g. Larger nails require a tool that is twice as heavy as the previous one. Five hundred gram hammers are considered universal, due to which they are widely distributed in relevant stores.
There are hammers weighing 1 kg. Such assistants are good for driving nails and dowels longer than 8 cm. We also note that with the help of a correctly selected hammer, the nail will penetrate dried wood better and faster (if, for example, this is what we are talking about).
3. Now you can begin the process itself.
- If you are right-handed (for a left-handed person the actions will be similar, just with the other hand), then take the nail in your left hand and place its sharp end perpendicular to the work surface.
- Take a hammer in your right hand.
Using the hammer, apply gentle blows to the head of the nail so that it penetrates a quarter of its length into the desired surface. Please note that your movements and, accordingly, the movement of the hammer should be carried out along a trajectory, the end of which should be a continuation of the nail.
“Curved” blows will lead to damage not only to the nail but, possibly, to the material as well. Apply confident, strong blows (and perhaps even a blow) to the head of the nail until it is completely “sunk” into the material.
The key here is confidence and accuracy.
How to remove a dowel-nail?
Often, during dismantling, the plastic part becomes firmly stuck in the surface. To pull out a dowel-nail for concrete or other material, craftsmen have invented several tricks:
Read also: Why do people buy old refrigerators?
- We screw the screw into the spacer cup and then use pliers to pull the product out of the wall.
- In serious cases, it is better to use a nail puller instead of pliers.
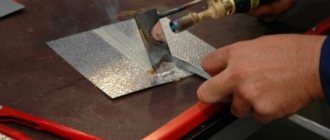
- If the tip of the screw is broken, you can melt the plastic part enough so that the exposed surface is enough to grip the pliers.
- The metal dowel-nail will first have to be loosened a little in order to be pulled out of the wall.
- If the metal part protrudes very little, then you need to use a hammer drill to make a recess around the head in order to reduce adhesion to the material and free up part of the dowel for a comfortable grip.
How to firmly drive a dowel into a wall
In this article you will learn how to hammer a dowel for a durable and reliable fastening. In this matter, the correct selection of the hole diameter plays a key role, since the plastic element of the dowel must fit tightly into the wall. The choice of auger or drill type depends on the required hole size.
Also, do not get carried away with the depth of the mounting hole. So, how to hammer a dowel correctly the first time? The best criterion when choosing depth is the direct length of the plastic element of the dowel, with a possible addition of 1-2 mm for the cap to fully fit into the wall. If you make the hole too deep, the dowel will become loose and will not withstand the expected loads.
When drilling or drilling a hole for fasteners, you must keep the hammer perpendicular to the wall. This is due to the fact that drilling at a different angle leads to an involuntary expansion of the hole, and therefore reduces the fit of the dowel base.
After completing the drilling, you should thoroughly clean the hole to remove any accumulated dust; it is better to use a vacuum cleaner for this. Blowing through the hole with your mouth is not recommended, as it is less effective and can cause contamination of the eyes and respiratory tract.
How to hammer a dowel into a base made of different materials
When working with walls made of soft building materials (such as foam blocks, cellular concrete), it is necessary to use special fasteners. The use of traditional dowel elements is not effective, as they expand the base and do not allow the dowel to be fixed in the wall.
There is an option in which you can limit yourself to ordinary dowel elements when working with soft walls. For this purpose, a gypsum solution is used, which must be poured into the hole before driving the dowel into it. With this option, the plaster will fill the voids and secure the base of the dowel in the wall. But this is an ineffective method and should be used only in cases of extreme necessity.
For walls made of soft materials, it is more effective to use dowels with full twisting into the plastic part. This fastening retains high strength and firmly fixes the dowel in the wall material. How to hammer a dowel of this design? In the usual way: the plastic base is strengthened, and then the metal element is screwed in (at this moment the dowel is rolled into a knot). Easy and reliable!
Do you need to hang a picture, a lamp, a baguette under the curtains on the wall, attach a hammock to the ceiling - in general, securely fix some kind of structure? Alternatively, this can be done using dowels. They look like a pen or pencil cap and are made of metal, plastic or wood.
In short, we drill a hole, drive a dowel into it, then screw a self-tapping screw or screw into it. And your fastener is ready!
But everything is not so simple, because it is very important to drive in the dowel correctly so that your expensive painting does not collapse and will please everyone for many years.
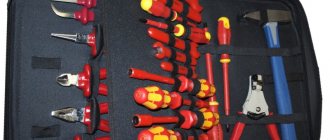
First you need to prepare the following tools and consumables: dowel, electric drill, Pobedit drill, sharp nail or core, electrical tape, hammer.
Weight and dimensions
Products are produced in very different sizes, given how different the purpose may be. The parameters are marked with 2 numbers: the first indicates the diameter, the second indicates the length in mm.
- The parameters vary from 5*23 to 10*160. The load that the product can withstand must be indicated.
- The weight of the product for different sizes and materials, of course, is different, but since the fastener itself is still small, the weight is indicated not as 1, but as 1000 nails.
As an example, the table shows dimensional data for a dowel-nail with a polypropylene spacer body.
| Designation | Hole diameter, mm | Nail diameter, mm | Dowel length, mm | Nail length, mm | Min. depth for through installation | Max. thickness of attached material | Weight 1000 shi, kg |
| 6*40 | 6.00 | 40 | 4 | 42 | 50 | 10 | 3,3 |
| 6*60 | 6.00 | 60 | 4 | 62 | 70 | 30 | 4,89 |
| 6*80 | 6 | 80 | 4 | 82 | 90 | 50 | 7,28 |
| 8*60 | 8 | 60 | 5 | 62 | 70 | 20 | 8,5 |
| 8*80 | 8 | 80 | 5 | 82 | 90 | 40 | 11,02 |
| 8*100 | 8 | 100 | 5 | 102 | 110 | 60 | 13,78 |
| 8*120 | 8 | 120 | 5 | 122 | 130 | 80 | 16,53 |
| 8*140 | 8 | 140 | 5 | 142 | 115 | 100 | 19,3 |
| 10*100 | 10 | 100 | 7 | 102 | 150 | 50 | 15,32 |
The dimensions and weight of the product for a construction and assembly gun vary within smaller limits.
| Designation | Weight 1000 pcs, kg |
| 4,5*30 | 5,1 |
| 4,5*40 | 6,45 |
| 4,5*50 | 7,7 |
| 4,5*60 | 8,84 |
Next, the technical characteristics of dowel-nails will be considered.
Standard sizes
When choosing a fastener, an important role is played by its dimensions, which are marked with a digital designation. The first number indicates the diameter of the product in millimeters, the second - its length. The variability of these parameters is quite large: from 5×25 to 10×160. Each dowel-nail option has maximum load restrictions.
Various parameters and technical characteristics of dowels are regulated by GOST 28457-90. Some changes in technical specifications are allowed, but there are standards and regulations that must be strictly observed. These include:
- production material;
- minimum and maximum value of rod curvature indicators;
- the thickness of the protective galvanized layer that covers the nail;
- compliance with the standards of misalignment of the rod and washer diameter.
Changes in other characteristics specified in GOST are permissible if justified and verified technical conditions exist.
The most popular among consumers are nylon dowels of different diameters (2 - 16 mm) with threads. They are used for standard base surfaces made of brick and concrete. They can easily withstand stationary loads ranging from 200 to 450 kg.
When mounting a profile, the best option is considered to be fasteners of size 6×40 mm. To fix various objects to wall and ceiling structures in large-panel houses, it is recommended to use dowel-nails 6x60, 60x80 mm.
Drywall dowels
The fragility and other features of gypsum plasterboard require the use of special types of dowels. Due to the great popularity of drywall, several fastening options have been developed. This:
- butterfly;
- "Molly";
- Driva;
- Dowel nail.
The “butterfly” option is used when it is necessary to attach a not too heavy part or thing, for example, a painting, to a plasterboard wall. The bushing has the appearance of a cylinder with deep slots on the sides. When screwing the screw, the back part is attracted, and the side parts are deformed and pressed against the back part of the gypsum board. The fixation is reliable, but not designed for too heavy loads.
A variety of “butterfly” is the “molly” dowel. This is a drywall anchor made entirely of metal. In addition to gypsum board, it can be used on any sheet material - MDF, chipboard, OSB, etc.
The second most popular dowel is the Driva type. It screws into a pre-drilled hole and is securely focused by the flared threads to form a strong socket for driving the screw. Holds parts weighing up to 30 kg, made of steel or polymer.
Material for making dowels
Most dowels are made from polymer materials - polyethylene, polypropylene and polyamide. Such elements are characterized by high performance, availability, ease of installation (there is no need to make significant efforts to attach them) and low cost.
Common materials for making dowels are polyethylene, polypropylene and polyamide
Products made from polypropylene are hard, wear-resistant, and resistant to high temperatures. Such elements are intended exclusively for indoor installation, which is due to their sensitivity to sub-zero temperatures. During long-term operation with temperature fluctuations, deformation of the dowels and the appearance of cracks may occur.
Polyethylene dowels are characterized by low weight, ductility, ability to operate at low temperatures and low cost.
The most reliable and durable products are dowels made of polyamide or nylon. They are characterized by high wear resistance, resistance to mechanical stress and temperature changes.
Dowels can also be made of metal. For this purpose, stainless steel, galvanization, alloys based on bronze or brass are used. Iron dowels are distinguished by high strength qualities, rigidity, the ability to withstand large mechanical loads and durability without compromising the integrity of the structure.
Important! The surface of the metal dowels has a special galvanized coating that prevents the formation of corrosion.
Metal dowel
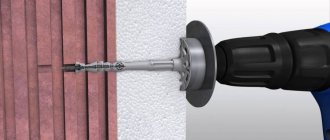
How to drive a dowel nail into drywall, ceramic or tiles
When installing drywall, you should take into account in advance the weight of the load that is attached to it. In cases where the weight of the load is quite high, it is impossible to use a dowel fastener, since it will simply destroy a fairly light plasterboard surface. In other situations (light load weight), driving a dowel-nail is a very simple procedure:
- a hole of the required cross-section is made in the drywall;
- the fastener is inserted all the way into the hole (in this case, you should not hit the fastening element with a hammer with all your strength, but only lightly tap);
- The screw is tightened manually or using a screwdriver.
When working with tiles made of tiles or ceramics, installation of fasteners is also simple, but the work should be done with extreme caution, given its high fragility. The fastening diagram is as follows:
- a marker marks the point of entry of the fastener into the tile (this can be either a seam or the surface of the material);
- Lightly tapping a metal screw using a self-tapping screw makes a hole on the surface of the enamel (up to 0.5 millimeters), and only after that use an impact drill, which drills through the tile (ceramics) to its entire thickness.
Do not forget that you will also need to make a hole under the tile in accordance with the instructions for brick or concrete (they are outlined above), and then install the fastening device into the tile and brick or concrete surface.
Alternative to plastic wall plugs
Most often, craftsmen use plastic fasteners for household work. They are easy to find at any hardware store. If you need a dowel at a certain moment, but you don’t have it at hand, you can make your own fasteners.
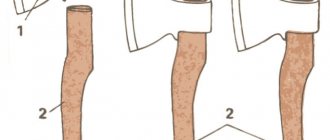
The simplest option is wooden blocks or matches, which are considered the predecessors of dowels. They are universal and can be used for all types of surfaces. The bars are easy to install yourself. Even such fasteners can withstand heavy loads. A prerequisite for this will be an accurate calculation of the configuration and selection of material. It is best to use hardwood. The diameter of the hole should be smaller than the chop. The dowel is driven in with hammer blows. If you incorrectly calculate the length of the dowel, you can cut it off with a sharp knife.
Wall dowels are considered popular products for creating strong and durable connections. You can choose the appropriate option based on the type of product, its weight and surface. The installation itself is quite simple, but requires care and compliance with the described rules.
The use of dowel fastenings when working with brickwork and concrete
To install fasteners into brick, you need to do the following:
- Choose a suitable location for the fastening material (most often this is the central part of the brick).
- Take an impact drill and start drilling. This must be done with care in order to avoid the appearance of cracks and chips on the brick. After approximately 1 cm of masonry has been drilled, the drilling speed can be increased.
- Use a vacuum cleaner to blow out small brick chips from the hole and drive in the fasteners.
To install fasteners in concrete, you must follow the following recommendations:
- Mark the hole using a hammer and punch.
- Punch a hole of the required depth using a hammer drill. The brand of the drill must match the brand of the fastener. In addition, the length of the dowel must be 5 - 6 mm less than the depth of the hole being drilled.
- Remove any dust with a vacuum cleaner and deepen the dowel using a hammer.
- All that's left is to hammer in the nail. It is recommended not to hammer it in completely. Leave 2 - 3 mm from the cap free for hanging.
Actions with the cord
This measure can indeed ensure high-quality fasteners.
However, if you need to stretch the cord between the corners (for example, for construction and repair needs), you can do it this way:
- Tie nails and other wire scraps to the nylon thread.
- Insert them into the mortar joint (with a soft mortar, immersion will occur without a pick or other tools).
- In winter, a pick may be needed (as is the case if the solution was yesterday).
- There is no need to hammer the parts too deep, because they need to be constantly pulled out.
In this case, you need to ensure that the rod can support the tensioned cord itself. It is important to pay attention to ensure that the element does not sit too firmly inside.
To do this, it will be enough to loosen it a little in its nest.
General recommendations for driving a comb nail into brick
Another option for 100% quality work is choosing comb options. This material consists of copper elements with sharper edges (this allows you to easily enter any material).
To accomplish your plan, you need to prepare those tools that can help you hammer in a nail, and in the future you won’t have to worry about the thing hanging on the wall. To do this you will need the following preparations:
- roulette;
- the comb nails themselves;
- drill;
- 3 mm drill for concrete;
- hammer;
- pencil.
The work algorithm will be as follows:
- Measure the brick itself.
- Measure the very place where the nail should go.
- Mark the front of the work with a pencil, making a bold dot
- Put the drill into operation.
The process of driving a dowel
During construction and repair, the dowel with a self-tapping screw or dowel-nail is most in demand; they can be fastened in different materials. In order to properly fix them in the wall, ensuring high-quality fastening, certain conditions must be observed. Only at first glance it seems that driving dowels into the wall is very simple. In order not to damage the material, you must follow the rule that the dowel body should not protrude beyond the edge of the wall surface.
A hole is being drilled
- A hole is made in the wall with a hammer drill, and the diameter of the drill must match the cross-sectional size of the dowel sleeve. It is important that the depth of the hole is 0.5 cm greater than the length of the dowel.
- After the hole is made, it must be cleaned with a long object at hand. To get rid of dust, the hole can be blown out with air or, for example, cleaned with a vacuum cleaner.
- Then you need to insert the dowel body into the hole and hammer it in until the edge of the part coincides with the surface of the wall.
- After this, the self-tapping screw is screwed into the plastic base almost all the way. In the version with a nail, the latter is driven in with a hammer. The core, after entering the body of the outer shell of the part, will have a bursting effect on the base in the hole, and it will be almost impossible to pull out the dowel. To install the dowel efficiently, you need to follow all the necessary rules.
Dowel in hole
It is necessary to take into account that the core needs to be twisted, and not driven in with a hammer. Otherwise, the bushing may rupture and lose its fastening properties. This statement is only suitable for dowels whose core is a self-tapping screw. The nail must be driven in with a hammer until it stops.
Type of dowels
There are many types of dowels. For each specific case, different ones are selected - it all depends on the task at hand. All dowels are divided into two large groups: universal and spacer.
Spacer
Expansion dowels include fasteners whose body undergoes expansion during installation. The top part of the part is usually made of dense plastic, while the core, which is screwed into the sleeve, is made of plastic or metal. Such dowels are mainly driven into solid walls with solid filler.
Universal
Universal dowels can be fixed in a wall that is hollow. The material of the upper part of such a dowel, under the influence of the rotating force of the core, twists and forms a nylon surface that fits tightly to the surface of the hole made in the wall. To fix insulation, dowels with wide heads are used.
Disc-shaped
The length of the dowels varies widely - from 20 to 120 mm. The same applies to the diameter of parts – from 4 to 20 mm.
One of the most popular fasteners are plastic expansion dowels. The body in such parts is made of nylon, polypropylene or other identical materials. The sleeve of such a dowel looks figurative - many sharp protrusions and tendrils are visible on it, thanks to which the part “sits” firmly in the wall. The plastic expansion dowel is equipped with a metal core that is longer than the outer base. The core is threaded or has cone-shaped formations. Thanks to them, the inner part of the dowel, when screwed in, is firmly held in the plastic sleeve and, accordingly, in the wall.
Types of dowel-nails
Depending on the conditions, builders have to use different tools. For example, attaching an object to a concrete or plasterboard wall has a significant difference. In some cases, the reinforced strength of the rod is important, in other places - thermal conductivity and moisture resistance. Even a seemingly simple driven dowel-nail has several varieties, which differ not only in size and material, but also in the method of installation.
Common types of dowel nails:
- Dowel-nail for manual installation
. - Dowel-nail for a gun
- installation is carried out using an automatic device, which greatly speeds up the progress of work. It does not have a spacer part. The nail is made of the strongest steel (hardness 53-56 HRC, bending no more than 0.1 mm). - Acoustic dowel-nail
- in the manufacture of fasteners, not metal is used, but plastic and fiberglass, which prevents corrosion or the passage of cold. Consumables of this type are used for installation of thermal insulation, sound insulation, cable ducts, and decoration. - Dowel-nail “umbrella”
– has a wide head and a long body, used for fixing thermal insulation.
Plastic dowel nails
A cup made of synthetic material has a spacer and non-spacer surface. The plastic dowel-nail is equipped with a cuff that prevents the fastener from falling into the surface. The presence of toothed elements prevents the product from scrolling in the hole. We list the common types of plastic fasteners:
- Universal dowel
- used together with wood and chipboard screws, screw-screws, suitable for hollow and solid materials. - Expansion dowel S
- nylon fasteners have a double-sided expansion. The absence of a stop edge allows you to hide the dowel inside the plaster. - MS Expansion Dowel
– Suitable for use with standard bolts or threaded rods. - Dowels for aerated concrete GB
– the presence of spiral ribs allows for a very strong fit in soft materials. - Dowels for mounting TV/TVV steps
– have a good surface geometry to prevent creaking and vibration. TV brand fasteners have a small spacer for installation in a steel profile.
Metal dowel nails
The use of a steel spacer sleeve increases the cost of the estimate, but allows you to increase the design load. A metal dowel-nail for foam blocks, brick structures or concrete structures is installed in the same way as plastic fasteners. We list the advantages and disadvantages of this product:
- High load-bearing capacity.
- Metal does not stretch over time.
- The galvanized or stainless steel sleeve is resistant to corrosion.
- Large selection of fasteners.
- Easy installation.
- The cost of dowel-nails made of metal is higher.
- It must be taken into account that steel fasteners can create more stress, so it is better to place them further from the edge.
How to choose the right dowel
Dowels for self-tapping screws are selected based on the location of their attachment and the weight of the structure. It is important that the fastener fits tightly into the hole, so it must match its outer diameter. The product is selected based on the base material, which will ensure reliable and durable fixation. To perform installation work indoors, you can choose any product. For fastening external structures, it is better to give preference to elements made of polyamide, which are resistant to temperature fluctuations and low temperatures.
For outdoor work it is better to choose a metal dowel
An important point is the type of surface. To deepen the dowel into a solid base, spacers are used. For hollow, layered or multi-hollow walls, anchor dowels are used.
Important! There are special purpose dowels designed for a specific type of surface, such as plasterboard, concrete, sheet substrates or facades.
The depth and type of dowel depend on the load that the fastening will support. The larger it is, the more powerful and longer the product should be.
For heavy massive products in the form of wall bars or wall-mounted exercise machines, fasteners with a depth of at least 85 mm should be used. When thinking about how to fix a shelf on the wall, you should take care of purchasing dowels with an outer diameter of 7-11 mm and a depth of at least 30 mm, which will ensure the strength and reliability of fastening the structure. In the case of installing ceiling lamps, fixing a suspended ceiling and other products in which the main load is located from below, dowels with spacer antennae or transverse notches are selected.
The use of polymer dowels for aerated concrete walls
Gun for installing dowel-nails
Previous methods of installing hardware differ in that the nail is driven into the dowel. There is a more convenient fastening option, which is done using a construction gun. This is called “targeting” the structure to the surface.
In this case, non-standard fasteners are used. A special washer is placed on the nail, ensuring a secure fit of the hardware in the base. Installation with a gun differs in that after shooting the fastening structure, the washer moves towards the head of the dowel-nail and is securely fastened.
This option is suitable for installing metal structures on dense, solid foundations (stone, concrete, brick, carbon steel and much more). Often, a mounting gun is used to securely install canopies on balconies. The product is manufactured according to a standard with lengths from 30 to 80 mm, while the cross-section varies from 3.7 to 4.5 mm. Additionally, a zinc coating is provided, which provides resistance to corrosion.
Types, size of dowels.
Together there are two main types of nails.
The first is the manual installation setup.
Thus, this type of fastener can be hammered in with a regular hammer. This element has the appearance of a metal nail, in the shell of which there is a specialized separating element. This results in a reliable application.
To create this type of nail you will need:
It is worth noting that this type of attachment in its structure has a separating element in the form of a special collar, which allows us to secure our positions in the hole, even if the hole is too deep.
Another type of nose nail is for assembling a (construction) gun.
If you use it, there is no need to drill holes, allowing you to quickly install the shaft. The dowel material is high-quality metal. It's like a fatty product with a special drug. The nail tip has an oversized cap and washer.
The work compression increases with the cage cover, which moves towards the movable washer. Attach the dowel gun in one shot.
There are other types of nails.
One of the most popular is stainless steel. This option is much more economical than others, and in many ways it can be said to be of higher quality.
Depending on the type of structure, there are also other types of fastening nails with their main purpose and size.
The design of the butterfly dowel and its installation
Butterfly dowel
A butterfly dowel is a fastening device that resembles a butterfly in shape. During the process of twisting, the dowel is compressed, due to which special legs are pressed against the back wall of the drywall. One of the advantages of this fastener is that it increases the area of pressure generated when hanging an object. In other words, the specific shape of the butterfly dowel evenly distributes the entire resulting load on the drywall. Several design features should be highlighted:
- Used for installing single and double sheets of drywall, respectively. The butterfly dowel can also be used for fastening chipboard, gypsum fiber board and other sheet building materials that are suitable in thickness.
- Sold complete with a self-tapping screw according to the length and type of thread. However, if for some reason it does not fit, you can replace it with another type of screw.
- The part of the dowel that is inside the drywall sheet does not rotate around its axis. This is achieved thanks to the ribbed surface of the element.
- Internal threads on the far head facilitate clamping and folding. And the presence of special internal legs, which are attached to this head, provide greater rigidity when the butterfly dowel is twisted.
Installation of a butterfly dowel
Fastening this dowel is quite simple and reliable. A few minutes are enough for this. The installation sequence is as follows:
- Where it is planned to organize the fastening, a mark is made with a pencil.
- A drill makes a hole. It should be of such depth that the plastic dowel fits completely.
- Then fasteners are put on the self-tapping screw. It could be just a bracket, a hook, a special plate, a clamp, and so on.
- At the last stage, a self-tapping screw is screwed into the dowel until it stops. During the screwing process, the plastic dowel behind the sheet of drywall folds. This can be felt during the process of twisting it. To check the strength, lightly pull the dowel towards you. But be careful not to tear it out.
In some cases, it can be problematic to use a butterfly dowel. This is due to the fact that the space between the drywall and the wall is very small. In this case, you need to drill a small hole in the wall. This will allow you to screw the self-tapping screw into the plastic dowel without any problems. This method will avoid using a long dowel and screw to secure it to the wall. Thus, the suspended structure will rest securely on the drywall.
Metal dowel Driva - anchor for drywall
Since in our article we are talking about such a universal material as drywall, we cannot help but note a very interesting fastener that was created for soft materials such as gypsum board. In practice, precisely because such material is not only soft, but also quite loose, it is very difficult to hang even a small mirror on walls made of plasterboard. We simply risk that the fasteners will come loose and our mirror will fall to the floor. But there is already a solution to this problem; it is enough to use a special fastening element called the Driva dowel.
Its design is a cylindrical rod with a wide and high thread. This design is designed for screwing into soft materials. In some cases, there is a tip in the form of a drill at the end of the mounting product; this approach allows you to screw in and use fasteners in plywood and chipboard without interference. For ease of installation, the mount has a fairly wide head with a cutout for a shaped screwdriver.
In order to install the anchor in the intended location, you will not need to drill a hole; installation of such a structure is carried out with a screwdriver with an appropriate bit or manually with a Phillips screwdriver. The sizes of such products come in two types: for a single wall of plasterboard and for a double wall. As we have already said, such a mounting element can withstand light loads, so it is better not to heavily load such a mount.
But in order to hang a mirror or a bookshelf, or maybe a flowerpot, such an installation will come in handy. It is recommended to use a metal screw as the nail itself in this device. Technically, such a mount does not use spacer functions, so the self-tapping screw is simply screwed into the wall to the required distance. Also, a structure of this type can be made of plastic; in this design, the scope of application of the device is limited only to use in drywall; it simply will not be screwed into a denser base.
Molly dowel attachment
Dowel Molly
This type of dowel also has some installation features. A hole is drilled with an eight millimeter drill. Then a dowel is inserted into the drywall, which has a side with two teeth and is pressed tightly. This action will prevent the anchor from twisting when it is fixed. After this, using the screw that comes with the kit, using a screwdriver or screwdriver, the dowel is screwed tightly to the drywall. In this case, the central part of the sleeve is twisted, thereby providing excellent fixation to the object that will be secured.
Molly dowel installation
The molly dowel has a number of advantages, for example:
- Has the ability to withstand loads of up to 35 kilograms.
- The screw and dowel are sold as a set.
- If necessary, the structure can be dismantled.
In turn, it has one significant drawback, namely the high price. However, a molly dowel for drywall is ideal!