Due to competition in the market, the choice of electric tools is constantly increasing, and prices are becoming more affordable. Nowadays women are happy to give them to men on February 23rd or relatives and friends on their birthdays. Almost every second household man has his own circular saw.
Over time, the wheels become dull or break and need to be replaced depending on the material being worked with. For example, a metal cutting blade should not be used to cut wood. Therefore, everyone needs the ability to correctly and quickly remove a disk and install a new one.
Disassembling the tool
Almost all problems with electric circular saws cannot be eliminated without disassembling the device partially or completely. Complete disassembly of a hand-held electric saw using the Interskol unit as an example is performed in the following order.
- Unscrew the angle and depth adjustment screws attached to the base of the device.
- Press the gear shaft lock button and use a hex wrench to unscrew the bolt holding the saw blade.
- Move the lower protective cover to the side and remove the circular disc.
- To remove the support sole, first unscrew the fasteners on the underside of the support.
- Next, you need to use two screwdrivers to remove the Sieger ring, which locks the rod on which the sole rotates, to change the angle.
Insert a screwdriver into the gap between the shield body and the sole, then move it aside and remove it.
In the next step, unscrew all the mounting screws located on the upper casing of the unit. Also unscrew the screws holding the movable saw guard. Remove both safety guards from the saw.
Using an open-end wrench, unscrew the bolt holding the riving knife and remove it. Unscrew the rod holding the movable mechanism of the casing and disconnect all its elements.
Next, you should disconnect the unit gearbox by unscrewing 2 screws.
When the mechanical part of the device is disassembled, you can begin to disassemble the electrical part of the device. Unscrew the fasteners holding the engine cover and remove it. When you remove the cover, you will see two electric brushes. If they need to be completely disconnected from the engine, it is recommended to use a marker to mark one of them, as well as the place from which it was removed. Next, you should unscrew the screws that secure the motor housing to the gearbox housing. After unscrewing the fasteners, disconnect both units. In the disconnected part of the motor housing you will see the stator coil. Next, you should unscrew all the fasteners from the handle of the unit. But before disconnecting it, you need to remove the rubber pad by prying it off with a screwdriver.
By removing one half of the handle, you will see the engine soft start module and the start button.
This completes the complete disassembly of the circular saw.
Classification of miter saws
Miter saws are classified into household and professional categories. Miter saws of low and medium power (up to 1500 W) are classified as household ones, professional models - from 1500 W and above.
For home use, owners most often purchase:
- miter saw "Bison" zpt 210 1400 l, "Master" series, 1400 W;
- miter saw "Bison" zpt 190 1100 L, 1900 W, "Master" series;
- miter saw "Zubr" 210 1300 l 02 - ZPT series, 1300 W;
- Miter saw "Zubr" 210 1300 l 02 - ZPT series, 1300 W.
For professional use, owners choose:
- miter saws for wood with broaching, for example, “Zubr” 255 1800, 255 1800 plr - ZPT series;
- combined miter saws “Zubr”, for example, zptp 255 1800, zptk 210 1500. Combination saws are usually good because the working part can be quickly and smoothly replaced with another, that is, you can switch from a regular miter saw to a table saw and back.
Cross-cutting machine of the Zubr brand - ZPTP 255:
The machine is supplied with the following parts: clamp, disk, casing, pusher, longitudinal guide, angle stop, dust collector, dust extraction elbow, wrench, manual. The assembled machine can rest on wheels, so the device can be transported by holding it by two support legs.
- saw blade installed by the manufacturer;
- saw table extensions;
- clamping clamp for circular miter saw “Bison” - a device for fixing wooden objects and workpieces;
- spanners and universal wrench;
- dust collection tank;
- instructions for the saw with a warranty card.
The safety guard is installed on the saw by default. If we are talking about a combination saw, then the casings are installed on both saw parts. Some miter saws are equipped with a belt drive, which reduces the load on the engine when cutting. This design increases the working life of the gearbox.
Maintenance of brush assemblies
Removing and checking brush assemblies.
Turn off the saw and unplug it and the outlets, then remove the blade. Locate the brush cover on each side of the motor housing.
Slowly unscrew each brush cap and carefully pull each one out - be prepared for the brush to fly out when the spring is released. Removing and checking brush assemblies.
Removing and checking brush assemblies.
Press each brush once or twice to check its spring. Repair a component in each brush assembly if:
- spring is damaged
- the body is cracked
- the brush is worn out
- uneven
- shorter than its width
Repair and replacement of brush assemblies in a circular saw.
Repair and replacement of brush assemblies in a circular saw.
Always replace components in each or both brush assemblies with exact duplicates, even if only one is damaged. On the model shown, all brush assemblies must be replaced
Carefully install each brush assembly into place, making sure the brush matches the curvature of the commutator. Then screw the brush cover back on
Removing and changing the blade on a circular saw
Due to competition in the market, the choice of electric tools is constantly increasing, and prices are becoming more affordable. Nowadays women are happy to give them to men on February 23rd or relatives and friends on their birthdays. Almost every second household man has his own circular saw.
Over time, the wheels become dull or break and need to be replaced depending on the material being worked with. For example, a metal cutting blade should not be used to cut wood. Therefore, the ability to correctly and quickly remove a disc
, everyone needs to install a new one.
What are they for?
Saw blades are used for cutting various materials. They will help you cut:
- steel;
- soft metals;
- tree;
- Fibreboard, chipboard;
- plastic.
There are also cutters for circular saws. Using such a disk, you can cut grooves or other types of recesses of the required size in any material. These devices make any repair simple and quick. The range of woodworking performed using a circular saw and discs is extensive and in demand. After all, a saw blade can cut material of any size and shape.
Thanks to the electric motor and high power, a tool with a cutting disc can perform the necessary work for quite a long time. However, in order to rationally spend time and effort, it is necessary to take into account the operating features of this unit.
The most significant indicator of a quality application is the correct choice of saw blade. To do this, you need to know the basic properties, types of this nozzle and the rules for its use with various materials.
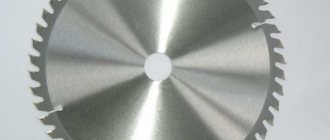
Types of circular saw blades
Solid disc. They are made of high-quality high-carbon or high-speed steel. They are used for processing wood and products made from it, as well as for cutting polymer products. They have a number of advantages:
- inexpensive;
- ordinary sharpening of teeth - you can do this operation without the help of others, without the presence of complex special devices;
- They are sharpened repeatedly, properly, and have a fairly long service life.
A disc with teeth that are reinforced with carbide brazing. The blade is made of strong tool steel. Brazing is an alloy of steel with a high content of tungsten or cobalt carbides. Thanks to this decision, these disks have become more widespread. They have a number of advantages:
- allow you to cut most of the recognizable materials;
- there is no need to create a tooth set;
- highly durable and reliable during operation;
- the service life from sharpening to sharpening is a couple of times longer compared to a solid disc;
- give a cleaner cut;
- increase cutting speed;
- are produced in a wide range to solve various problems when sawing materials.
With all this, there is a significant drawback - such discs are relatively expensive and special equipment is required for sharpening.
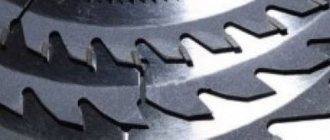
Tooth inclination
Determined by the deviation of the cutting edge surface from the disk radius. When the deviation is towards the back side of the tooth, the inclination is called negative, and when the inclination is on the reverse side, it is called positive. For longitudinal sawing, it is more advisable to use a tooth with a positive inclination, because during the processing process a typical capture of the material occurs, the disk collides with the part, which contributes to a faster cut of the workpiece as a whole. The inclination of the tooth is divided into:
- standard tilt – the angle varies from 5° to 15°;
- positive, brutal inclination is 15-20°;
- The usual, negative angle lies in the spectrum from 0° to .5°.
On a note!
To maintain cutting equipment in proper condition, it is necessary to control the degree of wear during work. It is important to check the radius of rounding of the cutting edge - it should not exceed 0.1 - 0.2 mm. Also, the shape of the cut indicates that the teeth are dull - the cut is uneven, the teeth seem to tear the wood.
Important to remember! Manual sharpening is not applicable to carbide-tipped discs - they are processed on special machines. Such equipment lasts 10 times longer than all-metal discs.
Types of saw blades
Classification according to the purpose of the saw blade
Circular saw blades are used for cutting a variety of materials, ranging from soft wood to dense metal. When choosing a saw blade, you must decide what material will be processed, as this plays a big role in production. Here is a list of basic materials; the choice of disk is directly related to this knowledge:
- wood of any species;
- plywood, chipboard, laminate, fiberboard, that is, wood products;
- polymer products, including polystyrene and plexiglass;
- stone of natural origin;
- soft metals such as aluminum or copper.
Classification according to the method of manufacturing the saw blade
In this classification, there are only two types of saw blades: monolithic and carbide blades.
- Monolithic saw blades are made from solid metal. In this case, high-carbon steel is used, because, as a rule, high-carbon materials are quite strong and are less subject to wear. Also, high-speed steel is used as a material.
- To cut any type of wood, you need discs with very sharp teeth. They are used for sawing crosswise and longitudinally. Monolithic blades are equipped with many sharp teeth because they are subject to wear compared to carbide blades. And in this case, periodic sharpening of the saw blade teeth is required.
- Carbide saw blades have a wide range of advantages over monolithic ones. Firstly, the blade itself consists of high quality hardened steel. Secondly, inserts are soldered onto the teeth; they are usually called “soldered on.” This is done in order to reinforce ordinary steel with a stronger metal. Most often, soldering is made from cobalt or tungsten carbides. Because of these advantages, carbide wheels are highly popular.
- If monolithic disks are used only for wood processing, then carbide disks are suitable for almost all materials used in construction. They are distinguished by reliability and increased strength. They also do not require frequent sharpening, and there is no need to set the teeth. Quite a good and clean cut at high blade speed.
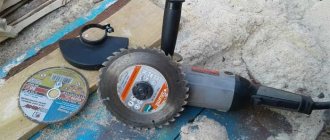
Why does the problem of disc jamming occur in an angle grinder?
If work is carried out with a device operating with a weak start function, then jamming is extremely rare. But at high speeds the following picture occurs:
- The angular speed of rotation of the disk decreases with resistance, as a result of which it begins to slow down.
- But in this case, the engine still operates at its speed, forcefully dragging the gearbox and spindle forward in a circle.
- Because of this, the disk is pressed in and tightened along the applied thread of the spindle head.
Several factors influence the occurrence of the problem:
- setting the circle too large;
- excessive power of an angle grinder, for example, from Bosch or Interskol;
- massiveness of the rotor;
- increase in resistance.
Replacing the circle
When performing repairs even at home, periodic changes of materials require replacement of the saw blade. Changing it is not difficult, but it is still worth knowing the correct sequence of actions for your own safety.
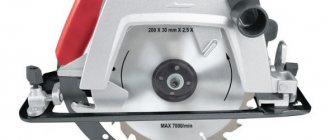
You need to start by installing the protective plastic casing (if equipped) in the upper position. To do this, unscrew the side auxiliary bolt, lift the structure, and then secure it with the same bolt, just in a different position.
Next, take a hexagon, which unscrews the clamping bolt in the center. In this case, on the back side of the saw, you must press the button of the shaft locking mechanism, which is a stopper. It prevents the shaft from moving. Therefore, while holding it, you can press out the central bolt using a hexagon. Then you need to unscrew the bolt (you can do it by hand), remove the side stopper (looks like a wide washer) and then the disk.
Installation is performed in reverse order. The disk is put on the shaft, then a lock washer is installed, then the bolt is screwed in by hand until it stops. To clamp the nozzle, you need to press the button and, while holding it, tighten the central bolt to the limit using a hexagon.
After installing the saw blade, you can check its strength by slightly shaking it longitudinally. If there is no play, the installation is completed correctly, and you can start cutting.
To learn how to sharpen a miter saw blade, watch the video below.
Replacement on circular Interskol 190
As with other models of circular saws presented on the domestic tool market, the Interskol 190 saw blade is fastened with a self-tightening central screw.
How to unscrew and remove from a manual circular saw, and also in which direction it is unscrewed
To replace the saw blade, follow these steps:
To ensure safety, the locking nut is equipped with a left-hand thread. This allows it to tighten during the sawing process. Therefore, unscrewing the nut must be done counterclockwise.
How to install correctly
Installing the saw blade begins with choosing the correct direction of rotation. To do this, there are arrows on the saw body and on the end of the saw blade indicating the direction of the cut. Their directions must match.
Mounting and fixing the disk is carried out in the following order:
After this, you can connect the tool to the AC mains and start working with a circular saw.
To make it easier to unscrew the fixing bolt, before tightening it, it is best to place a small piece of office paper under it.
After watching the video, you can familiarize yourself in more detail with the procedure for dismantling and installing a saw blade on a manual circular saw Interskol DP190.
What to do if it doesn’t unscrew
In order to unscrew such a bolt, you need to treat it with a deep penetration lubricant, such as WD-40. Further unscrewing must be done using a cap bolt with an extended handle (lever).
The design and principle of operation of a circular saw
A hand-held circular saw differs from a miter saw in the absence of a frame with a rotary table, as well as in the placement of the handle. But completely, both models are similar in internal structure, the principle of operation does not differ in the complexity of the design. The following figure shows the structure of a hand-held circular saw.
The unit consists of the following main elements.
- Upper protective casing with an opening for sawdust ejection.
- The housing that houses the electric motor and the start button. Some models of electric saws naturally run on rechargeable batteries. Under such circumstances, the battery pack is also placed on the housing.
- The lower (movable) protective casing, which automatically closes the cutting element after it leaves the workpiece.
- Saw blade. It is attached to the gearbox shaft using a nut, also called a bolt.
- Parallel stop. Makes an even cut without the use of additional devices.
- Base plate (sole) of the unit. Thanks to it, the tool is installed on the workpiece or tire at different angles.
- Depth regulator. When using it, there is an option to adjust the reach of the saw blade relative to the base plate.
- Adjustable sole angle. Allows you to tilt the sawing unit at an angle.
This tool works according to the following principle. Power from the mains or battery is supplied to the start button, which breaks the circuit. When you press the start button, current begins to flow to the electric motor. Below is the electrical diagram of the unit.
The electric motor starts and transmits rotational motion through the gearbox to the saw blade. The unit is installed using a sole on the workpiece (also called a guide bar), after which the process of both longitudinal and transverse sawing is carried out.
Shaft jammed during operation
This problem occurs when, for some reason, the stopper is pressed during operation of the tool. It is designed to fix the shaft when replacing accessories and should be used after the engine has been stopped. Otherwise, the stopper rod breaks and its fragments fall into the engine, causing jamming. There are often cases when this leads to deformation of the armature shaft. Also, as a result of pressing the stopper, you will experience a split in the gearbox housing, fragments of which will naturally damage the gears and cause them to jam. To solve the problem, it will be necessary to replace the armature, stopper, drive (large) gear of the gearbox and its housing.
The gear housing gets very hot
Rapid heating of the gearbox occurs if the passage, if the shaft bearing where the gear is attached and the equipment is attached, has become unusable. Then, in addition to heating, you can change the appearance of extraneous noise in a given unit of the device without any problems. It is necessary to disassemble the gearbox and replace the bearing. Also, the gearbox will heat up if the computer has insufficient lubrication or is completely missing.
Setting up a table saw for precise work
It is clear that not every home workshop has micrometers and dial indicators. Let's learn to do without high-precision measuring instruments.
Checking the belt and pulleys
First, check whether the belt pulleys are aligned by holding a straight edge to them. If this is not possible due to the design of the drive, close one eye and visually assess the alignment accuracy. To correct the problem, loosen the locking bolt and move the pulley.
Check the belt tension by pressing in the middle with your finger. The permissible deflection at an average force is no more than 6 mm. To tighten the belt, loosen the suspension bolts.
Turn the adjusting screw to the required number of turns and secure the electric motor fasteners.
Adjusting the Tilt of the Wheel
First, make sure that the saw insert is flush with the surface of the table by placing a rule or drawing square on top of it.
Adjust the position of the insert using the adjusting screws; if they are missing, add washers or thin plates. You can lower the liner by sharpening some of the material from the bottom side.
After completing the settings, check the plane with a square in several places.
Raise the saw blade fully, turn the tilt handle all the way to set the angle to 90° and check it with a square.
Adjust the hexagon through the hole in the table to an exact perpendicular position.
Rotate the handwheel in the opposite direction to the extreme position and make sure that the stop is accurately adjusted to 45°. Adjust the position of the saw blade if necessary.
After adjusting the swivel stops, check the tilt scale and adjust the pointer by loosening the screw.
Checking the saw table stops
Cuts on a circular saw will be perfect when the saw blade is parallel to the crosscut groove and the rip fence. Otherwise, burns, non-squareness and rough edges of the workpieces are inevitable.
Check the parallelism of the groove and the disk with a simple device, consisting of a straight piece of wood attached to a stop with a screw screwed in. Install the improvised probe until it touches the tooth of the blade and secure it with a clamp. Then slide the device along the groove to the far edge of the disk - maintaining tight contact of the screw indicates strict parallelism of the parts of the machine.
To change the position of the table in carpentry-type circular machines, there are four screws in the corners of the body. In household models, parallelism is usually adjusted by moving the motor, for which you need to unscrew the nuts from the bottom of the machine.
Advice. You can try to correct excessively free movement of the miter gauge along the groove by making holes on the side faces with a center punch. It doesn’t help - you’ll have to buy a new one or make a homemade one, at least for precise cutting at a right angle.
Having finished with the table, check the longitudinal stop with a block that fits tightly into the groove, inserting it from both sides.
Perform the steps necessary to adjust the stop according to the instructions for the sawing machine and adjust its scale.
Removing and changing the blade on a circular saw
Due to competition in the market, the choice of electric tools is constantly increasing, and prices are becoming more affordable. Nowadays women are happy to give them to men on February 23rd or relatives and friends on their birthdays. Almost every second household man has his own circular saw.
Over time, the wheels become dull or break and need to be replaced depending on the material being worked with. For example, a metal cutting blade should not be used to cut wood. Therefore, everyone needs the ability to correctly and quickly remove a disk and install a new one.
Technical specifications
Main parameters of the manual circular saw Interskol dp 190 1600 m at 1600 W:
- operating voltage suitable for the saw - 220 Volts;
- operating frequency 50 Hz;
- engine speed 4800;
- engine power 1600 W;
- disk - 190 mm in diameter;
- the maximum depth to which the tool can make a cut is 63 mm (90 degree angle);
- Circular weight: 5.5 kg.
How to replace a circular saw blade?
Learn how to change a circular saw blade
.
Skil will show you how to change
multiple blades
The general rule when choosing tooth height (and setting cutting depth): the cutting edge should protrude 1.5-2 mm above the material. Then he will go “like clockwork.” Also in the form of teeth there are the following recommendations:
- For thin materials, discs with a large number of teeth (60-80 pieces) are selected. They wear out faster, but the cut is neat.
- For rough cutting and thick material, discs with large teeth (24 pcs.) are used.
- For cutting along the grain, discs with fine teeth are used along the grain. with sparse.
The angle of the teeth is also important
When choosing a disc, pay attention to the inclination of the teeth. Sharpening with a large positive offset is suitable for fast sawing, for slow and precise cutting
with a slight negative angle or with the same small positive angle. A bit more:
- For sawing along wood fibers, it is better to use a blade with a positive teeth angle. An aggressive bevel is used for fast cutting. about 20°, for medium speed. from 5° to 15°. In this form, what happens is that the teeth pull the material under the blade because the cut is fast, but the speed is very difficult to control.
- For working with hard materials, either a slight positive slope is used. up to 5°, or the same value is negative. With this type of grinding, it is easier to control the feed rate because the material does not get caught on the teeth. This mode is safer, although slower.
There are many different cuts and cuts on the body of the saw blade. Their main goal. noise reduction, load compensation and pulse elimination
To extend the life of the saw blade, super-hard alloys are melted onto the cutting edge. In addition, extending the life of the blades is coated with a protective layer that reduces friction against the saw material and protects the metal from damage. Protective coating for discs:
The thickness of the disc can also vary. It is clear that in order to withstand loads, the thickness of the metal must be solid. But this increases the width of the cut and the amount of wood that turns into chips. The standard cut size is 3.2 mm, but to ensure normal rotation speed of such a disk, the motor power must be about 2.2 kW. Since not everyone has such units, discs began to be made thinner, but more hard alloys were used. So the benefit here is twofold: both less powerful circular saws can be used to cut serious materials, resulting in less waste.
How to choose
Any tool is divided into home, professional and industrial. Industrial equipment in the home is useless, but you can't say anything professional
Yes, it is more expensive than what belongs to the household class, but the characteristics and, more importantly, the labor resource are incomparably greater. So if possible, try to choose a tool from their professional series
You should be able to hold the tool comfortably: you will need to handle it and control its position
On a construction site, the quality of the cut and the speed at which the tool can cut are important to us. The speed and quality of work with a manual electric disk drive is affected by the engine power and its rotation speed. Rotation speed can be from 1800 to 5000 rpm, power from 500 W to 2.5 kW. It is clear that the higher the speed and the more powerful the engine, the higher the cost of the saw. Since the energy consumption is not very high, they are included in a normal household 220 V network. However, when operating at maximum speed, there can be significant differences.
It is very good if the tool has the ability to adjust the speed. This will allow you to choose the best mode for each type of material. Electronic overload protection, which is usually implemented by the function of maintaining constant speed under load, will not be superfluous.
Not long ago, battery-powered circular hand saws were discovered on the market. They cost more than the same devices running on the grid, but that's the price of the batteries, but they require a lot of capacity.
By changing the angle of the platform, you can make not a perpendicular, but an inclined edge
The design and principle of operation of a circular saw
Hand circular saw
differs from a miter saw in the absence of a frame with a rotary table, as well as the placement of the handle. But in general, both models are similar in internal structure, operating principle and do not differ in design complexity. The following figure shows the structure of a hand-held circular saw.
The unit consists of the following main elements.
- Upper protective casing with an opening for sawdust ejection.
- The housing that houses the electric motor and the start button. Some models of electric saws can be powered by rechargeable batteries. In this case, the battery pack is also placed on the case.
- Lower (movable) protective casing, which automatically closes the cutting element after it leaves the workpiece.
- Saw blade
. It is attached to the gearbox shaft using a nut or bolt. - Parallel stop. Allows you to make an even cut without the use of additional devices.
- Base plate (sole) of the unit. Thanks to it, the tool is installed on the workpiece or tire at different angles.
- Depth regulator. With its help, you can adjust the reach of the saw blade relative to the base plate.
- Adjustable sole angle. Allows you to tilt the sawing unit at an angle.
This tool works according to the following principle. Power from the mains or battery is supplied to the start button, which breaks the circuit. When you press the start button, current begins to flow to the electric motor. Below is the electrical diagram of the unit.
The electric motor starts and transmits rotational motion through the gearbox to the saw blade
. The unit is installed using a sole on a workpiece or guide bar, after which the process of both longitudinal and transverse sawing is carried out.
The saw does not gain power
If while using the unit you notice a drop in its power, it is first recommended to check the voltage level in the network. Sometimes even a slight drop can negatively affect the power of the power tool.
Also, a loss of power can be observed when the armature bearings or gearbox bearings wear out. In this case, extraneous noise will be heard that was not previously characteristic of this unit. By their location, you can determine where the problem bearing is located - in the gearbox or engine. To replace the bearings, you will need to disassemble the circular saw. How to do this was described above.
If you don’t hear any extraneous noise during operation of the unit, and the engine still has poor speed and power, then pay attention to its manifold. Usually you can see a circular spark (ring of fire) on it.
This may occur due to the interturn short circuit of the armature coil or the accumulation of dirt between the commutator lamellas.
Open the motor housing and carefully inspect the commutator (the area where the brush electrodes slide). It consists of parallel strips (lamellas). There is a small gap between them. When this gap becomes clogged with conductive graphite dust formed when the brushes wear out, a short circuit occurs between the lamellas and a burning ring appears around them.
The problem can be solved by replacing worn brushes and cleaning the gaps between the slats using a toothbrush, cotton wool and alcohol, followed by polishing the plates with fine sandpaper.
In some cases, a loss of power can be caused by a faulty start button. If testing by a tester confirms its malfunction, then the part should be replaced with a new one, since it cannot be repaired.
Features of the use of miter saws
The good thing about these kinds of tools is that they are compact and don’t weigh too much. The maximum weight of the cross-cutting machine is 30 kg; this figure depends on the model and its functional features.
Trimming saws are widely used in the field of woodworking, where they can be used to perform a large number of tasks.
Saws of this type allow you to make miter joints, and such machines are very popular in framing workshops and in furniture production.
Some cutting tool models are equipped with replaceable discs that are designed to cut a particular material. Basically, all types of miter saws are designed so that they can be placed at a certain angle and size when rotating the work table. And some models allow you to turn only in one direction; these are the cheapest options. Naturally, the cost of modifications to the trim, which can be rotated in different directions, will be significantly higher.
If the tool can be rotated 360 degrees, it can handle even very complex workpieces. Its saw head is tilted relative to the table, and its rotation can be adjusted without difficulty. But remember that in order to determine the angle of rotation, you need to decide on the materials and workpieces for the work.
The most optimal rotation of the tool at an angle is about 50 degrees.
Basic parameters of a circular saw blade. Purpose
Depending on the type of disk, the following can be processed:
- different species of wood;
- wood products - chipboard sheets, OSB, plywood, laminated flooring and other similar materials;
- polymeric substances and products made from them, for example, organic glass, polystyrene;
- natural stone material, for example, marble;
- soft metals - duralumin, copper alloys;
- products based on steel alloys - pipes, corrugated sheets, etc.
A cutting tool has certain properties, characteristics, dimensions, purpose, and characteristics of the material from which it is made.
Number of teeth on the disc
Affects characteristics such as cutting speed and surface finish. With a decrease in the number of teeth, the processing speed increases, the conditions for chip removal improve, but the cleanliness of the cut worsens. As the number of teeth increases, the cut comes out more cleanly, but the load on the engine increases. Conventionally, according to their quantitative ratio, disks can be divided into three groups:
- a huge number of incisors, in the range of 80-90 pieces;
- average quantity (40-80 pcs.);
- small quantity (10-40 teeth).
Discs with an average number of cutters are classified as the universal type. They can process soft and hard wood, make transverse and longitudinal cuts, and be used for processing various wood products.
Disc thickness
Determines the actual cutting width. The standard size is 3.2 mm. In addition, the thickness of the disc affects the strength of the cutting tool itself. Reducing the parameter leads to heavy operating conditions, overheating of the disk and failure. A larger size causes an increased consumption of the processed material, in other words, “translation into chips.”
Circular saws are used in processing various materials. Accordingly, cutting tools are produced for specific tasks.
Advantages and disadvantages of homemade products
Having a device helps solve several issues:
- the edges of the parts become smooth without burrs;
- allows you to connect adjacent structures at an angle;
- When joining parts, there is no gap between them.
The main advantages of working with a homemade trimmer:
- firstly, saving on the purchase of building materials;
- secondly, you can select the technical characteristics of the tool you are creating yourself: engine power, cutting wheel size, cutting depth.
Flaws:
- the duration of operation depends on the type of material used to create the equipment;
- homemade products are not equipped with security systems;
- home devices do not have special calibration.
How to repair a circular machine with your own hands
A circular hand saw is a fairly practical tool with which you can quickly cut a piece of wood of any length and width along or across, or cut any wood-based sheet material. In addition, after changing the equipment, you can use a circular saw to cut plastic, metal corrugated sheets and corrugated sheets. Despite the simplicity of the design and high reliability of this unit, it is susceptible to breakdowns, like any power tool. But in most cases, you can repair a circular saw yourself at home.
The saw does not turn on
If the unit’s engine is silent when you press the start button, then the first thing you should focus on is the power cable, provided that there is electricity in the outlet (to check, connect the device to another outlet). To check the electrical cable, you need to disconnect the handle
This will help you get to the contacts to which the power cord wires are soldered. Next, use a tester to test each wire, pressing one probe to the soldered contact, and the second to the plug pin
To check the electrical cable, you need to disconnect the handle. This will help you get to the contacts to which the power cord wires are soldered. Next, use a tester to test each wire, pressing one probe to the soldered contact, and the second to the pin of the plug.
If the network cable is intact, then do the following to find the problem.
- Use a tester to test the entire circuit, starting from the cable entry into the unit to the start button. You should also check the button contacts at its input and output when the key is pressed. In normal condition, an open circuit should close. Ring all the wires after the button going to the motor brushes.
- If everything is in order with the conductors, check how worn the brush electrodes are. Once the electrode is worn to 2/3 of its original size, it should be replaced. The brushes, regardless of how worn each one is, are replaced in pairs.
- If the brushes are in good condition, then most likely the motor has failed. A break or interturn short circuit could occur in its windings. In this case, it is better to entrust engine repair to specialists who will rewind the stator or armature coils.
How to replace a circular saw blade?
Looking for information on an older SKIL model or need an instruction manual for any SKIL tool?
There are few tools more versatile than circular saws (also called hand-held circular saws). What are they used for: cutting wood, metal, plastic, slate, fiberboard, chipboard and other similar materials. Having replaced the disk, polish or grind it, attaching a brush, and remove the rust. So the tool will definitely come in handy when building a bathhouse or house.
Circular saws are called so because of the shape of the cutting element, which is made in the form of a disk with a serrated edge. The dimensions of the disk, the material from which it is made, the shape and parameters of the teeth, the power of the electric motor - these are the main parameters by which a tool is selected.
Concept
A miter saw is a tool designed to make straight cuts at a given angle.
The cutting angle can be either 90 degrees or 45. Its main advantage is that it copes well with long parts and unusual surface shapes. A striking example of this is a plastic floor plinth. But this tool also has other features.
A miter saw can cut a large number of identical (predetermined size) corner and straight grooves. That is why it is mandatory in the recruitment of craftsmen for the manufacture and assembly of furniture and doors.
The appearance of this unit resembles a conventional circular saw (circular saw) mounted on a movable bracket. It allows the disks to descend not only vertically, but also at any angle of inclination. This tool can cut various materials:
- tree;
- metal (in particular aluminum);
- plastic;
- stone.
As with any saw, the type and quality of the blade depends on the material chosen. For maximum efficiency, you need to choose this component correctly.
Disassembling the tool
Almost all problems with electric circular saws cannot be eliminated without disassembling the device partially or completely. Complete disassembly of a hand-held electric saw using the Interskol unit as an example is performed in the following order.
- Unscrew the angle and depth adjusting screws fixed to the base of the device.
- Press the gear shaft lock button and use a hex wrench to unscrew the bolt holding the saw blade.
- Move the lower protective cover to the side and remove the circular disc.
- To remove the support sole, first unscrew the fasteners on its underside.
- Next, you need to use two screwdrivers to remove the Sieger ring that locks the rod on which the sole rotates to change the angle.
Insert a screwdriver into the gap between the shield body and the sole, then move it aside and remove.
At the next stage, unscrew all the fastening screws located on the upper casing of the unit. Also unscrew the screws holding the movable saw guard. Remove both safety guards from the saw. Using an open-end wrench, unscrew the bolt holding the riving knife and remove it. Unscrew the rod holding the movable mechanism of the casing and disconnect all its elements.
Next, you should disconnect the unit gearbox by unscrewing 2 screws.
When the mechanical part of the device is disassembled, you can begin to disassemble the electrical part of the device. Unscrew the fasteners holding the engine cover and remove it. When you remove the cover, you will see two electric brushes. If they need to be completely disconnected from the engine, it is recommended to use a tent marker to one of them, as well as the place from where it was removed. Next, remove the screws that secure the motor housing to the gearbox housing. After unscrewing the fasteners, disconnect both units. In the disconnected part of the motor housing you will see the stator coil. Next, you should unscrew all the fasteners from the handle of the unit. But before disconnecting it, you need to remove the rubber pad by prying it off with a screwdriver.
By removing one half of the handle, you will see the engine soft start module and the start button.
This completes the complete disassembly of the circular saw.
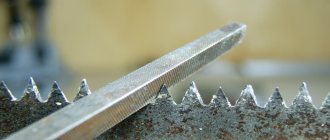
First of all - cleaning from contaminants
Even with an effective dust removal system, sawdust and tar deposits inevitably accumulate on machine parts. Contamination hinders the operation of moving mechanisms and control units.
Start servicing the circular saw yourself with a saw blade: replace the dull one, and clean the tarred one with a special product or white spirit.
The photo shows a cleaned section of a blade that was used to cut softwood for two months.
Now check the spindle flange - its surface should be smooth and clean, because uneven seating of the disk leads to vibration. Remove steel burrs with a file, and remove dirt with solvent.
Advice. Buy saw blades that fit the spindle size of your table saw, rather than using adapter rings. The latter are made of soft alloys and are often deformed when reinstalled.
Using a vacuum cleaner with a crevice tool, remove sawdust and dust from the saw body. There is no need to clean all surfaces until they shine; pay more attention to the moving elements: gears, pulleys, gear sectors, threaded parts and adjusting stops. Remove hardened deposits using a wire brush soaked in solvent, but be careful not to get any liquid into the bearings.
After thorough cleaning, lubricate the threads, tilt and vertical lift mechanisms with light machine oil. After applying a few drops to the parts, rotate the flywheels so that the lubricant is distributed evenly.
Advice. Dust and sawdust quickly stick to regular oil. The problem is solved by using a “dry” anti-friction lubricant that hardens on the surface and does not attract contamination. A similar composition, but silicone-based, can be used to wipe the table of a circular saw and guide bars.
Design
The design of the circular saw is simple and that is probably why it is so easy to use. It consists of:
- electric motor;
- saw blade;
- a body with one or two handles;
- a protective casing that covers the disk from above and below (the lower part is movable and automatically moves away during operation);
- a platform that allows you to set and hold the disc in the desired position;
- riving knife, which prevents the disc from getting stuck in the wood.
The saw blade is attached with one or more screws to the electric motor shaft. Thanks to this, replacing a disk is a matter of just a few minutes. You just need to unscrew one or more bolts, remove and install the disk, putting the fasteners in place.
The structure may be slightly different - instead of a battery, there is often an electric cable
The electric motor is attached to the platform. On more expensive tools, this mount is movable, which makes it possible to change the cutting angle. This angle is usually from 0° to 45°. It is displayed differently by different manufacturers. Most often there is a scale with mounting screws. The angle is set, the screws are tightened, due to which the cutting disc receives a certain slope.
Last checks
The principle of adjusting the riving knife is similar for most sawing machines: loosen the nuts or screws, change the inclination of the stand and the outlet of the angle, then tighten the fasteners.
All that remains is to check the side wing extensions and, if necessary, align the parts at table level. Try to carry out such maintenance at least once a year and your “circular” will always be in good working order. And for cheap machines, such a check is recommended immediately after purchasing the equipment.
Source
How to remove a blade from a circular saw?
To properly remove the canvas, you must adhere to the following sequence:
- For your own safety, be sure to unplug the electrical cord or remove the battery.
- For more convenient replacement, you need to install the tool on a flat, hard surface.
- To start unscrewing the bolt, you need to press the locking spindle, which blocks the rotation of the disk when unscrewing
- Unscrew the bolt using a special wrench, which is included in the kit
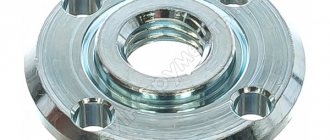
- Pull out the bolt and remove the pressure washer holding the saw blade
- Move the lower guide lever to raise the guard
- Remove the dusty circle
Differences
Mithras. This is a saw designed for repeated fastening of short lengths. This is a small mechanism with a moving electrical device that lowers at different angles and slopes. A circular saw is a circular hand saw for cutting boards, both lengthwise and crosswise, and can be mounted on a machine. A circular saw has higher power than a miter saw with a blade of the same diameter because the miter saw is designed to make a short crosscut, and the circular saw makes the rip cut. The speed of a miter saw is almost always around 4,500 rpm. Speed varies from 3000 to 4500 rpm. The cutting depth of a miter saw, depending on the size of the blade, is from 40 to 130 mm, and the width is from 70 to 363 mm, respectively. The depth of the saw blade, depending on the size of the blade, is from 40 to 100 mm, and the cutting width is from 65 to 700 mm , respectively. Another useful feature of a miter saw. You can work like a regular circular saw, that is, make longitudinal cuts. This saw is called a combination saw.
Due to competition in the market, the choice of electric tools is constantly increasing, and prices are becoming more affordable. Nowadays women are happy to give them to men on February 23rd or relatives and friends on their birthdays. Almost every second household man has his own circular saw.
Over time, the wheels become dull or break and need to be replaced depending on the material being worked with. For example, a metal cutting blade should not be used to cut wood. Therefore, everyone needs the ability to correctly and quickly remove a disk and install a new one.
What is the difference between a circular saw and a saw
Methods for sharpening a disc for woodworking
The following methods ensure efficient and safe sharpening of circular saws.
Grinder - step by step instructions
Special machines for sharpening circular saw blades are expensive and require certain skills to operate, so angle grinders, that is, “grinders,” are an effective and affordable alternative.
To fix the disc, a special smooth stand is used, which is designed taking into account the fact that the tooth must be perpendicular to the grinder disc and have a minimum deviation from it.
For sharpening using a grinder, the following algorithm is used:
- The grinder is equipped with a grinding disc, and the disc to be sharpened is attached to the platform.
- The grinder is held by hands or using a holding device.
- The cutting edge of the circular tooth is processed with a grinder. In this case, a light, uniform movement is performed.
Evidence that the edge has been sharpened will be a visual update of the edge - it will no longer be darkened.
It is forbidden to turn on the grinder if the disc is placed in the throat between the teeth of the disc being sharpened.
File
If a file or needle file is used as a tool, then all sharpening activities are the same as when using an angle grinder. In addition, to maintain the sharpening angle, a special template is required, which is used as a guide plane between the tooth and the file.
But at the same time, the work will take much longer, since circular saws use carbide attachments.
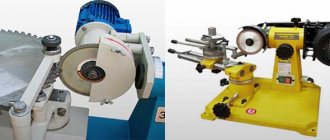
Special machine
Machines for turning circular saw cutters are complex engineering and technical devices, which, in addition to mechanisms, are also equipped with automatic electronics.
These machines allow you to perform the most effective restoration of cutting edges in compliance with all the necessary configurations. The efficiency of the machines is explained by the following criteria:
- Possibility of automating the sharpening process.
- Saving sharpening angle parameters for each cutter.
- All cutters are sharpened identically with minimal error.
- Possibility of complete restoration and restoration.
For sharpening on a machine, the saw blade is placed in a special support and secured.
The sharpening parameters are selected, which are provided by special mechanisms for tilting the disc being sharpened or tilting the sharpening disc in the machine.
The disc to be sharpened is placed in the working area of the device.
The machine starts up and sharpening is carried out automatically.
Homemade machine
To operate effectively, homemade machines must include the following components:
- Angle grinder (grinder) as a direct sharpening device.
- Support for securing the saw blade of a circular saw.
- Mechanisms to allow the support to tilt to adjust the sharpening configuration.
- The entire mechanism is fixed to a frame, which can be a channel or an I-beam.
The operating process is similar to using the original sharpening machine with the only difference - the circular blade is fed to the working area of the device manually.
Installation and adjustment of jointer knives
The first task that a craftsman faces if he wants to do a quality job is to create an even square workpiece. This article will discuss such nuances as installing jointer knives, their adjustment, and the principles of operation of the tool. In order to form a general picture, you need to consider techniques that allow you to keep your jointer in working condition, after which you can learn some features that should be taken into account when working. Many novice professionals have difficulty setting up knives; first of all, this article was created for them.
The work involved in removing or installing knives largely depends on the fastening mechanism and may vary. In most cases, even a novice will have no difficulty removing the jointer blade and putting it back.
It is not the installation of the knives that is of great importance, but the adjustment of the jointer knives and the adjustment of the tables. It often happens that workpieces have irregularities, for example, convex or concave
Before you rush to adjust the knives, you need to make sure that the problem is not related to the table. This is signaled primarily by concavities. This means that some part of the tables is tilted below the desired height. To determine the unevenness of the table, use a straight ruler. Convex edges indicate that the inside of the tables is excessively inclined towards the cutting head
It often happens that workpieces have irregularities, for example, convex or concave. Before you rush to adjust the knives, you need to make sure that the problem is not related to the table. This is signaled primarily by concavities. This means that some part of the tables is tilted below the desired height. To determine the unevenness of the table, use a straight ruler. Convex edges indicate that the inside of the tables is excessively inclined towards the cutting head.
Installing Windows on a logical disk partition
If the hard drive has primary partitions, even if Windows is purposefully installed on a logical partition, the OS will automatically convert it to the primary partition during installation. Windows is able to get out of this situation even when the limit on the main partitions is exhausted. The technical section will be arranged on any main section available for this purpose.
If the hard drive has only logical partitions, then Windows will not want to be installed at the stage of selecting a disk partition
It will be more convenient if there is no data on the hard drive or if it is not of particular importance
The problem can be easily solved using available tools from the OS installation disk itself:
- Existing logical disk partitions must be deleted using the “Delete” item.
- In their place, new sections will be created using the “Create” button.
- To access these buttons, select the Disk Setup option.
If the disk does not need to be divided into partitions, for example, a 60 GB SSD is used, then you do not need to create any partitions. All you need to do is set Windows to “Unallocated disk space”.
When there is a huge amount of data on the hard drive, you need to use special software to work with disk space.
Device and saw blades
In terms of design, these saws do not differ from most similar devices. This tool looks like a steel disk equipped with special teeth, which is connected to a motor that drives it. Depending on the configuration, some models may contain blades of various designs, a device for removing sawdust, etc. Tabletop models are also available for sale, intended for use in industrial production, in particular, for active cutting of plexiglass products.
Preparing to cut with these saws involves selecting the correct blades. Thus, for cutting plexiglass, it is recommended to choose consumables with a tooth density of at least two per centimeter. It is advisable that the blade be provided with a carbide coating, which will allow you to get the smoothest possible edge.
Safety during work
Safety precautions when using homemade and factory trimmers are no different. Basic Rules:
- The hand should not approach the cutting disc closer than 20-30 cm. When cutting small parts, clamps are used.
- Care must be taken to ensure that the electrical wire does not get caught in the cutting blade.
- Do not work outdoors during rain to avoid water entering the electric motor through the ventilation grille and socket.
- You cannot work tired, intoxicated, or with reduced reaction.
A circular saw is a very noisy type of instrument; long-term use of it has a negative impact on the hearing organs, so you must use headphones. Also with safety glasses, because... During the sawing process, a large amount of small sawdust is formed, which fly into the eyes.