In the industrial production of lining, powerful woodworking machines are used to produce products of excellent quality, but not all users can afford it. Is it possible to make lining yourself and what is needed for this? We will talk about this in this article.
Do-it-yourself lining
Lining
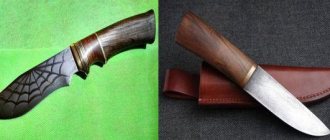
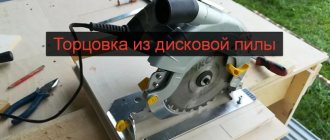
Manual device from an angle grinder
If you have a grinder on your farm, then you won’t find a better device for a hand-held circular saw. Don't know how to make a saw at home from such a popular tool? Don’t despair, because its manufacture only involves providing a sliding stop and an axial handle to an existing unit. The sliding stop includes in its design two pieces of metal corner of a small cross-section, located on both sides of the saw blade. Using bolts and nuts, the corners are connected from the front and back sides with a transverse ligament, and the technological gap between the sidewalls of the thrust structure and the working element will be provided with washers.
It is necessary to put a metal band clamp on the grinder so that its screw tie is located at the bottom, and a strip of galvanized metal with a hole for a sliding stop, folded in half, is fixed to it. In principle, a special clamp with a stand can be made as a single unit, but in this case the thickness of the metal strip will ideally be at least one and a half millimeters. Next, you will have to make a couple of holes for bolts in the gearbox housing of the future circular saw, for which it is disassembled and the drilling points are determined. Through the holes made, an axial handle for a circular saw assembled from a grinder is attached, since the existing handle will not allow for high-quality cuts, even if the master has remarkable physical strength.
The axial handle, which will be equipped with a grinder grinder, is made of a metal rod or tube. The shape of the design can be a transverse bracket or a kind of horn. The ends of the metal part with which the handle is attached to the gearbox are equipped with holes for fasteners. There is one important point here: the ends cannot be riveted in order to prevent the handle from bending during operation of the circular saw assembled with your own hands. It is also necessary to make an adjusting rod from a piece of metal rod (4 - 6 mm), for which we bend one end into a loop, rivet it a little and form a hole for the front stop bolt. As usual, we adjust the uniformity of the gap with washers.
At the other end of the rod, a thread is cut, thanks to which it is connected to the handle. First, one nut is screwed onto the thread, and after assembling the structure, a second one is screwed. By tightening and lowering the nuts of this device for a homemade hand-held circular saw, the depth of cut is adjusted. This is how, at home, you can convert an angle grinder into a full-fledged disk tool designed for cutting various materials. By the way, by remaking a circular saw from a drill, you can achieve a similar result.
Planing boards
The board becomes even and smooth after the jointing procedure. This is an extremely important stage and requires no less care and concentration. To do this, it is again necessary to reconfigure the machine. The boards are planed one after another, strictly on one side. Boards that have curled into a spiral during the planing process are immediately thrown away, because they are no longer subject to further use. To obtain even and identical boards in width, count how many times you need to pass along the machine and repeat the same number with each new board, applying the same force.
READ How to cut plastic panels correctly
When working on the other side, minor differences in thickness will not be noticeable.
The first thing you need to do is adjust the ruler by raising and lowering the table until you set the required depth for the groove. After this, cut out the grooves on both sides of the board. There is no need to cut grooves strictly in the middle of the board, making the groove a little closer to the surface - visually there is a feeling of a thinner lining than it actually is.
Using a hand router for carving
You can significantly simplify the process of wood carving with a hand router. This special electric machine allows you to perform almost all types of artistic carving much faster. The only exceptions are sculpted and notched carvings. A hand-held wood carving router is a specialized tool for wood processing. The main parts of the tool are cutters, heads with cutting parts of different shapes, each of which has its own purpose:
- profiling the edges of wooden parts;
- milling of decorative and technological grooves of various configurations;
- production of unusual parts;
- creation of artistic carved products using a hand milling machine.
Using a router, it is easy to make various elements of wood carving: wooden trim, carved plinths, carved cornices and a wide variety of moldings.
A hand milling machine can be used to produce exclusive custom-carved furniture with great efficiency. Artistic carving with a hand router is most often done with fillet and V-shaped cutters, which allow you to make engraving of the desired length. Disc types of cutters are designed for sawing rectangular grooves.
Block house machine
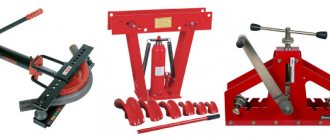
One of the varieties of lining (by the way, in enormous demand) is a block house. The material imitates rounded logs and is widely used for external and internal decoration of premises. It makes sense to cover houses with a block house, because such lining has a solid appearance, is durable and environmentally friendly, as it is made of natural wood. The panels are characterized by a complex shape, so the elements are connected using the “groove-tenon” principle. Making them manually is difficult and is fraught with “inconsistency” of individual “logs” in the future, so it is advisable to use specialized equipment:
- band sawmill;
- drying chamber;
- lining manufacturing machine.
When processing workpieces on machines, you can perform a number of operations:
- cutting prepared raw materials to the required size;
- surface milling;
- formation of recesses (grooves and tenons).
Where to begin?
First you need to find a separate room for work. Remember that machines and woodworking equipment create a lot of debris and noise during operation. You also need to consider the condition of the electronic wiring. It must be able to withstand long-term loads. Otherwise, the wiring may simply burn out.
Experts convince us that if you have the technical base, certain skills and consumables, you can make different types of lining, differing in shape, size and type of connections.
Manufacturing eurolining on a milling machine
This is more complex work; you will need solid experience working with woodworking machines. We will tell you about the technology, and select the dimensions of the lining and the profiles of the front surfaces yourself, taking into account the availability of tools and personal preferences.
The design of the machine is quite complex. Complete instructions must be included with such equipment.
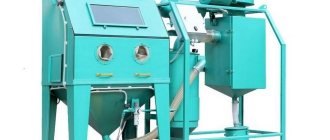
We see an example of a homemade machine for making lining, its components and details
We see another example of a homemade machine for the production of lining at home
How does eurolining differ from regular lining?
- The tongue/groove connection is deeper. Due to this, the risk of seams showing through during a significant reduction in the width of the boards is eliminated, and installation of the sheathing is simplified. It is easier to insert hardware for fastening into a deep groove.
- The reverse side has one or two slots - the wall surfaces can breathe, static forces are reduced when changing the linear dimensions of the lining. It is as a result of strong static forces that the cladding of a house can warp.
Photo - Eurolining category B
As the initial data, we assume that the boards of the required sizes have already been prepared, the material is sorted and folded in the proper place.
Step 1. Install a cutter on the machine to make a groove and a side decorative chamfer, adjust the depth. To do this, release the ruler, place the end of the board against the knife and, moving the ruler closer or further, find the desired position. Fasten the milling head and ruler with great force.
Mills used in the manufacture of lumber
In order to correctly align all the knives on the head, you need to plan a section of the board as a test. Next, place it again on the cutter and, slowly rotating the head in the opposite direction, check that all the knives are working. You can recognize this by the sound; if everything is normal, then the number of minor touches on the board should correspond to the number of cutters. For example, if the head has four knives, but you only felt three touches, then this means that one knife is not working. Find which one and adjust its position. This is quite difficult to do and will take several attempts. Make sure that the spacer wedges of the knives are pressed firmly against the head.
Knives
Several different knives-attachments for a homemade machine for making lining will allow you to create various wood products
Step 2. Attach the top and side clamps, set the desired distance. Such stops greatly facilitate the milling process, improve quality and increase labor safety. Pass all the boards on one side.
Step 3. Replace the cutter with a new one; it should cut the groove and remove the decorative chamfer. There is no need to re-adjust the clamps; the width of all boards is the same and did not change during the first pass.
Step 4. Remove the side cutter and release the ruler and clamps. Install a cutter to make recesses on the inside of the lining. The size and number of grooves do not matter; select them at your discretion.
Manufacturing eurolining on a milling machine
Industrial production technology
Lining - what kind of material is it?
You will need this knowledge in order to independently make the best decisions when making lining at home. The process of industrial production of lining consists of several stages.
- Making boards. The logs are sawn on band or disk sawmills into edged boards of specified parameters. The thickness of the board is in the range of 15-25 mm, width 100-150 mm. Specific dimensions depend on the type of lining.
- Drying lumber. The process takes place in chamber drying, which reduces the amount of waste and minimizes the risks of torsion and cracking of boards.
- Sorting. Lumber is sorted depending on quality. For the manufacture of lining, boards of at least second grade are selected.
- Manufacturing of lining. The process takes place on a powerful four-sided planer. By selecting various cutters and knives, four planes are processed in one pass, and the desired profile is immediately created on them.
Lining production line
- Quality control and product storage.
Warehousing of linings
That’s all the technology is, there is nothing complicated, modern equipment allows you to automate production to the maximum. It is impossible to achieve this at home; you will have to waste much more time making the forcing.
Table. Classes of lining and their description.
| Class or variety | Description |
Extra | Free from cracks, knots and other defects. The surface is perfectly smooth and even. |
A or 1 | The surface is smooth or slightly rough. There is 1 healthy knot per 1 linear meter (knot diameter no more than 1.5 cm). There may be cracks: hairline cracks - no more than ½ of the panel in length, non-through cracks - less than 9.5 cm in length (the exit of the cracks is directed towards the end of the panel), which appeared during drying - no more than the width of the panel. There may be tars and resin pockets of 2 pcs. at 1 m p. |
B or 2 | There are many knots, of which no more than 2 can fall out. per 1 m p. There may be through cracks up to 1 mm wide and up to 15-30 cm long, hairline cracks are allowed along the entire length of the board. The presence of wormholes (3 pieces per 1 square meter) and rot (no more than 1/10 of the panel) is allowed. Grade B lining is suitable for painting. |
C or 3 | The quality is low. Many different defects. This lining is suitable for upholstery of technical rooms or rough work. |
Classification of lining
Prices for lining
Lining
Stages of lining production
The process itself begins with drawing straight lines along which the sides of the boards will be sawn in the future. It is recommended to use green or blue pencils, this is necessary so that the lines are clearly visible in case the wood is damp and begins to turn blue. To cut the board, place it on the table top of the machine so that the previously marked lines are straight.
To cut the other side of the board, the machine must be reconfigured. To do this, set the ruler to the required width. It is common practice to use two clamps for fixation during processing. Then the second side of the board is sawed according to the adjusted ruler; when cutting the side without using a ruler, the output will appear sawn under the ruler. Put them in a separate place, we will need them for slats.
For those who are interested in how to determine the width of the slats, the answer is simple; for this, sawn-off lining is installed, which will be used instead of a ruler.
Now let's move on to the production itself. It’s worth noting right away that the process of making lining with your own hands is quite painstaking work. In order for everything to work out correctly and subsequently make you (or your customers) happy, you need to be patient. Otherwise, the finished products will turn out to be of different thicknesses and widths, which means that the appearance of the surface finished with clapboard will be spoiled.
The process of making lining with your own hands will consist of the following stages:
- First of all, we cut the boards into pieces of the required length;
- Next, the workpieces need to be sawn lengthwise to make planks of the required width;
- the next step will be jointing;
- Finally, we make grooves.
To complete the second stage, draw a straight line on the workpiece from one edge. To do this, it is better to use a blue or green pencil; it will be better visible on the surface. Next, using a circular saw, saw off one edge. It is better to process more boards in this way at once, so all the work will be completed faster.
The following steps will require your attention. It is necessary to rearrange the saw along the ruler so that the second cut accurately measures the width we need. After setting up the machine, we begin sawing off the second side of the future lining.
Next, let's start jointing. This process will give the workpiece a smooth surface, and will also make all products the same thickness. To ensure this happens, remember how many times you passed each side through the jointer. Then process all other workpieces the same number of times.
Milling lining grooves
For such work, it is advisable to have a universal woodworking machine. This device is equipped with all the necessary equipment for processing wooden workpieces. As a rule, such a machine is equipped with a jointing device and a circular saw. At the same time, it has a work surface convenient for processing wood. With such a machine, making lining with your own hands will not be difficult.
From the video you will learn how to make and use special clamps for more efficient milling of lining grooves.
While working, you should take advantage of some tips and recommendations from experts:
- First of all, you need to work correctly with the woodworking machine itself. When cutting blanks for lining lengthwise, it is necessary to lay the board on the work surface. Further, its movement towards the circular saw is carried out using the body. It is with them, and not with your hands, that you need to push the workpiece. In this case, the risk of injury is significantly reduced;
- so that the lining turns out to be the same width, when reinstalling the saw to cut the second side of the workpiece, you can use the finished product as a ruler;
- After all the work is done, you will be left with a lot of wood waste. You shouldn't get rid of them right away. When cutting blanks, you get a lot of thin planks; they can be used as slats to create sheathing. In this case, you will be able to save significantly on material.
After all the manipulations, you will have a finished, beautiful and practical lining. All that remains is to treat it with impregnations, and you can begin installation. Treatment with an antiseptic should be carried out on all sides, and not just on the front, this will preserve the strength of the material for a long time.
DIY installation
Before proceeding with installation, it is necessary to dry the lining. This will take several weeks. But then you won’t worry that the material will deform.
If drying did not take place inside the room where the finishing work will take place, the material needs a day to adapt to external conditions. After these recommendations have been completed, you can proceed directly to the cladding.
The lining fabric has a tenon on one side and a groove on the other. The latter should be located at the bottom during installation. This is necessary to prevent accumulated moisture from entering the structure.
The interior decoration of a house with clapboard can be carried out both from the ceiling and from the floor. But the first option is still desirable. Although the undercut can be hidden in the future using a plinth.
The slats can be secured in a hidden way using a clamp, or directly by nailing them to the lathing slats. The first option is more aesthetic.
Video - interior upholstery of a country house:
Varnishing or painting
To give the interior a finished look, you need to varnish or paint the lining. What is the difference between these procedures? Which composition should you choose?
The varnishes are based on several components. The appearance and application depend on them. There are varnishes:
- Acrylic;
- Polyurethane;
- Alkyd;
- Acrylic-polyurethane;
- Water based.
Video - painting wood:
Acrylic varnish dries quickly. It is suitable for both indoor and outdoor work. The varnish is not afraid of moisture and high temperatures. There are many colors and shades available for sale. Such a surface will be easy to clean from accumulated dust and dirt.
Alkyd varnishes take a very long time to dry. To speed up the process, you can use a special solution designed just for this purpose.
Another disadvantage is the unpleasant pungent odor. It is very difficult to remove it from the room.
The advantage is that after coating it forms a protective film against moisture.
The price for this varnish is higher, but its properties are much safer and more functional than other categories. The surface coated with this composition is very easy to clean.
Cost of work
Finishing with clapboard inside the house is a simple matter. It does not require special skills or years of training. You can perform this procedure yourself.
But if, due to some circumstances or other reasons, you cannot do this work yourself, you can hire a team of professionals.
The average price for interior cladding is 350 rubles per sq.m. This primarily depends on the complexity of the work, volume and premises. Rough finishing of utility rooms will be cheaper.
But for finishing work on an uneven surface you will have to pay a lot of money! The average price for the material itself ranges from 8 to 12 thousand rubles per cubic meter. m.
What determines the quality of homemade lining
Homemade lining
At home, all cutting parameters must be observed independently and quickly changed depending on the characteristics of the board and the capabilities of the machine. What should you keep in mind?
Pay attention to the location of the grain; never process lumber against the grain. Monitor the condition of the bearings
The slightest beating will certainly affect the roughness of the surfaces. As soon as it is discovered that the machine shaft is a little wobbly, the bearing must be urgently changed or, if possible, adjusted. Tenths of a millimeter of vibration significantly degrade the final quality. The serviceability of cutting tools is one of the important components of surface cleanliness. Saws and cutters must be sharp. If you make cutters yourself, then use only durable grades of tool steel. The geometry of all cutters must be the same. Otherwise, some of them will not work, and this is a very undesirable phenomenon. Position the cutters accurately, do not rush. It is very difficult for an inexperienced master to set all the cutters at once, do not be discouraged. Lose more time, but achieve the desired result. The lost time will be more than repaid in the future.
The cutters form the tenon and groove, and also determine the geometry of the lining
The more cutters, the better. If the head allows you to install four, then do so, do not work with two. Four cutters slightly increase the installation time, but then the machine works longer – they become less dull.
Set of cutters
Always use exactly the same wedges to secure the knives. Even small differences in mass cause head vibration. Vibration not only degrades the quality of processing, but also causes rapid wear of bearings and increases the risk of injury. Observe cutting conditions for lumber
We can talk about this topic for a very long time; cutting modes have a huge number of options. Beginning craftsmen need to become at least a little familiar with the theory, and in the future everything depends on the ability to learn practically and the desire to work with woodworking machines. Before feeding the board to the machine, inspect it, select the optimal cutting direction, taking into account the characteristics of the surfaces, the presence and type of knots and other defects. Place the finished lining in even stacks, do not place it vertically, and do not scatter it throughout the workshop. Cleanliness and order are evidence of the professionalism of the master.
The lining is folded in even stacks
If you have little experience, then the input/output of the board may be defective due to a slight change in the direction of movement and non-parallelism with the ruler. Keep this in mind when determining the length of the lining, make a reserve in length.
General requirements
On what machines and no matter what complexity you try to make lining, you must comply with the following requirements.
- Quality of lumber . Boards should only be edged, with the same thickness and width. Wide planes must be passed through a surface planer on at least one, and preferably on both, sides. For these purposes, it is better to have a double-sided surface planer at home, and if you don’t have one, then at least a basic jointer.
Jointer
Double-sided thicknesser
If there are no such machines, then you can work with a manual electric plane. This work is quite difficult and long, and the quality will always be much lower than when processing lumber on machines.
Practical advice! We strongly recommend that you do not plan boards with a hand-held electric planer. It is much more profitable to take the lumber to a friend who has a double-sided planer; in an hour or two of work you will pass 1-2 m3 of boards - this amount is enough to decorate a small country house. You will have to plan them manually for more than one day, and, as we have already mentioned, the quality will be poor. Such lining can only be used for finishing auxiliary premises.
- Drying. You can only work with lumber that has no more than 24% relative humidity. If the indicators are higher, then dry the boards under a canopy or in a ventilated area. The larger the gap between the stacks, the faster the lumber will get rid of excess moisture. Fold them carefully, do not allow any distortions to appear, place the spacers correctly, and be sure to press the top tier with a weight.
Drying the lining
- Job. Absolutely follow safety regulations. Statistics show that woodworking machines are considered the most dangerous equipment. Moreover, the injuries are very severe and often cause disability. This does not mean that machines should be feared, but they should be treated with respect. As for the use of mittens, this issue must be approached wisely. Mittens protect your hands from splinters, that's true. But it is also true that when the mitten gets caught under the cutting element, the hand or arm is pulled in, and injuries are much more dangerous.
Machine for making lining
We will tell you what machines and equipment you need to make lining with your own hands as the article progresses. The fact is that there are a large number of technologies, taking into account existing machines, it is impossible to describe everything in one article. Let's start with making the simplest lining - such work is accessible to most inexperienced craftsmen.
Price for the model range of jointing machines
Jointer
Characteristics and power
The functionality of using the equipment will depend on the correct choice of parameters, including speed indicators and drive power. The power rating is affected by the maximum permissible diameter of the toothed saw. It is believed that to process lumber with a thickness of about 10 millimeters, an electric motor with a power of 1 kW will be required. Based on the thickness of the processed and sawn timber, you should select the power of the electric motor.
Transmission from the drive in a self-made circular machine is best done using a V-belt. This allows you to ensure the necessary safety of using the equipment. When foreign objects get under the saw, the V-belt drive will slip on the pulleys, which eliminates injuries and jamming of the working disk.
Adviсe
- Even while working at the machine, do not remove the special protection (wedge and casing) from the saw. Many people mistakenly believe that these elements are necessary to protect the eyes from sawdust. Their main purpose is to prevent the wooden panel from flying back. The force of the blow can not only harm the master, but even pierce the abdominal cavity.
- In order not to be distracted by unnecessary objects and garbage while working, remove all unnecessary things not only from the table, but also from the floor. All attention should be completely focused on the work equipment or tool.
- If the length of the boards is more than a meter, it is not recommended to carry out the work alone. In this case, you risk not only your health, but also the quality of the lining. If you do not press the material against the ruler firmly enough, the linearity of the milling will be disrupted.
To learn how to make a lining with your own hands, see the following video.
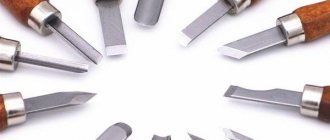
Types of wood cutters
In most cases, not all cutters will be needed, but only slotted ones. But others can also be useful for applying decorative notches. When purchasing a wood cutter for making lining, you need to consider the diameter of the shank. To do this, you should find out what collets are equipped with your existing manual router or machine. The most common cutters with shank diameters are 6.8 and 12 mm.
Inch cutters and regular cutters (with shanks measured in mm) are not interchangeable. That is, they cannot be inserted into a “millimeter” collet, although it seems that the difference is only tenths of a millimeter.
According to the design features of the cutters there are:
- Monolithic - cutting edges and shank are one piece. This is the cheapest and most common type. When the working edges become dull, the cutters are thrown away.
- With replaceable cutting edges, the double-sided knives are removable and can be flipped to the other side.
- Prefabricated - cutting elements are welded (soldered) to the main rod.
- For soft woods, high-speed alloys are used, designated by the letters HM.
- If the surface being treated is hard, then carbide steels - HSS - are used.
- Slotted straight cutters - with their help you can get a rectangular groove; the working part of the cutter itself has the form of a cylinder with cutting lower edges.
- Grooved fillets are similar to straight grooved ones with a rounded working edge, resulting in the shape of the groove in the form of the letter “U”.
- Groove fillet V-shaped - the tool is used to produce various V-shaped grooves; they differ in the size of the groove and the size of the angles.
- Groove structural - after milling, the groove has the shape of the letter “T”, turned upside down. Or “dovetail” - a groove in the form of an isosceles trapezoid that tapers towards the top.
- Groove shaped - needed for creating figured carvings, working with edges; the groove resembles a funnel and other symmetrical elements.
- Edge machines - differ in that they are designed for processing ends and edges; often the design includes a bearing for working according to a template.
- Edge straight lines - needed to obtain a right angle between the upper plane of the workpiece and the end part.
- Edge molding - to obtain a semicircular edge in the form of a wave, and of different shapes (depending on which part of the cutting plane is used), double cutters may have adjustment of the gaps between the cutter blades.
- Seam edges - allow you to choose a rectangular groove, a quarter on a flat or curved workpiece. The processing depth is adjusted using the position of the router or the diameter of the thrust bearing.
- Edge conical - needed for creating various kinds of decorative chamfers, for working with edges before joining them with other products, and so on.
- Edge fillets - with their help, semicircular grooves are obtained. To ensure that there are no distortions during operation, 2 bearings are provided in the design of the tool.
- Curved edge cutters (multi-profile) - to create complex-profile side edges, the length of such cutters is longer than conventional cutters; a powerful cutter is required for normal operation.
- Edge semi-rod - needed to obtain a semicircular protrusion at the end.
- Combination cutters are used to create tenon joints between several boards, both for corner and panel structures.
Most of all, the work will require tongue-and-groove cutters for lining. It is with the help of this tool that a tongue-and-groove system is created to connect the panels during assembly. They come in a set of two pieces. And for work you no longer have to calculate the dimensions of the groove and tenon.
There are varieties of tongue-and-groove regular paired cutters and those that are designed specifically for creating lining panels. The latter are distinguished by the fact that they allow you to simultaneously grind a groove/lock and round the edges on the front side. Using ordinary cutters, you can make flat panels from boards, for example, for a garage, where decorative chamfers are not needed.
Combined frame sets are kits; the blades can be positioned on the main axis, depending on what kind of work is supposed to be done. They contain: one or more thrust bearings, a lock washer and a clamping nut.
Figurine - needed for decorative processing of edges when creating panels. Since there is a bearing, both straight and semicircular surfaces can be processed. The diameter of the working edge of such tools is quite large, so powerful electrical equipment is needed to operate.
Trusted manufacturers
Today, there are hundreds of small and large firms in the construction industry. Experts recommend carefully studying all the nuances before contacting any of them.
The company has established itself as a reliable manufacturer of professional tools. End mills are designed for the manufacture of such products as lining, block house, eurolining. The kit includes two combined elements, a complex profile. This kit is good because it allows you to make a full-fledged eurolining strip in two passes, which can significantly reduce the cost of time and labor.
At all levels between the bearings, discs and nut there are installation spacers, thanks to which it is possible to easily adjust the gap between the discs. This will help adjust the gaps or tension of the tongue-and-groove connection. The carbide solders are soldered to a very high quality, without sagging or leakage of brass, and are made neatly.
"Inveld"
The company has been manufacturing carbide-tipped wood cutters for more than 20 years. One of the company's latest developments is a kit for making eurolining or simply lining. The set consists of two elements. One cuts out the front part, and the second makes the counter part.
The set is supplied in two types of configuration. The first variety is with an 8 mm shank. The second one has a 12 mm shank. This was done in order to work both on low-power milling machines and on more powerful equipment - milling machines. The design is collapsible. You can unscrew the fastening nut and remove the components, replace the bearing or sharpen the knives. Carbide knives, VK8 alloy. Soldered to the shaft using brass. They are easy to sharpen yourself with a diamond tool on the back of the knife.
"Slavic Courtyard"
This manufacturer produces options for four-sided and milling machines.
The Slavyansky Dvor enterprise supplies a wide range of models. They are intended for the production of all types of cladding boards (beams, linings, eurolinings, American boards, block houses). You can choose the type that suits you, either as a set or separately. With replaceable or brazed knives.
How to make a grinder at home
If we describe the design of the grinder quite simply, then it is a motor, 2-4 rotating rollers, one of which is adjustable, and a sanding belt. A grinder is usually distinguished from a manual grinder by a fixing stand with the ability to change the angle of inclination.
The stand is necessary for precision work. We decided to make descents - fix it, set the desired angle of inclination of the stand and start the grinder.
As for the adjustable roller, it is a must. After all, the sanding belt stretches over time, and subsidence forms. The roller is pulled up and the work continues. There is another important point: sanding tape is suitable only on an elastic basis. Otherwise, it will break under the load.
To assemble the machine at home, you will need:
- Think over the design of the device and make drawings.
- Prepare all the necessary tools: jigsaw, drill, ShMU.
- Prepare the parts required during the assembly process or arrange with a turner for turning them.
First you need to decide on the tape, or rather its length. For domestic use, the optimal option is 915 mm; this is the length with which the majority of Chapaevsky machines work.
The base for the bed must be more than 12 mm thick. Bolted connections in this situation are unreliable. It is advisable to use welding.
When turning rollers, the roughness index is important, which should be at least 1.25. Otherwise the tape will wear out quickly
If the machine is planned to be made with four rollers, then it is customary to use the following dimensions: 150 mm for the leading one, 100 mm for the adjustable one, and 70 mm for the remaining one. It is important to position them without distortions to avoid the tape slipping
The cost of a finished pulley starts from 2000 rubles. Somewhat cheaper you can order from private turners.
Grinder made by yourself.
Particular attention should be paid to the drive for the grinder. If it is not possible to acquire a specialized engine, you can use an alternative
It is advisable to use an engine with a power of 0.75 kW or higher, and a speed of 1,200 or more.
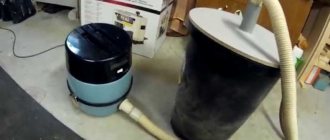
Homemade grinder with a washing machine engine
With a drive pulley size of 70÷100 mm, the motor for the grinder must spin up to at least 3000 rpm. The motor, removed from an old automatic washing machine, has low power (below 300 W). It is characterized by good reliability and is unpretentious in operation.
The popularity of using just such a drive is due to its wide distribution.
The drive from the washing machine must be included in the preliminary drawing. A do-it-yourself grinder at home requires a motor with an output shaft. In this case, the shaft has a threaded connection, the design of which allows it to be connected to the pulley without much difficulty.
From a drill
A grinder for a drill is a special attachment that can be made in several stages. There are hundreds of different manufacturing options. Let's consider one of the simplest and most reliable, step-by-step instructions:
- Everything necessary for work is prepared: shaft with gears, bearings and sheet metal.
- Two plates measuring 110x250 mm are cut out.
- The necessary holes are drilled on each of the plates. In this part the bearings will be fed for adjustment.
- Next, take a “hairpin” and cut it into 120 mm pieces. Homemade rollers are installed on studs and secured with bolts. The tape is stretched and fixed on the other side.
- A base is made for attaching the grinder. The machine is mounted on the bed, and the drill is fixed with clamps.
- A corner is sharpened and attached for convenient fixation of the knife during sharpening.
From the Bulgarian
The main design difference between an angle grinder and other types of power tools is that its output shaft is turned at an angle of 90º to the axis of the electric motor and, accordingly, to the housing. For this reason, it is called an angle grinder.
This feature is perfect for longitudinal fastening of the drive roller and the “electric file” blade. The result is a tool that is elongated in a line and very comfortable to use. The same attachment for a drill is located at a right angle to the body, which is quite inconvenient for work.
To make a device, it is enough to make a metal base for the rollers, tension the tape, and adjust the dimensions of the drive roller to the ShMU guide, and the machine is ready.
Tool for the job
In addition, for work you will need the following devices:
- cutters for lining. To do this, you can use a desktop universal lining machine;
- circular saw for cutting boards into the required lengths;
- measuring accessories.
It is also advisable to prepare special impregnations. Finished products are processed with these materials. As a result of impregnation, the lining will be protected from insects and mold. You can also use substances that protect the material from fire.
Let's take a closer look at a common option for producing cladding at home using a circular saw.
Work begins with preparing consumables and cleaning the workspace. It is necessary to accurately determine the amount of lumber. For production, you need planed boards, the width of which does not exceed 10 centimeters, and the thickness is from 1.5 to 2 centimeters. The use of larger boards is not recommended due to the type of connection between the linings.
As you work, position the lumber on one side of the circular saw and the finished product on the other. This will help maintain order and cleanliness in the room.
All boards must be the same length. If this is not the case, the material must be trimmed. Also carefully inspect the boards and evaluate the condition of their surface. If there are rotten, black knots, throw the raw materials in the trash. There is no way to get rid of such defects at home.
Pay special attention to the storage of workpieces. Watch not only the direction of the wood fibers, but also the location of various defects in the natural material. Every specialist will say that these are the most difficult elements to process.
When working, place the material so that the location of the fibers and flaws coincides with the rotation of the cutting device. If this rule is not followed, the surface cleanliness of the material will be unsatisfactory.
It's time to put out the circular saw. If there is a discrepancy in the width of the boards, it is necessary to align the lumber. To carry out this procedure, place the saw ruler at the required distance from the teeth and securely fix the element.
The standard lining is equipped with a quarter joint. You can make such a clutch using a regular circular saw. It is necessary to adjust the height of the table and the distance to the ruler. The fastening of the second element must be lowered and moved towards the saw. When working, carefully ensure that the planes are parallel. Distance – 1 centimeter. The ruler must be fastened firmly and securely.
Adjust the position of the table so that the teeth of the circular saw are placed at a height of one centimeter at the maximum point. As a result, the height of the saw and its distance to the ruler should be 10 millimeters. Check that the settings are correct using part of the board. Adjust the position of the elements if necessary.
Next you need to make the above type of connection. The first pass is carried out - the board is placed flat, the side plane is pressed against the ruler as tightly as possible. If everything is done correctly, then a characteristic type of cut should appear along the entire length of the product.
Never press down lumber by hand. Use a separate wooden block for this, otherwise it may cause injury. It is also prohibited to lean on the end of the board.
Then place the material on the edge. The cut is made from the side of the ruler. This way you cut out the “quarter” needed to connect the panels. Remove cut pieces from the work surface immediately to avoid cluttering the work space.
To finalize the connections, rotate the board 180° and perform the above procedure on the other side. The “quarters” on the lining should be placed mirror-like, that is, on one side of the panel the recesses are at the top, and on the opposite side, at the bottom. When installing the finishing material, the connections are overlapped, overlapping the joints with each other.
Craftsmen recommend processing the visible side edges of the lining using a hand router. The equipment you need is a standard milling machine.
Necessary equipment
First you need to select and prepare a large and powerful machine for work. A practical purchase would be a second machine. Due to the fact that even the most powerful machine will begin to overheat after a certain period of time, giving it the opportunity to rest and cool down will be a mandatory working moment. The required characteristic of the machine is a power of at least one kilowatt. It is required to perform two main functions - cutting and jointing, that is, leveling the wooden surface.
When giving preference to any model, pay attention to the presence of play - a gap in places where parts are adjusted. A high-quality woodworking machine, for example, an American one, does not exceed a width of fifteen to twenty centimeters
But the rulers and cooling system must also be of high quality.
Aluminum tends to leave black marks on wood. There is a possibility of applying stripes to the finished product with a jigsaw. As a result, defects adversely affect the appearance of the material after processing, and the finished lining must be painted when it was possible to get by with colorless varnish. For the operation of the saw, a specialized casing is designed, which is put on the base of the saw in order not to stain the wood, when both the table and the ruler do not have protective devices.
You can make alder lining manually, for example, with a milling cutter or using a circular saw. The milling method is of better quality.
Is it worth buying
It is not difficult to purchase a lining. There are different types of it on sale, they differ in the type of wood used, color, texture, shape of the outer surface, so you can choose a material that is perfectly suitable for any project. With all this, the lining has a significant drawback - the highest cost.
When undertaking a major renovation, it would be useful to consider the option of producing the lining yourself. It should be noted that even the most ordinary machine of this type will have a high cost, and before deciding to purchase, you need to evaluate its profitability.
Whether you need a similar machine in your home workshop or not is up to the master to decide; you can only give a few arguments in favor of the purchase:
- creating lining in a home workshop will allow you to significantly save on building materials;
- products made with your own hands will be of a higher quality in advance than similar ones going on sale;
- the machine can become a source of additional income due to the tangible difference in cost between edged boards and finished lining.
READ Laying tiles on moisture-resistant drywall
Also, we must not forget that this machine is multifunctional. The scope of its implementation is not limited to the creation of lining. With its help, you can make a number of other profiled wooden products, among others: platbands, skirting boards, figured slats for various frames.
Peculiarities
Before we begin describing the manufacturing process, it is necessary to understand what this product is.
Lining is a type of facing material that is a product of processing natural wood. It is used to design both simple (linear) and complex structures. Depending on the technical characteristics, the products are used for exterior or interior decoration. Externally, these are flat panels with special connections at the edges.
In the production of lining, various types of wood are used, both deciduous and coniferous: alder, cedar, ash, pine, beech and much more.
Wooden finishing combines excellent performance and aesthetic qualities. Due to these characteristics, finishing has become widespread. Lining is used for external and internal cladding.
Advantages of lining:
- aesthetic appearance;
- a wide range of products, differing in color, texture and performance characteristics;
- it is an environmentally friendly product, safe for health and the environment;
- high-quality material has excellent practicality and wear resistance;
- finishing material made of wood is a classic that is always relevant and in demand;
- simple installation process;
- natural finishes create a comfortable atmosphere in the room.
Flaws:
- high price;
- requires careful care.
This is interesting: Features of polyurethane sealants for external seams: let’s look at them from all sides
Choosing a location for installation
Correct installation of the machine for making lining at home is very important, since first of all you need to remember safety
Let's start with the fact that any woodworking equipment is classified as dangerous, so you are unlikely to be able to install it in the middle of your garden. Add to this the high level of noise produced by such machines, and there is a high probability of remaining sworn enemies with their immediate neighbors.
Basements and garages are ideal for placement, but they must meet a number of requirements, most of which are safety rules, and they must not be neglected under any circumstances.
So, what requirements must the premises meet:
- Concrete floor is required. The machines are installed with mandatory fastening to butterfly anchors and the base must be solid and durable.
- Maximum noise insulation. We've already talked about noise levels, so the more securely insulated your room is, the better.
- Humidity level. The tree should be stored in a dry, ventilated place. Otherwise, it will begin to deform and this will affect the quality of the finished product.
- Room dimensions. The average length of each panel is 3 meters, so our room must be at least 7 meters long in order to bring the workpiece into the machine and so that it has free space to exit.
- Availability of ventilation. Factory equipment is equipped with special forced exhaust hoods. It is unlikely that it will be possible to install it on a homemade machine for making lining, so chips will always fly in the room and must be removed.
- Convenient entrance. You need to easily bring long boards into the room, which will be very difficult to turn around, so ideally the machine will be located close to the entrance.
- It is mandatory to have high-quality electrical wiring that can withstand voltages of up to 5 kilowatts.
If your garage or basement meets all of the above requirements, then consider yourself lucky. If not, then something will have to be re-equipped and modernized.