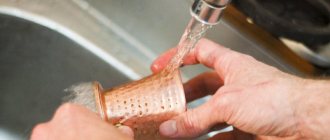
It often happens that a plastic part or its fastening bursts, comes off, and so on. I don’t really want to buy a new part because of some small fasteners. All that remains is repair by soldering and subsequent strengthening with soda and superglue. But first things first.
It may be that the part simply cracks: here you can immediately proceed to soldering. But it happens that the plastic is deformed, then before soldering it is necessary to return it to its original position, and this can be done with a hair dryer. After that, we take a soldering station (in fact, this is an ordinary soldering iron with a thin tip, the temperature of which can be adjusted, making sure that this or that plastic does not burn, but melts).
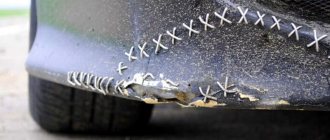
Carefully solder in depth, applying stitch by stitch, and solder 5-10 mm more than there is a crack. It may simply be that the crack is internal and is not visible on the surface. So we solder each crack, and in the end we get a similar web of seams.
We do the same on the back side of the part.
After this has been done, the seams need to be processed, made flush with the main surface, and the entire surface as a whole must be prepared, if, of course, this is required, but the most important thing is the seam. And we do this with ordinary sandpaper, about 100 grit.
Is that all? But no, now comes the fun part!
We need ordinary baking soda and any superglue.
On the soldered seam between the ties there is a space that needs to be filled in order to give the whole thing final rigidity and complete confidence in the reliability of the soldering.
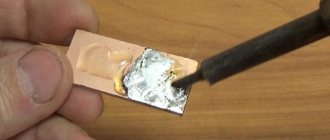
Take superglue and apply a thin layer of it to the seam. Make sure that each seam cavity is filled. Let it sit like this for about 10 minutes.
- After that, apply another layer of superglue and sprinkle soda on top of it all!
- If required, for painting, for example, the seam can also be treated with sandpaper.
The baking soda reacts with the superglue, after which it all crystallizes and you get a stone seam! All the space between the ties is filled and rigidly fastened, the seam is super strong, when you try it yourself, you will understand everything)
The fork shield was soldered in the same way. I didn’t process the seam, it just doesn’t make sense.
I hope that this method of repairing plastic will be useful to someone)
Source: https://PitBikeClub.ru/news/blog/paika-plastika-bez-armirovki-2083.htm
Welding with a hot air gun
This is a more effective way of joining polymer parts, used not only for repairing bumpers, but also for restoring a variety of plastic products. It allows you to more reliably fasten elements, spending much less time on work than with soldering. To use this technology, you need to prepare the same tools with materials as for soldering, excluding the metal mesh. In addition, for repairs you will need:
- hot air gun with a power of 1600 W with the ability to regulate the temperature of the supplied air from 100 to 700°C;
- Universal welding rods compatible with most plastics.
Professional hot air gun with different attachments
The technology for welding a broken bumper is very similar to soldering and differs only in the last stage:
- Having carried out the preparatory stage, align the edges of the cracks, secure them with clamps and grab them with a soldering iron, as described in the previous section. Reinstall the broken parts in the same way.
- Using a soldering iron, cut the crack along its entire length, making a recess where the welding rod will fit.
- Take a hair dryer heated to 400-600°C in one hand (depending on the type of plastic), and a welding rod in the other. Place its end at the beginning of the cut crack and heat it with a hairdryer at the same time as the surface of the bumper, holding the tool at an angle.
- When the rod begins to soften, begin to place it in the groove without stopping heating. Fill the cavity completely.
- For reliability, make several transverse seams, placing the softened rod directly on the inner surface of the body kit.
With such a rod attachment it is more convenient to weld a joint
If possible, use special welding nozzles for a hair dryer, into which a plastic rod is immediately inserted, so you do not need to hold it with your hands. Upon completion of the work, the repaired bumper must be repainted and polished.
Hot glue gun for welding with thin rods
Video material on welding plastic with a hairdryer
Repairing cracks in a plastic bumper is painstaking work that requires a serious approach. If you decide to do everything yourself, without having the relevant experience, expect to spend 1-2 days (depending on the damage). If successful, you will save a considerable amount, and if unsuccessful, you will always have time to buy a new body kit or contact a car repair shop, so you have nothing to lose.
Preparation of materials
The minimum set of materials may include metal mesh, plastic rods as solder, primer, putty, paint and an old bumper.
Metal mesh can be purchased at offline and online construction stores. Its cells had to be small (from 1 millimeter). Traditionally, steel mesh was used for the described purposes. However, recently many have begun to opt for a material such as brass.
The choice of primer has its own nuances. It is sold in different types and formats, but for working on a car it is best to buy primer in cans.
Putty should also not be neglected. No matter how carefully you seal the cracks, they still need to be additionally puttied - this is the only way to achieve an acceptable effect.
It is worth mentioning separately about solders. Each package of store-bought welding rods (solders) must be marked indicating a particular type of plastic.
The markings are as follows:
- ABS (acrylonitrile butadiene styrene);
- PA (nylon);
- PC (polycarbonate);
- PVC (polyvinyl chloride);
- PE (polyethylene).
If you don't know the type of plastic you have, pick up a rod that is similar in appearance and work with it on the back of the part.
The optimal thickness of the rods is determined by the seam. Thick elements should be used for deep cavities. And to embed reinforced mesh or to solder stitches on the outer surface of the bumper, thinner elements are used.
As for the old bumper, the need for it may be due, for example, to a shortage of plastic. In other words, this is only relevant for very serious damage.
Soldering large bumper damage
Repairing a plastic bumper with your own hands: features, instructions and recommendations
Numerous cracks, breaks and torn elements of the bumper are repaired using thermal methods, in particular, soldering. To complete this painstaking work, a small set of tools and materials is required:
- soldering iron with a power of at least 100 W with a wide tip and a wooden handle;
- thin metal mesh, specially designed for thermal bonding of plastic parts;
- knife, wire cutters for processing broken segments;
- screw clamp;
- sandpaper with fine and coarse grains for cleaning seams.
Powerful soldering iron with a wide tip
In preparation for soldering, paint must be removed to the base not only from cracks, but also from torn pieces of the bumper. Moreover, in this case, the body kit is not removed from the car until all the breaks are fastened and fixed by soldering, otherwise the element will lose its exact shape.
The soldering technology is implemented in the following sequence:
- After stripping, wipe the area with degreaser and let it evaporate.
- Align the edges of the cracks and, if necessary, secure them in this position with clamps.
- Using a heated soldering iron, make tacks along the length of all cracks. For high-quality heating, the tip must be immersed in the plastic to a depth equal to half the thickness of the material, and then level the surface of the molten plastic. The distance between the tacks is 1.5-2 cm.
- When tacks have been made on all the cracks, you need to put the broken piece back in place. Fit it to the hole and trim it if necessary so that it fits flush with the surface into the hole.
- Solder the torn segment using tacks, then repeat the operation from the inside. After which the bumper can be carefully removed from the car and work can continue in more comfortable conditions, although this is not necessary, depending on your convenience.
- Perform continuous soldering of all joints on both sides of the body kit. To prevent adjacent tacks from moving apart due to heating, the seam must be soldered with gaps. That is, first the first section between the tacks is welded, then the third, fifth, seventh, and so on. When finished, go back and solder all remaining sections.
- Cut the mesh into pieces 2-4 cm in length. They need to be soldered across the seam in the most intense places - along the edges of cracks, in the middle, at the junction and near the stiffeners. The technology is simple: a steel mesh is placed on the seam and, heated by a soldering iron, immersed in the polymer base of the bumper. At the end, the softened plastic over the mesh needs to be smoothed out.
Bumper cleaned and ready for painting
At the end of the soldering procedure, sand the surface of the element, then degrease and paint it in the required color. During further operation, be more careful, since a strong impact may cause the bumper to shatter into pieces, tearing in the same places. To fasten it more firmly, you should use another method - welding with donor plastic.
Photo instructions for soldering the bumper
All joints are carefully cleaned of paint. Fixing the crack with tacks. The fracture is now held on by tacks. The broken piece is clearly adjusted to fit the opening. The fragment is also secured with tacks. All seams are fixed at several points. Fully soldered joints. All soldering operations are repeated from the inside of the bumper.
Electrode welding
Making a case for a stealth subwoofer with your own hands
Recently, technology using special flat electrodes has become widespread in the repair of bumpers and other plastic products. The equipment used is construction hair dryers with special attachments. The nozzle of such a nozzle has a diameter from 2 to 10 millimeters. This size is needed to obtain a high temperature in one local area - the electrode will melt more efficiently.
Such electrodes are commercially available. There is a large selection for both polyurethane and polypropylene bumpers. It is worth knowing that the electrode for different materials cannot be interchanged.
For work, a heat gun with a smooth temperature change function is used. This can be explained by the fact that different polymer materials have different melting points. Next, the welding work begins.
Features of sealing polyurethane parts
Polyurethane materials have a lower melting point than polypropylene materials, and when heated above +220°C they begin to collapse. Therefore, it is important not to overheat the part, otherwise the polymer will become brittle and lose its properties. Also, when performing preliminary preparation, the ends of the cracks in the polyurethane bumper are not drilled.
- The splits are reinforced with a special mesh or staples from a furniture stapler.
- For a heat gun or hair dryer, select a nozzle with a 10 mm nozzle.
- Then 8 mm wide polyurethane electrodes are laid on top and melted with a construction hairdryer. In this case, the polymer should melt quickly, but without evaporation. Just as in the case of a propylene product, the strips are fused starting from the middle of the crack, then the middle of the half, and so on.
DIY plastic bumper repair
Making an electric air compressor 220v with your own hands
Repairs begin with the preparatory stage:
The bumper is dismantled and placed on a workbench or table of a suitable size.
This is done carefully so that the gap or fracture does not increase in size. But even when it comes to removing a scratch, it is more convenient to repair the part when it is removed from the car. Remove dirt and wash the entire surface using cleaning products.
Dry. If a crack is being repaired, then holes are drilled along the edges with a thin drill so that it does not increase in size. Using sandpaper, a grinding machine or a drill with an attachment, clean the plastic on the front side in the area of damage. The boundaries of the cleaned area should be at a distance of 20-30 mm from the crack or break. If a bumper made of thermosetting plastic is being repaired, then along the entire length of the crack or along the perimeter of the break, cut a chamfer with a milling cutter to a depth of 2/3 of the thickness of the plastic. Clean (blow away) sawdust and shavings from the surface. Depending on the material, the repair method is chosen.
Attention! If a through break is being repaired, then an insert is prepared for thermosetting plastic, and a fiberglass patch is prepared for thermosetting plastic. The contour of the insert should follow the contour of the break as accurately as possible, and a 45° chamfer should also be made along the edge of the insert for welding
The fiberglass patch should cover the crack or break by 2-3 cm at the edges.
Repair of thermosetting plastic bumper by gluing
The most difficult type of damage is sealing a break. A crack can be considered as a “special case”, and it is easier to seal it. The through hole repair algorithm looks like this:
- Turn the bumper over with the “wrong” side up. Secure it to the workbench with clamps.
- Clean the repaired area with sandpaper or Scotch Brite at a distance of up to 50 mm from the edges of the break (crack).
- Apply the first layer of two-component polyester or epoxy adhesive.
- Impregnate the fiberglass patch with glue.
- Apply a patch to the break (crack).
- Several more of the same layers are applied so that their total thickness is approximately equal to the thickness of the bumper. For each layer, prepare a separate portion of glue. Waiting time between coats should be about 15 minutes.
- After the glue has polymerized (about an hour), the bumper is turned over and the surface is leveled flush using putty.
- After the putty has dried, the surface is sanded in 2-3 stages, reducing the grain size of the abrasive.
- Then the bumper is degreased, primed, sanded and painted.
Welding thermoplastic plastic
Before repairing a plastic bumper by welding it yourself, the edges of the crack or insert with the bumper are brought together and secured using “auxiliary plates” from the inside of the part.
Soldering is carried out from the front side. To do this, you need a construction hair dryer with a special attachment in the form of a narrow nozzle. Small cracks can be repaired using a regular soldering iron, but large cracks must be “grabbed” from the face in several places before soldering.
The process of welding plastic is similar to welding metal using wire, only instead of it they use a rod or cord made of the same material as the bumper. You can buy it, or you can make it yourself if you find a suitable piece of an old bumper at a car dismantling station or at the nearest service station.
The most difficult moment is selecting the temperature in the welding zone. Each type of plastic has its own and is usually controlled by the condition of the rod. First, you need to warm up the plastic of the bumper, first the seam, and then the “tail” of the rod. When the rod becomes “soft”, it is pressed at the beginning of the seam so that it fits into the groove. Then slowly move the hair dryer nozzle, simultaneously heating the bumper and the rod, and fill the seam with plastic.
Advice! As a control “touch”, it is better to solder the seam again with a regular soldering iron from the inside and the front side.
Sealing cracks with fiberglass
If repairing the bumper by soldering is not possible, gluing the crack with fiberglass is used. This process is somewhat more complicated, but after such a repair, traces of restoration work will not appear, and the bumper will look like new.
Preparatory work.
After removing the damaged element from the car, it is thoroughly washed.
Using coarse sandpaper, the entire surface near the crack is cleared of existing paint and primer; as a result, a small area, approximately 5 cm on each side of the crack, around the work site should not be covered with anything.
There should also be no burrs along the edges of the crack, the surface should be smooth.
Then, using a drill with a thin drill bit, you need to drill out the edges of the crack so that it does not increase in the future.
Some people also recommend making a few holes or indentations around the crack to make it easier for the adhesive to adhere to the surface. But making holes is not necessary.
Having finished with the holes, the surface is sanded again to remove burrs from the drill.
If one edge of the crack extends to the edge of the bumper, you can use a clamp to secure the edges and prevent them from diverging during the work. After this, the entire prepared surface is degreased.
Surface gluing.
Having finished with the preparatory work, you can begin gluing the damaged area.
Thin fiberglass fabric is used to seal the outside of the bumper.
Two flaps are cut out of it according to size, which will cover the entire length of the crack, as well as the cleaned areas adjacent to the crack.
Then you will need an adhesive. It is made from epoxy or polystyrene resin and hardener.
After stirring the adhesive according to the instructions, apply a layer of the compound with a brush onto the prepared surface along with the crack.
POPULAR WITH READERS: Ordered to survive: how winter use ruins a car
Then one piece of prepared fabric is applied to this layer, which also needs to be thoroughly coated with the composition so that it is well saturated.
Afterwards, another flap is applied and also covered with glue. The applied composition together with the fiberglass should dry well.
Sealing the crack from the inside is done identically to that described, but it is better to use thicker fiberglass fabric.
After gluing the inside, no further work needs to be done.
The final stage of work.
After the applied layer has completely dried, you can begin leveling the surface. To start, use coarse sandpaper.
Particular attention should be paid to the junction of the applied layer with the surface of the bumper. This joint is processed until the transition is visible and tactilely felt.
Then the surface is once again well processed, but with medium-grain sandpaper.
Having finished with the pre-treatment, putty the surface to repair all small scratches and irregularities.
After the putty has dried, the surface is treated with fine-grained sandpaper to achieve a completely flat surface.
Subsequently, the restored area is primed, after which a paint coating is applied.
The difficulty of applying paintwork lies in the correct selection of paint, otherwise the sealed area on the bumper will differ in color. And if the area of the restored areas is large, the best option would be to completely repaint the bumper.
Work order
The sequence of work to restore and solder the bumper can be represented as follows:
- first of all, the plastic bumper, which needs repair, is carefully removed from the car;
- Next, you need to wash it, degrease it and get rid of dirt and debris, remove the paint and varnish mixture from the damaged area;
- if the bumper splits into several pieces, then they are combined into the original integral structure, joining the edges;
- Now you can begin the soldering process, which boils down to progressive movement of the soldering iron tip from one edge of the crack to the other with a slight recess of the tip into the body of the bumper;
- then the plastic that was squeezed out during soldering is leveled over the surface with a soldering iron;
- After this, you don’t need to do anything on the inside of the part; the soldering area will still not be visible. And on the outside, you will need to treat the surface at the crack site - sanding, puttying, painting.
Sometimes bumper soldering is carried out using reinforcing mesh. This mesh should be used correctly for large and serious cracks. The peculiarity of this method is that after removal and cleaning, the master must “sink” the mesh into the plastic. That is, the mesh for soldering bumpers is carefully applied to the inside of the part and heated with a soldering iron. And when the temperature of the mesh becomes sufficient, you just need to press it into the plastic with a screwdriver.
In some cases, craftsmen first, in addition to the mesh, install brackets or fasteners on the bumper to tighten the crack. The features of this procedure will be discussed in the corresponding section.
Final stage
You can ruin the soldering result with your own hands, even if you carefully follow all the instructions.
The fact is that after soldering you still need to pay attention to car repairs: Putty
Use putty to smooth out the seam on the bumper that was left by the mesh and the soldering iron. Most often, motorists choose a polyester substance - it does not need to be prepared for work for a long time, but simply mixed with a hardener with your own hands
Putty. Use putty to smooth out the seam on the bumper that was left by the mesh and the soldering iron. Most often, motorists choose a polyester substance - it does not need to be prepared for work for a long time, but simply mixed with a hardener with your own hands.
Bumper repair result
- Primer. Many people are interested in how many layers of primer should be applied. In most cases, it is enough to carefully walk the substance over the surface of the machine once.
- Painting. Wait fifteen minutes for the primer to dry and begin painting the bumper. You can do this in two ways - by applying paint with a brush or by spraying it with a special aerosol.
Bonding technology
Repair consists of several mandatory steps that cannot be skipped or swapped.
- Removing the bumper. If the plastic cover is cracked in several places, before removing it, you need to secure it with tape from the outside (so that the part does not fall apart).
- Preparatory work includes choosing an adhesive composition, selecting tools, cleaning the bumper, and preparing the surface. All work is carried out in a warm, well-ventilated area.
- Gluing process.
- Grinding.
- Painting.
Glued bumper
If it is necessary to repair a small crack, chip or deep scratch, after preparing the bumper, glue is applied from the outside, filling the gap with the composition, and lightly pressing the plastic. If the crack is significant and crosses the edge of the lining, use epoxy glue and fiberglass.
Preparation
Preparing the bumper before gluing it with epoxy glue and fiberglass in steps (if there is a significant crack):
- Wash the bumper and dry it.
- Sand the damaged area with coarse sandpaper, this will increase adhesion, and degrease with white spirit.
- Correct the fracture site.
Coat all cracks on the outside with hot glue (use a gun) or plasticine. This will prevent the epoxy from leaking out during drying and seal the future seam. Seal the outside with tape over hot glue. This will additionally maintain the shape of the bumper during the repair process.
Materials and tools
If there is a large gap, the bumper on the car must be sealed with two-part epoxy glue, which is diluted before the main work. The assorted two-component compounds “Khimkontakt-Epoxy” and the one-component “Nowax STEEL EPOXY ADHESIVE (steel 30 g)” earned good reviews from drivers.
What you will need for work:
- epoxy - 300 g;
- fiberglass - 2 m;
- brush;
- automotive primer, degreaser, auto enamel;
- sandpaper, scissors.
All work is carried out at a temperature of 18-20 degrees. The epoxy glue hardens for up to 36 hours; during this time, the bumper cannot be turned over and the adhesion strength must be checked. If the adhesion of materials is disrupted, in winter the inside of the glued patch may crack.
Repair process
Measure the required amount of fiberglass to cover the entire fracture area and cut it off. Craftsmen recommend using fiberglass rather than fiberglass to glue the bumper to the car. The material will increase the density of the seam and its strength.
Dilute epoxy glue if using a two-component composition. Take 10-12 parts of resin, 1 part of hardener, mix thoroughly. Leave for 5 minutes in a warm place (20-23 degrees).
Repair process step by step:
- Coat the inside of the body kit generously with glue.
- Apply fiberglass fabric, press it to the bumper, soak it with glue, make sure that no air remains.
- Apply glue and glue the fabric in 2-3 layers.
- Apply the last layer of glue.
- Place the bumper in a warm place for 24 hours, preferably in such a way as to reduce the stress on the crack, but not on its side, since the resin will drain as it hardens.
Bumper painting after repair
The final stage is putty and painting. After the glue has dried on the outside of the bumper, the bumper is sanded and primer is applied, and after drying it is painted.
Requirements for tools for soldering plastic
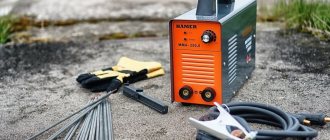
To perform the work, you can use a set of tools:
- Soldering iron;
- Scissors, tweezers, extruder;
- Set: construction hair dryer with nozzles and plastic electrodes for welding;
- Orbital grinding machine (OSHM);
- Fiberglass repair kit;
- Suitable supplies: staples, aluminum, copper or steel chicken wire.
First of all, you should remove the burst part from the car body.
This is done, firstly, for the convenience of repairs and to avoid excessive tension of the material in the cracks to the points of attachment to the machine body. The dismantled part is cleaned of dirt deposits and washed thoroughly.
After which the broken parts are combined with each other. If desired, they can be secured with tape on the outside of the bumper. Next, the soldering iron heats up and painstaking work begins.
A soldering iron and a hair dryer for plastic must be selected in accordance with the basic requirements. Such devices must:
- be ergonomic;
- heat up quickly;
- do not overheat the plastic.
The tool should not be heavy. It also makes the work much easier if the soldering iron has a light bulb that illuminates the soldering area. To make the soldering iron heat up faster, you can grind off the tip of the tip. If you often use a tool at work and it begins to heat up more slowly over time, then you need to clean the sockets. This can easily be done with your own hands.
Unscrew the bolts, remove the tip and, using fine-grained sandpaper, clean the joints. A burnt out or broken tip can be replaced with ordinary steel wire. For plastics, 100-watt devices are usually used.
When working with plastic, it is better to use a special hair dryer for welding plastic. It operates in a temperature range from 0 to 650 degrees Celsius and has air supply in 10 positions. The plastic hair dryer is programmed for welding, paint removal, bending, and there is a “soldering” mode. The average retail price of a “hair dryer with attachments” set is 3000-4000 rubles.
Such a device is not cheap and is most often used by craftsmen who do professional repairs. To perform one-time work on restoring a broken plastic structure with your own hands, you can use a construction or installation device of one hundred watts.
Repair procedure
First, let's look at repairing a part made of polyurethane, that is, made from thermosetting plastic, and show you how to seal it with your own hands. Therefore, we will carry out the work using glue, which is on the shopping list - at the moment it will be liquid polymer and fiberglass.
To repair a plastic bumper with your own hands, you need to start by disconnecting it from the supporting body of the car. If you have problems with this, there is a lot of educational material on the Internet about how to remove the front or rear bumper of a car. There is nothing complicated about this, it’s just that each car model has its own nuances.
Repair using fiberglass and liquid polymer
After the bumper is removed, you can proceed directly to repairing the fiberglass. To do this, you need to perform a number of works listed below.
- Wash the bumper well, dry it or wipe it with a cloth. Next, remove the paint coating from the damaged surface, as well as the varnish applied in several layers that is present on the part. The area of the crack and its surroundings should be thoroughly sanded, and then the entire surface to be repaired should be degreased.
- After the work has been done, you need to prepare the fiberglass. To do this, you need to measure the length of the crack on the bumper and cut off the appropriate piece.
- Connect the ends of the crack and apply glue in an even layer to the surface of the bumper, so that the part is coated on both sides of the crack along its entire length.
- Carefully place the fiberglass over the crack so that it runs along the center of the applied strip of fabric. Next, apply glue to the fiberglass in several layers until a white color appears.
- All that remains is to seal the glue. To do this, you need to roll the roller over the entire surface of the fiberglass. The movements should be such that the glue is forced into the fiberglass. That's it, wait for it to dry.
- After the glue has dried, you need to sand the surface until it becomes completely smooth.
- Apply putty in several layers and dry. After this, sand the surface again until perfectly smooth.
- Before sending for painting, it is necessary to thoroughly prime the area where the bumper is being repaired. It is better to apply the primer in several layers.
- Then painting work can be done.
Fiberglass strip filled with epoxy resin
These are the work regulations that will have to be followed to obtain an ideal result when repairing a polyurethane bumper with your own hands, using liquid polymer and fiberglass. Now the repaired surface looks like new.
All that remains is to find out how to repair a bumper with your own hands, made of thermoactive plastic that can be easily welded.
Welding the bumper with a hot air gun and solder
Having considered the question of how to make a bumper almost new using fiberglass and glue, let's move on to repairing a crack in the bumper using welding.
To begin the process, you also have to clean the damaged surface from dirt, rinse thoroughly and dry.
After this, you need to select a plastic solder that matches the parameters of the bumper. That is, the letters on the back side of the bumper must be the same as those written on the solder material.
You can start working.
- As in the previous case, you need to sand the area that will be subjected to heat treatment.
- Next, use a soldering iron to make an even groove along the entire length of the crack in the bumper being repaired. Try not to overheat the surface to avoid smudges.
- The next step is to weld the crack. To do this, the welding rod must be inserted into the groove made, heating the bumper and the rod at the place where the material is fastened with a hairdryer. All parts of the plastic will fuse into a single mass, forming a strong, unbreakable seam.
- The same must be done on the reverse side of the unit being repaired.
- To strengthen the weld seam, you need to make crossbars, for which use a soldering iron to make grooves across the seam and insert short pieces of solder into them, performing the same operation as in the case of the main seam. Crossbars must be made every 3-5 cm, starting from the outer end of the crack.
- After the plastic has hardened, sand the entire surface until a smooth surface is formed. Treat with putty, again bring the seam area to an even state, apply a layer of primer.
After applying a couple of layers of primer, you can begin to restore the paintwork.
A visual example of laying a repair rod TIP – To obtain a welding rod, use pieces of old plastic with similar markings. Now that you have repaired the car bumper with your own hands, it has acquired the appearance of a new part. After painting, traces of repairs will be invisible.
How to restore fiberglass and hard plastic parts
If the body kit is made of hard plastic or fiberglass, do-it-yourself repairs of plastic bumpers are carried out using the gluing method. This restoration method is most popular for fans of auto tuning and repair of body parts of VAZ family cars. In this case, after cleaning and thoroughly washing the part, the following actions are performed:
- Treatment of crack edges. After tearing, the edges of the cracks in fiberglass bumpers are framed by threads of material that do not allow the parts to fit tightly together. Interfering fibers are removed using a universal grinder (angle grinder), usually called a grinder.
- We combine the joined fragments and fix them on the front part with tape or special glue
- Next, epoxy resin or a more modern material is prepared - polyester resin , according to the instructions from the manufacturer
- From the wrong side, lubricate the crack and an area 50 mm wide next to it with the prepared composition.
- We impregnate a thin fiberglass mat with the same mixture and apply it to the fracture
- We apply layer after layer of glue and fiberglass until the thickness of the patch is comparable to the thickness of the bumper at the defect site
- We are waiting for the fiberglass to harden and move on to sealing the front side
- Using a grinder, we make a V-shaped groove on the outer surface so that the edges of the break gently converge towards the patch
- We fill the resulting groove with fiberglass impregnated with polyester resin until it is completely level.
- After the repair compound has hardened, we grind the ESM
How to solder a bumper using improvised tools?
Even a bumper that has burst in two halves can be repaired. Moreover, for this you will need only the most basic things: a soldering iron, a mesh (graph paper), scissors, a flat-head screwdriver and a little patience.
To properly solder the bumper, it is advisable to remove it from the car and sequentially perform the following steps:
- Turn on the soldering iron (100-watt) until it reaches maximum temperature;
- Place the bumper on a rack or table;
- Connect the broken parts as evenly as possible and solder the plastic on the front side;
- Use scissors to cut the mesh (choose the size depending on the damage, you can, for example, cut pieces of 10x10 mm or 10x5 mm);
- Turn over the plastic part (it is advisable to first lay a soft cloth on the rack so as not to scratch the paint);
- Place the mesh on the plastic and heat it with a soldering iron, then press it in with a screwdriver;
- If the damage to the bumper is significant, then solder the front part with mesh. This will further strengthen the seam;
- Use a blade to cut off any burrs left after soldering.
By performing the steps in this order, it is easy to solder the plastic parts yourself, and they can be from any car. After soldering, you should level the seam with a special putty for plastic, then fill it with primer and paint it.
Soldering should be taken quite seriously, because it is the foundation for future materials. It would be nice not only to know how to solder a bumper yourself, but to be able to do it in practice!
General information about the subject
External plastic structural elements are mainly made of thermoplastic plastics. The technology for restoring such products is based on welding, which allows you to get rid of through cracks and even recreate broken fasteners. Actually, the procedure is not much more complicated than preparing and spray painting a damaged area of a car body.
Some car enthusiasts claim that we simply repair the bumper with our own hands using metal brackets. But an experienced car owner knows that like can be treated with like, that is, repair plastic rods are used for soldering. Their composition, color and profile are different; the required rod is selected according to the markings on the buffer.
You need to know the material!
Making the right choice means guaranteeing quality repairs, because inappropriate materials can significantly shorten the life of the automotive element. To find out what a cracked bumper is made of, just carefully examine the inside of the part. Depending on the labeling, the following conclusions are drawn:
- PP – polypropylene base.
- ABS (GF, PAG 6) – hard plastics.
- PUR – polyurethane.
Welding plastic requires high temperatures, for example, 400-450°C is suitable for propylene, and 500°C is necessary to restore an ABS structure. Many car owners learn how to repair a bumper with their own hands in a video where craftsmen use an ordinary 100 W soldering iron.
You can also restore a damaged part using pieces from a bumper with similar markings. They are cut into strips 8 mm wide for PUR, and 4-5 mm wide for polypropylene.
Almost any breakdown can be treated by welding, even broken parts can be reanimated. However, no one has canceled the economic feasibility of such work, since the restoration of numerous defects can hardly be called justified. The cost of a complete restoration and painting will be more expensive than a new buffer.
putty and painting. Do-it-yourself bumper repair: putty and painting video
Puttying a plastic bumper before painting.
Well, instructions on how to dilute putty for plastic.
DIY bumper repair: putty and painting video
Do-it-yourself bumper repair: putty and painting video
Fill the resulting seams on the surface of the bumper with glass fiber putty. Despite the fact that the cost of most putty mixtures does not exceed 500 rubles, many car enthusiasts are interested in how to make putty for a bumper
with your own hands.
DIY textured putty
The car bumper is perhaps the part that suffers most often as a result of an accident, and not only that. Puttying and sanding the bumper.
| Bodywork information | 1152 |
| Let's consider the technology of correct | 7844 |
| And, of course | 2700 |
| Make sure you have availability | 880 |
| Home Repair by yourself | 8165 |
| Well, let's | 5490 |
| Although you can get by | 5586 |
Puttying and painting are inevitable processes.
Do-it-yourself bumper repair: putty and painting video
Emery wheels, solvent, putty, primer, paint and varnish; Technical devices to ensure respiratory safety. Do-it-yourself bumper repair and painting.
Puttying and painting of a car bumper, necessary materials and putty for this; a primer with a composition suitable for use on plastic after puttying with a special compound.
DIY bumper repair: soldering, putty and painting.
So, let's assume that you have figured out the putty; upon completion, you need to wait some time for the putty to harden.
How to properly repair a bumper yourself?
Assembling the electrical panel with your own hands
A grinder (its presence is very desirable, but if the crack is large, then it is simply absolutely necessary).
- DIY oscilloscope on a microcontroller
- DIY magazine beads
DIY frame buildings
A plastic bumper has an attractive appearance, its production is much cheaper, it weighs less than its metal counterparts and, as practice shows, repairing a plastic bumper is much easier to carry out. . To prove the latter, I bring to your attention a detailed photo report on repairing a plastic bumper, VAZ 2114, with your own hands, that is, at home.
DIY gear reducer
Putty, primer, paint and varnish.
The first step is to remove the damaged plastic bumper.
- DIY Caesar dressing
- DIY pots for aquarium plants
DIY graphic equalizer
It is quite difficult to clean everything manually, and it will take a lot of time. Alternatively, you can use an electric drill with attachments.
Recovery stages
Repairing a plastic bumper with your own hands requires full responsibility and a serious approach to the matter. It is best to find a specific place and create a home service where no one will interfere. The technology involves several stages and will take some time:
- Preparation of the damaged part and material.
- Processing the bumper from the inside.
Repairing a plastic bumper with your own hands requires full responsibility and a serious approach to the matter.
- Work on the front side: alignment.
- Applying primer.
- Alignment.
- Grinding.
- Puttying, if necessary.
- Painting.