Electrician in the house
Encyclopedia about electricity from A to Z
Masters catalog
Find the best master or company in your city
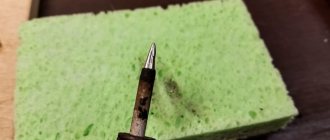
Soldering example
A soldering iron is a must-have for every home DIYer. With its help, with minimal knowledge of electrical engineering, you can independently eliminate most minor and visually visible breakdowns of household electrical appliances.
We'll tell you how to solder wires. In addition, we will describe how to restore functionality if cables are damaged, using the most common connector standards.
- The progress of soldering from start to finish What is needed for work
- Getting the soldering iron ready
- Soldering wires
- Connection of wire, contact or terminal
- Stranded wires
- Wires in insulation
- Enameled wires
- Cables made of several insulated wires
- Cables with RJ 45 connectors
Physics of the soldering process
This process is used to join metals. Occurs under conditions of elevated temperature sufficient to melt the consumables used, which fill the gaps between the adhesive surfaces and ensure their bonding due to crystallization of the applied seam.
Knowledge of the physical properties of soldering ensures widespread use in various fields. It is used in the manufacture of electrical appliances, equipment components, in energy and a number of other fields.
How to solder with a hairdryer correctly
It is necessary to cover all small components that are vulnerable to overheating with protection.
In this case, aluminum tape is used. It protects components well from temperature and holds the board components tightly. However, it adds heat capacity to the soldering area. Thermal tape also protects well, but sticks to the board less well.
The board is placed on a material that has the least heat capacity and slowly releases temperature to the environment. You can use, for example, a wooden plank. And at the same time, the soldering area should not be inclined.
It is best to apply flux to the contacts. It distributes heat well compared to heated air, but you should not add too much of it. It may boil, hiss, or interfere with soldering.
The first step is to warm up the soldering area. The hair dryer is set to about 100 °C and maximum air flow.
It is necessary to warm up both the part itself and the surrounding soldering area with contacts in a circular motion.
Next, after about a minute, you should gradually increase the heating.
The difference with the contacts will be small. Thus, within a few minutes, increase to 300 °C.
Steps of about 20 - 30 °C for every tens of seconds.
Advantages and disadvantages of soldering wires
Using this technological approach has the following advantages:
- High-quality workmanship ensures the reliability and durability of the finished product.
- Low level of contact resistance at the attachment point. In this it significantly exceeds all contact options.
- Minimum installation costs. The main equipment used is a soldering iron. It is inexpensive, and consumables are even less.
- Versatility of use. Soldering is suitable for working with wires that even have different numbers of cores and cross-section parameters. All this allows us to successfully solve even non-standard problems.
- Low maintenance.
- Long service life and high level of safety (subject to proper handling rules).
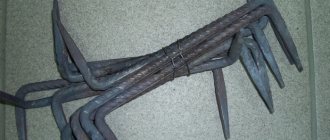
Old soldering irons are still in use due to the quality of the products.
To get the full picture, you should also be aware of the disadvantages:
- Low level of technology. Before work, you should always carry out preparatory operations.
- High labor intensity. Because of this, soldering is not used on an industrial scale.
- Relatively high requirements for the level of knowledge, skills and abilities of the performer.
- The need to select a soldering iron for the conditions of the tasks being performed (the main parameter is power).
- Only neutral fluxes are suitable for work.
Choosing rosin and fluxes
The choice of flux or rosin depends on what materials will be soldered:
- Tinned parts. In this case, liquid rosin is used. You can replace it with flux paste, which does not dry out and does not require removal of residues. Rosin gel has a gel-like structure, the product is easily washed off with water.
- Working with small radio components. Activated rosin fluxes, for example LTI-120, are suitable for this. Glycerin hydrazine paste also has positive qualities. However, after using this product, the parts must be degreased.
- Soldering of iron, brass and copper parts of small sizes. Liquid Rosin Lux copes well with the task.
- Connection of massive galvanized parts. In such cases, acid fluxes (orthophosphoric or soldering acid, Fim) are used. Acidic compounds work quickly, so the metal does not need to be heated for a long time.
- Soldering of aluminum parts. To solder these types of wires, in the past the soldering iron tip was usually treated with rosin. However, now F-64 flux is used to work with aluminum and copper, which provides good adhesion of the metals. The product contains toxic chemicals, so it is recommended to work in a ventilated area. F-34 flux, which has less activity, is considered safer.
Soldering equipment
The work process must be carried out using all necessary tools and consumables.
Electric soldering iron
Something without which no soldering is possible. It is a tool divided into a handle, a rod and a power system. When connected to the power supply, it heats up to a temperature sufficient to use consumables.
Tin-lead solder
One of the most popular consumables. Valued for its ability to create formations with eutectic properties. It has a number of valuable features, which are why it is widely used.
Important! Low operating temperature, ease of application, strength of the created fastening - this is not a complete list of advantages.
Although there is an impressive list of more modern solutions, such as soldering acid, this solder, made from tin and lead, still remains extremely popular. It is ideal for boards, cheap and allows you to solder almost anything with high quality.
Flux for copper wires
Solder and metals must interact with each other to obtain high-quality interaction. But natural chemical processes often prevent this.
Flux is used to clean wires from the resulting oxide film. Additionally, it provides protection against oxidation processes.
Solder pastes
This is the name given to paste-like homogeneous mixtures made from two components at once - solder and flux. This was done to improve technological processes and obtain a higher quality of work along with speeding up the actions taken.
Hot soldering iron stand
Stands for every taste - from homemade to purchased ones.
Since a soldering iron must heat up to work (and then cool down), and holding it in your hands all the time is not an option, a heat-resistant stand is needed. During preparation or during a break, it helps a lot, freeing up your hands and ensuring fire safety.
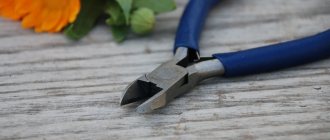
Braid for removing excess solder
This is a means to remove excess applied during work. Its full name is a tape braided from copper wires. It allows you to make products more attractive in appearance and spend consumables more economically.
Additional materials
Additional materials that simplify working with a soldering iron include:
- Stand. Provides convenience and safety of work. It is made from a thin metal sheet.
- Braid to remove excess solder. Consists of flux-treated thin copper strands.
- Device with clamps and magnifying glass. Provides convenience for working with small parts and a soldering iron.
- Clamps, tweezers, pliers. Makes it easier to work with heated parts.
Soldering iron selection
In order not to overpay, and at the same time to choose the ideal equipment, you should clearly know and understand what is necessary to achieve your goals. Their formulation allows you to give answers to a large number of questions at once.
Heater power
Beginners often mistakenly believe that the more powerful the tool, the better. This is not true. Power parameters directly depend on the intended purpose.
For reference! Soldering irons with a power of 25-30 W are suitable for soldering circuits, while tools with a power of 1-2 kW are used for working with pipes.
Soldering iron tip care
How easy it is to work with the tool, how to clean it after work, whether it can be replaced or changed position, sharpened or moved - all issues of care should be thought through. There are static tools, and there are also more flexible soldering irons that allow you to do everything described.
Soldering temperature selection
Another parameter that influences the choice is the amount of heat generated. It is measured in the temperature reached.
You should select a soldering iron based on the tasks for which it is purchased. After all, this parameter will remain unchanged for the tool itself. It can be adjusted through the use of special consumables, but this affects the final cost of the work.
Preparing for work
How easy it is to start working is a point that is often underestimated. It’s optimal if you just take it out, connect it to the power supply and put it on the stand to heat up. But even in this case, the time spent to achieve the required temperature varies and affects the duration of preparation for work.
Sharpening the tip
During operation, the tip gradually becomes unusable. Jagged edges appear and the size decreases. Long-term chemical exposure, albeit unnoticed, literally corrodes it.
In case of severe wear, replacement is required; in other cases, simple sharpening is sufficient. How easy it is to do this is important, although often underestimated.
Soldering iron tinning
Before starting the main work, it is useful to start with light loads. To do this, the tip is covered with a thin layer of solder, preparing it for the subsequent influence of chemical components. This is done when the instrument is warmed up and allows you to increase its service life. The name for these actions is tinning the sting.
Tools and accessories
Soldering, like any other technical process, involves the use of certain tools and accessories. You will need a few tools: a soldering iron, a knife, pliers, a file, sandpaper. There are even fewer accessories - soldering flux and alcohol or gasoline are enough. Nevertheless, all of these are important components of the process and the choice of both must be taken extremely seriously. Both the mechanical and electrical reliability of the soldered joint will depend on the quality of the soldering iron and the availability of the necessary accessories.
Preparing wires for soldering
Good preparation is half the success
Before soldering, the wires must be properly treated. To do this, just follow the sequence:
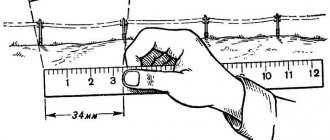
- At the junctions of the wire strands, the insulating layer is cut off by 2-5 centimeters.
- Bare areas are cleaned of the oxide film.
- Tinning is carried out, for example, using rosin resin.
- The wires are connected by twisting.
Now you can directly solder.
How to unsolder the wire?
Instructions:
- First you need to prepare a soldering iron. It is necessary to warm up the tool, then treat it with flux, and then carefully melt a small amount of solder.
- After this, strip the required part of the wire of insulation and clean it of mechanical contaminants.
- Wire tinning – it is necessary to apply flux to the wire and remove all oxidation.
- Secure the wire.
- Mark the desoldering area - use a file to cut out a small strip along which the tip will move.
- Carefully move the sting along the marked line several times until you achieve the result.
- Wait until the wire cools to room temperature.
- Apply insulation.
This process does not involve any difficulties, the only thing required is to follow the instructions, the desoldering process is not much different from the process of soldering two wires.
Soldering process with an electric soldering iron
And now directly to the question of how to solder wires with a soldering iron. The sequence of actions for this process is as follows:
- The surface of the twist is coated with flux.
- Take a little solder with the tip of the sting. When it melts to a liquid state, it should be applied to the twisted area.
- Let it harden and you're done!
This is a simple step by step instruction on how to solder correctly. But behind this small list lies significant preparatory work. It is important, even if you plan to use it only at home.
Differences in technology when using flux
Depending on the technical process, minor changes may be made. For example, for some compounds there is no need to remove the insulation; they cope with it perfectly. You can solder it like that, there’s nothing complicated. But in this case, you have to wipe the joint with alcohol to dispose of chemically aggressive substances. Or additional solution may be applied to the cleaned wires before soldering them.
Features of soldering stranded wires
Differences in nuances:
- Before tinning, the wires should be untwisted for easy dipping into rosin;
- each core should be covered with a thin layer of solder;
- Once they cool down, they are all twisted into one wire and insulated.
Otherwise, to solder, you must follow the standard procedure.
Wires in insulation
Insulation is a safety requirement.
To remove the protective coating, you can use wire cutters, a knife, or the soldering iron itself (but this is for experienced people and is accompanied by harmful fumes). In the latter case, it is enough to simply melt the insulation in a circle and manually pull it off the core. In other cases, you have to be careful not to damage the core of the wire.
Important! The soldering iron option is good if you have to deal with polypropylene. After all, there is also heat-resistant insulation with which such treatment does not work.
Enameled wires
They are misleading with their “purity”. In fact, they have a colorless enamel coating. It is removed in the same way as the oxide film.
Cables made of several insulated wires
Soldering is preceded by separation of the cores. They are processed separately.
Is it possible to solder copper wire to aluminum
It is prohibited to combine aluminum directly with chemically active metals. And copper is one of them. Therefore, they are not directly connected or soldered. Although there is an option with an intermediate bolt.
Soldering flux
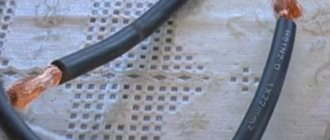
In order for soldering to be of high quality, the solder must firmly adhere to the part being soldered and moisten it. But when heated, almost any metal intensively oxidizes and is absolutely not wetted by solder. Even if you manage to depict something using a soldering iron and one solder, such soldering, called “cold” soldering among experts, will not provide either good contact or mechanical strength. An example of cold soldering can be considered a photo, which on many information resources for some reason is an example of exceptionally high-quality and correct work:
The solder did not adhere to the copper of the wires at all - this solder can be disassembled with bare hands
To ensure reliable adhesion of the solder to the metal being soldered, one or another flux is used. According to the method of influence, they are divided into two categories:
- passive;
- active.
Passive fluxes, as their name suggests, do not interact with the parts being soldered. Their main purpose is to ensure good spreadability of solder and prevent the formation of an oxide film when heating the parts being soldered. Passive fluxes are easy to use, affordable, safe for humans, non-conductive and completely neutral (do not require cleaning after soldering). The disadvantages of fluxes of this type include the ineffectiveness of use on oxidized parts.
The well-known rosin is the most common passive flux.
Active fluxes not only improve the spreadability of solder and prevent the formation of an oxide film, but are also capable of destroying this film. In view of this, acid or alkaline fluxes are widely used for soldering metals that are highly oxidized or instantly oxidized in air. There are even substances that remove varnish from an enameled wire when heated with a soldering iron. The disadvantages of this type of flux include high corrosive and electrically conductive properties (the flux must be washed off after soldering) and danger to humans.
Fluxes produced by industry based on acids.
What flux is best to use for soldering wires? If you are going to work with copper, then the ideal option would be rosin or a solution of rosin in alcohol. Even if the wires are old, but it’s easy to clean them to a shine, it’s still better to use rosin. It is a good dielectric and absolutely does not interact with metal at the chemical level.
You will need active flux if the wires are heavily oxidized or made of alloys that are difficult to solder - nickel, steel, aluminum, etc. Although no one prohibits the use of these compounds for working with ordinary copper. The only thing is, if you don’t want the connection to fall apart in a month or two, do not forget to thoroughly rinse the soldering area with alcohol or gasoline after work. And, of course, immediately wash your hands with soap - acid is acid, even if it is soldering.
Possible soldering problems
Common mistakes to avoid:
- Working under voltage. All electronics must be unplugged. High temperature affects the physical processes in the elements, which leads to their failure.
- High level of pollution. The tip and treatment areas must be cleaned before starting and ensuring the process progresses.
- Mechanical damage to the soldering iron. As a result, the required temperature may not be reached for efficient operation.
- Using consumables that are no longer suitable. Repeated use of the same material leads to a decrease in the quality of the result.
Soldering elements and circuits efficiently is difficult for beginners, even if the best tools are used. It will be possible to reach the heights of mastery only after acquiring solid experience. And although the first attempts will be very modest, in the future you can count on successfully completing more complex tasks, such as repairing car wiring.
Soldering parts from boards with one soldering iron
Small-sized SMD parts can be desoldered using a conical tip. Both contacts of the part heat up and it quickly comes off the board. Also, a conical tip is convenient when soldering SMD parts, since you can accurately dose the amount of solder onto the contacts.
Braided soldering
Braid consists of strands of thin copper wires.
You can use shielding insulation from the antenna as a braid. Using a braid, you can quickly and easily remove solder from a contact. It is necessary to apply flux to the braid and contact. Next, using a soldering iron, the soldering area is slowly heated and the tin is transferred to the braid. This soldering method is good for small parts and small DIP contacts. If you need to unsolder the PCI connector, then the braiding will quickly be wasted.
Vacuum syringe and needles
The vacuum syringe quickly removes massive burnt parts of solder. And with the help of DIP needles, the contacts are easily unsoldered from the board. The needle is put on the contact and heated up using a soldering iron. You need to have time to pass the needle through the board contact onto the microcircuit body while the solder is in a molten state. Or vice versa, when the contact is already warmed up, and at the same second the needle is inserted.
Such soldering methods are outdated. Modern boards are manufactured for machine assembly, so the gap between the contacts and pins of the parts is minimal. The needle is already weak, and the vacuum syringe does not have time to pick up the sharp drops of solder. It is no longer possible to desolder a regular electrolytic capacitor using a syringe. In this case, the liquid sting method will help.
Liquid sting and its advantages
The liquid tip is a drop of solder, which allows you to avoid using additional tools (braid, hair dryer, needles or syringe). The technique is the same as with the Rose alloy. The main difference is in temperatures.
The hatchet-type sting has a massive longitudinal working surface. It allows you to capture multiple contacts at once.
Apply solder to the tip.
A paste-like flux is applied to the chip to be soldered using a syringe.
The part and its contacts are heated with a sting until the tin melts, and the same must be done on the other side.
Using this technique you can also remove DIP contacts.
Connecting wires by crimping
The crimping method is widely used to make reliable connections in junction boxes. In this case, the ends of the wires are stripped, combined into appropriate bundles and pressed. The connection after crimping is protected with electrical tape or heat shrink tubing. It is one-piece and does not require maintenance.
Crimping is considered one of the most reliable methods of connecting wires. Such connections are made using sleeves by continuous compression or local pressing with special tools (press jaws), into which replaceable dies and punches are inserted. In this case, the wall of the sleeve is pressed (or compressed) into the cable cores to form a reliable electrical contact. Crimping can be done by local pressing or continuous compression. Continuous crimping is usually done in the shape of a hexagon.
Before crimping, it is recommended to treat copper wires with a thick lubricant containing technical petroleum jelly. This lubrication reduces friction and reduces the risk of damage to the core. Non-conducting lubricant does not increase the contact resistance of the connection, since if the technology is followed, the lubricant is completely displaced from the contact point, remaining only in the voids.
For crimping, manual press pliers are most often used. In the most common case, the working parts of these tools are dies and punches. In general, the punch is a movable element that produces local indentation on the sleeve, and the matrix is a shaped fixed bracket that perceives the pressure of the sleeve. Dies and punches can be replaceable or adjustable (designed for different cross-sections).
When installing ordinary home wiring, small crimping pliers with shaped jaws are usually used.
You can, of course, use any copper tube as a sleeve for crimping, but it is better to use special sleeves made of electrical copper, the length of which corresponds to the conditions for reliable connection.
When crimping, the wires can be inserted into the sleeve either from opposite sides until mutual contact is strictly in the middle, or from one side. But in any case, the total cross-section of the wires must correspond to the inner diameter of the sleeve.