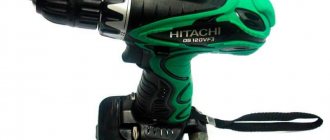
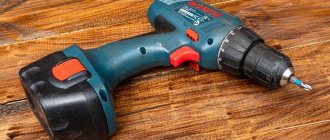
General view of the screwdriver
Screwdrivers can be corded or corded. The difference between them is the power source. The shape of the tool is similar to a pistol. The screwdriver design and general view are shown in the photo.
A screwdriver is structurally similar to an electric drill and consists of the following components:
- a body that smoothly turns into a handle and a support leg to which the battery is attached and there is a cavity - a block for storing bits.
- Control buttons;
- Battery or power cord.
Checking other parameters
During battery diagnostics, its self-discharge . To do this, voltage measurements are taken daily for 30 days. The data will help you understand the degree of battery discharge.
Each type has its own self-discharge percentage per month:
- up to 8% – lithium-ion batteries;
- 20 % – nickel-cadmium;
- 30 % – nickel-metal hydride.
The memory effect in parts of the power supply is established by carrying out 3-4 charge and discharge cycles . For discharge, use a 12 V light bulb, while measuring the residual operating voltage and idle voltage.
Screwdriver body
The power tool is “packaged” in a plastic case, a material with the following advantages:
- Plastic serves as a natural insulator from electricity; it does not conduct electricity. Therefore, it is safe.
- It is lighter than metal, and thus reduces the weight of the tool.
- And finally, in production, plastic is easier to shape into the desired shape than metal.
The body is conventionally divided into three parts. All rotating mechanisms are located in the upper part. The handle is equipped with soft pads. The master holds the tool with it while working. The pads reduce shock absorption, making work more comfortable and easier. The lower part, the support, inside of which there is a compartment for storing bits.
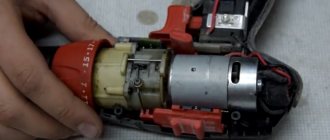
How to disassemble a Makita screwdriver
To disassemble a Makita screwdriver, you first need to disconnect the battery. Then all the screws that hold the two halves together are removed from the tool body. After this, the housing is removed, and all external components are revealed to the master: engine, gearbox and switch. It is also worth noting that in such models special plates are often installed that are responsible for switching modes
If you don't look very carefully, you may simply miss the small plate. After disassembly, you can immediately begin repairing the relevant part
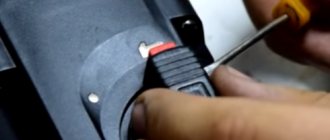
Trigger switch and LED lighting
The trigger switch is located between the top of the housing and the handle. It is located under the master’s index finger, and it is convenient to use it to put the tool into operation. The trigger button closes the electrical network of the screwdriver and starts the electrical mechanisms.
The photo shows the device of the trigger button.
Some models of screwdrivers have built-in LED lighting that illuminates the work area. This is prudent and convenient, since in dimly lit areas it can be difficult to see the screw slot. In the model shown in the picture, the backlight is located in the lower part of the body above the trigger; in some Western European models it is located on the leg above the battery.
Checking by resistance value
You can find out whether the battery is working properly by comparing the internal resistance of the cans . To determine this value, the voltage is divided by the current, and the load resistance is subtracted from the resulting value. A 10 ohm resistor should be used for the load. The normal operation of the battery can be judged if the obtained value is less than 1 ohm.
Checking battery cells
Speed control unit and speed switch
The rotation speed and reverse (rotation direction) control unit is connected to a PWM controller, a multi-channel single-pole transistor and a variable resistor, which are hidden in the switch block.
To change the direction of rotation, a changeover contact is used, to which a reverse switch is connected, located above the trigger at the bottom of the screwdriver. It is connected to a changeover contact, which changes the polarity of the voltage supplied to the electric motor. Thanks to this, the direction of rotation changes, which allows screws, self-tapping screws, and screws to be screwed in and out.
Another button is a gearbox speed switch which changes the rotation speed of the chuck. This occurs due to the fact that when the speed button is turned from one mode to another, the bracket (rocker arm) comes into motion, moving the gearbox gear from one level to another.
Spindle speed adjustment
Another very important device of a screwdriver is the speed controller. The device circuit consists of a pulse-width controller and a switch based on a field-effect transistor. Control is carried out by a variable resistor. Depending on the force of pressure on the button, its resistance changes and, as a result, the spindle rotation speed increases or decreases. Thanks to the presence of changeover contacts, reverse rotation of the cartridge is carried out. It depends only on the direction of application of voltage to the screwdriver motor. All shifts are automated, so manual mode is excluded.
The cordless screwdriver consists of the following elements:
- An electric motor that provides torque and rotation of the shaft at the required speed. New generation tools have a brushless motor, that is, they do not have commutator brushes, which wear out quite quickly.
- Planetary type gearbox. This element transfers the force to the spindle, equipped with a clamping chuck. A planetary gearbox is an arrangement of shafts and gears inside a cylindrical housing.
- A coupling that is attached to a gearbox. It provides torque control.
- Clamping cartridge. Used to attach the attachment to the motor shaft.
- Electronic control system. Ensures the screwdriver starts and works. To do this, it is equipped with a button to start the device, including a reverse switch. The system includes a speed controller, which matches the speed of the engine shaft with the force exerted on the power button. With less pressure, the bat chuck rotates more slowly. Reverse is controlled by a separate lever.
- Plastic case, all other previous elements are built into it. The body has an ergonomic pistol grip. Certain areas of the surface are rubberized for ease of grip.
- The battery is the power source for the screwdriver.
A modern cordless screwdriver can be equipped with additional elements: a torque limiter, LED backlight, a load limiting mechanism, a deep discharge protection system, a charging indicator, and so on.
READ Porcelain Tile For Floors What To Cut
Screwdrivers are divided according to other characteristics:
- Torque is the force that ensures the screws are unscrewed.
- According to the speed of rotation of the shaft, that is, the speed of screwing in self-tapping screws. Professional models provide 1200-1300 rpm, amateur models - 400-500 rpm.
- Number of torque control stages.
- Time to charge the battery: professional - 30-100 minutes, household - 2-5 hours.
- The presence of an impact mechanism (drilling holes in concrete and working with socket heads).
- Ergonomics and weight.
Chuck with locking mechanism
A planetary gearbox transmits torque to a shaft onto which a self-centering chuck with attachments or bits inserted into it is screwed. The quick-release chuck ensures the fixation of screwdriver and drill bits; it consists of a holder, inside of which there is a clamping sleeve with movable jaws.
The shaft to which the chuck is screwed is equipped with a locking mechanism, which consists of an outer and inner housing and rollers installed between the housings and preventing rotation.
Rotation adjustment clutch
In order to prevent the thread from breaking off part of the screw and breaking the tool itself due to overload, the design of the screwdriver is equipped with a rotation adjustment clutch. It consists of a stopper, a washer, a threaded bushing and a spring. The device is connected to the cartridge parts. When a force exceeding the nominal one occurs, the load is transmitted through the spring to the cylindrical rods of the cartridge, and they exert an impact on the sleeve. As a result, the ratchet is activated and the chuck stops.
Rechargeable battery with locking button
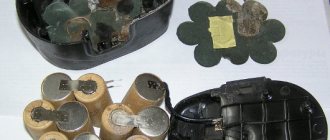
Since the screwdriver can be cordless and wired, the power supply system in them is different. The cordless screwdriver has a built-in rechargeable battery, which is a device with built-in external contacts for transmitting electricity. The main element of the battery is its power supplies connected in series. Otherwise they are called banks, sample in the photo.
It also has a thermostat that protects the battery from overheating when charging. The rechargeable battery is a removable device, since it must be replaced as the resource is exhausted. The battery is attached to the screwdriver with a locking button, which is located on the side in some models, and in the front in others. From the handle extend contact plates that connect to the battery and provide power.
Details
How to repair a screwdriver
One of the most common problems with Makita screwdrivers will be problems with working at first speed. At the same time, everything will work perfectly on the second, and this problem is due to the fact that the gearbox in the tool is faulty, which does not allow the first speed to be used effectively. We suggest considering how to get rid of this problem and repair the screwdriver.
How to disassemble the gearbox
First of all, you should definitely disassemble the tool itself and separate the gearbox. Next, it is important to remove all other parts that are unnecessary at this stage. To do this, you simply need to pour out all the gears from inside the gearbox, and it should also be noted that if there is no information about the exact location of all the parts, it is better to disassemble it carefully and sequentially. Also, do not forget to write down and mark the location of the gears. This is required for high quality assembly after repair work has been completed. You can also use educational articles or videos.
How to screw in bolts instead of teeth
How to repair a Makita screwdriver? After all the gears are removed from the gearbox, the inside of such a device will open to the eye. Taking into account the specifics of the problem, the technician will most likely see that all the plastic teeth on the inside are worn off. This will happen during long-term use of the device, or if there was a gross violation of the rules of use. Plastic teeth are very soft, because under the influence of temperatures and constant mechanical load they will simply grind down. This can lead to the fact that the main gear has nothing to cling to and it begins to scroll. To restore and repair functionality, you will need to restore the teeth. In this case, it is not necessary to restore all the teeth; installing a couple of iron ones is enough. In order to achieve what you want, you will need a drill, drills and bolts. It is advisable to use a drill coated with diamond, because it makes it possible to effectively grind off the excess part of the bolt in a short period of time.
The work order is as follows:
- At the location of the plastic tooth, a hole will be drilled in the side of the gear wall. It is required to use drills with a slightly smaller diameter than the diameter of the bolt. This way you can screw it in with reinforcement and also ensure secure fastening.
- A couple of holes are required to be drilled diagonally to ensure reliable gear retention and stable tooling performance. Thus, the load will begin to be distributed over both teeth.
- When drilling, it is advisable to point the drill slightly downward so that the bolt does not stick up. Otherwise, it will take much longer to process it with a drill.
- Next, you should firmly screw the bolts into the holes that are created.
After completing all such manipulations, the tooth blanks will be ready. Next, you should properly process them and give them the desired shape. This is done using a drill.
Using a drill
The bolts should be screwed in and processed from the sides using a drill, and if necessary, shortened to length. It is required to give the bolts the shape of a real tooth and provide for the installation of the crown without any problems.
Please note that it is not recommended to overheat the bolt using a drill during the working process. Otherwise, it can become very hot and melt the surrounding plastic. The gear housing will begin to deform, which can lead to a more serious problem, and so during operation you will need to take a break so that the bolt has time to cool.
As soon as the teeth are ready, the gear ring can be inserted back. If you do everything correctly, it will be inserted without any interference. Two teeth are usually enough to restore the gearbox to working order, so screwing in a huge number of bolts is not logical.
How to properly repair a screwdriver battery
Screwdrivers that operate not from a 220 V network, but from a battery, are also heavily subject to battery wear. This will happen over time even with proper use. If you do not follow operating rules, the battery will stop holding a charge pretty soon.
In such a situation, there are a couple of options - buy a new battery or try to repair the Makita screwdriver battery yourself. By the way, the second option will require spending a certain amount of time, effort, and will also require the presence of specialized elements. The battery in a screwdriver is a large set of a certain number of specialized power banks, which are soldered to the charging controller and form an integral structure. Corresponding power supplies can be found in laptops or power banks. There are still the described banks in a certain quantity. But laptops have 6 cans, but a power bank only has 4. But the number may be completely different and depends on the battery capacity. If the master has excess elements of such lithium batteries, then you can use them to repair the battery in a screwdriver.
How to disassemble the battery
At the very beginning, you need to understand the battery in the Makita screwdriver. To do this, it will be disconnected from the screwdriver, and then all the screws will be removed from it. The battery case opens and you can see the design of this element. There will be 10 cans located there, which are soldered together and soldered to the controller for power. It is necessary to disconnect all banks from the board. To do this, use a drill with a special attachment.
Removing cans from the circuit board
Using an electric engraver (drill) with a disk attachment, cans can be sawed off from the board. Next, you should sequentially remove all connections of all contacts with the controller, and also the elements should be disconnected from the common frame. You need to do the work as carefully as possible so as not to damage the board, but forcefully to disconnect it completely.
Soldering new cans
Immediately after the frame and board have been freed from the old power elements, new ones can be attached to them. Before the soldering process, it is recommended to thoroughly clean the surfaces on the cans and on the board itself from remnants of old soldering. This will make it possible to achieve ideal contact for a long time.
Now all the new cans from the remaining devices are placed in special places on the frame and soldered one by one to the power controller. It is recommended to do this using a thick tip on a soldering iron because a lot of solder will be required. The contact must be very reliable and have a huge contact area. After proper assembly, it is recommended to wrap the entire structure in special paper and place it in the previous case. Next, reassemble the battery and close it with the cover, which will be attached with screws.
Before use, the battery should be recharged at a special station to 100%, and only then connect it to the screwdriver for testing. If everything is done correctly, the battery will be functional again. Replacement cans can be taken from another battery or purchased separately. The price for them is quite high, but still manual replacement will cost you much less than buying a new battery.
Engine
Now let's look inside the screwdriver body. The photo shows a cutaway screwdriver, or rather, with the cover removed.
A DC motor converts electrical current into mechanical energy, causing machinery to rotate. This is what the electric motor looks like in some power tools.
An electric motor consists of a stationary stator and a rotating rotor. The stator is a cylindrical metal casing with permanent magnets built around its walls.
Inside the housing there is a rotating rotor. It consists of a shaft on which a core is attached, which is a connection of plates made of high-tech steel, in the grooves of which winding turns of special copper wire are laid. When electrical energy is supplied, the rotor begins to rotate under the influence of these magnets and, through a gear pressed onto the shaft, transmits rotation to the planetary gearbox.
The circuit is connected to the motor through a brush mechanism consisting of two graphite brushes located opposite each other. During operation, the graphite brushes are gradually worn out, but pressure springs ensure their contact with the commutator.
Brushes are consumable parts and if the engine does not start, they are the first thing to check. The impeller serves to remove hot air and cool the engine. In the housing, opposite the impeller, there is a radiator grille.
DIY repair
In a home workshop, repairing a gearbox is not so difficult. Repair comes down to disassembling the unit into individual parts, checking the integrity of their structure, purging and lubrication, followed by reassembly. The process is divided into the following stages:
- Separating the gearbox from the engine and removing it (usually together with the chuck) from the screwdriver housing.
- Unscrewing the housing and removing the locking washer.
- Sequential removal of satellite gears and transfer plates (2 or 3, depending on the design).
- Removing the ring gear and checking the ball bearings (they can roll around the entire seal, but should not roll out beyond it).
After removing all the parts, they must be cleaned of “old grease,” wiped dry and made sure that they are not damaged.
Then the craftsmen recommend folding them in the reverse order “dry” and making sure that when the satellites rotate, the chuck spindle also rotates. If the rotation is carried out without twisting, then it can be assembled back.
First, bearings are placed in the recesses in the housing, onto which the ring gear is installed. Then, one at a time, the transfer plates are placed, with the satellites installed on them, and the locking washer is placed on top.
Planetary reductor
The drive sun gear is also pressed onto the rotor shaft. A bracket in the form of a rocker arm is mounted on the engine body, with the help of which the gear stages are switched.
Screwdriver gearbox
The differential gearbox can be enclosed in a plastic housing. The arrangement of gears in a planetary gearbox depends on the number of switched speeds and may differ in different models. In a two-speed power tool, the gearbox has three stages. The first stage contains:
- sun gear;
- fixed ring gear;
- planet gears, small gears that rotate inside the ring gear.
- toothed drive.
The second stage serves to transition from the first stage to the third when changing gears. It consists of a planetary gear, which, with the help of a bracket, moves to the first and second rows of gears, due to which the rotation speed of the cartridge changes. It also has built-in satellites and carrier. The third stage is connected to a crown gear with protrusions at the end, 5 satellites, and a carrier with a cross-shaped grip.
The tightening torque clutch (the force applied by the screwdriver when performing work), also known as the torque regulator, consists of cylinders and balls, a housing, a washer, and a spring.
The clutch blocks the operation of the screwdriver if the load on the rotation mechanism increases, and thereby protects the screws on one side from failure, and the engine and planetary mechanism from unnecessary overloads and premature failure.
If you switch the screwdriver to drilling mode, the spring tightens and presses the washer as much as possible so that the third stage ring gear is blocked and its rotation is prevented. Thanks to this, the operation of the cartridge is not blocked. This video shows how a screwdriver works.
Description, general information
produces various power tools, among which are screwdrivers. The company began its history in the 20th century, and to this day it continues to amuse consumers with its high-quality products. It is necessary to consider the general features and properties of the models of this office.
Makita screwdrivers are very powerful. The average speed for different models is about 2300 rpm, which is a good indicator compared to other brands. The weight of most instrument models is 1.5 kg. Its low weight means that in fact, such equipment will be comfortable to work with. The manufacturer also took care of the convenience of working in poorly lit rooms, making most models backlit with LEDs. Separately, it is worth highlighting the type of handle for holding these tools on the weight. You, they are made of rubber, so they are comfortable to hold in your hand, and accordingly, the work process is much easier.
Read also: Dimmer for adjusting light
The disadvantage of these screwdrivers is the powerful vibration of the handle during operation, as well as their short-lived batteries.
Already today, the cost of products from this company is quite high, which is important for the Russian consumer
Features of corded and cordless screwdrivers
In corded screwdrivers, the power source is a 220V electrical network and a power cord is built into the handle of the power tool. To work with corded power tools, an electrical outlet is required; this is a disadvantage of such tools. However, a constant power source and voltage of 220 V do not limit the power of such power tools. It's no secret that batteries are limited in this regard. They are also limited by operating time, after which the battery must be charged.
A cordless screwdriver with a rechargeable battery is appreciated by motorists who have to carry out repairs in the absence of a constant power supply, somewhere on the highway, and by builders, since remote construction sites are not always provided with electricity in a timely and stable manner.
A little about how to convert a battery from cadmium to lithium and who needs it
Let's talk about how to convert the battery yourself from one type of battery to another. There are many videos on the Internet on this topic, where they talk a lot about the advantages of using lithium in a screwdriver. However, unless you use the tool intensively and constantly, there is absolutely no point in using a lithium battery. Lithium-ion batteries tend to “age” faster than cadmium, and simply will not have time to exhaust their service life under conditions if the tool is used occasionally.
Converting a screwdriver battery using lithium batteries may be necessary for professional craftsmen who use the tool every day and need powerful power sources. Of course, if you really want to, you can solder the battery to lithium, but whether this will be advisable is up to you to decide. Read more about which batteries are best for a screwdriver →
Thus, you can not only disassemble the battery of any screwdriver, but also solder two bundles into one, which will last as long as possible, and you will not have to buy a new battery in the near future.
The performance of a converted battery, provided the elements are properly soldered, will be no worse. The main thing is to treat the process with patience and maximum care, so that during the first experiment you can finish the job with minimal losses and solder everything correctly. If you manage to collect everything, this will be an additional incentive to continue your experiments in the field of electronics. Assemble the battery yourself once - and you can save on buying new batteries for your screwdriver in the future.