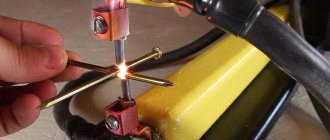
The principle of spot welding is to join two metals under the action of an electric arc created by two movable electrodes (tips). High power electric current is supplied to them. When the electrodes are compressed at the site where the metal is pierced with an arc, a melt of a homogeneous structure is formed.
The spot welding method is often used in auto repair shops and private garages when body work is carried out. Very often, car batteries fail due to a broken contact; in order to change them, conventional soldering is not suitable; a stronger connection is needed.
Spot Welding Technology
The method is suitable for durable joining of heterogeneous alloys. Spot welding is called spot welding because of the size of the contact; it depends on the area of contact between the two tips or electrodes that form the electric arc.
To make spot welding, take two sheets of metal and a welding device. The process consists of several stages:
- the metal to be welded is placed between the tips, to which electric current is supplied;
- the power supply turns on;
- the stings connect with force;
- an electric arc occurs, it passes through metals, heats them up;
- Due to the compression force, the melt is compacted, resulting in a point connection of two sheets of metal.
The strength of the connection depends on the compression force of the tips, the power of the arc and the area of the tangent surface of the tips. They are made from alloys of high electrical and thermal conductivity; non-ferrous metals based on copper have such properties.
Execution of work
Arc welding is not suitable for welding individual points.
Before performing work, it is necessary to sharpen the electrodes for resistance welding, every welder on resistance welding machines knows this.
Flash butt welding is performed as follows:
- Parts are installed between the electrodes.
- Under the action of the pressing force, a frictional force is created between the electrode and the surface.
- The maximum gap is set before applying voltage. As current flows, contact resistance is created.
- Voltage is applied and the electrode moves, gripping the joints, forming a seam.
The connection of aluminum structures is carried out using contact butt welding. Contact welding of aluminum can be seam and spot welding. A welder on resistance welding machines can have the same qualifications as when working on inverters. Electric arc is considered the most dangerous.
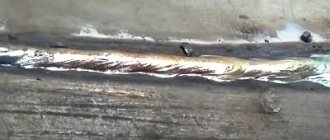
Quality control of seams is carried out according to state standards. The standard is GOST 14098, which quality control workers are guided by and based on laboratory testing.
Equipment
Ready-made machines for spot welding are either stationary or portable; they are convenient to use when carrying out repair work. Automatic welding machines are used in industry. There are portable lever welding devices called tongs.
Welding equipment is expensive, and you rarely need to use it. Craftsmen found a rational way out of the situation.
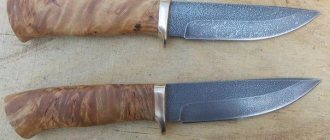
It is quite possible to make a spot welding device for batteries and a body yourself. It can be used to repair household appliances and create decorative metal products.
Contactor from a welding transformer
Such equipment can be turned into a full-fledged resistance welding tool. The only drawback is the inability to control the current strength.
Drawing development
The correct choice of circuit helps to produce a working welding machine. Preference is given to simple drawings that include a minimum number of parts and blocks. Such options do not allow you to create an overly powerful device, but the device is sufficient to perform minor repairs on a car, garden equipment, and fences.
We recommend reading Description of resistance spot welding technology
List of parts and consumables
To convert a welding transformer into resistance welding equipment, you will need the following elements and materials:
- a transformer that converts electrical energy;
- thick cable;
- copper electrodes;
- bolts;
- tips;
- breaker;
- wooden blocks, plywood to create the body.
The process of creating a device
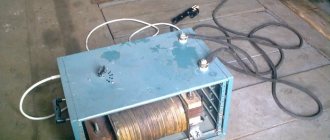
The homemade device is assembled as follows:
- The welding transformer is installed in a housing made of metal sheets. The electrical board is assembled on a textolite sheet more than 1 cm thick. The part is fixed in the body of the welding machine.
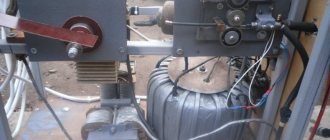
- A welding wire is bolted to the busbar and secondary winding. The remaining end of the cable is connected to the electrode.
- The power wire is connected to the contact block located on the electrical board.
Spot Welding Operation
A master using a contact transformer apparatus must stand on a rubber mat and use protective gloves and goggles. The grounding cable is connected to the part to which another workpiece will be welded. After this, press the power key, compare the elements to be connected, and clamp with the electrode of the welding gun.
5 seconds after the start of the impact, the rod is transferred to the next point.
Welding of small parts
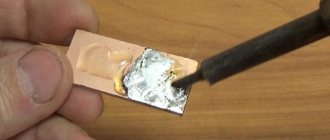
Sometimes it can be problematic to attach small contacts: a regular soldering iron is not suitable for this; the connection obtained by tinning is very fragile and cannot withstand high dynamic loads.
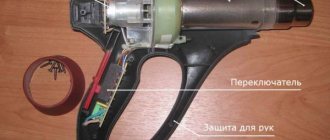
You can spot weld two small contacts using a low-power mini-welder. It is made according to the same principle as pliers, only the lower handle of the clamping device is permanently fixed, only the upper one moves.
The current source is fixed on a dielectric base, it can be:
- tree;
- plywood;
- non-flammable plastic;
- textolite
A transformer from a microwave oven or a ready-made TR1 is suitable as a current rectifier. If a transformer from a microwave oven is used, a wire with a cross-section of at least 8 mm2 in a durable heat-resistant braid is used as an additional winding.
When selecting electrodes, it is important to compare their thickness with the size of the wire. D The ends of the electrodes are sharpened to the required size. The smaller the contact area, the stronger the connection.
DIY fan: how to make a homemade powerful fan. Basic parameters and properties of fans (130 photos)- Why do you need a security alarm, what functions does it perform?
How to choose winter workwear and not make a mistake - recommendations from the pros
The following is used as an electrode for spot welding:
- soldering iron tips;
- solid brass products (rods, hexagons, capillary tube);
- rods made of cadmium chrome bronze.
When choosing a lever, take into account the length of the working area - this is the depth to which the welded metal can be inserted into the welding device. To attach the tip to the handle, terminals are used: current is supplied to one end, the other part is secured with a self-tapping screw.
To select the correct pulse time, a resistor is included in the electrical circuit of the power supply. The power button is located on the handle or fixed on the power supply box. The wires and housing can be hidden in a single electrical insulator housing.
Self-production
Contact butt welding machines must be safe during operation, and you also need to know for what purpose the device will be used. Homemade contact welding is made at home. To do this, it is taken into account that the thickness of the metal should be no more than 1 mm, and the cross-section of the wire electrodes should not be more than 4 mm.
The welding machine operates at 220 V and 50 Hz, with the output voltage ranging from 4 to 7 V. The pulse current is up to 1.5 thousand A. The resistance welding control unit can be made after watching the video.
The electrical circuits in the drawing combine the following designs:
- switch operating in automatic mode;
- circuits for operating control;
- power unit;
- transformer for resistance welding;
- single-phase thyristor for connecting power to the network.
The winding circuit includes a primary one, which has six outputs for turning on and providing current regulation in the secondary. In this case, the first one connects to the network, and 5 regulate the process parameters.
The starter circuit in the MTT4 drawing includes:
- Thyristor switch.
- Through two contacts, the load is simultaneously redistributed to the other 2 contacts through a transformer.
The control circuit consists of:
- power supply from a transformer;
- relay for closing contacts when voltage is applied;
- diode bridge performing the function of a rectifier.
Accessories for resistance welding:
- Current-impervious housing.
- A transformer on which a wire is wound.
- Ticks.
- Electrodes.
- Electrical circuits.
- A number of safety devices: gas pressure gauges at the pressure inlet.
Automation of the process is carried out using all components. A resistance welder must have certain skills when making seam or spot joints. Job openings in this specialty can often be found on the Internet.
Battery device
A do-it-yourself mini-spot welding device is made using a car battery. Its power is enough to weld a contact to another one that requires restoration.
Two brass or bronze rods are attached to a block with a copper alloy terminal block; they are insulated in the area of contact with the hand. It must be taken into account that during welding the rods will become very hot; the insulator-connector should not melt.
The disadvantage of this device is the lack of a switch and high battery power. You must work with the device carefully so that there are no burns in the contact area.
How to choose an air conditioner for your home or apartmentDo-it-yourself bait - composition, application features and storage methods (115 photos and videos)
DIY sliding gates - how to build simple and automatic gates. Schemes, drawings and review of the best ideas (90 photos)
Device features and design
Currently, there are several functions of the control circuit. If it is necessary to turn on k1 for a given period of time, you need to set this period correctly, determining the specific time for applying electronic pulses to the elements being welded.
The electrical circuit design contains capacitors: from c1 to c6 with characteristic electrolytic properties. Their voltage is 52 V. In addition, it is necessary to use a capacitor with a capacity of 46 μF .
The main power unit of the mechanism is the transformer. It acts as a converter from one type of electricity to another. In this case, it is customary to use a 2.5 A magnetic wire. It is better not to use the old winding, but to install electric cardboard rings at the end of the magnetic wire. They are folded along the inner and upper edges. The next step is to wind the magnetic circuit with lattic fabric in three or more layers. To successfully complete the winding, you should use the following wires:
- primary winding with a diameter of 1.5 millimeters, which is impregnated with a varnish composition.
- the second version of the winding with a diameter of about two centimeters, which is equipped with multi-core insulation of organosilicon origin.
When making the first winding, it is important to arrange intermediate type terminals. Then the winding is impregnated with a special varnish, and a cotton tape , which is also impregnated with a varnish composition. Then the process of secondary winding begins, as well as further impregnation with varnish.