(01/06/2016 23:48)
LM317
is an adjustable voltage and current stabilizer with an output voltage from 1.2 to 37 V. The fact that the input is 21 volts is normal, but the output should be 15 volts. Check the entire LM317 harness and the stabilizer itself. Almost 19 volts is still too much.
Here's another link to help.
8. diggerweb
(01/09/2016 09:57) Your task is to ensure the normal operation of the control board and drivers (you have a device with a TGR?), which are powered by a voltage of 15 volts from the LM317 stabilizer.
I haven’t encountered this particular defect, and here it’s up to you to decide what to do and what to change to what, experiment, just be careful.
It’s better to unsolder the power transistors for the duration of the experiments, first start the stabilizer, check the operation of the control and drivers, and only then solder them in, and then you can’t do it right away, but first like this
.
19. diggerweb
(12/17/2016 00:24)
ilm1987ir
Most likely the power part has failed, check everything.
47om. which was shunted by this 4D14 zener diode. Next is the transistor 4Q1. It was this transistor that clicked. So much so that there was a burn mark on the 4C2 capacitor and the entire front part of the transistor flew off. Does anyone know what kind of transistor can be put there? Resanta 250. The board says SSB-200-142 Control board 12 pin Shim 3845 and LM324
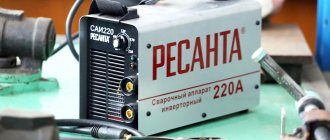
Welding inverter Resanta SAI 250 PROF - diagram and faults
A Resanta 250 welding machine came in for repair with a defect: no switch on .
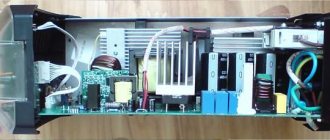
Burnt IGBT transistors of the Resanta 250 welding machine
During diagnostics, it turned out that there was a short circuit in the power part and the resistors were getting very hot; there were two current-limiting resistors of 100 Ohm 10 watts each. When dialing, it turned out that the power IGBT transistors were broken, all 2 pairs. And burnt resistors are visible in the harness.
Scheme for boosting power transistors Resanta 250, 18 volt zener diodes, 10 and 100 ohm resistors and UR1560 diodes often burn out
Design and principle of operation of Resanta SAI 250
The principle of operation of the inverter is based on converting alternating current of 50 Hertz from a regular household electrical network into direct current. This voltage indicator has a value of 400 Volts . The current of the welding machine is regulated by modulation (by and large, it is wide-pulse) of the resulting high-frequency voltage.
The device in question for welding Resant SAI is manufactured in a steel case. On the outer part of this housing there are power connectors, which are intended for connecting welding cables, two indicators (“Network” and “Overheat”), and a regulator for selecting the characteristics of the welding current. There is also a special hole in the housing, through which hot air is removed from the device. It is part of the forced ventilation system, which protects the inverter from excessive overheating during operation.
The Resanta SAI inverter also has another protection system ; it automatically turns off the device in cases where the power cords are shorted. Moreover, the corresponding indicator on the front control panel begins to blink. The inverter is distinguished by the presence of several important functions that are often used during operation:
- Anti-sticking;
- Hot start.
Hot start guarantees quick and high-quality ignition of the welding electric arc due to an increase in the level of welding current (the worker does not have to do anything, the current increases automatically). And the anti-stick mode, on the contrary, reduces the welding current if, during ignition of the electric arc, sticking of the welding wire (electrode) is observed. Then, when sticking is eliminated, the welding device automatically restores welding performance.
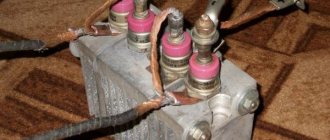
How to connect a powerful single-phase stabilizer for 220 V
Before presenting the diagram, it is necessary to remember that 220 V electrical networks are equipped with two wires. The first is phase, the second is zero. To correctly identify them, you will need a special indicator screwdriver. The verification procedure is as follows. Take a screwdriver, place your thumb against the metal protrusion on the handle, and connect the working surface to the exposed electrical wire through which the current passes. If the light on the screwdriver lights up, then it is a phase; if not, it is zero.
Now let's look at the scheme itself. When connecting a single-phase stabilizer, you need to pay attention that it has several attachment points where cables are connected. Many people simply do not understand what should be connected where.
There are two types of units from this group. The first ones have zero and one phase each (for input and output). The latter have phase-input and phase-output along with zero-input and zero-output. They look like clips with a corresponding signature.
In the first situation, the phase conductor coming from the meter is taken and connected to the phase-input connector, and the zero conductor to zero. In this case, there are two output electrical cables going to consumers: the first is connected to the output phase, the second to zero.
In the second situation, the cable phase and neutral are fixed above the corresponding “phase” and “zero” terminals. The output ones, in turn, are attached to the phase-output and zero-output.
It is important to pay attention that the wires are securely fastened and do not dangle. Otherwise, there is a possibility that they will begin to overheat over time, which is no longer safe. The connection diagram for a voltage stabilizer in a private house is presented below.
The connection of a 220 V voltage stabilizer in the apartment panel is carried out according to a similar scheme directly after the electricity meter.
Technique for repairing and troubleshooting welding inverter Resanta 250
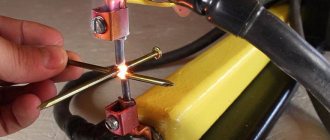
We check all zener diodes and resistors - 10 ohm resistors, and 4 18 volt zener diodes, located in the power transistor drive circuit, and also call two MUR1560 diodes. Now we try to turn on the device with the IGBT transistors soldered off and see if the standby power supply supplying the PWM and the cooling fan are working with 24 volts. The device started up, the protection relay worked, the fans started working. Now we look to see if there are control pulses on the transistors and what their shape is.
Measuring voltages and waveforms at the gates of power IGBT transistors in the Resanta 250 welding inverter
Burnt 10 ohm resistors in the boost circuit of power transistors Resanta 250
There are pulses in our Resanta 250 welding inverter; in addition, we resolder the burnt 10 Ohm resistors. The form of the control signal for power IGBT transistors is shown below; it is essentially a reference; unfortunately, not all currently presented oscilloscopes are able to unsee and show this form. But we have been repairing welding equipment for more than 10 years, so we are able to repair any welding machine in Ryazan.
Correct square wave, control signal for power IGBT transistors in a resanta welding machine
All faulty elements have been replaced, the welding machine is working! The output is 80.5 volts. Let's try the electrode welding machine in action. Everything is working! Everything is fine, the current is regulated. Before repair, all repair welding machines are purged with a compressor and all soldering areas of radio components are washed from rosin and other aggressive fluxes. Diagnostics and repair of the RESANTA 250 welding machine were carried out in the presence of the client. An hour later, this device was already in operation and was making up for lost downtime.
Inverter technical data
The main advantage of this welding inverter for the home needs of consumers is that it is specially adapted for connection to those electrical networks in which there is a low voltage (130-250 Volts) . Resanta SAI operates without interruption at the specified voltage when welding in manual arc mode.
You can use welding rods with a cross-section of up to 6.0 millimeters. The welding current in the device can be adjusted up to 250A. It is also important that the device is capable of withstanding quite large workloads for a long time. This property positively distinguishes its operating scheme from other devices that are found in abundance in the windows of specialized hardware stores.
At idle, the Resanta SAI welding device operates with a voltage of 80 Volts. The durability of the device at fairly high power is ensured in its circuit by the design of modern high-quality IGBT transistors. In addition, this welding inverter has a high degree of protection - IP 21 protection level.
It is impossible not to mention the compactness of this welding machine, as well as its excellent mobility. Equipping the device with a carrying handle makes it easier to carry it around the site where construction is taking place. Consumers also note the accuracy and ease of setting up the Resanta Sai welding inverter. At the same time, the specified indicators are guaranteed to retain the established data even in cases where the electrical network is not stable in its voltage indicators.
The technical characteristics of the Resanta SAI device we are interested in are as follows:
- maximum current consumption – 35 Amperes;
- load duration at 250 Amps – not less than 70%;
- welding adjustment interval – 10-250 Amperes;
- operating ambient temperature range – -10/+40С;
- electric arc voltage – 30 Volts.
If necessary, this device can be connected to the equipment of a generator that runs on gasoline. It is best to choose a generator with a power above five kilowatts.
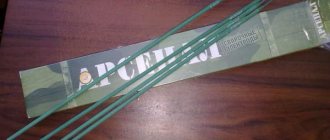
Attention! When choosing a welding electrode (the electrode can have a diameter of no more than 6 millimeters), it is also necessary to take into account that the welding current decreases when the input current decreases.
SAI 160
Belongs to the budget category. A primer for a beginner in welding. However, it will allow you to cook, say, a greenhouse in the garden. If your requests for welded configurations are also unpretentious, this is what you need!
What you can do with a 160 Ampere welding current on hand Apply a patch to a barrel-type container or eliminate a leak in a garden water supply.
Start building a fence on your property. Weld a simple, but with a twist gate. This is enough for a standard “kit” for a country welder.
Getting started is easy. Socket + 220 volts. The operating principle is the same for all AIS models. The power is small, so you don’t expect to spend a lot on electricity. For an electrode, a diameter of 2 to 3 mm is sufficient.
The budget option also has anti-stick and hot start functions. It will greatly simplify the work of novice craftsmen. The SAI160 kit is similar to other inverters.
We are talking about welding cables, holder and ground. A mask will be a separate purchase. In this case there is an advantage. In the retail chain, you can choose the right size for yourself and take into account the specifics of the welding that you have to do.
The kit may only include a modest mask-shield, the eyelid of which may turn out to be unpleasantly short. The manufacturer will not think about the above-mentioned nuances. When buying SAI 160, take care of the cables. You can hardly expect super quality from complete ones. Below is a diagram of the device.
How much does it cost to repair a Resanta 250 welding machine in Ryazan?
The work of replacing spare parts in this welding machine (Resanta 250) cost 1,500 rubles, the radio components needed for repairs cost 880 rubles, that is, 4 IGBT transistors for 220 rubles each. Small things in the form of 10, 100 Ohm resistors, 18 volt Zener diodes and other passive components, completely free.
Total: 2380 rubles.
The client was very satisfied, therefore, without violating the principles of the service industry: “ Once a client, always a client .” We repair Resanta welding machines in Ryazan: 8951-109-3200 .
How to prepare a welding machine for work?
The scheme for preparing a welding device for operation is quite simple, but it must be carried out as accurately as possible if you want the device to serve you for a long time and without repair. First of all, you need to connect the cord with the electrical holder and the ground wire to the power terminals of the device (you definitely need to pay attention to the polarity of the welding rod you are using).
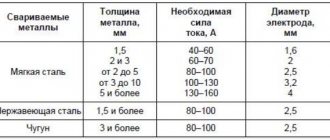
Set the regulator to minimum welding current , then you can connect the inverter to the mains, and then turn it on. The required level of welding current must be selected from the calculation of indicators recommended by the manufacturer of Resanta SAI:
- 200-300 Amperes – electrode diameter 6 millimeters;
- 160-200 Ampere – 5 millimeters;
- 130-160 Ampere – 4 millimeters;
- 90-140 Amperes – 3.2 millimeters;
- 60-90 Amperes – 2.5 millimeters;
- 50-60 Ampere – 2 millimeters;
- 25-50 Amperes - 1.6 millimeters.
After welding, the current is set to the minimum value using the regulator, the inverter is turned off (first with the switch, and then from the mains). You also need to disconnect the electrical holder and grounding cord from the device.
Checking PN
Since the current characteristics of all inverters are overestimated, the voltage limit indicated on the inverter nameplates is also not true. To imagine what load duration the sources have, let’s calculate their approximate operating mode. To do this, all devices will be loaded with their real maximum current and placed in a heat chamber (at a temperature of 40 degrees). Based on the time that each source can stay in the thermal circuit without turning off, we will draw conclusions about the real PN.
When coming to the store to buy a new welding inverter, a professional welder pays attention to the continuous load current, which is indicated on the nameplate. The numbers indicated there indicate the threshold current values that the welder can set at the source without fear of the machine shutting down due to overheating, regardless of operating time. Incorrect data indicated in the PN100% column can mislead the welder and lead to forced downtime.
Test results obtained in a thermal chamber
| Inverter | Imax, A (maximum inverter current in the heat chamber) | Time spent in the chamber before the overheating indicator turns on | Real value of PN, % at max. current | Declared PN value, % at max. current | Real PN 100% (continuous load current), A | Declared PN100%, (Continuous load current), A |
| SAI160K | 120 | 2 min 36 sec | 26 | 70 | 61 | 100 |
| SAI 190K | 140 | 2 min 14 sec | 22 | 70 | 65 | 120 |
| SAI 220K | 160 | 1 min 56 sec | 19 | 70 | 70 | 140 |
| SAI 250K | 183 | 3 min 13 sec | 32 | 70 | 101 | 160 |
Safety requirements at work
Before switching on, the device must be kept at positive air temperatures for several hours. Otherwise, condensation may appear in it, which can lead to damage to the inverter. It is strictly forbidden to operate the device in cases where its welding cords or power connection wire are deformed (even small ones).
Near the switched on welding machine, you cannot process metal and steel parts using grinders, electric jigsaws and similar equipment, during the operation of which metal dust appears . Dust can get inside the housing and damage the inverter. In addition, it is prohibited to operate the unit in open areas in the rain or in rooms with high humidity.
Before operating the Resanta SAI inverter, you must study the “Safety Rules for Users of Electrical Devices” and “Rules for the Operation of Household Electrical Installations.” When operating the welding machine you need to:
- create access to fresh air in the room where welding work is carried out (when welding takes place in a room, it must be well ventilated);
- work in a welding protective mask, gloves, headgear and special clothing that protects the body from possible thermal burns;
- comply with fire safety rules.
The welding device must be stored in rooms where the formation of acidic or alkaline vapors is excluded, and there is also no excessive dust. Optimal characteristics for storing the device:
- temperature – no higher than +55 and no lower than -15 degrees;
- relative humidity – no more than 70 percent.
Selecting the type of protection
The modern market for electrical appliances offers two types of voltage stabilizers: stationary (for the whole house) and mobile (serves one or more electrical appliances). Also, depending on operating conditions, stationary units are divided into single-phase and three-phase. Installing a voltage stabilizer has certain differences: connecting to 220 V or 380 V.
In a country house or apartment, as a rule, a single-phase model is installed, which protects the entire network from overloads.
Do-it-yourself repair of a Resanta welding machine
The operating reserve and potential of this inverter is quite high. The device is classified by many foreign experts as one of the best in its group. If this equipment is used correctly, its repair may not be required for years (even if the inverter is used quite actively). But, of course, equipment does not last forever, so you need to be prepared for the fact that the welding device will probably need to be repaired.
It is best to do repairs by craftsmen (in many localities there are authorized centers that deal with equipment). Moreover, the user can fix some minor breakdowns with his own hands. For example, when an overheating indication appears , you need to clean the device from the dust accumulated in it.
But if the welding machine cannot reach maximum power, then drying the electrode that is used for welding can help. Often, a wet welding rod is the cause of poor equipment performance. The same problem appears in cases where the voltage in the electrical network is very weak.
Join the conversation
It is perfect for those who need maximum performance for household repairs and training. Can work with coated electrodes with a diameter of 1.6 - 4 mm.
When choosing a welding electrode, the electrode can have a diameter of no more than 6 millimeters, it must also be taken into account that the welding current decreases when the input current decreases.
Now about the characteristics.
This is an important plus, since Resanta boasts a developed network of service centers throughout Russia.
The optimal electrode diameter for welding is mm.
Thanks to this, the device is suitable both for delicate welding with thin electrodes, when the thickness of the metal being welded is minimal, and for more difficult operations in which welding or cutting of very thick metal is performed. One in the gate circuit of the field-effect transistor 4N90C at 47 Ohms is marked - , and two at 2.4 Ohms 2R4 - connected in parallel - in the source circuit of the same transistor. Wide-pulse modulation of the resulting high-frequency voltage allows such devices to regulate the welding current. In this case, the existing problem can be solved by using electric generators that are installed in close proximity to the welding machine. Resanta SAI-220A: repair for yourself
Scheme of the welding machine Resanta Sai 250
The fact that the pulse feeder in Resanta inverters often fails is a fairly well-known fact, this inverter was confirmation of this - the UPS is the weak link of these devices, although in general Resanta are good welders and are quite repairable.
But, as they say, repetition is mother. something there. so let’s run at a light gallop over a similar defect.
So: the Resanta SAI 250 inverter does not start
.
Carbon deposits are visible under resistor R010, most likely it has burned out. Resistor R013 is clearly burned out. All this suggests that the switching power supply has failed.
Now let's check. Resistor R010 22 Ohm 2 W - power is supplied through it to the primary winding of the TPI - broken. Resistor R013 1.2 Ohm - located at the source of transistor Q02 4N90C - is broken. Resistor R011 22 Ohm - located in the gate of the same transistor - is broken. Zener diode D012 18 volts - intact. Transistor Q02 4N90C - intact.
There is a chance that everything will work out by replacing these three resistors.
In the video, a hum can be heard due to a broken fan. But we’ll deal with the fan later, but for now the main thing is that everything is turned on. This is already making me happy.
Now we change all the dead resistors. It is worth saying that instead of R010 22 Ohm 2 W in these devices, the thrifty brothers from the Middle Kingdom usually install a one-watt 22 Ohm resistor.
It will be more reliable this way. Let's check the inverter again.
Video: Resanta SAI 250 welding inverter after repair.
As we can see from this video, pun :), everything starts up perfectly. That's what we wanted.
And “on the road” the operating mode of the UC3842B chip, just in case all the above operations do not lead to the desired result.
Attention! It is IMPOSSIBLE to predict all the nuances that arise during the repair of welding inverters. If in doubt, it is better to consult a specialist.
Repair of welding inverters from Resanta and other manufacturers.