A screwdriver is one of the most popular electrical tools used by professionals and home craftsmen. It is necessary for carrying out construction and finishing work in the house and in production. They can be used to unscrew and screw in self-tapping screws, bolts, screws. There is a wide range of different bits available for this purpose. By inserting a drill bit, you can drill a hole in metal or wood. Knowing how to disassemble a screwdriver chuck is necessary for its maintenance and repair. Regular cleaning will extend the life of the tool.
What is a cartridge
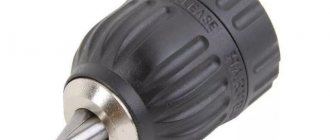
The cartridge resembles a metal cylinder. The part is attached to the screwdriver shaft.
The purpose of the element is to fix the working bits of fasteners.
Chuck device
The internal thread on the chuck or a special cone is designed for mounting on the shaft. Structurally, the most wearing components are divided into three main types:
- quick-clamping (BZP);
- self-clamping;
- gear-crown (key).
The most common option is BZP.
The shank in this case is clamped by manual rotation of the tool sleeve.
Clamping elements, which are installed on modern screwdrivers and drills, allow you to securely fix shanks with a diameter of 0.8-25 mm.
Perhaps the only disadvantage of a new product of this type is the higher cost relative to key sleeves.
To fix an element in a clamping product like BZP, a few seconds are enough.
In this case, the help of auxiliary components is not required.
The blade of the adjusting sleeve is corrugated, so rotation of the cylinder is not difficult.
The pressure on the product shank is adjusted using a locking element.
Over time, parts of the clamping mechanism wear out.
Therefore, the design of a cartridge of the BZP category implies a gradual loosening of the clamp.
As a result of wear, the sleeve is not able to reliably fix large diameter round shanks.
In disassembled form, self- and quick-clamping models are:
- sleeve;
- base;
- movable jaws;
- washer;
- bearing;
- serrated nut.
Design and features of the toothed chuck
Unlike popular modern sleeves, this classic version requires the use of a special key. But in this case, a more reliable fastening is possible in any situation.
ZVP refers to cam or collet type clamping sleeves.
They make it possible to clamp both products with round shanks and cylindrical elements. Main components of cam VEP:
- cylindrical body;
- an adjusting sleeve or ring that rotates externally;
- cam mechanism, which is mounted inside.
The collet mechanism is made of durable steel.
It consists of three twin cams.
When the sleeve or ring rotates, the latter form a single whole.
Due to this, reliable fixation of products occurs.
How to repair a clamping cylinder
Often the reason for removing and disassembling the screwdriver head is to repair individual parts and eliminate defects. Read more about how to do it yourself at home.
With backlash
If the deviation of the sleeve during operation does not exceed 1 mm, then this is not critical. If there is more play, you will need to disassemble the device. Repairing a screwdriver chuck for this case is performed as follows:
- Unscrew the fasteners on the top cover of the tool and remove it.
- Disconnect the engine from the gearbox and carefully check all fastenings.
- Disassemble the gearbox. If the bushing fails, then it is the cause of the strong play. This part must be removed manually and replaced with a new one.
Disassembled gearbox
- Next, you need to lubricate all the rubbing elements and assemble the gearbox back in a clear sequence: bushing - shaft - bearings - retaining ring.
- The gearbox is attached in place to the engine.
- The top cover of the screwdriver is screwed back.
When the cylinder runs out
If there is beating of the chuck in the screwdriver, the reason also lies in the gearbox. It must be dismantled, disconnected from the electric motor, disassembled, and carefully inspect all the parts. A broken cartridge case is a consequence:
- violations of shaft geometry;
- wear of gears, pins;
- failure of the shaft bearing.
After identifying the broken elements, you need to purchase new ones, install everything correctly, assemble the gearbox back and attach it to the engine.
When jammed
Another common problem is that the cartridge begins to jam. This is caused by the jaws losing full clamping over time. To repair the head, there are several methods:
- Carefully lubricate the cylinder in all places - perhaps this is the only reason.
- Squeeze the cartridge in your hand and hit it hard 1-2 times on a hard wooden object - a beam or a stable table.
- Compress the body with a vice and the cylinder with a gas wrench. Place the screwdriver against the table with the chuck and turn it on.
Often the head jams after it becomes clogged with sawdust and other small debris. If there is a suspicion of clogging, the cylinder should be thoroughly heated with a hair dryer, or even better, held over an open fire for several minutes. The part is then thoroughly lubricated.
When scrolling
If the cartridge rotates, then the problem is most likely due to the abrasion of the teeth on the locking coupling. The problem is solved like this:
- Remove the coupling.
- In place of the ground teeth you need to drill small holes.
On the left is the coupling and its teeth.
- Insert screws into the holes. Their protruding parts are removed with pliers.
- Return the coupling to its place and check how the cylinder now moves.
Types of cartridges
More details about the types.
Screwdriver clamping devices are divided into:
- quick-clamping:
— single-coupler; — two-coupling;
- self-clamping;
- key.
The first two types are similar.
The difference lies mainly in the fact that self-clamping models fix the products automatically.
If the tool has a locking mechanism, single-clutch cylinders can be used.
If there is no blocker, you will have to use a two-clutch type.
Elements with one coupling can be clamped with one hand.
To work with another type, the participation of both hands is required.
Quick- and self-clamping models are intended mainly for modern tools.
For example, for pneumatic screwdrivers.
Models with automatic clamping are convenient for those who need to quickly and often change different attachments.
Key options are less convenient, but more reliable. They clamp better and are more resistant to shock loads.
If the cylinder will be used intensively, it is recommended to choose a screwdriver with a key.
Mounting methods
There are three ways to attach the clamping cylinder to the spindle:
- using thread;
- using a fixing screw;
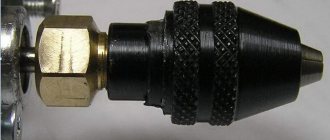
- using a Morse taper.
The first method involves the presence of threads on two parts in contact.
The cylinder is screwed onto the shaft.
The screw is used as a contact amplifier between the sleeve and the shaft.
In this case, screwing also takes place, but the fixing component serves for additional fastening.
The screw is usually characterized by a left-hand thread and the presence of a “cross” head.
To see the element, you need to move your fists as far apart as possible.
The Morse taper is a variant that has been used for over a hundred years.
The surface of the shaft has a cone-shaped format, similar to the shape of the cartridge.
The matching parameters of both cones make it possible to reliably and quickly combine parts.
This option is used in many modern models (pneumatic, etc.).
How to determine the fastening method
Before figuring out how to remove the chuck from a screwdriver, you need to determine the method of fixation.
A tool that uses a clamping device with a Morse taper fastening type may be marked B10, B12, B14, etc.
According to GOST, there can be 9 standard sizes - from B7 to B45.
The number indicates the size of the cone.
Next to it, in millimeters, the range of diameters of the shanks of fasteners that are suitable for fastening in this screwdriver is indicated.
The screwdriver chuck with a threaded fastening has a different marking.
On domestic models you can find the type designation 1.0-11 M12x1.25.
This marking is in metric format.
The numbers before the letter indicate the permissible shank size, the rest - the thread size.
Foreign screwdrivers use the inch designation.
For example, a part may be marked as follows: 2-13 mm ½-20 UNF.
Here the first numbers are the diameter of the bits, the fraction is the diameter of the thread in inches, 20 is the number of threads in each inch.
How to remove and change the cartridge
You need to understand how to remove the chuck from a screwdriver even if repairs have not yet been made and are not expected.
The procedure must be performed periodically for routine cleaning and lubrication.
This will increase the service life of the tool.
There are various ways to remove the clamping device.
The method depends on the manufacturer of the screwdriver and the specific type of model.
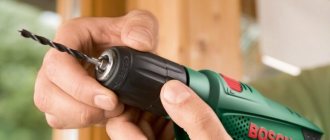
Below we will look at how to remove the Bosch and Makita cartridge.
Using the example of these brands, it will be possible to handle tools from other manufacturers - remove the cartridge "Interskol", "Metabo", "Dewalt", "Zubr", etc.
Attention!
It must be remembered that we remove the cartridge only from a cooled tool.
Correctly removing a heated element will be more difficult, since the rotating parts are firmly fixed in the socket for a long time.
First, let's look at how to unscrew a cartridge with a fixing screw.
To do this you will need a hexagon of the appropriate size.
A diagram describing how to change the cartridge with this mounting method:
- unscrew the screw clockwise (if the part has a left-hand thread); To do this, open your fists to the maximum;
- insert the key into the cams and turn it sharply counterclockwise; for this you can use help - for example, a hammer;
- unscrew the cartridge.
Read more about how to replace a cartridge with a different type of mount.
If jammed
Chuck in screwdrivers Elitech, Flex PD 2G 18 volt, Bort, Whirlwind, Patriot, AEG BS D, Dexter, Makita DF 331 D, etc. can jam if the user has to unclench the cams to the maximum, and then they cannot be returned to their place, no matter how much effort is applied. In this case, a drill of the maximum size allowed is inserted.
The jaws cannot be opened in order to remove a bit or drill clamped in the chuck if they are unevenly compressed . Because of this, the attachments may dangle and the fastening will be unreliable.
Rarely do the jaws jam during their free movement , when compression or expansion occurs. The reason is that chips, scale or debris have gotten under the figured part of the cams. To wedge it all, you need to remove and clean it all.
Regardless of the cause of the jamming, the first step is to lubricate the internal cavity of the cartridge. To do this, use the correct, special lubricant . WD-40 works well . This universal lubricant is also introduced onto the surface of the cams. They stand for 15 minutes, so they gently tap the chuck and jaws without excessive effort. If you tap with a simple hammer, then it must be done through a fabric pad, but it is better to use a rubber one.
When a bit jams in the chuck of a screwdriver of some brands, for example, Bosch, the problem is solved using 2 adjustable wrenches . But first, be sure to lubricate the parts. Use one key to grab the base of the cartridge, and use the other to carefully twist the top part. To avoid damaging anything, the procedure is performed through dense, soft tissue pads.
Methods for removing the cartridge
To remove the cartridge you need to know how it is secured.
If you need to replace the chuck in a screwdriver with Morse taper type locking, you need the help of a hammer.
The last thing to knock out is the shank from the housing socket.
Sometimes the method may not work.
In this case, you need to take a radical path:
- disassemble the screwdriver;
- we take out the shaft with gearbox and chuck;
- Using a pipe wrench, unscrew the clamping cylinder.
In rare cases, the sleeves may have wrench-type recesses.
This simplifies the task, but it is better not to count on it.
Rules for using a screwdriver
It is possible to ensure long-term operation of the tool if you adhere to simple operating rules:
- protect the unit from moisture;
- Be sure to adjust the tool before use;
- disconnect the battery when changing attachments;
- If not used for a long time, periodically run the screwdriver to discharge the battery;
- have several spare batteries.
Replacing a chuck in a screwdriver in a home workshop can be done by any man. By using the methods described above, you are guaranteed to complete this operation quickly and with a minimum of effort.
In our country, screwdrivers, as a household and industrial tool, appeared not so long ago. They were first used in the space industry, and then screwdrivers found application in ordinary human life.
Among the main parts of this equipment is a mechanism consisting of a hollow cylinder, an adjusting sleeve and clamping cams. This mechanism is called a cartridge.
disassembled cartridge
How to remove a cartridge with a threaded connection
Let's look at how to remove a chuck from a screwdriver, in which the cylinder is attached to the spindle using a thread.
The scheme is as follows:
- unscrew the threaded fastener using an L-shaped hexagon;
- insert the key (usually 10 mm) with the short part into the cylinder and securely fix it with cams;
- turn the screwdriver on and off at low speeds; in this case, the free part of the hexagon should hit the support.
As a result, the threaded fixation will loosen and the clamping cylinder can be easily removed from the spindle.
If the mount is very strong and all three methods do not work, then you need to disassemble the tool.
How to remove the sleeve in this case is described above.
Situations requiring disassembly of a drill or screwdriver arise when preventive maintenance is neglected - routine removal and cleaning of the “clamp”.
In addition, it is recommended to rest the instrument at least every 15 minutes.
Then the repair can be postponed, and unnecessary difficulties with removing the clamping device can be saved.
Examples of cartridge removal
Owners of Makita screwdrivers are usually faced with the need to remove a chuck that uses a threaded fixation with an auxiliary screw fastening.
In such cases it is necessary:
- unscrew the screw;
- activate the shaft stop button;
- wrap the screwdriver body with thick cloth and secure it in a vice;
- hold the hex key in your fists;
- hit the key with a hammer and unscrew the cylinder.
Bosh tools are also most often equipped with a locking screw.
To remove the chuck, it is not always necessary to clamp the screwdriver body in a vice.
In many cases, it is enough to place it on a table or other support, press the stop button, remove the cartridge retainer and the cylinder itself.
Models from other manufacturers must be dealt with using one of the described methods.
The sequence of actions in these cases is similar:
- determine the fastening method;
- According to the diagram, we remove the part.
The nuances of removing, disassembling and replacing heads on screwdrivers from different manufacturers
The design of the screwdriver chuck is such that the procedure for its removal, disassembly and replacement is generally the same and standard for all models. The differences are only in the subtleties for each company.
- Makita
Household tools from this manufacturer are often equipped with a plastic head. It should be removed carefully, because the risk of damage is higher than that of a metal sleeve. Quick-clamping devices on Makita screwdrivers are usually single-socket.
- Bosch
The cylinders on Bosch screwdrivers are designed similarly to Makita and are removed and disassembled in the same way. The only difference is that Bosch has a fixing screw in the cylinder. It must be unscrewed clockwise.
- Bison
To replace the cartridge, you need to unscrew it clockwise from the shaft.
Removing the head on screwdrivers of the Interskol, Hitachi, DeWalt, Metabo, and Vikhr models is not very diverse. The procedure is:
- Unscrew the fixing screw using a Phillips screwdriver. It is recommended to lightly lubricate the pre-unscrewed element with WD-40. This will not only loosen the strong clamp, but will also dissolve any rust if there is any.
- Clamp an L-shaped hex key of 10 mm or more with the short side into the chuck.
- On the long side of the hexagon, it is worth applying one pointed blow with a hammer in a clockwise direction. It is necessary to hit the hexagon, and not the cylinder itself: this can break the clamping device and deform the screwdriver shaft.
- After the impact, you can unscrew the cartridge by hand.
You only need to hit the hexagon
How to disassemble a screwdriver chuck
Sometimes disassembly of the cartridge is required.
To perform this operation, you need to remove the plug at the base.
It is enough to pry off the plastic part with a knife.
The metal one can be knocked out with a heavy object by hitting the base of the clamping sleeve.
The process is as follows:
- take a large bolt and insert it into the cylinder, after which it is slightly centered with a small clamp of the cams; in this case, the head of the bolt protrudes a couple of centimeters above the sleeve;
- hit the bolt with a hammer.
After this, the most interesting part remains - disassembling the cylinder itself.
It is necessary to divide it into its component parts - sleeve, base, washer, bearing and nut.
The design may be slightly different, but in general the part consists of these elements.
In rare cases, it is impossible to disassemble the cylinder without damaging it and being able to reassemble it in the same form.
But if the design suggests such a possibility, then you can use the following method.
Instructions on how to disassemble the cartridge in the simplest and most effective way - using a hammer drill:
- some kind of adapter is inserted into the hammer drill; the role of the latter can be played, for example, by a broken drill with a diameter of 10-12 mm;
- put the cartridge on the adapter with the back side - the one opposite the cams;
- remove the cams and rest the cylinder against a hard surface, but always through a shock-absorbing buffer (rubber, foam, etc.);
- turn on the hammer drill in impact mode.
Thanks to vibration, we disassemble the cartridge in a matter of seconds.
As a result of manipulations, the sleeve flies off the cylinder, exposing other parts.
After cleaning, the elements are easily put back together.
It is important not to mix up the cams - although they are similar, during the operation of the tool the parts grind in and require correct assembly.
Some complex designs require sawing of the coupling.
After maintenance or repair work, the halves are assembled using a makeshift “tire”.
But in most cases, the indicated method - using an impact drill or hammer drill - works.
Do-it-yourself repair of a Zubr screwdriver
In this paragraph we will briefly look at the main screwdriver malfunctions that arise both in the structural elements and in the electrical part.
You will have to check the contacts and electrical circuits of the tool if:
- it is impossible to turn on the screwdriver;
- there is no possibility of switching reverse mode;
- it is impossible to regulate the number of revolutions of the tool’s working body per minute.
Having discovered these malfunctions in the device, the first thing you should pay attention to is such an important element as the battery. In the simplest case, you will get away with simply charging the battery. In the rest, you will have to use a multimeter to more accurately detect the problem. The voltage on the battery is measured. If the values do not match those indicated on the case, either the battery or the charger may be faulty. The charging unit is checked using a multimeter. Each battery included in the battery must be tested. If faulty batteries are found, they must be replaced with new ones of similar capacity.
When repairing the start button, you will need some knowledge in the field of electronics and radio engineering, namely: the ability to read circuit diagrams and soldering skills. When disassembling this element, close attention should be paid to darkened or charred contacts and terminals, and if necessary, clean them with sandpaper. A complete replacement of the starting system is possible if it is impossible to regulate the speed of the working element with a button. This can be observed if, with different pressures on the button, the speed does not change synchronously with this force.
If a switch or reverse button breaks, you can repair it yourself. The process of repairing it is similar to repairing the start button. You should pay attention to the condition of the contacts and terminals of the structure.
How to choose a new cartridge
A screwdriver chuck is selected based on a number of aspects. When choosing a suitable part, you should be guided by the following recommendations:
- if bits have to be changed frequently, it is better to prefer quick- or self-clamping cylinders; otherwise the work will go slower;
- gear-rim design - the choice of those who strive for maximum cartridge reliability; if 100% fixation of the bit is a priority, it is better to purchase a key cartridge;
- when choosing a part, it is necessary to take into account its characteristics; parameters are regulated by relevant GOSTs; the larger the clamping cone, the larger the number with which it is marked;
- it is necessary to take into account the country of origin - the alphanumeric designations of foreign models differ from domestic ones.
If it is difficult to decide on the type of “clamp” on your own, it is better to seek advice from a specialist.
An incorrect choice is tantamount, at a minimum, to incorrect operation of the tool.
In the worst case, it is possible not only to re-spend on a new cylinder, but also to replace the entire screwdriver.
Selecting a New Tool
If the old cartridge could not be carefully disassembled and repaired, then it is necessary to replace it. You'll have to choose a new one. It should be noted that different types of cartridges can be installed in the design of screwdrivers. They can be keyed or keyless, as well as quick-clamping. The key product is different in that the clamp on it can be done better. Keyless chucks are not inferior in this parameter, but they have to be changed quite often, since the clamping mechanism very quickly becomes unusable.
If you have to frequently change the equipment when removing the chuck, it is preferable to choose a quick-clamping option, since if you replace the old part with it, you can save time on this procedure. When using large-diameter equipment, it is best to purchase a key chuck.
There are cartridges that are secured inside the device using a cone. They are also available with a key or are quick-release. The choice always remains solely with the buyer.