This is one of the most common tools, which is available in every family for cutting all kinds of materials, but does not always perform its tasks clearly enough.
Rough operation is caused by improper sharpening of the blades or unbalanced movement of the cutting edges.
Eliminating them is quite simple for anyone with a regular set of sharpening devices. To do this, it is necessary to understand the principles of creating a cut.
The article provides advice to the home craftsman on how to sharpen scissors and adjust their blades for proper DIY work at home, with explanations along the way using pictures, diagrams and a video.
- Scissor straightening tools
To understand the principles of sharpening and setting up a tool, you should understand its design and the basics of cutting the materials being processed.
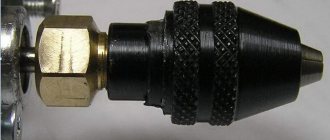
What is a cartridge
The cartridge resembles a metal cylinder. The part is attached to the screwdriver shaft.
The purpose of the element is to fix the working bits of fasteners.
Chuck device
The internal thread on the chuck or a special cone is designed for mounting on the shaft. Structurally, the most wearing components are divided into three main types:
- quick-clamping (BZP);
- self-clamping;
- gear-crown (key).
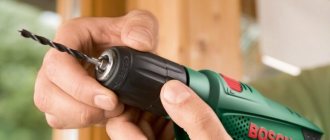
The most common option is BZP.
The shank in this case is clamped by manual rotation of the tool sleeve.
Clamping elements, which are installed on modern screwdrivers and drills, allow you to securely fix shanks with a diameter of 0.8-25 mm.
Perhaps the only disadvantage of a new product of this type is the higher cost relative to key sleeves.
To fix an element in a clamping product like BZP, a few seconds are enough.
In this case, the help of auxiliary components is not required.
The blade of the adjusting sleeve is corrugated, so rotation of the cylinder is not difficult.
The pressure on the product shank is adjusted using a locking element.
Over time, parts of the clamping mechanism wear out.
Therefore, the design of a cartridge of the BZP category implies a gradual loosening of the clamp.
As a result of wear, the sleeve is not able to reliably fix large diameter round shanks.
In disassembled form, self- and quick-clamping models are:
- sleeve;
- base;
- movable jaws;
- washer;
- bearing;
- serrated nut.
Design and features of the toothed chuck
Unlike popular modern sleeves, this classic version requires the use of a special key. But in this case, a more reliable fastening is possible in any situation.
ZVP refers to cam or collet type clamping sleeves.
They make it possible to clamp both products with round shanks and cylindrical elements. Main components of cam VEP:
- cylindrical body;
- an adjusting sleeve or ring that rotates externally;
- cam mechanism, which is mounted inside.
The collet mechanism is made of durable steel.
It consists of three twin cams.
When the sleeve or ring rotates, the latter form a single whole.
Due to this, reliable fixation of products occurs.
Tool
To sharpen scissors, use the following tool:
- sandpaper;
- file;
- machine with diamond wheel;
- whetstone;
- special sharpener;
- homemade gear device.
At home, you may not have special tools, so you can sharpen manicure or sewing scissors using improvised materials:
- a sheet of foil;
- needle, bottle or pin.
Types of cartridges
More details about the types.
Screwdriver clamping devices are divided into:
- quick-clamping:
— single-coupler; — two-coupling;
- self-clamping;
- key.
The first two types are similar.
The difference lies mainly in the fact that self-clamping models fix the products automatically.
If the tool has a locking mechanism, single-clutch cylinders can be used.
If there is no blocker, you will have to use a two-clutch type.
Elements with one coupling can be clamped with one hand.
To work with another type, the participation of both hands is required.
Quick- and self-clamping models are intended mainly for modern tools.
For example, for pneumatic screwdrivers.
Models with automatic clamping are convenient for those who need to quickly and often change different attachments.
Key options are less convenient, but more reliable. They clamp better and are more resistant to shock loads.
If the cylinder will be used intensively, it is recommended to choose a screwdriver with a key.
Working principle of a micrometer
Micrometers may differ slightly in design, but the principle of operation is the same - the part is placed between the stationary heel of the device, after which it is secured with a screw that rotates in a threaded bushing.
When the device is firmly fixed, you will hear a corresponding click of the drum. Now you need to take measurements. As we have already found out, the micrometer has two scales - a fixed one on the stem (in mechanical structures, the division value is usually 1 mm), then we look at the data on the rotating drum scale (these divisions show fractions of a millimeter). There are 50 divisions on the drum, the microscrew pitch is 0.5 mm. A full revolution of the drum gives us a movement of the microscrew by 0.5 mm. Thus, by adding the dimensions from two scales, we obtain the exact size of the part.
Important! When working with the tool, special attention should be paid to the tightening force of the screw. Exceeding the permissible limit can lead to damage to the thread of the device or deformation of the measured object.
Mounting methods
There are three ways to attach the clamping cylinder to the spindle:
- using thread;
- using a fixing screw;
- using a Morse taper.
The first method involves the presence of threads on two parts in contact.
The cylinder is screwed onto the shaft.
The screw is used as a contact amplifier between the sleeve and the shaft.
In this case, screwing also takes place, but the fixing component serves for additional fastening.
The screw is usually characterized by a left-hand thread and the presence of a “cross” head.
To see the element, you need to move your fists as far apart as possible.
The Morse taper is a variant that has been used for over a hundred years.
The surface of the shaft has a cone-shaped format, similar to the shape of the cartridge.
The matching parameters of both cones make it possible to reliably and quickly combine parts.
This option is used in many modern models (pneumatic, etc.).
Line arrangement in the mower
The structure of the element on which the nylon thread is wound is very simple. This element is called a coil. It has two “tracks” - upper and lower. Between these tracks there is a special partition with a recess. A fishing line is wound around these tracks. It must first be pulled through the notch.
To be able to pull out the reel without any obstacles, you need to unscrew the special button located on the mower body.
Features of replacing fishing line on video.
How to determine the fastening method
Before figuring out how to remove the chuck from a screwdriver, you need to determine the method of fixation.
A tool that uses a clamping device with a Morse taper fastening type may be marked B10, B12, B14, etc.
According to GOST, there can be 9 standard sizes - from B7 to B45.
The number indicates the size of the cone.
Next to it, in millimeters, the range of diameters of the shanks of fasteners that are suitable for fastening in this screwdriver is indicated.
The screwdriver chuck with a threaded fastening has a different marking.
On domestic models you can find the type designation 1.0-11 M12x1.25.
This marking is in metric format.
The numbers before the letter indicate the permissible shank size, the rest - the thread size.
Foreign screwdrivers use the inch designation.
For example, a part may be marked as follows: 2-13 mm ½-20 UNF.
Here the first numbers are the diameter of the bits, the fraction is the diameter of the thread in inches, 20 is the number of threads in each inch.
A little history
The first micrometer was invented in 1848 by the Frenchman J. Palmer, and in 1867 it was presented at the Paris Exhibition, where it was bought by the Americans Sharp and Brown. In 1877, they proposed their own design, which has been produced to this day almost unchanged.
A rare micrometer from the 19th century, there are no thermal insulating linings yet, the pitch of the screw pair is about a millimeter
For that time, the precision of the tool was excessive, since most machines did not allow the production of parts with such a small tolerance. The main use of the micrometer began already in the twentieth century.
Soviet period pointer micrometer
Modern realities have made their own amendments - and the requirements for the accuracy of parts have increased noticeably, and new possibilities for accurate measurement have appeared.
Modern digital micrometer and the ability to measure in inch and metric systems
How to remove and change the cartridge
You need to understand how to remove the chuck from a screwdriver even if repairs have not yet been made and are not expected.
The procedure must be performed periodically for routine cleaning and lubrication.
This will increase the service life of the tool.
There are various ways to remove the clamping device.
The method depends on the manufacturer of the screwdriver and the specific type of model.
Below we will look at how to remove the Bosch and Makita cartridge.
Using the example of these brands, it will be possible to handle tools from other manufacturers - remove the cartridge "Interskol", "Metabo", "Dewalt", "Zubr", etc.
Attention!
It must be remembered that we remove the cartridge only from a cooled tool.
Correctly removing a heated element will be more difficult, since the rotating parts are firmly fixed in the socket for a long time.
First, let's look at how to unscrew a cartridge with a fixing screw.
To do this you will need a hexagon of the appropriate size.
A diagram describing how to change the cartridge with this mounting method:
- unscrew the screw clockwise (if the part has a left-hand thread); To do this, open your fists to the maximum;
- insert the key into the cams and turn it sharply counterclockwise; for this you can use help - for example, a hammer;
- unscrew the cartridge.
Read more about how to replace a cartridge with a different type of mount.
Preparing for replacement
Disassembling the trimmer spool
For clarity, the mowing head (spool) was removed from the brush cutter. There is no need to remove the fishing line to replace it; everything is done locally. It doesn't take much time.
We disassemble the trimmer spool - it is held on by latches. Remove the cover by pressing the latches. If there is not enough effort to do this with your hands, then use a screwdriver.
The spool consists of the following:
- Housing with spring
- Cover with locking latches
- Reel with button
The operating principle is as follows. By pressing the button, the reel presses on the spring and comes out of the fixing grooves in the spool cover. By holding the reel in this state, you can twist it, thereby adjusting the length of the fishing line. When the button is released, the housing spring returns the coil to its original fixed state.
Disassembled trimmer spool
There are several holes on the bottom of the reel for different diameters of lines. These may differ between trimmer manufacturers. In some cases (like here) they are signed, in others they are not.
These holes are needed to fix the fishing line when replacing it. After winding the fishing line around the bobbin, the ends of the latter are inserted into them. This is necessary so that the line does not unwind when the reel is installed in the trimmer body. In other words, it makes line changes easier.
Holes for fixing fishing line
There are models without indicating the diameter of the consumables. Then, in order to find out what maximum diameter of the line can be used, it is tried on using the holes for the line exit from the trimmer spool body (see the figure below).
Trying on the fishing line exit holes
The reel has two sections for fishing line, separated by a partition. They may not exist. They are needed only to differentiate and facilitate winding of consumables.
Methods for removing the cartridge
To remove the cartridge you need to know how it is secured.
If you need to replace the chuck in a screwdriver with Morse taper type locking, you need the help of a hammer.
The last thing to knock out is the shank from the housing socket.
Sometimes the method may not work.
In this case, you need to take a radical path:
- disassemble the screwdriver;
- we take out the shaft with gearbox and chuck;
- Using a pipe wrench, unscrew the clamping cylinder.
In rare cases, the sleeves may have wrench-type recesses.
This simplifies the task, but it is better not to count on it.
Battery trimmer options
Cordless scythes are easy to use; they actively help clear the area near your home from grass. Such devices contain batteries with a charge indicator. The bar and handle can be easily adjusted.
Advantages of battery trimmers:
Stihl fs 38, thread the line without removing the head
- You can care for lawns without noise or wires;
- ideal for amateur use;
- It is light in weight and has good balance.
The equipment comes in a series, and it includes the following.
- Barbell with height adjustment. It can be adjusted at any time. Ideal for those conditions when the unit is used by several people, and everyone can adapt it to suit themselves.
- The handle is shaped like a circle and is easy to adjust. It has six positions.
- The mowing unit is adjustable. This can be done in four positions.
- The edge can be cut vertically. In this case, the angle can be changed up to 90 degrees.
The most famous versions of battery-powered braids are listed below.
How to remove a cartridge with a threaded connection
Let's look at how to remove a chuck from a screwdriver, in which the cylinder is attached to the spindle using a thread.
The scheme is as follows:
- unscrew the threaded fastener using an L-shaped hexagon;
- insert the key (usually 10 mm) with the short part into the cylinder and securely fix it with cams;
- turn the screwdriver on and off at low speeds; in this case, the free part of the hexagon should hit the support.
As a result, the threaded fixation will loosen and the clamping cylinder can be easily removed from the spindle.
If the mount is very strong and all three methods do not work, then you need to disassemble the tool.
How to remove the sleeve in this case is described above.
Situations requiring disassembly of a drill or screwdriver arise when preventive maintenance is neglected - routine removal and cleaning of the “clamp”.
In addition, it is recommended to rest the instrument at least every 15 minutes.
Then the repair can be postponed, and unnecessary difficulties with removing the clamping device can be saved.
Examples of cartridge removal
Owners of Makita screwdrivers are usually faced with the need to remove a chuck that uses a threaded fixation with an auxiliary screw fastening.
In such cases it is necessary:
- unscrew the screw;
- activate the shaft stop button;
- wrap the screwdriver body with thick cloth and secure it in a vice;
- hold the hex key in your fists;
- hit the key with a hammer and unscrew the cylinder.
Bosh tools are also most often equipped with a locking screw.
To remove the chuck, it is not always necessary to clamp the screwdriver body in a vice.
In many cases, it is enough to place it on a table or other support, press the stop button, remove the cartridge retainer and the cylinder itself.
Models from other manufacturers must be dealt with using one of the described methods.
The sequence of actions in these cases is similar:
- determine the fastening method;
- According to the diagram, we remove the part.
Results
If you have a summer cottage or a large plot of land near your individual house or cottage, then for the convenience of cleaning grass and weeds you need to use a lawn mower. If you are thinking about choosing an electric or gasoline lawn mower, then click here and you will find comparative characteristics of different models.
Over time, the line on the mower wears out and needs to be replaced - you can do this yourself. It is necessary to choose this polyethylene thread depending on the mower model. It is also worth keeping an eye on other parts of the unit; here, for example, you will find information about blades for Craftsman lawn mowers, which also wear out and can lead to irreversible consequences.
The structure of the reel into which the fishing line is inserted is very simple. But it differs depending on whether the spool is working with one or two tendrils of thread. It is important to follow safety precautions when replacing line in a reel.
How to disassemble a screwdriver chuck
Sometimes disassembly of the cartridge is required.
To perform this operation, you need to remove the plug at the base.
It is enough to pry off the plastic part with a knife.
The metal one can be knocked out with a heavy object by hitting the base of the clamping sleeve.
The process is as follows:
- take a large bolt and insert it into the cylinder, after which it is slightly centered with a small clamp of the cams; in this case, the head of the bolt protrudes a couple of centimeters above the sleeve;
- hit the bolt with a hammer.
After this, the most interesting part remains - disassembling the cylinder itself.
It is necessary to divide it into its component parts - sleeve, base, washer, bearing and nut.
The design may be slightly different, but in general the part consists of these elements.
In rare cases, it is impossible to disassemble the cylinder without damaging it and being able to reassemble it in the same form.
But if the design suggests such a possibility, then you can use the following method.
Instructions on how to disassemble the cartridge in the simplest and most effective way - using a hammer drill:
- some kind of adapter is inserted into the hammer drill; the role of the latter can be played, for example, by a broken drill with a diameter of 10-12 mm;
- put the cartridge on the adapter with the back side - the one opposite the cams;
- remove the cams and rest the cylinder against a hard surface, but always through a shock-absorbing buffer (rubber, foam, etc.);
- turn on the hammer drill in impact mode.
Thanks to vibration, we disassemble the cartridge in a matter of seconds.
As a result of manipulations, the sleeve flies off the cylinder, exposing other parts.
After cleaning, the elements are easily put back together.
It is important not to mix up the cams - although they are similar, during the operation of the tool the parts grind in and require correct assembly.
Some complex designs require sawing of the coupling.
After maintenance or repair work, the halves are assembled using a makeshift “tire”.
But in most cases, the indicated method - using an impact drill or hammer drill - works.
What else do you need to know about sharpening and caring for scissors?
Some useful tips
If the scissors become dull, then in order not to completely ruin the instrument, you should know and follow some nuances:
- You should not try to sharpen professional scissors on your own, as they require a special approach and knowledge when carrying out this process. Therefore, it is necessary to find a qualified craftsman who has special tools for this job. This type of scissors, as already noted, includes manicure, thinning, hairdressing and tailor's zigzag scissors.
- If you sharpen other types of scissors yourself, you should always observe the angle of the cutting edge specified during the manufacture of the tool.
- You should not disassemble the scissors if you are not sure that they can be assembled correctly, so that the blades fit tightly to each other.
Sharpening pruners with a file
- If work is carried out at home using a file or an abrasive stone, you cannot move it perpendicular to the blade, or back and forth. Movements should be directed only in one direction - from the connection of the blades to their end.
Possible reasons for poor scissor performance
In addition to the fact that scissors may become dull, there are several other reasons why a tool may begin to cut poorly. These include the following points:
- Sometimes it happens that the scissors are well sharpened, but still cut ugly. In this case, their blades should be brought together and turned to see if there is a gap between them. This is a common reason why a tool does not function as expected. And such a gap can arise due to high loads that are transferred to the tool during its operation. Because of this, the fastening weakens or even deforms the metal. In order to return the scissors to working condition, it is necessary to tighten the mounting bolt or align one or both blades. The bolt should not be tightened too much, otherwise the scissors will not work at all.
The gap between the blades will become a significant obstacle to high-quality cutting of fabric or paper.
If a rivet that has become loose is used as a fastening element for the two halves of the scissors, the scissors must be opened and placed on a solid surface, and then carefully hit the head of the rivet with a hammer so that it tightens again blades.
- Scissors can also be difficult to cut due to damage to the cutting edge. This can happen when trying to cut materials that are too hard for which the tool is not designed, or due to wear on the blades. If the reason for poor performance lies in a flaw in the sharp edge, then you should seek help from a workshop, where a master will sharpen and polish the cutting edge.
Rusty tailor's scissors can ruin expensive fabric.
- Rust on the inner surfaces of the blades can also cause the scissors to cut poorly or even not work at all. In this case, the plaque must be removed, otherwise it will leave a mark on all cut objects. The cleaning process can be carried out using improvised or special means. The latter perfectly eliminate plaque and will not damage the metal, but they are not cheap at all and are unlikely to be found in every home. The available tools that are available in every apartment include:
- baking soda mixed with water to a paste consistency;
- raw potatoes, cut in half;
- a solution of vinegar or citric acid.
One of these products is applied to a cotton swab, which is used to wipe the blades. If the plaque has already penetrated into the structure of the metal surface, you can first rub the surface with a metal kitchen sponge or “zero” sandpaper. This process should be carried out carefully so as not to damage the cutting part of the blade. After removing the bulk of the rust, the metal should be wiped with one of the above-mentioned products.
How to keep scissors in working condition for as long as possible
Scissors will function for a long time without repair if you follow the recommendations for their storage and operation. It is especially important to follow the following rules:
- If this is a specialized instrument—hairdressing or manicure scissors—that requires periodic disinfection, then it should be carried out exclusively with a special antiseptic.
And under no circumstances should you use boiling for disinfection! High temperatures will certainly cause unnecessary deformation of the metal. Plus, this is also an extra step towards the appearance of corrosion.
- Periodically, once every six months, it is recommended to lubricate the fastening mechanism with machine oil.
- Scissors should be used only for their intended purpose, and after use, wipe with a dry, clean cloth.
The case will protect the instrument from accidental damage and from moisture.
- The instrument must be stored in a case, and never left in a wet state, be sure to wipe them with a well-absorbing cloth.
* * * * * * *
So, in conclusion, it must be said that scissors are a simple tool that will work flawlessly if handled carefully and stored properly. As mentioned above, there is nothing difficult in sharpening scissors yourself if they are used for household needs. The workshop will help you sharpen and straighten a professional instrument.
How to choose a new cartridge
A screwdriver chuck is selected based on a number of aspects. When choosing a suitable part, you should be guided by the following recommendations:
- if bits have to be changed frequently, it is better to prefer quick- or self-clamping cylinders; otherwise the work will go slower;
- gear-rim design - the choice of those who strive for maximum cartridge reliability; if 100% fixation of the bit is a priority, it is better to purchase a key cartridge;
- when choosing a part, it is necessary to take into account its characteristics; parameters are regulated by relevant GOSTs; the larger the clamping cone, the larger the number with which it is marked;
- it is necessary to take into account the country of origin - the alphanumeric designations of foreign models differ from domestic ones.
If it is difficult to decide on the type of “clamp” on your own, it is better to seek advice from a specialist.
An incorrect choice is tantamount, at a minimum, to incorrect operation of the tool.
In the worst case, it is possible not only to re-spend on a new cylinder, but also to replace the entire screwdriver.
AutoCut mowing head
The two-string model is designed for mowing and clearing areas. Its four-string modification is suitable for trimming near obstacles (stairs, walls, thresholds, curbs) and processing large areas. It differs from the previous design by automatically adjusting the length of the cutting strings - right during operation. To supply a supply of fishing line, you need to touch the bottom edge of the mowing head to the surface of the ground. This will loosen the cord lock and it will move out under the influence of centrifugal force.