Definition and purpose
The unit, which is based on a drive device that drives the abrasive belt, is called a grinder. They are classified according to the following criteria:
- purpose;
- areas of application (industrial or for individual use);
- nature of execution (stationary, manual);
- production method (industrial devices or self-made ones).
The main tasks that can be solved using the machine include:
- removal of roughing residues (burrs, remaining sharp edges, various protrusions);
- surface grinding;
- removal of the effects of corrosion and old paints and varnishes;
- sharpening knives and cutting tools.
All of the above tasks are solved by a professional grinder. This machine has advanced capabilities. They are usually performed in combination with several abrasive devices (for example, a belt and a disk).
Scheme and principle of operation
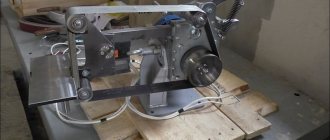
Structurally, any belt grinding machine consists of the following elements:
- Electrical engine;
- pulley with fixed straight roller;
- tension rollers;
- rotary clamping mechanism;
- abrasive tape;
- base.
To expand the functionality of the unit, individual designs have additional elements that allow work with heavily contaminated or deeply corroded surfaces. In this case, an abrasive disc is installed on the motor drive shaft.
A homemade grinder is assembled according to a similar scheme as a professional one.
The basic principle of operation of such a grinding machine is to drive the abrasive belt using a roller system.
It consists of a main video, which is the leading one. It is fixed to the motor shaft. The remaining rollers are secondary or driven. They have an adjustment mechanism that allows you to change the tension of the tape. To change the angle of inclination, the grinder has an adjustment mechanism.
The engine for the grinder is selected based on the list of work that is planned to be performed, productivity and degree of load. The industrial version is equipped with an engine designed in accordance with the specified parameters. It allows you to obtain the required belt speed, as well as uninterrupted operation for a long time. The value of this parameter is determined by the engine shaft speed and the size of the pulley. The most optimal belt speed is considered to be about 30 m/sec. To simplify obtaining the necessary parameters, a summary table has been developed. With its help, you can find the desired belt speed depending on the speed of the selected engine. It can be accurately calculated using known formulas and table data.
In modern literature and Internet portals you can find drawings with dimensions of various grinder designs. When choosing the layout and design of a future device, you need to evaluate your capabilities for purchasing or manufacturing each element of such a unit. For example, what kind of electric motor is planned to be used. Determine the required dimensions of the entire product. What type of tape do you plan to use in your work?
Design features
The design of the grinder rollers is of great importance for work productivity.
For a homemade device, an electric motor with a nominal speed of 1500 per minute is most often used. With a slip rate of 9%, the actual rotation speed will be 1380–1400 rpm. Based on this, the dimensions of the parts are calculated. The drive roller deserves special attention. It is made massive in order to smoothly accelerate the belt to a given peripheral speed due to a significant moment of inertia. If you make the drive pulley from solid steel, it will turn with difficulty when starting. Therefore, it is made hollow or from duralumin grade D16 and higher. It is recommended to machine driven and tension rollers from light and hard duralumin, then there will be no need to make cavities.
The larger the diameter of the drive roller, the deeper the cavity should be.
Pulley drawing
The standard diameter of the drive pulley is 150 mm. The tension one is made with a size of 100 mm, and the other two are 70 mm each. Dimensions may vary slightly depending on the dimensions of the machine. The width of the parts corresponds to the size of the sanding belt with a small margin.
The generatrix of the drive pulley must be straight, otherwise the belt will bend along its entire length when rotating. It is reliably kept from sliding by the remaining rollers.
The speed of movement of the belt will depend on the diameter of the pulley. If the belt runs slowly, it will tear the material being processed. And from rapid sliding it will soon wear out. A simple rule to keep in mind is that hard parts and fine abrasive grains require high belt speeds.
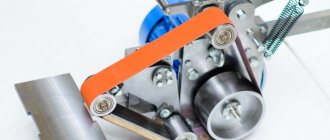
Compact grinder with working pulley and tensioner
To avoid slipping of the sanding belt when the planes of the rollers do not coincide, a groove is made on the generating surface, corresponding in width and depth to the section of the belt. However, this design has a drawback: under heavy load, the tape slides onto the flange. A proven and reliable option is to use barrel rollers. In some cases, the products are covered with rubber material.
During installation on the grinder, you need to ensure that all the rollers are located in the same plane.
VIEW GRINDER from AliExpress →
When processing, it is necessary to ensure the roughness of the forming surface in the range of 1.25–2.5 Ra. Large values will lead to wear of the belt, and on a surface that is too smooth it will turn. The “barrels” are installed on the shafts using bearing supports. The bearing assemblies are sealed to protect them from debris and abrasive dust. Bearings will be required to be self-aligning, not lower than 6th accuracy class. Their load-bearing capacity must correspond to the drive speed and planned loads. The prefabricated structure is fixed to the axis through cotter pins or through a collar and a fastening kit. For the drive pulley, you need to make a keyway in the mounting hole for installation on the engine shaft key or hole for the goujon.
The tensioner roller is made movable. It has a support spring to tension the belt, compensate for runout on the pulley and rollers and sagging when the part is pressed. This way the tape will last longer and will not break.
The rollers must have a barrel-shaped profile to securely hold the rotating belt. The central part is made 2 mm higher than the edges.
Based on the connecting dimensions, a working drawing is drawn up, according to which the turner can produce parts.
Typical drawing of a roller
VIEW RUBBER ROLLER from AliExpress →
Advantages over a sharpener
The belt grinder has a certain number of advantages compared to other tools designed for sharpening and grinding. Compared to a sharpener, it has the following advantages:
- expanded capabilities for surface treatment, including for parts of large sizes and weight;
- improved capabilities for positioning the tool relative to the surface being processed;
- uniform grinding of the abrasive coating of the belt (unlike wheels on a sharpener)
- simplified abrasive replacement system.
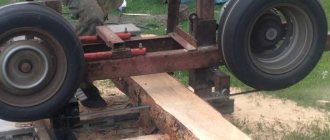
The wider capabilities for surface processing that are inherent in belt grinding machines are expressed not only in the processing of large-sized parts. Even the simplest model is capable of processing second- and third-order surfaces, such as pipes, fenders and car bodies.
The correct selection of belts allows you to carry out all stages of processing: rough sharpening, grinding, polishing.
The abrasive wheel with which the sharpening machine is equipped wears unevenly during operation. This leads to a violation of its geometry, and therefore, the accuracy and quality of processing.
However, grinders have two disadvantages associated with their design. The first refers to lower reliability. This is due to the presence of a more complex mechanism for setting the belt in motion: bearings, shafts, tension springs, and the belt itself. The machine only has a motor and an abrasive wheel.
The structural complexity requires periodic inspection and maintenance. Wear of the bearings leads to imbalance and, as a consequence, to uneven adherence of the belt. Long-term use of the grinder changes the geometry of the shafts. They change from cylindrical shafts to oval ones.
Grinders from Chapai
Currently, a large number of designs of belt grinding tools are offered in the literature and on the Internet. Some of them are considered more successful, others are difficult to implement.
The designs of grinders from Chapai are recognized as one of the successful developments. Developer Andrey Chapai offers professional tools and versions for the home workshop. One of the significant advantages of these models is the wide range of machining angles. To solve this problem, the author proposed an original design of a rotary table. This design formed the basis of all grinders in the professional line. These include: GC 10, GC 12 and GC 16. They received a fairly high rating among specialists. To expand the functionality, the author equipped his products with a device for mounting a disk. A rotating frame assembled from two metal sheets 12 millimeters thick ensures high reliability of the entire tool.
In addition to professional versions, Chapai has developed mobile versions (GCh610-63 and GCh610-71). They are easy to use and demonstrate good consumer characteristics.
Grinders from Rustam
The most common model is GR-1. They are equipped with two types of motors: single-phase or three-phase. The grinder from Rustam has a 1.1 kW motor. This power is quite enough to provide the necessary characteristics. The developed design uses rollers that are coated with a layer of propylene. This significantly reduces noise levels and reduces heat during rotation.
The original design of the rotary table allows processing of parts of various geometric shapes.
Drawing of a belt grinder frame
In the absence of access to this equipment and a certain amount of experience and perseverance, using the basic dimensions in the grinder drawings, you can assemble the machine yourself using an angle grinder for cutting metal and a drill for drilling holes. The easiest way to transfer grinder drawings to blanks is to print them in 1:1 format and glue them.
Making a grinder with your own hands
The high prices for devices of this type encourage many to make a machine with their own hands. To implement such an idea, you need to understand how to make a grinder in a home workshop. To this end, consider the following points:
- what problems are planned to be solved using such a unit;
- choose a scheme that meets the requirements;
- select components (according to the diagram);
- how and with what tools and equipment to carry out the assembly.
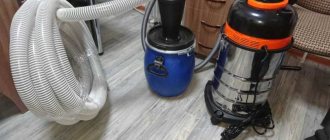
You can make a stationary or manual grinder yourself. In all cases, a device must be developed capable of transmitting rotational motion from the motor shaft to the drive and driven rollers. They, in turn, force the abrasive belt to move in a circle. Almost any electric motor can be used in the design. For example, use a motor from a vacuum cleaner. Experience in operating such units has shown that it is desirable to have a belt speed control system. This increases the efficiency of its use. For this purpose, you can use a ready-made frequency converter or a stepper switch.
You can place the grinder on the sandpaper. This greatly simplifies the task. To create a rigid structure, it is advisable to provide for the insertion of a metal corner. It will give the structure the required rigidity. Drive and driven rollers can be made from various available materials. For example, made of wood, plastic, duralumin, profile pipe.
The most important conditions for their production are strict adherence to the geometric shape and ensuring the necessary surface roughness. For a grinder, this indicator should be in the range from Ra 1.25 to Ra 2.5. Increasing the roughness will lead to rapid wear of the belt. Reducing it will cause slippage and malfunction of the grinder. This will not allow for high-quality metal processing. When using emery as a basis for a grinder, the listed features must be taken into account.
In addition, it is necessary to provide for the possibility of protecting the roller and bearings from particles of material formed during grinding. Contamination of these elements will lead to failure of each of them. You can ensure reliable fastening of the rollers using standard cotter pins or using a specially made pin.
From the Bulgarian
The simplest and most common design is the grinder made from an angle grinder. The motor and electrical control circuit located on the grinding machine are used as the basis. To set the abrasive belt in motion, a special nozzle is made. It consists of two shafts and a fastening system. The grinder for the angle grinder is an additional accessory. To assemble a grinder from an angle grinder with your own hands, you need to make individual structural elements yourself.
Ready-made structures can be found from 125 angle grinders. They are installed on the grinder, creating a belt mechanism for using a standard abrasive belt. The horizontal mechanism allows you to provide the necessary characteristics of the grinder.
With a washing machine motor
The main element of grinding machines is the engine. It can be selected independently from other electrical appliances. One option is a homemade grinder with a washing machine engine. The use of such a motor requires the creation of a reliable frame and a fastening system for all elements.
They make a finished unit from a washing machine motor with their own hands, having previously calculated the rotation speed of the belt. This can be done by knowing its characteristics: engine power and speed. If the rotation speed is too high, it is necessary to develop an electronic engine control system.
Usually, to simplify the task, they use the engine of a small washing machine. This greatly simplifies the task of making a grinder with your own hands. Such grinders are made to fit a standard belt size of 75 mm wide and 475 mm long.
From a drill
A grinder from a drill can be made using a set of simple tools. In this case, he presents a special attachment for the cartridge. Made by hand, they are designed to perform simple surface cleaning and sanding work. Craftsmen have accumulated vast experience in creating such structures. Having the simplest skills in plumbing, you can independently develop a diagram of the unit and make it with your own hands.
The use of a drill allows you to create stationary structures on a frame and portable ones. In this case, the drill is not attached to the machine, but is transferred to the surface to be processed.
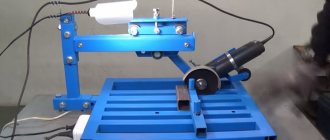
From a sander
The most common are grinder schemes in which a grinding machine is used as a motor. To implement these schemes, it is necessary to manufacture a drive and driven shaft, a frame and a system for adjusting the tension of the abrasive belt. A do-it-yourself grinder from a grinding machine can be quickly made in a home workshop. A grinding machine mounted on a frame allows you to get a high-quality stationary grinder for solving a wide range of tasks related to sharpening and grinding.
Step-by-step manufacturing instructions
Stage 1. Device body
We will need:
- an angle grinder will be used as a drive;
- pipe 15 mm with a square profile;
- four-millimeter metal strip.
- First, bend the metal strip to the diameter of the grinder.
- Let's start welding work. Press the rim to a flat surface and place a square with a side of 2 cm at a right angle.
- We check the corners and you can grab and scald.
- You can clean all the seams, but this step is not necessary.
- Now you need to cut a thread with a diameter of 4 mm in the place where the ferrule is tightened. To do this, we core and drill.
- Using an angle grinder, we cut the workpiece so that the clamp can be crimped.
- On the reverse side, we drill a hole for the body of the bolt so that it fits freely in this half and is screwed into the other.
- Let's try on the body. If nothing is loose, then you can continue.
- At this stage it is necessary that the leading video is ready. We weld the profile pipe perpendicular to the roller, having previously determined its middle.
- We clean and polish.
Stage 2. Leading video
- You need to make small notches on the nut. This is done so that the carboxyl resin runs through them and better holds the nut when rotating.
- You need to make small notches on the nut. This is done so that the carboxyl resin runs through them and better holds the nut when rotating.
- We dilute the resin and pour it. Cover the reverse side with masking tape, otherwise the glue will leak out.
- We begin processing only after 24 hours. Using a rasp, we begin to shape the roller.
- We clamp the grinder in a vice and continue. First we make the roller semicircular, later we will grind it until we get the desired shape.
Stage 3. Roller with tension mechanism
- As a basis we take a metal square with sides of 12 mm. It fits best under this profile pipe.
- We cut off unnecessary parts.
- We put a piece of profile pipe on the edge of the square and scald it. A bearing will be fixed in it, which will act as a roller.
- We drill a hole with a diameter of 8 mm for the bearing shaft and shorten the part.
- Now you need to cut off 2 walls of the profile pipe to fit the bearing.
- After the cut, we process everything with a file.
- An 8 mm drill can be used as a shaft. We insert the shaft into the roller and grab it.
- After making all the parts of the grinder, you can proceed to assembly. We insert the roller with the tensioner and put on the abrasive tape.
- This design still lacks a flat stop. We set the stop under the tape and you can grab it.
Video instructions for making
In addition to popular scientific literature, which provides design diagrams, calculation formulas and summary tables that help you choose the required grinder design. Find out how you can make such a unit with your own hands.
On popular Internet portals you can find video instructions for assembling and using the grinder. For example, you can find out this information by watching the following videos:
There are quite a lot of such links. Therefore, you can choose the most suitable video for making a grinder with your own hands.
Do-it-yourself belt sander: operating principle
A distinctive feature of this device is that it has a simple design that anyone can replicate at home. This grinding unit includes an electric motor, rollers and the working tool itself – a belt with an abrasive coating. The strip may have different grain sizes. This indicator is selected in accordance with the purpose of the instrument.
The grinder, unlike the usual stationary machine, is a more versatile tool
When assembling a grinder with your own hands at home, you should prepare and study the principle of its operation. When the unit is turned on, the engine starts. It has a shaft that connects to the main (drive) roller. The roller begins to rotate around its axis, acting through the abrasive belt on the secondary (driven) rollers.
Sanding is quite simple when the device is turned on. To do this, you need to attach the workpiece to a moving abrasive belt. During work, you need to focus on the position of the working strip.
A self-made grinding machine will allow you to process workpieces made of different materials. Such a unit has the ability to eliminate defects on the surface of metal, wood, and glass. Using grinders, rollers are often adjusted, which makes it possible to process defects of different depths.
It is worth remembering that with prolonged use, the sanding strip wears out, which leads to its stretching. In such units this problem is solved very simply. One of the device's rollers contains a special mechanism that allows you to tension the tape. Most often, such a device is installed on a roller located between the main and secondary roller of the device.
A grinder can be used to easily remove rust from the surface and sharpen a knife.
How to make rollers for a machine
The rollers on which the abrasive tape is placed can be selected from ready-made samples. This approach can be implemented if such a possibility exists. In most cases, they make grinder rollers with their own hands. Their sizes range from 70 mm to 150 mm. It is determined by the width of the tape used. In this case, use the following approach:
- Select the belt tension mechanism.
- Dimensions of each roller.
- Select the material.
- Fastening methods.
The most affordable materials for making grinder rollers are wood or plywood, PVC blanks, and ready-made bearings. To make rollers from PVC pipes, select a blank whose internal and external diameters correspond to those specified in the drawing. The main disadvantage of such a roller is that at high rotation speeds the temperature increases. Therefore, the polypropylene roller may lose its original shape.
The production of such rollers from bearings comes down to their selection according to their internal and external diameters. Professionals advise choosing bearings of at least sixth grade.
In some cases, wood is used. For example, you can make your own rollers from plywood. The whole structure will be quite light.
The main condition is the requirement that the rotation loop of the abrasive belt must be reliable and durable. The tension roller for the grinder must have an adjustment mechanism that will provide the required degree of tension.
All rollers must be installed vertically. Even a slight change in relative position will cause the tape to break quickly.
DIY belt grinder: drawings with dimensions and assembly instructions
Large and small industrial enterprises have always had a need to have various types of grinding machines, including belt grinders, in their equipment fleet.
In recent years, in connection with the development of small businesses, handicraft workshops, and simply for performing minor work on grinding any parts, desktop small-sized belt-type grinding machines began to be produced. The thing is necessary, of course, but everything is spoiled by one nuance: the high cost.
And this applies not only to foreign models; prices for domestic analogues also bite sharply. Here, inevitably, many craftsmen begin to think about how to make a tape grinder with their own hands.
How does the grinder work?
A benchtop belt grinder, or simply a belt grinder, is a drive device where an electric motor plays the role of a power unit.
The tool is intended for processing, finishing and grinding flat surfaces, removing the layer of rust or paint coating present on the workpieces.
It is used to process burrs and sharp edges of steel, cast iron, aluminum or non-metallic parts.
Design
There is nothing particularly complicated in the design of a belt grinder. The device consists of a motor, drive and guide rollers. A sanding or roughing belt of the required grain size is passed through them.
When the engine is turned on, the drive roller mounted on its shaft begins to rotate, and through the tensioned working belt, the rotation is transmitted to the guide rollers. By pressing the part to be processed in the working area against the belt, the operator performs the required operation, changing the position of the workpiece relative to the surface of the belt if necessary.
By adjusting the distance between the guide rollers, it is possible to process surfaces with defects of different depths. During prolonged use, the sanding belt may not stretch much.
a tension mechanism is provided in the design on one of the rollers .
Typically, such a function is assigned to a roller located at the same distance between the leader and the slave.
The grinding machine is supplied with a support table, which also serves as a surface for fixing the workpiece. As a rule, such a table should be able to rotate 90 degrees about one axis. In this case, it is possible to process two perpendicularly located planes without reinstalling the part on the support table.
Although you are required to wear safety glasses when working on such machines, it would be a good idea to install a folding transparent acrylic glass to avoid eye damage from scale particles, paint flakes or metal dust. For example, you can look at the installed protective glasses on industrial machines, where a round emery stone is installed as a working element.
Of course, a grinder control panel is required! For safety reasons, it is recommended to mount it on the machine frame in close proximity to the operator’s working area. Portable machines are equipped with a stand made of durable steel with mounting holes on the base, allowing you to fix the unit on a wooden surface.
If you look at the design details, you can immediately notice some visual instability of the assembled grinding device. The overhang of the side dimensions of the installed rollers significantly exceeds the supporting surface on the base. In addition, the absence of a support table makes it difficult to effectively process relatively large surfaces, and holding the part in a canopy is inconvenient and quite dangerous.
An increased length of the working belt leads to additional losses due to friction. It is necessary to use a higher power power unit in the drive, and this increases energy costs. The tension unit is simple and functional.
Adjusting the tension is a matter of seconds. The machine comes with replaceable sanding attachments, which can be used for sanding even on internal surfaces. Despite this, the cost is 100 thousand rubles. makes me think.
Tape selection
To choose the right belt grinder, it would be a good idea to first determine the overall dimensions of the surfaces of the products to be processed, and then become familiar with the sizes of commercially available sanding belts.
Endless sanding belts differ in three parameters: length, width and grit level. The currently produced size range of sanding belts for such machines is as follows: 610 mm, 915 mm, 1230 mm, 1600 mm, 1830 mm in length; width dimensions are limited to 50 and 100 mm, although others can be found.
In any case, the following criteria must be met:
- The tape should be on an elastic fabric base .
- Maintain maximum angular speeds of at least 1500 rpm.
- Possess great abrasive resistance.
- The maximum relative tensile strength is at least 15%.
- Heat resistance during long-term operation.
When choosing a belt, it is necessary to take into account that the most optimal size of sanding belts for a homemade grinder is 1230 mm.
Shorter abrasive belts wear out faster because they do not have time to cool sufficiently during idling.
As for longer ones, their use will lead to an increase in the dimensions of the entire structure, which is unacceptable; however, this does not provide any improvement.
The parameters of the mechanical tensile strength of the tape are very important.
The use of composite tapes, even glued with the most advanced compound or double tape, is strictly prohibited !
When the joint is stretched during operation, the tape increases in length and the tension weakens. In this case, the tape may come off the guide rollers or break, and at such a speed this is fraught with serious consequences for the operator and others. Taking into account the high speed of movement of the belt along the surface of the guides and drive roller, the applied specific force on the abrasive surface should not exceed 0.8 kg/cm2.
Approximately this parameter corresponds to the mechanical strength of an electrocorundum sanding belt: 800-900 MPa.
Tip : before installing the tape on the grinder, it is recommended to hang it on a cylinder with a diameter of about 60 mm. This ensures natural stretching of the abrasive element before work.
DIY grinder: drawings with dimensions + assembly instructions
During development, special attention is paid to the configuration of the rollers, the method of fixing the product and the optimal power of the power unit. More about this.
Making rollers
Particular attention is required in the manufacture of the main, driving roller , which acts as a pulley! It must be fairly massive.
This will allow you to avoid an unnecessary jerk during the starting moment due to the present inertia of the resting state. The speed is gradually increased to the desired values.
If we take into account the use of a standard power unit in the drive design, with a slip not exceeding 9% at a nominal 1500 rpm, the speed will be no more than 1400 rpm maximum.
One more nuance ! Steel or cast iron are not suitable for the manufacture of a driving part, because during startup there will be a heavy load on the engine, or it will not be able to turn the too heavy blank at all.
There are two options to solve this problem:
- Make a hollow steel roller to reduce mass according to the principle: larger diameter - deeper cavity. Exact dimensions can be calculated using a reference book, although particular accuracy is not necessary.
- Second option: making a roller from duralumin grade D16 and higher.
It is advisable to carve an end groove on the pulley, the dimensions of which will be identical to the dimensions of the belt intended for use. This will help prevent uncontrolled belt derailment if the rollers are incorrectly positioned in the plane of rotation.
It is recommended to do the same with the rest of the guide rollers, including the tension roller. The use of duralumin for their manufacture will eliminate the operation of turning cavities to adjust the weight.
The degree of surface roughness is of considerable importance . Recommended limit values: Ra1.25-Ra2.5. Increased roughness will lead to premature wear of the belt base, and roughness below the designated limit will contribute to unnecessary slippage during long-term operation.
The rollers must be installed using closed-type bearing units based on self-aligning bearings with a stationary outer ring. With this installation, abrasive or other particles cannot get on the roller shaft. When selecting bearings, it is necessary to take into account the correspondence of their load-bearing parameters with the maximum number of revolutions of the power unit.
The rollers can be secured using conventional cotter pins or using a shoulder at one end of the axle, as prescribed by the standard. The drive roller must have a groove for a key common with the motor shaft.
Motor and turntable
If you are going to assemble a belt grinder with your own hands, then you should pay special attention to the choice of drive! Most often, a 0.75 kW engine is used (although up to 1.5 kW is not prohibited) with a speed of 1500 to 3000.
Please note that the belt may not withstand high speeds. As a rule, the engine power is selected depending on the intended operations on the assembled machine.
If roughing work predominates, when the load on the drive is large, the power unit is installed more powerful, but with fewer revolutions, and if just surface grinding is required, the parameters remain within the limits mentioned above.
The grinding process is characterized by considerable contamination in the form of microscopic dust particles, so the motor must be a closed type with its own fan for airflow! It is better to ignore the recommendations of “experts” about using a motor from a used washing machine.
To design a homemade grinder, you need drawings with dimensions; in addition, it’s a good idea to think about safety precautions and ease of use on the assembled machine. This requires:
- Rotary table.
- Pressing plane on the back side of the tape for support.
For the first task, the table bracket must be movable , rotatable by 90 degrees and fixed at extreme points. The recommended table thickness is at least 15 mm, preferably using alloy.
For the clamping plane, a machine frame ground near the support table is suitable.
Homemade pulley
This structural element is the most difficult to manufacture. A ready-made pulley for a grinder is quite an expensive part. To make it yourself, you need certain knowledge in the field of mechanics and turning. You can get a high-quality pulley from steel or duralumin. In this case, the workpiece must be processed on metal-cutting machines. In a simplified version, it can be made from plywood. It must be FSF or FB. The thickness is selected based on the width of the tape used.
The diameter of the drive shaft is calculated based on the characteristics of the selected motor and the required belt speed. You can make this calculation yourself or use existing tables.
Composition of the owner's belt grinder kit for DIY assembly
| List of the main set of working drawings of the MG-915 OWNER belt grinder for self-assembly. | ||
| Sheet | Name | Note |
| 1. | Common data. | |
| 2. | Belt grinder frame. | |
| 3. | Support mechanism. Retractable crossbar. The table plate is retractable for the belt grinder. | |
| 4. | Support table. Thrust plate, belt grinder ears | |
| 5. | Belt grinder drive pulley. | |
| 6. | Straight belt grinder roller 2 pcs. | |
| 7. | Roller barrel of a belt grinder. | |
| 8. | Rolling bushing for belt grinder. | |
| 9. | Threaded axle of belt grinder 4 pcs. | |
| 10. | Assembly view 1. | |
| 11. | Assembly view 2. | |
| 12. | Assembly view 3. | |
The main elements of the belt grinder (retractable crossbar, main frame and rotary mechanism) are cut from metal 10 mm thick. We recommend assembling the material of the frame and main elements of the grinder from metal with a thickness of 10-12mm; to make the structure lighter, aluminum of a similar thickness is also suitable. For the manufacture of grinder frame parts, we recommend using laser or waterjet cutting; a plasma cutter or milling machine is also suitable.
Bonding tape
Modern manufacturers of abrasive materials offer ready-to-use belts. They can be in rolls of a given size or glued into a ring. Usually there is a need to make an abrasive belt for a grinder to specific sizes. This is done by gluing strips to a specific size. To solve this problem you will need the following materials:
- tape for gluing abrasive materials;
- glue;
- degreasing liquid (gasoline or white spirit);
- a clamp or weight for compressing glued parts.
The tape should be applied in the following sequence:
- Mark the strip of abrasive along its length, taking into account the joint, which is made at an angle. The larger it is, the longer the contact length.
- The backing of the required length is cut out of the braid. It ensures reliable gluing.
- The surfaces are prepared for applying glue: they are cleaned with sandpaper and degreased.
- Cover the substrate and part of the tape with glue.
- Gently press the substrate against the abrasive tape and fasten them together using the available tools.
If the gluing is done carefully, the homemade tape will last quite a long time. In terms of its consumer characteristics, it will be no worse than the samples produced at the enterprise.
Review of factory models and prices
The variety of factory-produced models creates great difficulties when choosing the required unit. The selection is made based on the following criteria:
- number of functions performed;
- technical characteristics of individual components and assemblies;
- at the price specified by the manufacturer.
The most appropriate approach is considered to be based on the “effectiveness – cost” criterion. Thanks to the correct definition of this criterion, you can choose an effective grinder at an affordable price.
Lefty
Belt grinder Leftsha 610 belongs to the category of professional machines. It operates from a three-phase 380 V or two-phase 220 V network. Possessing a rotating bed that can be rotated 90°, it allows processing of workpieces of various shapes. Grinder Levsha 610 provides a belt rotation speed of 15 m/s. This belt grinder is equipped with a 1.1 kW motor. It provides a rotation speed of 3000 rpm.
The manufacturer offers several modifications of its products: 610pro, mg 610a, Lefty 1250. Each of the listed models has its own design features. For example, the grinder Master 610 is designed to use a belt 610 mm long. Grinders from the company Mosgrinder have similar characteristics.
Energomash
The Energomash company offers grinders of its own production. Possessing a powerful production base, they manufacture a line of grinders designed to solve various surface treatment problems. Basically, this is professional equipment designed for different lengths of tape.
Bison
The Zubr grinding machine is classified as a universal portable machine. With two grinding tools (wheel and belt), it can solve almost any deburring and grinding task. Thanks to the angle stop and fixing the angle of inclination of the work table, it is possible to change the processing plane and ensure high accuracy. A special system for removing generated dust and processing products improves working conditions, reduces dust and fire hazards.
The provided protection system against inadvertent activation of the electrical circuit ensures compliance with safety regulations.
Grinderok
This company offers several types of grinding equipment that fall under the category of grinders. These include the following families:
- Gandalf;
- Frodo;
- Filit;
- Sam.
Each of the proposed tools has its own advantages and disadvantages.
One of the significant disadvantages is the price. It starts from 24,000 rubles and goes up to 41,000 rubles. To make the right choice from these families, determine the list of tasks that you plan to solve using the purchased machine.