For many projects, a CNC router is necessary for good and fast results. After some research on the current CNC machines, I came to the conclusion that all the machines under 150k could not meet my needs in terms of workspace and accuracy.
What I want:
- working space 900 x 400 x 120 mm
- relatively quiet spindle with high power at low rotation speeds
- maximum possible rigidity (for milling aluminum parts)
- highest possible accuracy
- USB interface
- spend up to 150 thousand rubles
With these requirements, I began 3D design by developing schematics and drawings, testing the many parts available. The main requirement: the parts must fit together. In the end I decided to build the machine on a 30-B nut with 8 aluminum frames with 16mm ball bearing spindles, 15mm ball bearing guides and 3 amp NEMA23 stepper motors that fit easily into the off the shelf mounting system.
These parts fit together perfectly without the need for special parts.
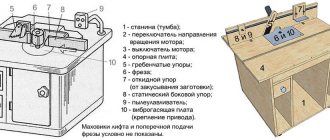
Rotary axis design
There are many different options for rotary axis equipment. Four-axis devices are considered the highest quality. On conventional hardware, performance is often lower.
High-performance devices are equipped with a belt drive. Some models even have a fifth axle.
The dimensions of the desktop may vary depending on the model, but the length and width should not be less than 1 meter.
Homemade devices are characterized by the fact that a faceplate or a lathe chuck is fixed on them. Lathe chucks are most often installed on factory equipment.
REFERENCE. In most cases, two-phase motors are used, connected by four wires.
The cost and dimensions of the device depend on the specific CNC model. Larger versions are used in industrial settings. Small rotary axles are installed on equipment intended for domestic purposes or small businesses.
4-axis CNC milling machine Modelist CNC-3040AL4x
- Weight, kg 35
- Bed material aluminum
- Spindle power 400 W
- Axles 4
- Working field 390*540 mm
- Maximum movement speed, mm/min 3000
- Maximum workpiece height, mm 80
- Price 144,000 rub.
Go to product
Mistakes and ways to avoid them
The most common mistakes:
- Rotary axis play. If there is backlash, very often steps will appear on the workpiece. It is necessary to install the bearing as tightly as possible. It should be pressed into the guide with difficulty.
- The fourth axis must be located strictly perpendicular to the X axis. Otherwise, the parts will be processed with a slope in one direction.
- It is necessary to use a high-quality stepper motor. This is the key to accuracy of work.
A rotary axis for CNC machines is often a necessary element. Without it, it will not be possible to process complex parts in large quantities. It simplifies and speeds up work.
- November 08, 2020
- 4352
Configuration
The machine configuration determines which two additional axes are used when machining parts.
The rotation of the axes in machines equipped with a trunnion is ensured by the movement of the work table. In articulated tables, on the contrary, additional axes are provided by a special position of the spindle.
Each of these machines has unique advantages. For example, machines with a trunnion can process a part of the largest possible size, and hinge-type machines can process parts of huge weights, due to the horizontal position of the table.
Methods of working with a rotary axis
You can work with the rotary axis in two ways:
- indexical;
- rotary.
The first method involves step-by-step processing of the workpiece. It begins with free movements and ends with stationary conditions. The transition between different types of processing is accompanied by a stop and fixation.
The second method does not require any additional steps. The quality of processing depends on the program and the availability of suitable working tools.
For full operation, the equipment must be equipped with a four-coordinate system. The Z axis is additionally equipped with a gas spring to compensate for the weight of the spindle.
The CNC equipment must have access to the auxiliary axis control unit. A good level of performance can be achieved using a stepper motor controller, which has four control channels.
3D CNC milling machine AMAN 3040 4axis 200 Z+
- Power supply 220V ± 10% 50HZ
- Dimensions, mm 520 x 600 x 530
- Weight, kg 60
- Spindle power 200 W, 8000 rpm
- Axles 4
- Spindle cooling Air
- Working area 300 x 400 x 130 mm
- Resolution, mm 0.003125
- Control system Mach3 interface, Windows 2000/XP
- Compatible software MACH3, ARTCAM, TYPE 3, UCANCAM, KCAM, etc.
- Collet chuck ER11
Go to product
The continuous processing method is suitable for the production of workpieces with complex shapes. During index processing, the operator can change the position of the part. All subsequent actions are carried out thanks to three-dimensional processing. But none of the methods will be effective unless you configure the control program. The following software is suitable for this:
- Mach3;
- DeskProto.
How to cut parts for a CNC machine from plywood?
All elements not included in the list above must be made of plywood. Therefore, the question of competent processing comes first when making a machine from plywood.
How to properly cut a plywood sheet?
In the process of cutting a sheet of plywood, you need to adhere to some rules:
- For material whose thickness is ten millimeters, manual and electric jigsaws are used, in which the blade has small teeth.
- Plywood larger than ten millimeters is cut with a circular saw.
- The material to be cut must be dried, otherwise it will delaminate.
- The sheet should be cut near the fibers of the first layer.
- If an electric tool is used, the feed should be at a minimum.
- To prevent chipping, you can use paper tape.
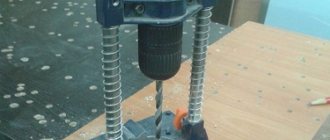
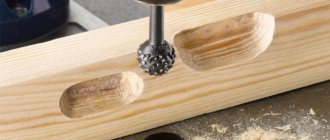
How to make holes correctly?
To make holes in plywood elements, it is better to use a drilling machine. In this case, you need to choose a high drill speed and minimum feed. A milling and engraving machine can also be used, which will allow you to make holes of any shape.
Help: If there is no such device, then a simple drill will do. The only thing that is needed is that the runout of the cartridge be minimal. Otherwise, the error will become higher.
How to sand and process?
After the process of sawing and drilling holes, the workpiece should be sanded. To do this, use sandpaper. Sanding is carried out near the fibers and starts from the corner, which is sanded at the very end.
Information: after the grinding process, the entire surface of the part is coated with special compounds that prevent unraveling and cracking.
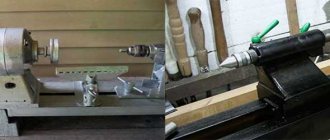
↑ The soldering iron case is afraid
I'll start with the power supply. I planned to do an impulse one, I tinkered with it for probably a week, but I still couldn’t overcome the excitement that was coming from out of nowhere. I change the trans to 12V - everything is OK, but when I change it to 30 it’s a total mess. I came to the conclusion that some kind of bug climbs through the feedback from 30V to the TL494
and demolishes its tower.
So I abandoned this impulse generator, fortunately there were several TS-180s, one of which went to serve the homeland as a trance power supply. And whatever you say, a piece of iron and copper will be more reliable than a pile of powder. The transformer was rewound to the required voltages, but it needed +30V to power the motors, +15V to power the IR2104
, +5V to
the L297
, and the fan. You can supply 10 or 70 to the motors, the main thing is not to exceed the current, but if you do less, the maximum speed and power are reduced, but the transformer did not allow more because needed 6-7A. Voltages 5 and 15v stabilized, 30 left “floating” at the discretion of our electrical network.
All this time, every night I sat at the computer and read, read, read. Setting up the controller, choosing programs: which one to draw, which one to control the machine, how to make mechanics, etc. and so on. In general, the more I read, the scarier it became, and more and more often the question arose “why do I need this?!” But it was too late to retreat, the engine is on the table, the parts are somewhere on the way - we must continue.
It's time to solder the board.
The ones available on the Internet did not suit me for three reasons: 1 - The store where I ordered the parts did not have
IR2104
in DIP packages, and they sent me 8-SOICN.
They are soldered onto the board from the other side, upside down, and accordingly it was necessary to mirror the tracks, and there are 12 of them ( IR2104
).
2 - I also took resistors and capacitors in SMD packages to reduce the number of holes that needed to be drilled. 3 - The radiator I had was smaller and the outer transistors were outside its area. It was necessary to shift the field switches on one board to the right, and on the other to the left, so I made two types of boards.
Benefits of 5-axis machining
Five-axis machining of parts on computer-controlled machines has a number of advantages. These include:
- the ability to technically process parts of complex design in one installation;
- reduction of time spent on processing parts;
- high device performance;
- technology makes it possible to produce large series of parts with minimal time costs;
- quick payback;
- high quality of created parts;
- processing accuracy.
The technology of five-axis processing of parts on CNC machines has many advantages. It has only one drawback - its high price. That is why many users are inclined to independently assemble a five-axis CNC machine. A self-assembled device is much cheaper than a ready-made analogue and is focused on performing tasks set by the user.
- November 30, 2020
- 1658
Article rating: