Search by topic
About choosing a hand router
Hello everyone. I plan to do the sheathing of the dacha with inch and remake the walls of the veranda with warmer ones, from the five. Those. The router is needed primarily for cutting out the quarters and then as necessary. For this purpose I decided to purchase a manual router. Because You can go shopping endlessly and there is a dime a dozen of this stuff on the Internet, then I would like my colleagues to listen to the real experience of the owner of this machine, indicating the shortcomings of a certain model. I decided on the price - 8-9 tr. This price includes mainly Chinese instruments and Russian ones, but also assembled in China. I still haven’t decided what to choose.
I have an interskol FM-32/1900E. I don’t work it often. No complaints so far. take less power, it’s a prank, just cut the cutting boards
Should I rake out a quarter with a hand router in such volumes? Not quite an on-topic tool.
Those. should the power be 1.5-2kW? What is the maximum diameter of the cutter (not collet)?
The disk version will take 2 installations - it will take a long time to tinker. And the quality is not the same compared to a milling cutter.
With such volumes, 1.5 will not be enough. diameter tomorrow, go to the garage for scrap right now. cutter diameter 32mm, collets 812
Last edited by Igor Sever; 02/19/2017 at 18:12.
Well, yes, for my purposes, as I understand it, I need a diameter of about 30mm. I’m also not very familiar with cutting tools for it. I will be grateful for the educational program.
You need a stationary milling machine, not for finger cutters, but drum cutters with insert knives. The planes are single-sided, where you can choose a quarter of any depth. A hand router will surprise you in a couple of meters :)
Well, take a hospital for the sake of redoing the veranda. Somehow I doubt such a reasonable investment. 2 kW if you don’t force it and don’t drive it, then it’s fine, anything is better than cutting 2.5 mm with a plane
there are tons of milling cutters in stores, current prices
For 1.5 cubes of five, does it make sense to get involved with a stationary machine? The plane is also questionable, the same problems with the bearings. But that's okay. Better tell me how he can surprise you. Will the cutter sit quickly? That’s why I’m asking so as not to waste money at this stage.
I had a milling cutter, I don’t even remember the name right now, China, something in the range of 1-1.2 kW, so the little things are fine, I started making a box for the garage, so it surprised me, it turned out to be weak and began to puff on the groove selection meter, construction doesn’t wait and the choice fell on the most powerful one that came across. He coped well with many tasks later on building a bathhouse, a terrace, a flock, and a stoking room. The cutters were sharpened for me by a turner on a diamond wheel. the plane will probably die from such a volume of planing, it’s not all about the bearings
Last edited by Igor Sever; 02/19/2017 at 18:30.
I am not suggesting the author be inpatient. The author, as often happens, decided that he was the most cunning - and he would catch up with the linings and stay with the tool :) In reality it will be different. But everyone has their own rake, someone else’s is not a decree for us. so you have to try)
As for widening by 2mm... It won't be faster with a milling cutter, quite the contrary. But IMHO, a router is more useful in the end than a plane. I have two planes lying in the bins, now I don’t even remember where)))
Last edited by dzintars; 02/19/2017 at 18:31.
As for widening by 2mm... It won't be faster with a milling cutter, quite the contrary. But IMHO, a router is more useful in the end than a plane.
I have a completely opposite opinion. When I was building a bathhouse, I planed the timber, and with a milling cutter I went through it from 2 sides (from the bottom and from the top) each, the partition in the same way, I had to do it on 4 sides, then I made the ceiling with clapboards, then the terrace. I have my own mini carpentry shop where I mainly make coffins with crosses, sometimes as a hobby I make wedge doors along with a frame, the volume is not much smaller than the author intended. So his idea is essentially correct. IMHO of course
Last edited by Igor Sever; 02/19/2017 at 18:42.
General operating rules
Despite its ease of use, the router is a dangerous tool if you use it without following simple rules. So, the basic rules for working with this unit are as follows.
- The sleeves of clothing should fit snugly to the arms. If you have long hair, then you need to pick it up to prevent it from getting caught in the cutter and then getting tangled.
- Before starting work, be sure to check the network cable for insulation damage. Damage to the cord occurs when the cable accidentally hits a cutter that has not yet stopped. Any abrasions found in the insulation must be insulated.
- Prepare the workplace so that there are no foreign objects (wrenches, screwdrivers, screws, etc.) that could get under the working tool and damage it.
- Use only well-sharpened tools (cutters). You can check the sharpness of the blade with your finger: to do this, you need to run it along the blade at an angle of 90 degrees. If the edge is sharp, you will feel the skin slightly catching on the sharp edges. Otherwise, your finger will easily slide off the blade.
- Before using a cutter with a thrust bearing, be sure to lubricate it with one drop of oil. The bearing should rotate easily and without delay.
- When installing the equipment into the collet, make sure that the cutter shank fits into it at least 20 mm.
- Each time you install a router bit, remove carbon deposits and wood residue from the edges using a soft metal plate.
- Use special safety glasses. It would be good if they were dustproof.
- Be sure to protect your respiratory system from fine dust, which is generated in abundance during milling, especially if parts made of chipboard and MDF are processed. As protection, you can use a respirator or a regular medical mask purchased at a pharmacy.
- Always secure the workpiece to the table using clamps. Holding the workpiece with one hand during processing is prohibited.
- Correctly select the rotation speed of the unit’s spindle, depending on the diameter of the installed equipment. You should also pay attention to the hardness of the wood. The higher the hardness of the material, the lower the rotation speed should be set.
- The cutter should plunge into the workpiece to a depth of no more than 3 mm in one pass.
- Before starting to process the workpiece, you should turn on the milling cutter and wait until the cutter reaches the required speed, and then begin inserting the cutter into the wood. If you start milling at low speeds or at the initial speed of the tool, the cutting part of the equipment will hit the workpiece, forming chips on it. In addition to damaging the part, the router can jump to the side and injure the operator.
- You should hold the unit so that you can see the rotating equipment and control its immersion in the material.
- Since the cutter rotates clockwise, the movement of the cutter should be directed in such a way that the blades of the equipment move towards the material, as shown in the figure below.
- The milling cutter must be held firmly in your hands, but without undue pressure on the workpiece. It should be pressed evenly and the unit should be driven smoothly, without jerking, throughout the entire trajectory of movement.
- If you work with a milling cutter at low speeds, and even for a long time, then it needs to be allowed to cool periodically. The unit should be started at maximum speed (idling) for 20-30 seconds so that the engine is well ventilated by the air flow created by the impeller mounted on its shaft.
- To stop milling, for example, the edge of a workpiece, you must first remove the cutter from the wood and then turn off the unit. But when milling a deep groove, you first need to stop the feed of the tool, turn it off, wait until the equipment stops completely, and only then remove the cutter from the recess.
How to use a router to select a quarter in a workpiece
We place the workpiece on the surface of the work table and securely fix it so that it does not move during operation. Then we attach the template. We install the tool so that the bearing on the cutter moves along the template, and its cutting part moves along the workpiece. We install it in the working position and clamp it. We advance the router until the cutting edge touches the workpiece.
We lower the depth stop to the lower level, then set the required depth for removing the quarter. If the wood is very dense or the depth is large, several passes of the tool should be made until the desired result is obtained. After the first pass, you need to inspect the surface and, if necessary, adjust the tool settings.
The router can be pulled or pushed away from you, whichever is more convenient for you. There are two types of movement - passing and counter. Concurrent movement, when the direction of movement of the device coincides with the direction of rotation of the cutter, is undesirable; in this case, chips appear on the surface being processed.
When working with long boards, do not remove the entire depth of the quarter at one time. This is a large load on the router, overheating, the quarter is not always smooth. It is better to do this in 3-4 passes.
- Always turn off the power to a device that is not working and unplug the cord from the outlet.
- Securely secure parts before handling them.
- Hold the tool firmly in your hands when working.
- Do not work in clothing that is uncomfortable or dangerous.
- Don't get distracted while working.
Working with a router is a rather complex process that requires skill and some experience. This kind of work should be taken seriously. But with some effort, you can learn to work with it. These will be very useful skills for a home owner.
Source: pro-instrument.com
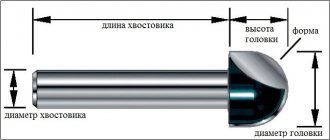
Preparing the tool for work
The most important thing to do before starting milling is to configure the unit for a specific type of work, taking into account the properties of the material being processed and the type of equipment.
Speed selection
A milling cutter is a unit capable of developing very high spindle speeds, from 8,000 to 24,000 rpm or more. The higher the rotation speed of the equipment, the cleaner the processed surface will be. But you should know that exceeding the permissible speed for certain cutters can cause the workpiece to burn in the processing areas. Therefore, in addition to the rotation speed of the tool shank, the linear speed of the blade should also be taken into account. As a rule, the larger the diameter of the equipment, the higher the linear speed of the cutting edge of the equipment rotates. If you intend to use large-diameter equipment, then the spindle speed will need to be reduced slightly.
Below is a table, using which you can select the optimal rotation speed of the tool depending on its diameter.
In addition, when choosing the rotation speed of the tool, the hardness of the material being processed should also be taken into account. Milling hardwood requires slower speeds than those recommended for a given tool diameter.
You should also reduce the speed of the tool if cutting PVC, processing plexiglass and plastics is required. At high speeds, the plastic will begin to melt and stick to the blades of the equipment. In each specific case, the rotation speed is selected experimentally.
Installation of cutter
Before replacing the tool, you must disconnect the router from the power supply. Disabling the start button will not be enough. It is very important to unplug the cord from the outlet to prevent accidental starting of the engine.
The equipment changes as follows.
- Place the unit on its side so that the spindle locking button is on top.
- Press the button and turn the spindle until it engages the lock. After this, put the wrench on the collet nut and unscrew it. On some models of routers this button may not be available. In this case, you will need 2 wrenches. The first key is put on the nut located on the spindle and acts as a lock (if it rests against the guide rod), and the second key is used to unscrew the collet nut.
- After loosening the collet clamp, remove the cutter shank from it.
- Next, insert the new equipment, immersing its shank into the collet to a depth of at least 20 mm, that is, until it stops.
- Tighten the collet nut. The tool should be tightened with sufficient force, but not so much as to strip the threads.
- Remove the lock from the spindle.
It should be remembered: the nut of the collet clamp cannot be tightened if there is no equipment in it. This will cause it to break.
Setting the processing depth
Almost all milling units are equipped with depth regulators. Setting the tool immersion depth is as follows:
- Place the unit on a flat surface, for example, on a table.
- Place the smallest step on the turret stop (1) under the plunge stop (2).
- Remove the lock from the depth stop by slightly unscrewing the screw (3) so that the stop (2) can move freely.
- Unlock the unit's immersion mechanism. In some milling cutter models, the motor is fixed to vertical rods using a single rotating handle. There are also a considerable number of models of these units, where the drive is fixed using a special rotary lever.
- Lower the motor until the cutter touches the workpiece. This should be done slowly to avoid the blades hitting the part.
- Next, you should fix the engine on the guides again.
- Lower the depth stop (2) to the lowest step of the turret (1).
- Set the slider (4) to “0” on the scale (6).
- Raise the limiter (2) to such a height that opposite its slider (4) on the scale (6) is the value of the dive that you want to perform. For rough adjustments, the limiter (2) is raised or lowered by hand. More precise adjustment of the tool's immersion depth is made using the fine-tuning mechanism (5).
- The position of the limiter (2) should be secured with the locking screw (3). Now you can unlock the immersion mechanism and lift the equipment along with the motor up.
As a result, if you lower the drive until the stop (2) touches the lowest step of the turret stop, you will get maximum extension of the cutter relative to the base of the unit. This amount of immersion of the tool into the workpiece will be final, that is, it will have the required depth.
If you need to make a deep groove that cannot be selected in one pass, then you can use a turret stop to gradually immerse the tool into the workpiece . To do this, place the highest step of the turret stop (1) under the depth stop (2) and carry out milling. Next, place the next, lower stop under the stop, and again make one pass with the tool. When the stop reaches the lowest stop, the required groove depth will be obtained. The following figure shows how the tool is gradually deepened into the workpiece when using a turret-type stop.
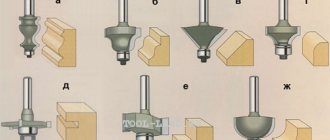
Edge processing
To process the edges and ends of the workpiece, special edge cutters are used. They can be either straight or curly. Straight cutters are used for trimming (aligning) the edges of parts according to a template (curvilinear) or along a ruler. For example, if you cut laminated chipboard with an electric jigsaw, then in this case you cannot do without a router. The edge after passing the nail file turns out to be uneven and with small chips. To give it the ideal geometry, do the following.
- Attach a straight edge bit to the router collet. This cutter may have a bearing at the bottom or at the top (near the shank).
- If the cutter has a lower thrust bearing, then the template is placed under the workpiece and both parts are pressed to the workbench with clamps. Conversely, the template is fixed to the workpiece with the upper bearing on the tooling.
- In the case of a bottom bearing, place the router pad on the edge of the workpiece and lower the cutter so that the thrust bearing is centered on the end of the template, and the lower part of the blades overlaps the template by about 2-3 mm. For a cutter with an upper bearing, everything is done the other way around: the base of the cutter is installed on a template, under which the workpiece is laid. The cutter is lowered until the bearing reaches the center of the template and the top of the blades grip it by 2-3 mm.
- Next, the slightly clamped workpiece is aligned relative to the template (you can use a rubber mallet) according to the previously applied markings.
- After alignment, firmly press the parts onto the workbench with clamps. If you clamp them loosely, they may move due to strong vibration during operation of the tool.
- Place the milling cutter sole on the workpiece (template), without touching the parts with the cutter, turn on the unit and wait until it reaches full speed;
- Smoothly move the cutter to the beginning of the workpiece so that the tool cuts into it and rests the bearing against the template, then mill along the entire edge.
To process the ends of workpieces, you can use conventional submersible (vertical) milling machines. If you need to remove overhangs from a PVC edge, the thickness of which can reach up to 4 mm, then it will be more convenient to work with an edge router, since it has compact dimensions and light weight.
Shaped end mills are mainly used for processing wood and MDF products. In this case, the workpiece is first given a certain shape using a straight miter cutter. And after this, a tool with the required shaped profile is inserted into the collet and the edge is processed in the usual way. The aligned edge of the part serves only as a template or guide for the bearing.
When milling wooden parts, the direction of the wood grain should be taken into account . If this is not done, chips will occur at the corners of the workpieces or at the places where the longitudinal fibers transition into the end fibers when processing, for example, curved parts. To avoid chipping, you should circle the “problem” areas on the workpiece with chalk (Figure A). If you go through these areas with a milling cutter in the usual way (counterclockwise), this will most often cause the formation of chips. Therefore, up to the “problem” zones, the tool is fed counterclockwise, and in the places where the fibers transition, the direction is reversed (Figure C).
The same rule applies to processing the corners of wooden workpieces. First, the cutter must pass along the fibers clockwise (through the corner), after which trimming continues in the usual way.
If MDF facades are milled (before pasting them with plastic) or other products made from this material, then you should not worry about chipping, since the material has a homogeneous structure.
What does drying out lead to?
A typical case: you made a shed at your dacha to store household equipment and for other needs. They did it for themselves, so they pulled together the boards from which the walls were made, carefully, without the slightest crack. Two or three months pass; the boards dry out and the entire wall glows with cracks. In winter, snow blows through them; in summer, the wind blows dust inside the barn.
Shrinkage reaches 10-13% of the linear size. That is, a board with a width of 100 mm after drying is reduced to 88 mm.
To prevent this from happening, you need to use quarter boards for wall cladding. A wall covered with such boards will never have through gaps. With their quarters, neighboring boards overlap each other and when they dry out, through cracks no longer appear.
Unfortunately, lumber is very rarely sold with a quarter finished. Therefore, an amateur craftsman should know the ways in which boards can be modified if necessary.
Cutting holes
You can use a straight mortise bit to cut holes in wood pieces. If the hole has a complex shape, then it is cut with a router according to a pre-prepared template using a copy ring. The latter is attached to the base of the milling cutter and, when the unit is operating, sets the movement of the tool in the desired direction.
So, to cut a hole in a wooden piece, you need to perform the following operations:
- secure a straight slot cutter in the collet of the machine;
- attach a copy sleeve to the router sole;
- place the workpiece in which you want to make a hole on the workbench;
- place small pieces of chipboard under the workpiece to slightly raise it above the table (this is required for the tool to come out when cutting through the part);
- place the template with the already prepared hole on the workpiece and press both parts to the table with clamps;
- set the minimum value of the cutter overhang (about 3 mm) relative to the base of the device;
- turn on the router and carefully lower it onto the template so that the cutter gently enters the material;
- mill along the entire perimeter of the template;
- lower the cutter another 3 mm and repeat the above operation;
- Continue adding 3mm depth at a time until the cutter goes right through the workpiece.
In the same way, you can cut a round hole according to the appropriate template. But in order to cut a circle in a workpiece, there is a much simpler way. Most models of routers already include a compass device. It consists of a rod with an adjustable (pointed) screw on one side.
The rod is attached to the sole of the unit, and a pointed screw is inserted into a hole that serves as the center of the future circle. Next, you need to set the desired radius taking into account the diameter of the cutter. The following figure shows how to correctly calculate the radius of a hole.
Milling is carried out in the usual way in several stages, each time deepening the tool by 3 mm.
You can also use a router to drill holes, for example, for installing furniture hinges. This is done as follows.
- Clamp a Forstner drill of the required diameter into the collet of the unit.
- Set the spindle speed to minimum.
- Place the router on a flat surface.
- Lower the cutter so that the spike in its center does not reach the table surface 2-3 mm, and fix the drive on the guides.
- Next, lower the depth stop onto any step of the turret stop and secure it with the locking screw. Thanks to the depth limiter, the cutter will not be able to drop below the required level.
- Remove the drive lock so that it can move freely up and down along the guides.
- The center of the future hole should be marked on the workpiece.
- Place the router pad on the workpiece and lower the cutter so that the tenon located in its center exactly hits the intended location on the part.
- Raise the cutter slightly above the workpiece, turn on the unit and, after reaching full speed, smoothly begin to plunge the tool into the material until the depth stop reaches the stop. At this point the drilling operation can be considered complete.
Before drilling on a workpiece, you should perform the same operation on some unnecessary piece of wood or chipboard of similar thickness.
It is important that this blind hole has the required depth, sufficient to install a furniture hinge cup into it, while there should be no bulges or through holes on the back side of the part.
If you need to make a through hole, then it is not necessary to install a depth stop. For a “clean” cutter exit on the back side of the workpiece, drilling must be carried out in 2 stages. At the first stage, the cup drill is immersed into the workpiece until a small hole from the tenon is formed on its reverse side. Next, the workpiece is turned over, the drill spike is installed in the resulting hole, and further drilling is carried out. This way, the edges of the hole on both sides of the workpiece will be smooth and without chips.
All about selecting a quarter using an electric planer on a board
It happens that you don’t have the right tool at hand, but certain work needs to be done. A quarter sample is just that. You need to select it with a router, but what if you only have a plane at hand? In the article we will look at the concept of a quarter and how to select it using the Interskol electric planer.
What it is
A rectangular cut in a piece of wood is called a rebate. A quarter is a type of fold with equal sides and a square section. An example of a rebate can be seen in any building - this is a rebate in all door frames under the door leaf, on window frames under the frames, etc. They are also commonly called “quarter”, but the correct name is “rebate”.
What kind of plane and tools should you use?
Some conventional electric planers have sampling devices as an additional option. In principle, an electric planer is designed for planing surfaces. For selecting wide and deep folds, other tools are more convenient and effective - a router, a circular saw. And also a special plane for selecting quarters. Differences:
- deep, shorter knives;
- powerful engine;
- special design for holding the tool on both sides during sampling;
- adjustments for height and width of the passage.
In Russia, this instrument is rare, but it can be found on international platforms.
If the delivery set of a conventional electric planer includes a side stop-platform and a depth limiter, you can also use them to make a sample of the desired size. Electric planers with this function are arranged so that parts protruding beyond the edge of the knife do not interfere with the tool being immersed in the wood.
Other electric planers do not provide mounts for these devices, and they are not included in the delivery set. In addition, parts protruding beyond the width of the knife will prevent the plane from sinking to a significant cutting depth.
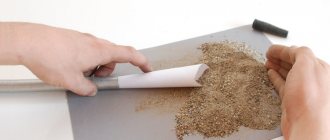
Choosing on the board
When planing, an electric planer is capable of removing a quarter to a planing depth of 2-3 mm in one pass.
The electric planer is configured for sampling as follows:
- the parallel fence is set to the desired width of the sample;
- The depth stop is set to the required size.
In 5-7 passes you can make a sample to a depth of 10-20 mm. The sampling depth is limited by a stop that is screwed to the body. The electric planer is kept from sliding to one side by a persistent parallel bar, which moves along the other smooth edge of the workpiece. To prevent the electric planer from moving in the other direction when cutting, you have to hold it with your hands.
The edge of the workpiece along which the stop bar moves must be smooth, since it is this that sets the sample size in width.
The most difficult thing in this work is to correctly guide the entry and exit of the knives at the beginning and end of the workpiece.
At first, the support bar is not pressed completely against the workpiece and the electric planer can wobble deeper, damaging the workpiece. The electric planer is held with your hands so that the bar is strictly parallel to the workpiece.
The same thing happens at the end of the workpiece, when the bar comes off the workpiece and if the hand efforts are directed in the wrong direction, the electric planer can wobble. Therefore, at the beginning and end of the workpieces, it is difficult to maintain the size of the quarters. To avoid defects, the workpiece is made longer than the required size, and then the damaged ends are cut off.
There are conflicting videos online showing unsuccessful and successful sampling.
An example of a bad sample. The sample is too deep. The side wall of the fold, along which the unsharpened side of the knives runs, turns out to be torn. When the stop bar comes off the workpiece, it is not possible to hold the electric planer, it moves to the side, and the size of the sample becomes unpredictable.
An example of a successful sample. A small quarter is selected. The master manages to carry out the entry and exit of the tool from the workpiece parallel to the side of the workpiece, the ends of the sample are relatively even.
However, if you measure such a finished quarter with a caliper, it turns out that the dimensions of the quarter “walk” within 1 mm. When removing, the electric planer can fall towards itself or away from itself, and the angle and depth of the extraction will change. When entering and exiting without full support of the thrust bar, manual control is also difficult to achieve perfect accuracy.
Therefore, such samples are quite acceptable, but where significant tolerances are acceptable, plus or minus 1 mm. That is, for rough carpentry work.
How to choose on a board using an Interskol plane
Not all models of electric planers of this brand are equipped with the quarter sampling option. It is available on the Interskol R-82 710 710 W model. It is carried out in exactly the same way as described above.
But there are two features of the model.
- The stop bar for selecting the quarter is mounted on one screw with a thumb for tightening by hand. All fastenings are on the same axis - a little “spinner”, so the fastening is unreliable, goes to the left or right from parallel with the body.
- The model is equipped with a stand for operation in stationary (inverted) mode. A quarter can also be selected in two ways - by moving the plane over the workpiece, or by moving a small workpiece along the plane in a stationary mode.
The depth of the quarter on this model is 15 mm.
Sampling with a hand plane
It is impossible to select a quarter with a regular hand plane or jointer (large plane). For this purpose, a special hand tool is used - selectors.
With an ordinary hand plane, the knife extends only a fraction of a millimeter, literally the thickness of a hair. This is how much the plane can remove in one pass.
If you attach a supporting parallel plank to the board and move the plane along it, it will remove a layer of the same thickness as the knife. Further, the edge of the platform opposite the knives will rest against the wood, and it will not be possible to go further into the quarter, since the knife does not extend to the edge of the platform.
If you attach the support bar to the plane itself, according to the principle of an electric plane, you will get something like a type of hand plane called a selector (rebate, folded gobel, or folded bevel).
But since the knife of a conventional plane does not extend to the edge of the platform, a gap will form in this place, and the plane will not be able to plunge further evenly. For selectors this is provided; the knife is located flush with the edge of the platform or protrudes slightly beyond its limits.
Selector - folding
Selectors, as a rule, had no adjustments other than the depth of the knife release. This is a special tool for selecting quarters of the same size. For example, if the selector blade is 10mm wide, it will select one side of 10mm. According to another, you can choose 10 mm, 20 mm or more, making more passes. It will not be possible to go deeper indefinitely, since the body of the selector is hidden in the wood and it becomes impossible to hold it with your hands.
Wooden selectors had a wooden strip - a parallel stop.
Working with such a tool requires patience, experience and diligence. Modern craftsmen, accustomed to working with power tools, will find working with the tools of the old masters tedious.
Summing up, it becomes clear that it is better to carry out work on quarter sampling with a tool specially designed for this purpose, and not with an electric plane, much less a manual one. If absolutely necessary, of course it is possible, but it is best to use a router for this purpose.
Insertion of locks and hinges
For inserting hinges and locks into a wooden door, many special devices have been developed, on which a plunge router is installed.
These devices are quite expensive, so craftsmen try to make them with their own hands. For example, inserting hinges with a router without a template is quite a troublesome task. But this process is significantly simplified if you make a special simple template. You can learn how to do this from this video.
The insertion of locks into interior doors occurs in 2 stages: first, a wide groove is formed for the front plate of the lock, and then a deep groove is selected for the lock body. To form the seat of the lock body, you must perform the following steps.
- Take a straight groove cutter with a diameter 0.5 mm larger than the lock strip.
- Set the immersion depth on the router to about 3 mm (depending on the thickness of the plate).
- Attach a parallel stop to the sole of the device.
- Attach the lock plate to the end of the door leaf and trace it with a pencil. Find the center of the door edge and draw a line through it (along the door leaf).
- Place the router with the stop on the end of the door and center the cutter along the markings, then fix the stop in this position.
- Turn on the unit, immerse the cutter into the door leaf to the set depth and mill this area along the entire length. The result will be a wide and shallow groove for the front plate of the lock.
- Applying the lock to the resulting recess, mark where the beginning and end of the deep groove will be.
- Next, you should choose a cutter (straight groove) with a diameter so that it is slightly larger than the thickness of the mortise lock body. Also, its shank must be of sufficient length so that this cutter can be used to make a groove 2-3 mm deeper than the height of the lock body.
- Clamp the equipment in the collet of the unit.
- Set the maximum immersion depth of the equipment on the unit, sufficient to insert the lock body. This is done using the depth regulator.
- Turn on the unit and drill to the full depth set at the beginning of the marking. Repeat drilling along the entire length of this section, placing the holes as close to each other as possible.
- When the entire area has been worked, lift the cutter slightly so that the upper part of the tool blades comes out slightly from the groove (1-2 mm) and mill, moving the unit back and forth. After several passes, the cutter can be deepened and the above operation performed again. As a result, you will get a deep groove with a flat bottom and smooth walls.
DIY accessories for a router
In this article I will describe various kinds of devices and tricks for working with a router, which significantly expand the functionality and make work easier.
I decided to post only additional (mostly homemade) tools for the router that I personally tested in my workshop, so the article will be gradually updated with new ideas.
Cutting along the guide
In order to make a straight cut exactly where you need it, you will have to use a guide bar. It can be made from any board with a smooth edge, for example, initially I just used a piece of 16mm chipboard measuring 1200x150 mm. The principle is as follows: the distance from the center of rotation to the edge of the milling base is the same and you need to know it. It's easy to find out. Screw a guide to an unnecessary piece of material and make a test cut. Measure the distance from the edge of the cut to the tire, add the radius of the cutter and get the required value. For my Ryobi it is 61 mm.
Next, we do the following (for example, I use a straight groove cutter with a diameter of 12 mm, i.e. its radius is 6 mm). We draw a line along which the cut is planned, retreat a distance of 55 mm (61 mm - 6 mm) from it, and draw another line. We attach the guide along it. We make a cut and make sure that its edge passes clearly along the first line.
Sampling of grooves and quarters
To select a groove on the face of the workpiece or its edge (end), you can use a parallel stop, as when cutting in door locks. But you can also make a special device to facilitate the process if you need to select grooves in a large number of identical wooden parts. What the grooving device looks like is shown in the following figure.
This device is easy to set up:
- the unit is installed on the device platform;
- the entire structure is superimposed on the workpiece;
- using parallel guides, the straight groove cutter is centered relative to the markings on the workpiece;
- After adjusting the immersion depth of the equipment (usually several passes are required), the grooves are made.
To select a quarter in a piece of wood, use a groove cutter with a bearing.
The edge (end) of the workpiece serves as a guide for the equipment. The tool is clamped in the collet of the unit, after which the immersion height is set and the quarter is removed in the usual way.
Quarter selection is not the only function of this equipment. With its help, you can select a groove along the edge of the workpiece and make a tongue-and-groove board. The depth of the groove is adjusted by changing thrust bearings of different diameters.
To produce tongue-and-groove boards in large quantities, you will need to attach the router to the table.
Which instrument is used to choose a quarter?
There are a number of 6-m boards calibrated to 20 mm.
I want to sew up the ceiling with them, choosing a quarter. How is this easier to do? I tried it with an electric planer, but it turned out poorly: 10 mm is selected in 3 passes; If the width of the groove can be more or less controlled using a plane ruler, then the depth can only be approximately controlled. It is difficult to keep the planer platform strictly horizontal. The power tool store advised me to purchase a router for this purpose; but I didn’t understand how to work with this tool at all. Most models don't even have a ruler. How to keep it on the edge of the board? Maybe there is some simple machine or device for a plane specifically for this purpose? You can cut it on a stationary circular saw in two passes, if it (the circular saw) has an overhang of the disc above the table. In general, a milling cutter. There is a parallel stop included in the kit, but you can make the device yourself. Read here » >
Take a hand-held circular saw (I removed the protective cover and the rear guide fang). Attach with self-tapping screws to a piece of chipboard, plywood, or a wide 25mm unedged board. Turn the switch on completely down. TURN OFF and UNPLUG FROM THE SOCKET. Turn on and wrap the button with electrical tape. Turn the base over and secure it to trestles or the like. Attach the rip fence. Set the height of the circular. Two passes - groove. For convenience, wooden “springs” are used as a clamp.
A disk without a protective cover is DANGEROUS.
I tried it - slowly and a lot of chips. The milling area is not small - the router gets hot. Did not like.
Well, the same desktop circular machine, only in a homemade version. By the way, on bourgeois desktop circular saws (real ones, which are large machines), you can put several saw blades with intermediate inserts or a wide cutter on the spindle. It works very effectively. But this cannot be done on a manual circular saw under any circumstances.
With a milling cutter, yes, slower and dustier. And it may take several passes.
IS wrote: Well, the same desktop circular machine, only in a homemade version.
It is almost impossible to do such things in large volumes with a router or plane. Very slow, a lot of chips, plus the constant risk of screwing up the workpiece. The simplest thing, as suggested, is a stationary circular saw with an adjustable disc reach and a parallel stop. The required two passes on it are obtained faster than one pass with a plane. The most budget option is ENCOR-10, it costs about 3100 rubles. I made door frames on a Soviet-era UBDN machine, where even the reach is not adjustable. I had to put wooden spacers between the bed and the top of the table. But it turns out quickly and the accuracy is good.
But keep in mind that the angle from which the quarter is selected must be strictly straight along the entire length of the board. Before cutting, I check all the angles with a square and choose the straightest one. And the board should not be bent or twisted. Also, a 6-meter board will require additional supports and, preferably, an assistant.
Selecting a quarter in a wooden piece is one of the most common operations in carpentry and carpentry. Why is this done and how is it discussed below.
Wood, like any material, has specific properties that need to be taken into account. This obvious fact, however, is often ignored by novice masters. The result is a spoiled mood, time spent on rework, and often spoiled material.
One of the characteristic properties of wood is that when humidity changes, the linear dimensions of the wooden part change. When wood dries, it contracts and expands when humidity increases. In addition, over time, resins evaporate from wood. Because of this, the wooden part gradually decreases in linear dimensions regardless of changes in humidity. They say about this phenomenon: the tree is drying out . These effects are especially noticeable in softwood, from which the most popular lumber is produced.
In construction and dacha farming, spruce and pine boards are most often used. These types of wood change size the most as they dry.
What does drying out lead to?
A typical case: you made a shed at your dacha to store household equipment and for other needs. They did it for themselves, so they pulled together the boards from which the walls were made, carefully, without the slightest crack. Two or three months pass; the boards dry out and the entire wall glows with cracks. In winter, snow blows through them; in summer, the wind blows dust inside the barn.
Shrinkage reaches 10-13% of the linear size. That is, a board with a width of 100 mm after drying is reduced to 88 mm.
To prevent this from happening, you need to use quarter boards for wall cladding. A wall covered with such boards will never have through gaps. With their quarters, neighboring boards overlap each other and when they dry out, through cracks no longer appear.
Unfortunately, lumber is very rarely sold with a quarter finished. Therefore, an amateur craftsman should know the ways in which boards can be modified if necessary.
Methods for making a quarter
You can select a quarter using several methods using different tools. For example:
- electric plane,
- milling cutter,
- hand circular saw,
- stationary circular saw.
The last method - selecting a quarter using a circular saw - is the most convenient and productive. Let's consider it.
If you require planed boards, then it is more convenient to plan the boards first and only then proceed to making quarters.
Quarter selection sequence
- We adjust the reach of the saw blade so that the cutting depth is equal to half the thickness of the board being processed. The easiest way to do this is right on the spot. To do this, place the board on the side of the saw blade, as shown in the photo, and adjust the reach of the blade.
- We install a parallel stop on the machine so that the width of the cut is also equal to half the thickness of the board. We take into account the thickness of the disk itself. This completes the machine setup.
- We make longitudinal cuts on opposite sides of the board.
- We make cuts from the ends of the board. A quarter is ready. As a by-product we get glazing bead)).
Alternative methods
As mentioned, a stationary circular saw is very convenient for selecting quarters. (There is a separate article on our website about the types of circular saws and the features of their choice.) But it is not always in the master’s arsenal, and sometimes it is physically impossible to use it.
If you need to cut quarters out of thick, long boards, you can use a hand-held circular saw. The manufacturing principle and sequence of operations are the same. The difference is that in this case the board being processed and the tool change places. The board is fixed motionless, and the master moves the circular saw with a parallel stop along it manually.
If you don’t have a circular saw or a hand-held circular saw at hand, you can use a grinder with a wood blade or a hand router with a suitable cylindrical cutter. Both methods are very slow and are not suitable for large volumes of work. In addition, choosing a quarter with an angle grinder is inconvenient, dangerous and turns out uneven.
Another way is to use an electric plane. However, most modern plane models are not suitable for this due to their design features. Watch the video that shows just this method of choosing a quarter.
Some tips
- Don't forget about safety precautions.
- If the boards are long, work with an assistant.
- The boards must be the same thickness.
- Do not use freshly cut lumber. Let them dry for at least 1 year.
In the following articles we will continue the story about woodworking techniques and the tools used.
A quarter or fold is a notch made along the wooden edge along the entire length. With the help of a fold, the parts are connected to each other by placing them on top of each other. In this way we collect:
Choosing a tool
From the huge number of electric planers, we will find a tool with the “select a quarter” function . This means that the plane must be equipped with a special stop that determines the planing width and a depth regulator, which is attached to the side opposite the stop.
When performing work with a good tool:
- The quarter line is straight;
- There is no staircase defect;
- A perfectly right angle is created.
Checking the operation of the electric planer
Before starting work, the selected power tool must be checked. Carefully inspect the body, cord, drum where the knives are attached. The rotation of this part must be free.
Important! We check the rotation of the drum manually with the instrument turned off. If the electric planer vibrates and when working, unevenness and burrs appear on the surface of the board, you need to check the sharpening and installation of the knives. If necessary, adjust the gap between the plates. The knife should protrude beyond the slabs by 0.5-1.0 mm; without this condition, the plane will not select a quarter. You also need to check the fastening of all knives.
We work according to the rules
First you need to carry out trial work on any board of a similar shape. Then, the block on which we will cut the quarter with a plane must be carefully secured to a workbench or a strong, stable work surface. An uneven angle results from the fact that the workpiece is not securely fastened.
You need to turn on the plane and give it the opportunity to gain momentum. You should start the action by holding the tool strictly parallel to the working surface. It is necessary to move the plane along its length smoothly, without jerking. There is no need to increase speed or stop, we work evenly.
Choosing lumber
All the lumber we need must be well dried. You need to carefully check that the block for cutting out a quarter with a plane does not have:
- Knots, resin cavities;
- Cracks along and across;
- Protrusions and recesses.
If minor defects nevertheless arise during processing, there is no need to rush to correct them immediately using an electric planer. Sometimes it is more rational to use a hand plane or sandpaper to refine a part element. It is necessary to carefully examine the edges of the workpiece; a crooked groove is obtained due to the unevenness of the edge.
The quarter selection is not performed in one pass; several times are needed. At the beginning of the passage, the pressure on the front of the plane should be stronger, and at the end, the efforts must be transferred back.
Determining how to select a quarter
Work can be done in different ways. The first is that the tool moves lengthwise along the board . The second is that the workpiece moves along the tool; this type of work is effective for large volumes.
Tenon-groove and dovetail connection
To create a tongue-and-groove connection, there are many complex devices. But if the production of wood products is not on stream, then the tongue-and-groove connection can be made in a simple way using a hand router.
- The part on which the tenon will be cut must already have a finishing size. When marking, you should add the length of the tenon to the length of the part. For example, for the legs of tables and chairs, a tenon length of 30-40 mm will be sufficient, and for doors – 55-70 mm. Using a square, mark the edge of the workpiece.
- Take a hacksaw and make small cuts (these will be the shoulders of the tenon).
- Prepare the barrel cutter and secure it in the collet of the machine. With its help, a tenon connection will be created.
- Secure the workpiece on the workbench, and perpendicular to it, secure a second part of the same thickness (it will act as a support for the router sole).
- Next, you need to set the amount of overhang of the cutter relative to the unit platform. If the tenon is located exactly in the center of the workpiece, then the overhang of the tool should be such that after turning the part over and the second pass, you will have a thickness of the tenon corresponding to the width of the groove. The width of the groove, in turn, depends on the diameter of the groove cutter. It is from this size that you should start calculating the entire connection.
- After you have decided on the depth of the tool and set the limiter, you can begin to remove the tenon. Turn on the unit and start milling the workpiece, but in stages, going 3 mm deeper into the material each time.
- When the required depth is reached, stop the machine and turn the workpiece over.
- Continue selecting the tenon using the method described above. As a result, you will get a spike with a rectangular cross-section. But, since the groove will have a rounding at the edges from the cutter, the corners on the tenon will also need to be cut off. This can be done with a knife or on a sharpening machine.
How the groove is selected was discussed in detail above. If you need to make a tenon-groove along the entire length or width of the workpiece, then you will not need to round the corners of the tenon.
To make a dovetail tenon joint, use a special device.
The router is equipped with a dovetail groove cutter, as well as a copy sleeve with sides for better positioning in the slots of the template.
After clamping the template and the workpiece, milling is carried out according to general rules.
The tongue-and-groove joint is also used in the manufacture of lining. Just to make the lining, you need to have a set of 2 cutters. One cutter selects a groove on the edge of the part, and the other makes a tenon.
To make a panel, the edge of which is a tenon, and to cut a groove in the facade frame, a set of cutters is also used.
How to choose on a board using an Interskol plane
Not all models of electric planers of this brand are equipped with the quarter sampling option. It is available on the Interskol R-82 710 710 W model. It is carried out in exactly the same way as described above.
But there are two features of the model.
- The stop bar for selecting the quarter is mounted on one screw with a thumb for tightening by hand. All fastenings are on the same axis - a little “spinner”, so the fastening is unreliable, goes to the left or right from parallel with the body.
- The model is equipped with a stand for operation in stationary (inverted) mode. A quarter can also be selected in two ways - by moving the plane over the workpiece, or by moving a small workpiece along the plane in a stationary mode.
The depth of the quarter on this model is 15 mm.
Metal work
Milling of metal with a manual milling machine is carried out in very rare cases, since this tool is not intended for this purpose. Sometimes it is used for cleaning welds or countersinking holes. It is also possible to use this tool for processing products made of aluminum, copper, bronze and brass (for making grooves). A carbide groove cutter is installed in the unit, and the part is milled in the usual way.
In this case, the machine must be set to minimum spindle speed, and the immersion depth of the equipment per pass should be 0.5-1 mm.
Sometimes a hand router is used to engrave patterns on planes made of non-ferrous metals. In this case, the same templates and devices are used as for woodworking, only special engraving cutters are clamped into the router collet.
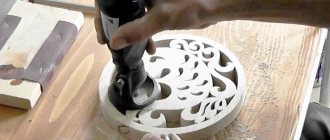
Figured carving and making crafts
Typically, grooved fillet and grooved straight cutters are used for figured wood carving. Wood carving with a hand router occurs as follows:
- install a fillet groove cutter of small diameter into the unit;
- apply a design to the workpiece (you can use a stencil);
- outline the applied pattern with a black marker (not alcohol);
- follow the drawn lines with a fillet cutter, setting the immersion depth to 3-4 mm;
- Next, you should change the fillet cutter to a straight groove cutter and select the entire inner part of the pattern;
- After milling is completed, the resulting pattern should be sanded with sandpaper and varnished.
In the same way, volumetric figured wood carving is made. Only the cutter selects not the pattern, but the background around it. The finishing of the ornament is done with a drill or mini-drill (engraver).
Also, with the help of a router, not only surface wood carving is produced, but also openwork through (slotted) cutting of plywood, thin furniture panels, and MDF boards. The following picture shows a slotted pattern made with a router on plywood.
Processing of plywood is done with ordinary wood cutters.
Since plywood contains a certain amount of adhesive, the equipment must be cleaned of glue adhering to the blades more often than when processing wood.
Using the work techniques described above, you can cut out shaped elements for gazebos, kitchen facades, country furniture, etc.
Curly wood carvings can be used to decorate various wood crafts. For example, boxes, backgammon, making signs for various establishments.
The router can also be used if you need to make balusters decorated with twisted or straight carvings. To mill straight grooves, use a special device that is easy to make with your own hands.
The process of milling a baluster occurs as follows.
- A fillet groove cutter with a bearing is installed in the unit.
- To prevent the workpiece from turning, it is fixed with a screw. It should fit into one of the holes in the disk with the baluster attached to it.
- Next, the tool is lowered so that the thrust bearing is to the left or right of the workpiece and just below its center. But the cutter must be located exactly in the center of the part.
- After positioning the equipment, the unit is turned on and a rounded groove is produced (the bearing guides the tool, repeating all the shapes of the baluster).
- At the next stage, the router is moved to the side, the fixing screw is released, and the disk is rotated so that the lock fits into the next hole.
- After fixing the workpiece, the longitudinal groove is removed again. After each pass of the cutter, it is necessary to rotate the workpiece by 1 step.
The following photo shows balusters with longitudinal grooves.
To make twisted balusters you will need a more complex device.
The twisted pattern is obtained by turning the workpiece while the cutter moves along it. The rotation of the workpiece and the movement of the milling cutter on this machine are synchronized.
Quarter selection sequence
- We adjust the reach of the saw blade so that the cutting depth is equal to half the thickness of the board being processed. The easiest way to do this is right on the spot. To do this, place the board on the side of the saw blade, as shown in the photo, and adjust the reach of the blade.
- We install a parallel stop on the machine so that the width of the cut is also equal to half the thickness of the board. We take into account the thickness of the disk itself. This completes the machine setup.
- We make longitudinal cuts on opposite sides of the board.
- We make cuts from the ends of the board. A quarter is ready. As a by-product we get glazing bead)).