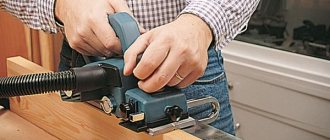
An angle grinder is a universal tool in every sense, with which you can cut wood, steel profiles, process stones and concrete, carry out roughing and grinding work, as well as sharpen hacksaws for other tools.
Each of these operations requires a specific circle.
For example, it is impossible to sand the surface using a thin cutting wheel for an angle grinder, because the attachment will very quickly become unusable. How to properly remove the disc from the grinder and put it back when grinding or grinding a circle?
Features of application
You most often have to use a key for an angle grinder when you remove and change the disc. And such a need arises mainly due to the appearance of cracks in the disk itself. Before using the key, you must stop the equipment and turn off the power. Failure to comply with this rule can result in big trouble.
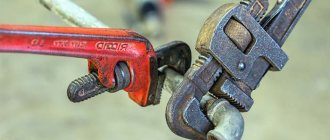
After de-energizing the device, use a wrench to tighten the lock nut. Sometimes it happens that the disk is jammed to the limit, and a standard tool does not help. Then you can use a powerful gas wrench. The remaining part of the disk can be cut off with a regular hacksaw; After replacing the disk element, the lock nut is returned to its original position.
Details about the universal “crab”
The “crab” puller consists of two plates, which are the body, and 3 grippers installed between them. There are notches on the working surface of the paws that prevent them from sliding over the surface of the filter. The grips are controlled by a clamping mechanism located in the middle of the crab body and between the rotary mounts of the legs.
The mechanism itself, like the puller as a whole, is activated by a special key supplied - this is one of the design types - or by an end or cap tool, for which a corresponding tip is provided, extending from the body. The scheme of working with the “crab” is identical to the process of unscrewing the filter with a “cup” puller. You must first attach it to the end of the cleaner. It is in this part of the work that the “crab” is fundamentally different from the cup, which makes it universal. In the initial position, its paws are spread apart and are able to cover the filter with the maximum diameter allowed for its design.
Universal “crab” for removing the filter element
After placing the grips on the smaller cleaner, the clamping mechanism is activated. In this case, the “crab” will be able to grab a filter whose diameter corresponds to the minimum allowable for the puller design. After the paws grab the cleaner, you must continue to work with the key placed on the drive of the clamping mechanism. This will unscrew the filter. Moreover, the stronger the applied force, the more reliable the grip of the “crab” paws will be - slippage is excluded.
Depending on the “crab” model, it can be used to remove and install filters with a diameter ranging from 60–125 mm. This puller, like the “cup”, is very good when working in narrow and confined spaces.
How to choose?
The key used during operation must provide quick and reliable clamping of the disk, so the tool is made of high-strength steel; only under this condition will it work for a long time.
- presence of a soft start function (prevention of jerks during startup);
- possibility of blocking brushes during power surges;
- option for automatic spindle balancing (reduction of runout during use);
- The ability to hold the start button is a very useful feature during long-term work.
Some craftsmen prefer to use a universal wrench to work with an angle grinder. This device can tighten and loosen threaded flanges not only on an angle grinder, but also on a wall chaser, and even on a circular saw.
The main part of the key is made of tool steel. It would be very good if the handle had a polymer coating. The universal device has a movable working part, the dimensions are very smoothly adjustable. Their range can vary quite widely.
- Judging by customer reviews, attempts to find such a tool in branded retail chains and large electrical goods stores are usually not successful. It is advisable to look for a key for an angle grinder at construction markets and in stores selling hardware.
- When choosing, please note that a device from one brand may not be suitable for grinders from other manufacturers. To minimize the risk, you should take the nut with you as a sample. You can make such a mechanism yourself using an open-end wrench: in this case, the workpiece is drilled and the hardened fingers are welded.
- The steel grade must be indicated on the handle of a high-quality adjustable wrench. If the manufacturer does not do this, then it cannot be trusted.
- It is undesirable to purchase a mechanism with even slight play.
- The diameter of the nuts (in millimeters) that the factory wrench can unscrew is indicated after the letters “KR”.
- Before purchasing, you should check the tool in your hand to see if it will slip out.
You should not buy goods from companies of dubious quality that offer too low a price.
You will learn how to make a universal key for an angle grinder in the video below.
A universal element for any builder is an angle grinder or, more simply put, an angle grinder. With the help of a grinder, you can cut steel, wood, or process stone or concrete, as well as carry out grinding work or sharpen workpieces. Each operation has its own nozzle and you cannot work on the material with a circle that is not intended for this. For example, you cannot grind surfaces with a thin cutting wheel. In order to replace the nozzle you need a special key, but how can you do this without the help of a key?
Design and method of use of the cup puller
This type of puller is available for filters of all sizes, but each individual tool is designed to unscrew filters of only one diameter. Therefore, when buying a cup you need to be especially careful. This key should ideally match the filters installed on the car engine. Even a difference of a few millimeters will turn the cup into a useless accessory.
Auto repair shop owners immediately purchase entire sets of these pullers, including up to 30 wrenches for filters of various diameters. Such sets are supplied with a suitcase in which the cups are conveniently arranged by size numbers.
Set of cup wrenches for removing oil cleaners
The “cup” oil filter pullers have a square hole in their “bottom” for the tip of a socket wrench. Some manufacturers additionally make a hexagonal “bottom” - for a spanning tool. Many pullers, primarily their sets, are supplied with a tip for the “cup” hole, onto which the key is placed, and some are complete with all the necessary tools, including a socket and socket.
The “cup” puller is placed on the ribbed top of the filter with a wide open part, on the inner circumference of which there are edges. They must match in number and size with those available on the purifier. Otherwise, the puller will not fit tightly, and unscrewing the filter will be difficult or impossible. The “cup” is considered the most convenient tool. It itself is compact and, as a rule, it is easier to “crawl” into the filter. Moreover, a correctly selected “cup” never slips relative to the circumference of the filter housing, which sometimes happens with some other types of pullers.
How to change a disc on an angle grinder without a key
Method 1
Use a regular gas wrench. You need to grab the nut with an adjustable gas wrench and carefully unscrew it without applying much force. There is a big drawback to this method - you can bend the nut or break the rotation lock. putting in too much effort.
Method 2
You can make a simple homemade key for an angle grinder. For this you will need a long nail, the head of which needs to be sawed off and the tip bent so as to give the nail a U-shape. The nail must be bent so that the ends of the workpiece fit into the flange posts. If the nut is tightened very tightly, then you can strengthen the structure with a metal rod, with which you need to rotate your key. This method will not damage the structure of the angle grinder, but it will require time and tools to make such a key.
Method 3
Tapping with a chisel. You need to treat the spindle shaft with regular WD 40 and wait 15 minutes for the job to go easier. After which you need to place the chisel at an inclined surface into the flange hole and gradually unscrew the fastener using tapping movements. This method also has a drawback - you can damage the hole or damage the flange of the angle grinder.
Method 4
You can heat the nut using a gas torch. In this case, you should be able to unscrew it by hand. Be sure to use heat-resistant gloves after heating the workpiece. This method is the most risky, as you can overheat the oil in the tool or damage the gearbox due to heat.
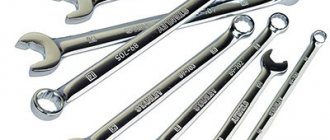
Combination wrenches – what are we talking about?
Manufacturers combine different heads in one product, but if we talk about a combination wrench without specifying what exactly was combined, then we are talking about a combination of open-end and ring tools. This combination has many varieties, for example, the heads are turned to each other at right angles.
This is very convenient - no matter which end you have to work with, your palm will rest against the wide plane of the opposite key.
When we talk about a combination tool with a ratchet and a hinge, we mean an open-end wrench, the socket part of which is movable, thanks to the hinge, and has a ratchet that allows you to turn the wrench without removing the nut from it. So-called crank nut tools may look like the letter “C” or “S” - in some situations, for example, when adjusting the ignition timing in a car starter, you simply cannot do without them. Your combination wrench set should have at least a couple of these in the most popular socket sizes.
What is important to remember when working with an angle grinder
We are for safety and therefore once again remind you of simple rules when working with this tool:
- Install only circles of the appropriate size according to the instructions on the grinder. Based on the characteristics of the tool and install circles smaller or the same size as provided by the manufacturer. Otherwise, you risk losing your arms or other limbs.
- The protective disc develops hardening over time due to constant use. It definitely needs to be cleaned from time to time.
- Remember, if the circle rotates clockwise, then the nut also needs to be unscrewed clockwise.
- Before attempting to remove the disc from the grinder, be sure to unplug the tool!
Well, for those who know about safety precautions and already know how to work with a large number of tools, we recommend reading an article on how to make
An angle grinder is a universal power tool. With its help, you can cut steel profiles and wood, process concrete and stones, perform grinding and roughing work, and sharpen hacksaws. And for each operation there is a specific circle. For example, you cannot grind surfaces with a thin cutting wheel for an angle grinder - it will quickly break. How to properly place a disc on a grinder when grinding and breaking a wheel or switching to another type of work?
According to the instruction manual, replacing the disc on an angle grinder should be done as follows.
- Unplug the power tool cord from the outlet.
- Press the spindle rotation lock button.
- While holding the grinder's stop button, use an open-end wrench to unscrew the flange nut. You need to turn the angle grinder wrench in the direction of rotation of the disk. If it is difficult to press a button with one hand and operate the key with the other, ask someone close to you to help.
- Remove the old disk from the spindle shaft.
- Install a new disk.
- Secure it with a nut manually or using the same universal wrench. At this moment, you need to hold the stopper with your other hand. Do not overtighten the nut.
- Plug in the grinder for 30 seconds at maximum speed. If the disk rotates freely, without beating, without touching the protective casing, you can start working.
The delivery set of the angle grinder must include an open-end wrench. Cheap grinders often come with a poor quality key. It can quickly break (however, this also happens with tools from leading manufacturers). In the end, the key can simply be lost .
How to properly install a disc on an angle grinder in this case, without having a suitable tool at hand?
The most reliable way is to simply buy a new key. You can take a standard one, for a specific flange for an angle grinder, or a sliding one, with the ability to adjust the jaws. But keys for angle grinders are not sold in all hardware stores, and finding the right tool can be difficult. We bring to your attention several tricks with which you can change the disc on an angle grinder without a universal key and save nerves and money.
Garageman's tools: homemade keys and nuts from a rocket design bureau
Read previous stories from “Uncle Vasya” here
In my work, tools and equipment are an absolute necessity, like air or water. Each mechanic has his own approach to this. Young people, of course, are now immediately purchasing modern sets. But since I first disassembled the car back at the end of the era of “developed socialism” and still use some things since then, I am completely eclectic - everything is motley, partly unsystematic, but at the same time for me it is as practical and convenient as possible. Yes, I don’t have anything in the “expensive-rich” style. A tool is a common consumable that wears out, breaks, gets lost, and is sometimes forgotten in client machines. Therefore, I have never had and never will have keys like “Snap On” with a lifetime warranty and corresponding price. Everything in the workshop is arranged in such a way as to make money with minimal costs. Well, as in the old joke about “checkers or go” - I only have “go”, but there are no “checkers” at all. Yes, this is far from an ideal workshop, but it suits me and, more importantly, my clients.
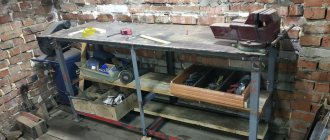
I'll start with the main thing - the lift. Not only does it allow me to work faster and better, it also keeps me healthy. Many garage mechanics work on pits or jacks, and as a result they inevitably face serious back and joint diseases. Pah-pah-pah, but this is still unfamiliar to me, and precisely because of the work on the lift. What is he like?
It is not young, it was made more than 20 years ago in what was then fraternal Poland. In those years, these lifts were quite common in our city, in particular, similar ones were used in the local AvtoVAZ service station, the only one we had at that time. Its main advantage is saving space, which is important for garage conditions, and a very affordable price. There are many more disadvantages - it is very slow, noisy, and the load capacity is only 1500 kg. In addition, it can only lift cars with a rigid and fairly long straight threshold, and the width of the car is strictly limited - maximum like a Chevrolet Cruze or Mazda3. But it is enough for most of the cars of my regular customers, and this is the main thing for me.
The power nut is made of bronze, with a steel safety nut underneath it. The “original” nut lasted about ten years, but those made to order based on its sample lasted three to four years at best. Moreover, the nut that worked the least was the one that was made at the local missile design bureau, where I once worked. It’s interesting why rockets sometimes fall... However, this is beside the point. By the way, making one nut costs 4,000–5,000 rubles including metal.
The safety of this lift... I once saw in another workshop how one of the nuts on a two-post lift was cut off while lifting a car. The mechanic working on the lift did not realize that the load-bearing nut had long since worn out and the machines were lifted only due to the safety nut. And when that too wore out, one half of the lift came down with a roar as soon as the wheels of the machine being lifted came off the floor. But the second lift stand remained holding the car, and the car was severely skewed. It’s good that neither equipment nor people were hurt.
On a single-post lift, when the supporting power nut wears out, the entire frame suddenly settles onto the safety frame, while the car remains hanging evenly, as it was, and I only need to lower the lift. Of course, this lift will not last forever, and if it breaks down seriously it will have to be replaced, but for now it works. And the support under it - well, just in case.
A sliding rack is often used in conjunction with a lift - to tighten the suspension when tightening silent blocks, to support the engine when removing the gearbox.
Well, now about the keys. There are not just a lot of them in the workshop, but very, very many. Some were bought, some were given as gifts, some were received for the occasion. There are no branded ones, mainly “Delo Tekhniki”, “King Tony”, “Jonnesway” and the like. Here are the usual cap-on horns...
With ratchets (nice pampering, but short-lived)…
Curved caps and with them for the company of non-standard sizes...
And another backup set of different...
And separately for the nuts on the tubes...
Why are there so many keys? Well, you should have a pair of all common sizes, because you can’t always fit a bolt with a nut with heads and collars. Curved caps - also at least one per size, you never know. Plus, not the most standard sizes - 16, 18, 21, and now you can’t live without them either. I remember how a friend in the early 90s dismantled the gearbox on a Volvo 340 and cursed that he needed keys and heads for 15, but where could he get them then? And how I tried to unscrew the drive of the Audi 80 back in 1993 with homemade “stars”... How young we were... but oh well
Yes, about those same “stars”. Over the course of a couple of decades, several of these sets were used, and as a result, all the surviving insert attachments were combined into one box. They are harmoniously complemented by matching heads.
Now the heads. There are as many of them as there are open-end wrenches. The logic here is the same - there must be two heads of any size used. Ratchets, cranks, rotators - of course.
In this case, it is desirable that the same size includes heads with both a hexagon and an asterisk.
There are also power heads, a large wrench and special tools in the form of heads welded to a crowbar
The elongated heads lie separately.
Some instruments can be called historical artifacts, or even rarities. On these tubular keys (the most convenient thing!) you can see the prices - 1 rub. 20 kopecks and 80 kopecks.
Yes, there was a time when you could buy something for one ruble, and the prices were so stable that they could be engraved directly on the product. Tell today's young people this now - they won't believe it.
I still enjoy using a set of heads made during the USSR in Chernigov, Ukraine. I wonder if the plant is still operating?
And this key was also once made in a long-defunct country...
Of the three moment keys, two are also from those ancient times.
Well, we will return to the present and go through small-scale mechanization and electrification. Here is one of the main assistants in the work. Sharpening ax knives is a matter of course, but not only that.
Firstly, I don’t like standard internal chamfers on heads and I make sure to end all heads and spanners so that they cling more reliably to the bolts and nuts. Secondly, sometimes some heads have to be quickly ground on the outside. Well, open-end wrenches also sometimes need improvement. This key for “32” was sharpened a long time ago for the timing belt tensioner pulley of the very first “eights”.
But this one on the “24” is processed to hold the “Opel” camshafts on Ecotek engines.
Sometimes you have to chamfer the head to fit a powerful open-end wrench in order to use the head when disassembling a suspension strut or to work in tight spaces when the spanner comes off.
And if you slightly grind down the edge of an old piston pin from a Zhiguli, you will get an excellent drift for the cups of the crosses.
Well, no comments here.
Although I work on a lift, I have several mechanical jacks on the farm. In my opinion, they are more reliable than hydraulic ones, although perhaps this is just a habit.
Now for the special tool. There seems to be a lot of it too, but it’s never enough. Here are countersinks and reamers for repairing block heads. Why does everyone call them “sharoshkas”???
Since we are talking about cylinder head repair, what can we do without feeler gauges, valve seal pullers, depressurizers and the like.
Desiccants are modified to accommodate different sizes of valve plates.
Since I’m making engines, I can’t do without compression gauges and an oil pressure meter with adapters for different engines.
An irreplaceable thing when repairing engines is a compressor. Blow out any remaining chips after turning, blow out dirty spark plug wells before replacing spark plugs, etc. Got it when discarding old equipment at a dental clinic, made in Israel.
An equally useful thing for a mechanic is this pallet. I bought it from a conscientious alcoholic who walked past the workshops and offered it to everyone, since he felt sorry for just handing over the non-ferrous metal, it was a useful thing.
The dent on the side of the pallet appeared when it saved my leg from a client’s car unexpectedly running into me. The pallet, standing vertically close to the wall, bravely took the brunt of the blow. But that's a completely different story...
It is very convenient to wash parts in it; if necessary, it can be slipped under any car to drain the antifreeze. And it is very easy to clean.
There are mandrels for centering clutch discs of different sizes, but nevertheless you often have to use a universal one in the form of a bolt with wound electrical tape
And this is a mandrel for fixing satellite gears when removing the gearbox of front-wheel drive VAZs. Yes, you can use a rolled newspaper, but it’s not necessary.
I use this old VAZ clutch disc with a welded powerful nut to fix the input shaft when disassembling the gearbox.
But this tool is a modern driver... but what about the driver, not everyone recognizes the mechanic
This is a device for sharpening the edges of these cylindrical tubes. What are they for?
All together - this is a set for punching holes of different diameters in homemade gaskets, which has survived to this day from the time of general shortage. I kept it as a technical curiosity, but, oddly enough, sometimes it is used.
And here is another representative of the past. This is a silent block presser for Moskvich-412. Two neighbors still drive them, so I don’t throw them away.
In general, I have several such devices, but they have hardly been used for many years.
There are also more popular things. Here are the devices for pressing in wheel bearings, made to order at a local aircraft factory. The material is not bad, those manufactured in the missile design bureau turned out to be much worse. But the accuracy is lame, especially compared to how they once did the same thing at the Voronezh Mechanical Plant...
There are several universal ball pullers. Favorite - fork impactor, if the ball joint or ejection tip.
There are keys for steering racks.
Various devices for grabbing something small in the depths, say, pulling out fragments of a chain guide in a Zhiguli.
Some tools are universal.
And some are highly specialized, like this mandrel for installing drive seals on front-wheel drive VAZs.
Sets of spring ties of different shapes and lengths, selected for different types of suspension springs, are stored along with tools for loosening the strut nuts. The best ones are made to order.
Some of the instruments look very unique. What is this?
I use these strange contraptions to hold the crankshaft pulley of various cars when unscrewing its nut in cases where there is no other way.
But here is an equally strange piece of iron.
This is a camshaft lock for Opel Astra, Vectra, Zafira engines, as well as Opel-like Chevrolet Cruze, Orlando, Aveo. It so happened that my clients had a lot of such machines, so I had to delve into it.
With these and similar engines, non-automotive things such as markers and a regular stationery “Stroke” are often used - they are convenient for marking timing gears, a chain or a belt.
With Zhiguli, of course, everything is simpler. Here are some wrenches for the crankshaft pulley nut. Homemade powerful one - for unscrewing this nut with a starter.
Well, oil filter pullers. Cup - on Logan.
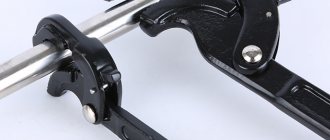
A recent purchase is a set for recessing rear disc brake pistons. Useful for those cars where the service and parking brakes use the same pads; previously I used pliers or a grinder key for this.
By the way, about pliers and other side cutters with round nose pliers.
Of course, that's not all. Lots of little things that you can’t live without. It occupies all the nooks and crannies of the workshop - syringes, funnels, open-end wrenches in sizes from 5.5 to 41, drill bits, taps...
A lot of different, not new, but usable fasteners.
During leisure hours this is all sorted, but it would be nice if I had less leisure time at work. Let the sorting wait a little longer...
I almost forgot about another important device.
I'm not kidding! This ancient Chinese fan has been regularly cooling engines for 15 years before adjusting valves or replacing antifreeze, and also helps out in the midst of the summer heat.
And finally, the most important tools in a mechanic’s work: “liquid wrench” and electrical tape.
How to use? We use “liquid key” to water everything that should move freely, and with electrical tape we securely fix what should not move
How to change a disc on an angle grinder without a key?
Method 1.
Use a gas wrench. Use an adjustable pipe wrench to grasp the nut and carefully unscrew it without applying much force. Disadvantage: you can crush the nut and break the rotation lock.
Method 2.
Make a homemade key for an angle grinder. To do this you will need a long nail (at least 100 mm). You need to cut off the head, the point and give the nail a U-shape. It should be bent in such a way that the “tool” posts fit into the holes in the flange. If the nut is tightened tightly, insert any metal rod between the posts of the nail and, holding it with both hands, rotate the structure in the direction of movement of the circle. At this time, you need to press and hold the spindle lock button. The method is safe, but it requires time and additional tools - a hacksaw, a vice, a hammer.
Method 3.
Tapping with a chisel. Before changing the disk, you can treat the spindle shaft with WD-40 and wait at least 15 minutes. Then place the tip of a thin chisel at an angle to the hole of the flange nut and gently tap over the entire surface of the hole with a plumber's hammer. Sooner or later, thanks to gentle tapping, the nut will move, and it will be possible to unscrew it manually. The disadvantage of this method is that the holes can be damaged and the flange can be damaged.
Method 4.
Heat the nut. If it is difficult to unscrew the angle grinder nut by hand, you can heat it a little with a gas burner or autogen. You need to wear gloves when unscrewing the flange to avoid getting burned. This is the riskiest of the proposed methods. It is possible to overheat the bearings and oil in the gearbox of an angle grinder.
Finally, I would like to mention a few important points regarding replacing a disc on an angle grinder.
The main thing is that when changing a disc on an angle grinder, do not violate safety precautions and perform all manipulations with the tool unplugged.
A fairly common problem for those who use an angle grinder is that the cutting disc breaks and the clamping nut is tightly clamped. And the most interesting thing is that it is sometimes almost impossible to unscrew the nut, either with a special angle grinder, or a gas wrench, or anything else. And if you manage to do this, then it takes enormous effort and wasted time. I will show you a simple way to save your time and effort in order to unscrew this angle grinder nut without unnecessary difficulties.
Results
In the end, I would like to say about a few important points that relate to replacing the disk on the device:
Install only those wheels that have the appropriate size on your angle grinder. Safety regulations must be strictly observed and the protective cover must not be removed under any circumstances so that a disc with a larger diameter can be installed. When choosing a disk, you should take into account the model of the electric tool, spindle speed and power.
- Due to the disc, which rotates at high speed, hardening appears on the surface of the protective casing of the angle grinder, and therefore, when replacing the disc, be sure to remove and clean the casing.
- Certain models of angle grinders have washers to prevent the disc from getting stuck between the flanges. In any case, the support flange may have a rubber washer. Instead of factory-type fastenings, you can cut gaskets from rubber, cardboard or even plastic. Two gaskets should be used - between the disk and the nut, and also between the support flange and the disk.
Do not forget that if the circle rotates clockwise, then the nut should also be unscrewed clockwise, and tightened, on the contrary, counterclockwise.
- If you do not want to buy a new wrench, then you should install a quick-release nut from the BOSCH company on your angle grinder - you can definitely unscrew it easily and quickly with your bare hands.
And the most important thing when changing a disk is that you should not violate safety precautions, and all manipulations should be performed with the tool turned off.
A simple way to unscrew the nut of an angle grinder
To unscrew the nut, the first step is to break off the remains of the broken cutting disc at the root. This can be done very simply with pliers. Do not forget about protective equipment: glasses and gloves, as various small fragments fly. The result should be this: Now we need to find a piece of metal that will be thinner in thickness than the grinder disk. Turn on the angle grinder and use this piece to grind off the remaining disc between the nuts. After everything has been ground off inside, the nut is unscrewed not only with a wrench, but even with your hands. This is a very simple and very fast way. In addition, grinders are safe for bearings, because if the nut does not unscrew, most people immediately take a hammer in their hand and start trying to unscrew the nut by tapping.
Slip-on and slotted options are reliable helpers!
An open-end tool is indispensable in situations where there is no other access to the nut other than from the side. In other cases, a spanner wrench is a more convenient option. It is a ring whose internal shape corresponds to the shape of a nut or bolt of the required size. This form is completely devoid of the disadvantage of the carob - six points interact with the surface and corners of the nut at once, moreover, they are located a little further from the corners. You can crush them with such a key only if the dimensions of the head and fasteners are different.
The internal profile can be either six or twelve edged - the latter option is more common since it only requires 30° to rotate the fasteners. The hexagon is adapted for power work. At the same time, the dimensions of the head itself are smaller compared to the horn analogue. Manufacturers combine different head sizes in one tool, or offer options with a straight and bent working part. Sometimes you can find an option that resembles an open-end wrench with rounded edges - in fact, this is the same ring option with a slot for those cases when you cannot get to the nut from the end.
What can be done to prevent this from happening again?
In order to avoid this situation again, you can place a plastic, paper or cardboard washer under the nut before clamping the new disk. And in such a case, the nut can always be unscrewed without any problems. Nowadays it is not always possible to find cutting stones or discs of the required quality and therefore their breaking becomes a frequent problem. Of course, the human factor of improper operation cannot be ruled out. But now, if you find yourself in a similar situation, you know what to do. See you again!