Sometimes a house needs to replace old electrical wiring or increase the number of sockets, lighting fixtures, and so on. To prevent wires from passing along the surface of the wall, spoiling the appearance, a gating procedure is carried out. Work on cutting grooves is carried out during major and cosmetic repairs, when laying electrical wiring in a new building.
Selection of equipment for wall gating
The hammer drill itself is considered a fairly powerful power tool, as it can be used as three tools, namely a drill, a screwdriver and a jackhammer.
The use of a hammer drill greatly facilitates and speeds up both installation and dismantling work. Its use is considered the cleanest and fastest process compared to using an angle grinder or wall chaser. In addition, when purchasing a hammer drill, you need to opt for a three-mode hammer drill, which, in addition to the drill and impact drilling modes, has a jackhammer mode. If you use different attachments, the process will not be so complicated. The main disadvantage is increased dust formation, but when using an angle grinder there is much more dust.
In order to correctly decide which hammer drill to choose and what kind of attachment is needed for this work, you need to know what material the walls are made of and what kind of work will be carried out. The type of attachments you need to purchase and the power of the hammer drill depend on this. The device must have a power of at least 800 watts. If possible, it is better to rent a tool.
Hammer with a nozzle for cutting a peak Hammer with an attachment for gating a crown
Of course, you need to choose a brand of hammer drill. If you look at the reviews, the most recommended ones are BOSH, Zubr, and SDS Max. Makita, although a Japanese technique, has an average impact force, although there are good reviews about it. But if the concrete is of high quality, then the work will not work at all.
To make holes with a crown, you need a more powerful tool. You can use such a tool, but with transitions from a smaller diameter to a larger one with small gaps in diameter. Then a powerful tool is not required and money is saved. But it’s still better to choose one with an impact force of 3-5 J. It is imperative to take into account the idle speed.
Basic rules for carrying out work
Most importantly, when starting work, you need to know the basic rules for gating walls.
If this is an apartment building, such work on cutting grooves in load-bearing walls is prohibited. This is especially true for panel houses. In the process, the reinforcement is exposed and becomes corroded, which weakens the structure of the entire house. In a brick house, during this work you should use an ordinary metal detector. It is also prohibited to cut ceilings in apartment buildings.
It is best to have an apartment plan indicating load-bearing walls or consult with a BTI specialist. There is a document that would be a good idea to read before starting work. This is SNiP 3.05.06-85. It specifies the rules for the distribution of wires in the walls. It’s better not to be lazy, but to read it so that no incidents happen during the gating. It must also be remembered that the depth and width of the groove after work should not exceed 2.5 mm, and the length 3 m. The distance from doorways should be at least 100 mm, and from gas pipes 400 mm.
Slotting scheme
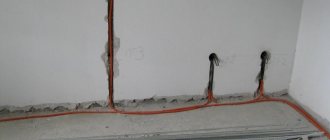
You also need to know the location of the old electrical wiring so that you can bypass it and lay grooves without touching it. It may make sense to de-energize the old wiring. Be sure to have voltage indicators with you. After punching the grooves, the wires begin to be laid. They can be laid in two ways - either by laying them in a pipe or by fixing them in the channel with plaster. The holes for the socket are made in blocks, that is, everything is placed in one unit: sockets, connectors for the telephone, the Internet, etc.
Surface marking
Preparation for gating walls is as follows:
- detect old wiring , for which testers and indicators are used. It’s good if you have a plan for the old wiring, but, as practice shows, not everyone is so lucky. The location of the old wiring must be marked on the wall;
- the old wiring needs to be disconnected, and if this is completely impossible, then the new line should not intersect with the old one;
- the new wiring route is also marked on the walls from the junction box to each connection point;
- It is better to cover doorways with a damp cloth. Even if the door leaf is closed, dust will find its way into the cracks and fill the rest of the room.
Types of nozzles for gating
Well, we got acquainted with the basic rules, the drawing and plan were drawn up. It is advisable to take a photo of the markings so that you don’t have to look for the wiring later. Now let's decide on the nozzles. Basically this is a drill and a shovel for laying cables and a crown for openings for a socket. Please note that this type of work will generate a lot of dust, so doorways should be covered tightly with a damp cloth. During work, you need to use a special construction vacuum cleaner to clean the air and room from concrete dust. An ordinary vacuum cleaner will quickly fail.
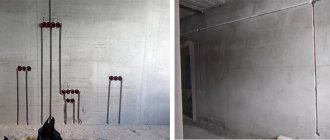
You need to start work by drilling holes for sockets and mounting boxes using a drill and a hole saw of the required size.
Grooving principle
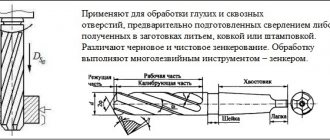
To start making a recess for the sockets, use a bayonet punch attachment, then a spatula, then a crown. The crown is usually used with an extension. This nozzle has the shape of a cylinder with cutting teeth. It is secured in the chuck using a shank. You can also use this method: use a hammer drill to drill a hole of about 10 mm with pressure, then use a crown to expand it and deepen it. We use a crown of the required size for holes for mounting boxes, where you can hide both electrical connectors, for the Internet and telephone, and under sockets.
Manufacturing of block channels
How to seal a groove?
The final stage of work proceeds as follows:
- the grooves must be cleaned of dust; either a construction vacuum cleaner or an ordinary broom will do;
- grooves should be treated with a primer;
- to reduce the level of shrinkage, you can slightly wet the wall near the grooves;
- when everything is completely dry, cables and distribution boxes are installed according to the diagram;
- gypsum plaster is usually used to seal the grooves;
- To prevent the plaster layer from sagging and starting to collapse, you can use a reinforcing mesh.
Finally, let us note again. If you are not sure that you can do all the work yourself, it is better to immediately contact specialists.
The article was written for the site.
Tags:Electricity
Grooving technique
Then, using a drill, we punch holes along the markings, then using a spatula, according to preliminary markings, we select grooves for the wiring. The blade itself is placed along the groove. If you put it across, the edges, which are already torn, will become even worse, even to the point of falling out whole pieces. A spatula is an inexpensive tool, the only thing is that it is better to use it after preliminary cutting. When used independently, its edges turn out to be somewhat torn.
Removing excess concrete with a chisel Using the chisel attachment
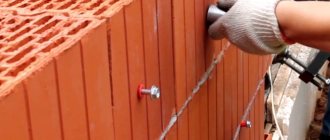
The difference in working on walls made of concrete and brick is that when working with a concrete wall you need to apply more force to the hammer drill, and when working with brick walls you need to first make holes manually using a core and a hammer. Then the drill will immediately take the right direction and will not go to the side.
When working with brick walls, you should not press too hard to avoid breakage of both the tool and the drill. Any hole must first be drilled with a small diameter, 4-6 mm, then 8 mm, only then the desired diameter is made using a drill. The bridges between the holes are removed with a spatula with a U-shaped tip in the “impact with drilling” mode. It is advisable to drill holes as close to each other as possible or use a hammer drill attachment to drill concrete.
Working with a hammer drill
In this case, the hammer drill is set to impact with drilling mode.
The nozzles themselves, depending on the type of work used, come in different shapes.
If you need to remove plaster or old tiles on the wall, use a pick, which has a narrow and thin chisel at the end. For making grooves, the best attachment is considered to be a squeegee. But most often, a drill and a shovel, or, as it is also called, a chisel, are used to knock out a groove.
Homemade dust catcher for an angle grinder
Craftsmen often resort to making their own protective casing for a sander under a vacuum cleaner. This curtain will help remove dust. To work you need to take:
- aluminum pan;
- measuring instruments;
- grinder;
- paint.
A casing is cut out from the bottom of the pan to fit the diameter of the grinder's impeller. Here you need to accurately calculate the depth of the disk. The height of the cut being formed depends on it.
A landing axis is cut out from the remains of the pan. A cross-section of the exhaust device is tried on the grinder. They fasten it securely.
Using the same method, a pipe for the hose of a simple household vacuum cleaner is assembled. The edges of the finished structure are carefully folded inward along a single line. This is needed to attach the side walls. They can be made from any material (metal sheet, etc.). All that remains is to give the finished device an aesthetic appearance: clean the joints and paint.
Before you start gating, you must mark the walls. This is necessary in order not to accidentally damage the old wiring, reinforcement of supporting structures and not to violate the basic requirements of SNiP for such work. Markings are made using a level/ruler and a construction pencil.
Selection of nozzles
Basically, the crown and similar attachments are included with the equipment. The price of slotting attachments for a rotary hammer is quite high, but it is also impossible to work without them. If you buy an ordinary attachment, for example, the same crown, it can be inexpensive, but it will not last long. Of course, you can increase the service life of the nozzles, water them, for example, with water to cool them, and take frequent breaks so that they do not overheat.
But it is much more effective to use diamond drill bits, but when choosing them you need to take into account the permissible size and type of hammer drill.
Diamond bit
You also need to choose a drill for concrete. The one that comes with the equipment is generally not for heavy loads. Therefore, you need to choose a set for the job, or choose a high-quality tool that has a certificate. Not quite suitable Chinese drills for an expensive hammer drill. When choosing, you need to pay attention to the spiral - it is considered the best with a more twisted spiral. When choosing a blade, you need to look at what metal is used in it. A hardened tool will crumble and require constant sharpening.
Attachments for hammer drills for wall slitting
It is better to choose the original instrument. Analogs are not helpful in this type of work, you’ll just waste money.
| Attention Bearing Buyers Dear customers, send your questions and requests for the purchase of bearings and components by email or call now: Delivery of bearings throughout the Russian Federation and abroad. Bearing catalog on the website |
Attention Bearing Buyers
Dear customers, send your questions and requests for the purchase of bearings and components by email or call now: +7 [email protected] Delivery of bearings in the Russian Federation and abroad. Bearing catalog on the website
themechanic.ru