The question of how to groove a concrete wall for wiring without dust arises during the renovation of a room or when purchasing a new household electrical appliance, for which a separate line must be drawn. Creating grooves allows you to make hidden electrical wiring, but before starting work, all the features are taken into account; you need to know and follow the groove procedure.
A groove in the wall is the only way to make hidden wiring with minimal labor costs.
Why is this process necessary?
Most often, the main purpose of gating is to give the room an aesthetic appearance, so that wires and other communications are hidden in the walls and do not look out.
Therefore, in modern apartments, gating walls to hide wires and pipes in them is among the mandatory work when performing repairs.
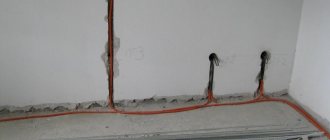
A wall chaser made from a grinder without dust + cable laying without fasteners. Useful idea!
However, in addition to the aesthetic appearance, gating walls in rooms helps to properly use their area, through a convenient and rational arrangement of openings, furniture, and other household items.
How to get rid of dust when gating
When installing wiring inside walls, professional builders use equipment with a built-in vacuum cleaner. But the cost of such an instrument is high and purchasing it for a one-time event does not make sense. To pierce a wall with a wall chaser without additional options, without creating a cloud of dust, craftsmen have to resort to various tricks. The simplest method is to generously wet the surface to be treated with water. Small particles can be collected with a simple household vacuum cleaner.
To grind with a grinder without dust, they use wet concrete cutting technology. It consists of a continuous supply of water to the cutting disc through an attached hose. You can use the help of a helper who will simply water the disc and cutting area from a plastic container. In this case, you should be careful not to let any liquid come into contact with the power tool.
The following measures will help reduce dust in the room:
- the floor is covered with film,
- an industrial curtain or fabric is fixed above the entrance,
- A damp rug is placed in front of the door.
After the grooves are made, the debris is swept away with a broom and vacuumed. The recess is treated with soil, the cable is laid and secured. The channel is sealed with putty, plaster or plaster.
How to make grooves without dust! We cut grooves with a grinder without dust!
It is possible to install electrical wires without cutting walls. This option is attractive due to its complete absence of dust. The retail chain offers many different products that allow you not only to disguise exposed wiring, but also to enliven the design of a room. These include:
If there is a need to replace the wiring, without laying a new one, you can use the existing channels.
Small particles of concrete and sand-lime brick should not get into the mucous membranes or into the respiratory tract. Therefore, when carrying out work it is necessary to use protection in the form of glasses and a respirator. If there is furniture in the room, it is also better to cover it with film or cloth.
Almost everyone who decides to renovate their apartment, dacha or house is faced with the need to shingle walls.
This part of the repair work is carried out if during the repair there is a need to install new electrical wiring or replace the old one, lay pipes and other communications.
Hammer and chisel
A hammer and chisel are used to make grooves in soft materials, which include almost all types of plaster.
To chisel a wall with a hammer and a chisel, you need to take a hammer in one hand and a chisel in the other and, placing the chisel at the desired place on the wall, hit it with the hammer, as a result of which a pothole will appear in the wall.
By creating potholes in this way and expanding them in the desired direction and size, you can create a groove
.
The dimensions of the groove, such as depth and width, are determined by the dimensions of the cable or pipe, but cannot exceed 30% of the width of the wall.
Procedure and safety precautions
The sequence of preparing walls for wiring is as follows:
- The room is protected from dust and debris. Furniture and appliances are removed from it, and the doorway is covered with a damp cloth.
- Removing wallpaper (if any).
- Transferring the wiring plan to the wall.
- Checking areas with old cables. If detected, they are removed or a distance of at least 10 cm is made from them.
- Creating grooves with a suitable tool (according to the surface material).
- Cleaning furrows and priming them.
- Installation of wires.
The strobes differ in their purposes. And not only wires are laid, socket boxes, junction boxes, switches and pipes are also masked.
The boxes are usually concentrated directly under the ceiling, and the grooves for sockets occur 30 cm from the floor line. A round recess is created for them.
You need two crowns: 8.5 and 6.5 cm. They are placed on a drill. Next, the necessary holes are cut out.
There are also cases when it is necessary to move the socket with grooves. In apartments of standard buildings, outlet areas are determined before the residents move in. But often new residents are not happy with this arrangement and build a new line.
The transfer of the socket with grooves is carried out in the following order:
- Power outage in the premises.
- Designation of the route for laying a new groove.
- Her sawing along it. The groove is deepened so that the wire does not come out of it.
- A niche 5 cm deep is created using a crown for a new point in the designated area.
- Its walls are cleaned of dust and debris and covered with gypsum. It also processes the outer edges of the “glass”.
- Laying the wire in a niche. It is fixed every 5-7 cm using plastic clamps.
- The distribution box feeding the old point is opened. The contact point of the output wire with the cable directed to the previous outlet is detected. These wires are disconnected.
- Dismantling the old line in tandem with the socket.
- The new line is powered. To do this, the end of the output wire is connected to the new cable using spring terminals.
- Placing the connected unit in the mounting box and fixing it with bolts. Any backlash is not allowed.
- To ensure tight contact between the wires, the wires are connected using terminal blocks. There should be a slight reserve at both ends of the conductor for high-quality electrical contact.
- The free, cleaned ends of the cores are connected to a new point using terminals (screw or spring). The neutral cable is placed on the right terminal, the phase cable on the left.
- Connecting the grounding conductor to a terminal with antennae (it is located on the housing).
- The connected functional unit is placed in the socket box and secured with clamping screws and spacer feet.
- Installing a decorative panel on top.
Features of the work depending on the wall material
The peculiarity of gating in concrete is that the concrete has high strength.
The question often arises: is it possible to groove load-bearing walls in a panel house? It is possible, but there are some peculiarities here.
When making grooves in a load-bearing wall, special attention should be paid to the reinforcement that is located in the wall. It is necessary to avoid damaging it, as this can lead to corrosion of the metal and possible weakening of the supporting structures. In order to prevent damage to the fittings, you need to use a metal detector.
In addition, when gating the load-bearing walls of panel houses, it is strictly forbidden to do horizontal gating, since the load-bearing panel is constantly in a stressed state and any reduction in its cross-section can lead to the collapse of the floor panel and even the entire house.
If, however, the need for grooves cannot be avoided, then the grooves on load-bearing walls should be placed only in the vertical direction, which corresponds to the direction of the ribs of the rigid panel structures.
When gating the load-bearing walls of panel houses, the minimum number of folds in the recess should be made, and the length of the channel should not exceed 3 meters.
Certain features also exist when gating walls made of silicate bricks. Sand-lime brick is inferior in strength to concrete, and therefore it is easier to make grooves in it.
The peculiarities of gating walls made of sand-lime brick include the fact that when gating, one should take into account its natural properties, such as increased moisture absorption and susceptibility to aggressive environments.
Moisture, if it gets on a brick, worsens its thermal insulation properties, and aggressive environments present in soils can lead to a reaction with the limestone base of the brick and its destruction, which can result in the destruction of the entire building.
In this regard, when grooving walls made of sand-lime bricks, special attention should be paid to ensuring that the grooves do not come into contact with a source of moisture and open soil.
Side of the law
From the point of view of legislative acts, if the owner of the apartment independently trenched the wall and this caused cracks, deformations and other damage to the supporting structures, he is held responsible for these damages. All repairs carried out by the management or maintenance organization of the house will be carried out at the expense of the culprit.
When cutting grooves in partitions by third-party specialists hired by the owner, damage to the structures will be compensated at the expense of the performers or the employing organization
Standards for wall gating
The main regulatory document regulating the gating process is SNiP 3.05.06-85. According to it, the channels cut into the wall must meet the following requirements:
- Horizontal grooves should have a depth of no more than 25 mm, a width of no more than 20 mm, and a length of no more than 300 mm. In this case, the distance from the channel made in the concrete to the floor slab should not be less than 150 mm.
- Vertical grooves, unlike horizontal ones, can be of any size. A few restrictions for them are compliance with the following distances: 100 mm - to window openings and corners, at least 400 mm to gas pipelines.
It is also not allowed to lay these channels in concrete structures that damage the reinforcement frame or mortgages.
Standards and restrictions when tapping walls for wiring
Before you take the tool to the wall, you need to properly prepare for the process. Initially, you need to calculate the wiring plan on a piece of paper. Mark the locations of future sockets, switches and lighting points throughout the house. There shouldn't be too many of them. Each element must be defended by a vital necessity. You also need to take into account the materials of the walls and decide on the best method of gating this material.
Regulatory documents on the distribution of wires are collected in SNiP 3.05.06-85. It is best to study them in detail once, so as not to have to redo everything again later. Here are the main points to focus on when performing work:
- The groove (deepening) must be carried out strictly horizontally or vertically. Oblique mowing lines should not be present. The only exception is when the wiring needs to be installed on walls with a slope, for example, in the attic. Then the line can run parallel to the slope of the wall.
- Between two electrical points, the groove can only be turned once. Each turn is a bend in the cable, which will heat up more in these places. Such conditions can lead to dangerous situations.
- The grooves have size restrictions. The maximum permissible groove width is 30 mm, and the depth is 26 mm. The total length of the route from the distribution box to a specific point should not exceed 3 meters.
- It is imperative to maintain indentations: from the battery and gas pipes - at least 40 cm, from the door - 10 cm, and from the ceiling and floor at least 5 cm, although it is advisable to still adhere to 10 cm.
- It is prohibited to do grooves on internal load-bearing walls. The thickness of the external walls will not be affected by a shallow ditch, but for load-bearing partitions you need to obtain permission from the municipal authority. This is especially true for panel houses. Grooving walls for wiring on the first floors must be done with special care - the lower walls support not only the roof, but the entire building.
- It is forbidden to touch a reinforced concrete structure when cutting. This may lead to a violation of the integrity of the structure and, as a result, loss of its reliability. In case of urgent need, the grooves in reinforced concrete should be shallow and the reinforcing mesh should not be affected.
- When making grooves in the ceiling, it is necessary to calculate the shortest path to the lighting point.
- It is prohibited to make grooves in the floor slab. If you need to conduct wiring along the floor, then the best solution would be to do it in a concrete screed. It needs to be filled with the grooves for the wires in mind.
- Brick walls are easier to chip than concrete walls. This must be taken into account when choosing a tool and having the appropriate skills.
- When gating, it is necessary to protect the respiratory tract from dust with a mask or respirator.
READ How to Put a Grinding Disc on a Grinder
Important! Grooving always occurs with increased noise effects. The whole house will hear your work, thanks to the inevitable vibration of the walls. Therefore, such work should be carried out on weekdays from 10 to 17 hours. Then mutual understanding between the residents will save your nerves during neighbor renovations.
Preparation and marking of the working surface
At the initial stage, places with previous wiring are identified. This is where testers and indicators come into play. Their principle is based on an overall electrical circuit.
Important
The indicators detect the phase cable. Their light bulb signals this. Thanks to such actions, safety from electric shocks is guaranteed.
Then the planned route of the wire is depicted on the wall: from the distribution center to all points.
Before work starts, a cloth soaked in water or a protective film is placed on each doorway.
What are the walls used for?
The standard arrangement of lamps or sockets does not always suit the apartment owner. In this case, the question arises of moving them to another place. To do this, you need to make grooves or holes in the walls or ceiling. In multi-storey buildings they are made of concrete or brick. Therefore, if you need to tap walls for wiring, it is better to take care in advance to avoid a large amount of dust.
You can make grooves in the wall manually, but if you need to lay a long cable, this will take a lot of time. Therefore, it is better to use a power tool. For this type of work use:
- hammer drill,
- grinder,
- wall chaser,
- impact drill,
- chisel and hammer.
Using a hammer drill has a number of disadvantages. Firstly, the tool makes a lot of noise. Therefore, if work is carried out in a residential building of a high-rise building, you will have to negotiate with the neighbors. The process of punching with a hammer drill is quite labor-intensive and takes a lot of time. In addition, the resulting indentations have an uneven edge. Traditional " grinder
"with a diamond wheel produces holes with a high-quality edge, but the recesses themselves have an uneven surface. This creates a risk of damaging the wiring, and the process creates too much dust.
The ideal option would be a wall chaser. With its help you can quickly and easily make holes and grooves for electrical cables. This tool cuts with two discs. They are insulated with a casing that covers the point of contact with the surface. This makes it possible to make furrows of varying depths. The grooves are smooth inside, and their edges remain even.
If you don’t have a power tool, make a groove
You can also do it manually. For this purpose, use a chisel and a hammer. This technique is not suitable for hard materials such as sand-lime brick or concrete. Using a chisel, a groove is punched in the wall, which is then deepened and widened. The tool is held in the right hand, parallel to the surface, and struck with a hammer.
Working with a hammer drill
For gating with a hammer drill, a special blade-shaped attachment is used. This attachment creates a narrow track that is exactly what you want to achieve.
The part is placed only along the drawn lines, since with a transverse arrangement there is a high probability that an extra piece will break off from the base. In areas reserved for the installation of sockets, use a bayonet attachment, which is used to mark the desired recess, and then expand it again with a spatula.
Grooving for wiring with a hammer drill
There is another way of gating with this unit. The process will require a regular round drill from 6 to 100 mm in diameter. First, a chain of holes is drilled along the line of movement in small increments, literally 1-2 cm. Then they change the nozzle to a spatula, turn on the breaker mode, place it at the very beginning and remove the space that holds the holes together. In the same way, prepare empty space for sockets or switches.
This approach allows you to make a groove with minimal risk of excess chipping, but the edges of the recess turn out to be very uneven. Hand sanding will be required.
It is possible to make the depth in accordance with SNiP if you attach a limiter or wind electrical tape at the required distance from the tip of the drill.
How to get rid of dust when gating
When installing wiring inside walls, professional builders use equipment with a built-in vacuum cleaner. But the cost of such an instrument is high and purchasing it for a one-time event does not make sense. To pierce a wall with a wall chaser without additional options, without creating a cloud of dust, craftsmen have to resort to various tricks. The simplest method is to generously wet the surface to be treated with water. Small particles can be collected with a simple household vacuum cleaner.
To grind with a grinder without dust, they use wet concrete cutting technology. It consists of a continuous supply of water to the cutting disc through an attached hose. You can use the help of a helper who will simply water the disc and cutting area from a plastic container. In this case, you should be careful not to let any liquid come into contact with the power tool.
The following measures will help reduce dust in the room:
- the floor is covered with film,
- an industrial curtain or fabric is fixed above the entrance,
- A damp rug is placed in front of the door.
After the grooves are made, the debris is swept away with a broom and vacuumed. The recess is treated with soil, the cable is laid and secured. The channel is sealed with putty, plaster or plaster.
How to make a WALL CUTTER WITH YOUR OWN HANDS! Strobe IN CONCRETE WITHOUT DUST!
It is possible to install electrical wires without cutting walls. This option is attractive due to its complete absence of dust. The retail chain offers many different products that allow you not only to disguise exposed wiring, but also to enliven the design of a room. These include:
If there is a need to replace the wiring, without laying a new one, you can use the existing channels.
READ Lubricant for Gearbox Makita 181490 7
Small particles of concrete and sand-lime brick should not get into the mucous membranes or into the respiratory tract. Therefore, when carrying out work it is necessary to use protection in the form of glasses and a respirator. If there is furniture in the room, it is also better to cover it with film or cloth.
Necessary tool
When choosing a tool for wall grooves, you need to focus on the volume of work and existing skills. Below we consider the main types of technology used.
Chisel and hammer
The simplest tool that a man should have in his arsenal is a chisel and a hammer. This option is suitable for gating in soft materials, for example, plaster or foam block.
To create a groove, place the edge of the chisel against the marking, and then hit it with a hammer for deeper penetration. By using a hacksaw you can get straighter lines.
Advantages:
- No costs for purchasing expensive equipment.
- Quickly move sockets or add multiple appliances.
- Having a tool at hand.
Flaws:
- Inconvenience of performing work.
- Duration of the process.
- Curved output grooves. Getting straight lines is almost impossible.
- Difficulties when chipping in brick or concrete walls.
Drill
Many men have a regular drill in their household. It can be used for gating in various surfaces, including concrete.
The general algorithm of actions is as follows:
- Make markings on the surface.
- Choose a drill suitable for the drill (material will win), diameter 8-10 mm.
- Drill holes along the wiring line at a distance of 5-10 mm from each other. Hold the drill so that the drill bit enters the wall strictly perpendicularly. Otherwise, there is a high risk of damage.
When chipping a concrete wall, set the rotation speed to the minimum to avoid overheating the drill. Periodically let the tool rest and cool the drill in cold water.
- Use a hammer and chisel to knock out the gaps.
The technology considered makes it possible to make grooves at short and medium distances. This option is not suitable for creating electrical wiring throughout a room or house.
Pros:
- Higher operating speed compared to a chisel and hammer.
- No big dust.
- Tool availability.
Minuses:
- The method is not suitable if it is necessary to lay wiring throughout the entire apartment/house.
- The groove turns out to be curved with sharp corners.
- The gaps have to be punched using a chisel and hammer.
Hammer
If you have a hammer drill, you can speed up the process and avoid the use of hand tools.
The algorithm for making a groove takes place in two stages - drilling holes at a distance of 10-15 mm along the line of laying the wires, followed by replacing the nozzle (a special blade is installed) and removing the partitions.
Advantages:
- High speed.
- Comparative availability of the tool.
Flaws:
- It is almost impossible to make an even groove.
- It is necessary to use different nozzles.
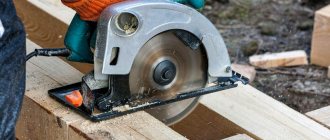
Bulgarian
Another option is to use an angle grinder, with which you can make grooves in different types of walls (including concrete).
For greater efficiency, a turbo diamond or diamond blade must be inserted into the tool.
The work is carried out in three stages. First the marking is done. At the next stage, using a grinder, two parallel lines are made. At the final stage, a hammer drill is used to knock out the center line.
Pros:
- High speed of work.
- Evenness and accuracy of the finished grooves.
Minuses:
- The work is accompanied by huge volumes of dust, so eye and respiratory protection is mandatory.
- It is necessary to additionally work with a hammer drill.
- It is recommended to remove all equipment and furniture from the room.
To at least partially reduce the amount of dust, you can use a special vacuum cleaner (construction, industrial). In this case, the work must be performed by two people: one does the strobe, and the second holds the hose near the point of impact on the wall.
Another option is to wet the surface with water, but in this case there is a high risk of flooding your neighbors.
Wall chaser
This is an optimized version of an angle grinder, equipped with two parallel discs and a platform (rests against the wall).
To protect the room from the spread of dust, you can connect a vacuum cleaner (construction, industrial) to the casing.
Advantages:
- High speed.
- Smooth outlet grooves in walls made of any material.
- No dust.
- Relatively little noise.
- Precisely even edges.
Minuses:
- Cost of equipment. For one-time work, it is better to rent a wall chaser.
Additionally, you will need another tool to help tap walls for wiring - a level (preferably a laser), a pencil and a tape measure.
Using a wall chaser
Before you start processing the walls, you should find out what material they are made of and choose a tool for cutting walls for wiring.
Having professional supplies will make the work much easier. These can be:
- wall chaser;
- hammer and chisel;
- perforator;
- Bulgarian
.
The wall chaser is the most effective tool. Its device is designed specifically for making grooves in walls. This is a Bulgarian
, equipped with two disks that are located in parallel. Making grooves of the required size is carried out by adjusting the gap between them. The clamp sets the same depth of the channel along the entire length. When using other tools, differences occur.
The disadvantage is that a lot of dust is generated when it is used. Basically, all wall chasers are equipped with clamps with which the vacuum cleaner pipe is attached to the device. This is necessary for the convenience of removing unnecessary material. The furrow for electrical wiring is made much faster, as it is cut in one pass.
How to make a wall chaser from a grinder with your own hands
Before we consider the method of making a wall chaser from a grinder with your own hands, it is important to note that the tool is not at all intended to function with double the load. Although this option is effective, the master performing the work must understand what this entails both for the tool itself and for its safety.
To make a wall chaser with two cutting discs from a grinder, screw the first disc with a standard nut, and secure the second with the nut from the stripping disc. If there is not enough thread to screw in the second nut, it should be placed with the reverse side. A groove of this small size is suitable for laying electrical wiring. If you need to get a larger groove, then you will need to use spacers or make an extension sleeve.
Using an angle grinder as a wall chaser without a protective cover is not rational, since fragments of stones and dust fly towards the master. To avoid such negative consequences, you should make such a dustproof cover for your angle grinder. Such a nozzle will not only prevent splinters from getting on the master, but will also prevent the formation of dust, provided that a special dust collector is built (or connected to a vacuum cleaner).
It is important to know! To remove dust, you should use a construction vacuum cleaner, otherwise a regular one will quickly become clogged, which will significantly reduce the efficiency of its operation.
To save yourself from dust, you will need to make a special casing. Making a protective casing for an angle grinder for a wall chaser allows the use of any available means: old plastic cans, aluminum pans, plywood, pieces of laminate, boards, stainless steel sheets, etc. In general, you need something that can be done
durable casing for an angle grinder. To remove dust, such a casing must have a hole for connecting a hose from a vacuum cleaner. Moreover, such a hole should be located in the direction of the disk cut.
The disadvantage of such a casing is the impossibility of adjusting the depth of cut. But this does not mean that it cannot be done
a casing that could regulate the depth of cut. Below is one of the options for a wall chaser casing for an angle grinder.
It all depends on the available arsenal of materials, as well as the imagination of the master.
How much does the construction procedure cost?
The price of the process directly depends on the criteria for its implementation. It is clear that doing it yourself at home is more profitable. The cost will directly depend on the tool, plaster, and the wiring itself. Sometimes it turns out cheap, and sometimes not so much. For example, having chosen a hammer drill as a device, you only need to pay for the wires and termination materials, because, as a rule, every man has a tool. But if you give preference to a wall chaser, you are unlikely to save money.
If you decide to order the work of a master from a construction company or from a private specialist, you should not count on an acceptable price. Get ready to shell out a pretty penny. This work is dangerous, so payment is requested accordingly.
Home renovation is never complete without making channels for electricity, so it is important to know the basic requirements for wall grooves, as well as follow safety rules during construction
Making furrows on concrete
To lay a groove
in a concrete wall, it is better to use a wall chaser, a hammer drill and a chisel. At the same time, be careful not to damage the reinforcement that is located inside the slab to strengthen the structure.
When working on a concrete wall, a large amount of dust is released. Therefore, you can use a hammer drill, operating it in impact mode. The rest of the process is similar to working on a brick wall.
If you don't have a wall chaser, you can use a grinder. It is better to equip it with diamond discs with a diameter of 105-125 mm. To select the depth of the groove, you should take into account the diameter of the cable being laid, as well as the thickness of the putty layer. You need to cut the edge of the furrow step by step: do
first deepen by 1 cm and pay attention to how the tool copes with the load. If the concrete yields well enough, complete the cut to the required depth.
Sources:
https://moy-instrument.ru/podelki/kak-sdelat-shtrobu-v-betone-bolgarkoj.html
Preparatory stage
Regardless of the building material from which the walls are made, the preparatory stage includes the following work:
- We find old hidden electrical wiring in the wall. For this purpose, we will use a special device: an electrostatic or electromagnetic finder. We mark the wires on the wall. We do this so that when carrying out work on laying grooves we do not damage the electrical wires of the old wiring, and also protect ourselves from electric shock.
- We determine the location of the reinforcing elements in the wall using a special reinforcement search detector. We mark the location of these reinforcing bars on the wall. This will help prevent the tool from getting on them and prevent damage.
- We mark the location of sockets, switches and distribution boxes.
- We mark the necessary channels for laying electrical wires.