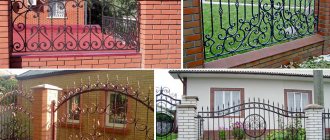
Looking at the fences, gates and gates, as in the figure, in houses that are clearly not of the elite class, a person who has some idea about the equipment of the forge and the nature of the work there may think: where did they get so much money? Those more knowledgeable in blacksmithing will not have such a question: these beauties, as well as the metal decor of furniture, light garden buildings, swings, benches, etc., are created by cold forging.
Samples of artistic cold forging
Forged flower stand
Prices for cold art forging are affordable because production costs and initial equipment costs are low, and labor productivity is not bad for artisanal conditions. Consequently, an individual blacksmith specializing in artistic cold forging can count on a fairly quick start and good profitability. Perhaps one of the owners of the samples in Fig. I made my own: cold forging with your own hands can be done in a garage or barn without experience, and forged parts for small pieces of furniture, balusters, barbecues and all sorts of other metal utensils (see, for example, the figure on the right) can be done even at home conditions.
The basis of a “cold forge” is a cold forging machine. For a full production cycle, capable of satisfying any conceivable fantasies of your own or the customer, you will need 5-7 types of machines, 3-5 main ones of which you can make yourself. However, in the beginning, before spending money on a machine or materials for it, it is highly advisable to master the basics of blacksmithing. Therefore, further we will also consider some techniques for making artistic forging parts without a machine and equipment for them, which can be quickly made from scrap materials.
Do-it-yourself cold forging as a separate art form
Cold forging is a method of forming metal products under pressure. This method consists in the fact that the metal is not heated before deformation, but is bent using special machines. Forged patterns will decorate garden fences, stair railings, windows or entrance doors. Simplicity and low cost will allow anyone to quickly master the process and independently bring their ideas to life.
Using the cold forging method you can create incredibly beautiful products.
History of the forge: description of cold forging
Forging is a process of processing metal to give it the desired shape, turning a blank (blank) into a product. For people who are unfamiliar with the peculiarities of metal work, the word “forged” is associated with a forge, where a blank is heated from 800 to 1000 ° C and processed with a hammer to give shape. But in everyday life, items made by cold forging are more often used. Pots, teapots, patterns on gates and doors, metal stands are made by deforming metal under pressure without preheating.
Beautiful forged elements can be created even at home without the presence of special expensive equipment.
Cold forging is an easier, safer and more ergonomic processing method than hot forging. Main advantages:
- equipment for cold metal forging is cheap and ergonomic;
- low labor intensity;
- quick job training, low qualification requirements;
- the ability to create a unique ornament from basic elements.
The downside is the limited working surfaces and materials: rods, sheets and plates.
Cold forging is one of the ancient methods of metal processing.
Hand-made cold forging is historically older than hot forging. The first products were discovered in Egypt and Mesopotamia and date back to the 4th-3rd millennium BC. Initially, ore was used, which was deformable after being hit by a stone. Cold forging was used to make gold jewelry. Soft metal was easy to process with stone hammers. The oldest product was found in Egypt, it was made 8 thousand years ago.
Several centuries later, by observing volcanoes, people learned that high temperatures made it much easier to shape metals. They began to build blast furnaces and the profession of a blacksmith appeared. The Stone Age gave way to the Iron Age, and not only jewelry, but also dishes, weapons, and garden tools entered people’s lives. The principle of operation of the forge is still preserved, but the equipment for cold forging has been modernized.
Using modern equipment it is possible to create products with a large number of forged elements.
Classification of machines
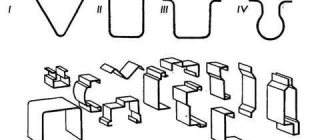
Types of machines for cold forging.
Cold forging machines are divided into four main types:
- Twisters or snails twist spirals with a flat surface and narrow cores, these machines are most often used for hand cold forging.
- Torsion types of devices are designed for the manufacture of twisted volumetric spirals.
- Bending types - for spirals with wide cores.
- Inertia-stamping - for decorative clamps and processing the ends of all elements.
Before a detailed description of each type, we will go through cold forging technologies, there are only three of them:
- Drawing : This is the rolling out and lengthening of a metal piece, a process similar to rolling out dough with a rolling pin. In forging, pressing rollers work in this way. Using this technology, paws, clamps, and peaks are prepared.
- Torsion : twisting a part along an axis, see below for a detailed description.
- Bending : bending metal according to patterns in different directions.
Basic tools for cold forging at home
The creation of a unique product always begins with material calculations and the development of a detailed work plan. The easiest way to think through the moves is to create scale sketches of forged products, write down the dimensions and select the necessary tools. The choice of material deserves special attention. The metal should be strong, but bend easily.
Note! Hardened sheets or rods cannot be used. Under the influence of temperature changes, the structure of the metal changes, it becomes brittle and can break under pressure.
There are two types of do-it-yourself metal forging - rolling (working with rods) and stamping (extruding sheets under a press). At home, the first option is more often used. To press sheets, you need to make a special blank for deformation. Common rolling tools: bender, snail, twister, wave and flashlight.
Cold forged elements can be used to decorate stairs.
A bender is a basic tool used for bending rods at different angles. The spiral elements of cold forging are twisted using a snail. For shaping, it is best to choose rods with a diameter of 10-12 mm. Choosing a material that is too thick can significantly complicate the work of the master.
A twister machine is used to twist rods along the longitudinal axis. The wave, accordingly, is intended to create wave-like elements. The flashlight tool is used to work with several rods at once. They are installed on the equipment and bent by rotating the lever.
Equipment for rolling at home
You can buy devices for cold forging yourself or make them yourself from available materials. Initially, you need to create 2-3 basic workbenches to process one rod. The design and complexity of manufacturing depend on the type of work performed. A thorough study of the process will allow you to make the equipment yourself.
To create complex forged products you will need more than one workbench.
Twisters or snails?
Description of forging machines.
Both of them are one and the same. The most popular cold forging machine among the general forging community. Indeed: at first glance, the machine seems too primitive.
But in it simplicity is combined in half with genius:
- it’s easy to make it yourself;
- it's cheap;
- it is extremely easy to use;
- with its help you can make entire arrays of beautiful metal lace.
According to the principle of operation, twisters are a type of bending machines, see below about them, with some improvements, beginners can easily work on them. In a word, a snail or twister is an amazing machine in terms of all possible criteria: ease of manufacture, wide artistic possibilities, low cost and ease of use; there are simply no others like it.
Twisters are found in two engineering versions:
- With a collar and a rotating plowshare with the principle of rigidly fixing the product on the surface and turning the scroll clockwise. The rotation is made by a lever, most often manual. This is the most democratic machine for cold forging of profiles: you can work on it alone, even in an apartment. It is not without reason that the largest number of links in RuNet related to cold welding are filled with pictures, drawings and videos with the action of rotary volutes. Everyone who starts with them feels like a master and is in a hurry to share their own finds in twisting flat curls. So this machine can add a few more points for increasing the master’s self-esteem - this is always important, and especially at the beginning of work. The maximum number of possible curls is 5.
This snail has weaknesses, what would we do without it. It's all about the folding share: both the correct material from which it needs to be made and the complexity of making the joints of the share links are important. These joints must be extremely precise - they are the ones that create the shape of the curl. The design and material of the joints must take into account multiple repetitions of turns with severe workloads. The second and final weak point is the eccentric clamp of the part.
Considering the frequency of use of the snail and its weaknesses, the wisest thing to do would be to buy it rather than make it yourself. If we are talking about a debut in cold forging, and the choice of machine is made for an absolute beginner, then the best option would be the second engineering version of the snail.
- Champion in popularity and positive aspects of work! Lever volute with a fixed template and a deflection roller. At its core, it is a pipe bender. It should be immediately noted that this option is inferior in labor productivity to a twister with a collar and a plowshare. Secondly, no tabletop is suitable for it; here you will need a real steel frame with fastenings on the supporting surface. You can’t install a bed at home: you can only work on a lever volute in a workshop.
Machine for giving a relief surface.
Another feature of the lever volute is the slow pace of work. You can curl 3 – 4 curls, a little less than with a collar snail. However, the advantages of the lever snail outweigh all its disadvantages:
- All elements of the machine can be made of ordinary steel.
- Instead of a pressure roller, which is not made of ordinary steel, you can use a bearing.
- The material of the bed and other parts allows you to count on long-term use of the machine.
- Greater variety of curls - you can change their shapes with bends in both directions (in the first version of the snail this is impossible).
- It is more convenient to work with the ends of parts that can be fastened.
On a lever twister you can work with strips of metal laid flat. This is considered a great advantage of the machine, since it is impossible to work on other devices with flat strips.
In this champion subsection, you can make a small champion summary in the form of advice for beginners: in debut artistic work in cold forging, it is better to start with a lever twister - a snail with a fixed template and a deflection roller.
Gnutik: what products can be created with its help
It is not necessary to create bending drawings for cold forging yourself. It is enough to look at the principle of operation once to make the tool yourself. The machine is a steel tooling, which is divided into three parts. The middle element (lead) is movable; a central roller (wedge) is attached to it, which bends the rod. On the side plates, the rollers are made replaceable and inserted into the groove. By choosing different diameters, you can vary the bending angle of the rod or plate. A lever is attached to the top of the leash, which sets the structure in motion.
On a note! Bending a rod requires a lot of force, so attaching the workbench to a movable support will lead to incorrect bending and make work difficult.
The rollers should rotate freely in the holes, which will reduce the force required to bend the plate. Grooves for the rollers can be drilled in several places symmetrically to each other. This will allow you to quickly move the parts, varying the desired bending angle.
The bender helps bend metal rods at any angle.
Mechanism for bending metal with a bend:
- a plate or rod is installed between the rollers;
- using a vice, the central roller is pressed against the metal;
- By rotating the lever, the plate moves along the roller, acquiring the desired bend.
For convenience, a dial (a tape with divisions showing the height of the angle) is placed under the central roller. It is used to produce parts with high precision that must fit together perfectly.
The bent rolling tool is quite easy to use.
Manufacturing
A vice is rigidly attached to an I-beam of the required length on one side. For fastening it is best to use welding. And also, before installation, a steel sheet is welded onto the I-beam. This will help avoid deformation of the part during the tightening process.
Mobile system
It is assembled on the side opposite to the fixed vice. A vice is installed on top, which is equipped with a movable central part.
It is important that the vice on both sides of the I-beam is strictly in the same plane.
Instead of a lever, a wheel (steering wheel) is welded to the vice. The larger the diameter, the less effort will be required to manufacture the part.
One end of the workpiece is clamped into a fixed vice, the other into a rotating element. Using a steering wheel, the workpiece is twisted into a spiral with the required number of turns.
Snail: a simple tool for creating curls
The second name is a do-it-yourself conductor for cold forging. For manufacturing, you need to familiarize yourself with the bending process, for example, watch a forging video. Then the design itself will not raise questions and will be easy to repeat. The workbench is a frame on which the main matrix or spiral module stands. A rod is driven into the snail and moved around with a metal roller, pressing against the arc. The frame must be made of metal, since wood quickly collapses after prolonged stress. A metal corner, thick-walled pipe or channel are suitable for this purpose.
The machine is designed for two tabletops. One serves as a support and takes on most of the pressure, and the second holds the shape of the snail. Two circles with a thickness of at least 5 mm are cut out. The first part is installed on the frame. The center of the circle is marked on top, and a three- or four-leaf leg is welded to distribute the load.
The upper part of the volute, on which the metal is bent, is called a module. It can be static or typesetting.
The snail tool allows you to create curls from forged metal.
A static module is a device for cold forging, designed for bending pattern parts of the same type. The bend radius or angle cannot be changed. Before starting to form the module, markings are drawn on the tabletop. A snail is assembled from metal plates (at least 0.6 mm thick) and welded.
The typesetting module consists of several parts. Its use is the most common for do-it-yourself artistic forging, as it allows you to create elements of different radii. Initially, parts are marked on the tabletop and the grooves are calculated. Removable parts of the snail are cut out of thick metal. Holes for fixing to the tabletop need to be cut only in the middle. Otherwise, the stress is distributed unevenly and the groove breaks faster.
The module for forging with your own hands can be made replaceable. A structure of the required radius is welded onto a metal circle. It is attached to the tabletop with grooves or bolts. To produce elements of different diameters, several modules are made that can be used on one machine.
The typesetting module will allow you to create curls of various radii from forged metal.
A rotating shaft and lever need to be secured between the tabletops. It is necessary that the distance between the roller and the module be at least 2 cm, and the shaft stroke must extend beyond the tabletop. A movable element is installed on the lever handle to adjust the radius of the roller stroke.
Wave: how to create and use this tool
Wave is a tool for forging lines like a sine wave. Two rollers are machined to the specified dimensions. The first roller is static (the rod will bend around it), it is fixed on a support. The second is the leading one, it is mounted on a lever and rotates when it comes into contact with the surface. Pressure is generated between the shafts, which acts on the metal and causes it to bend.
The static roller can be machined into the shape of a stepped pyramid. Thus, the radius of the wave can be changed by moving the lever and rod higher by a division. When using such a machine, one side must always be held in order to avoid damaging the bend. To more accurately repeat the wave shape, two static rollers are machined, one of which holds the rod in the desired position, preventing further deformation, and the second is used for bending.
The “Wave” tool will help you make the rod wavy.
Flashlight device
Used for making elements in the shape of a “basket” or “lantern” from a square or round rod.
Design and principle of operation
The device is made on the basis of a standard torsion bar machine. A piece of pipe with a large diameter nut welded onto the end is clamped into a fixed vice, in which holes are drilled along the ends to the size of the workpieces.
Then the same part is secured in an opposite, rotating vice. Workpiece parts are inserted into the holes of the coaxial nuts.
A metal shaft is installed between the nuts. Its diameter should be less than the internal diameter of the nuts. Afterwards, by rotating one edge of the blanks, a figure of the required shape is made.
The edges of the rods are fastened together by welding or a clamp.
Flashlight and twister: features of these machines
A flashlight is a cold forging equipment for working with several rods and creating three-dimensional baskets. To avoid constructing a frame, you can use a regular vice to secure the tool. The tool consists of three parts: two dies and a roller. The matrix can be made of strong, preferably hardened metal 4-5 cm wide.
In each matrix, a central hole is machined into which the roller is mounted. Grooves are made on the sides for installing rods. The second matrix must move freely along the lever, since during deformation the distance between the working surfaces decreases. When the lever is rotated, the rods bend in a spiral, forming a structure similar to a flashlight. Do-it-yourself metal products, which consist of several rods, are secured by welding.
The twister machine has a similar design. However, instead of a shaft, a rod is inserted into the matrix, which is pressed with a plate or bolts. Between them you need to install a movable element that moves forward when the shaft rotates. The rod twists along the longitudinal axis, forming a symmetrical spiral.
You can create forged elements using the flashlight and twister tools.
Note! The running matrix should approach static with each rotation. If it is fixed in one position, the master will have to make more efforts to bend the rods.
Connecting parts and painting
Now all the curls need to be collected into a single canvas. The work is not easy, but very rewarding: it is at this stage that the main artistic idea begins to be realized. Meanwhile, at this stage you can easily ruin everything. This is easy to do: start connecting the parts by welding, and then use a grinder to clean them.
But we have already talked about the professional ambition of cold forging masters, which can only be welcomed. Special U-shaped clamps, which are stamped on inertial machines, will look much more impressive. Don’t be lazy, but work well with the clamps - this is the key to successfully completing the forging of the product.
Torsion of metal on a machine.
Now about painting. Thank God, now there is something to paint: thanks to modern construction technologies, there are a huge number of paints on sale for every taste, budget and, most importantly, purpose. There are countless paints for metals. Most often, special acrylic paints for metal or blacksmith's enamels are used.
Very often, for completely unknown reasons, blacksmiths prefer a finish coat with paint with pigment from a forge patina - “antique”, showing an amazing unanimity in tastes. If you are a forging customer, then you need to stop the craftsman in time to offer him your own version of the color and texture of the coating. But seriously, who said that forging should be dark and antique? And the white one? Colored? This is where there is vast space for the most daring artistic solutions.
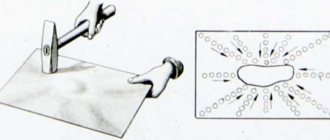
Do-it-yourself cold forging under pressure: creating blanks for forming products
On wrought-iron fences you can often notice not only geometric patterns, but also flowers, butterflies, leaves and other decorative elements. They are also made using cold forging techniques, but by rolling rather than stamping.
Do-it-yourself volumetric forged products are made from sheet metal. Working with a press at home is less common than rolling. Extrusion of sheets under a press can be either manual (knocking and pressing) or automatic. At home, it is cheaper to use hand stamping. To do this, the master needs to make several blanks that will be printed on a metal sheet under pressure.
A drawing of the future forged product will greatly facilitate the work of the craftsman.
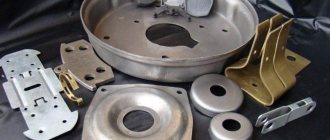
Metal forging equipment:
- Punch (press stamp or cotter pin) is the upper part of the press, it pushes the sheet inward. The pressing side of the stamp can be drawing or smooth.
- Matrix is an element that is made in the shape of the required object. The applied relief deforms the plate under pressure, giving it the required shape.
- Press lever - a handle or relay for bringing the dies closer together and adjusting the force of the press.
Before starting work, you need to create a drawing of the future product. Sketches of artistic forging are transferred to the workpiece, it is cut and ground along the edges. You can use a regular vice as a workbench for pressing. It is most convenient to place them in a vertical position so that the plate lies horizontally to the plane. This way, the plate will be positioned exactly between the dies and will not slip out when the lever is rotated.
Different types of workbenches allow you to create unique forged elements.
Simple forging of metal at home can be done with a chisel and hammer. In this case, the chisel acts as a punch, the anvil as a matrix, and the hammer as a lever. To better print the design, you can put a plate with notches under the sheet. This way the relief will be clearer and more beautiful.
Note! The metal used for stamping must be softer than the punch and die. Otherwise, the tools will quickly break.
To make the “sheet” element, a blank of the desired shape is cut out of a metal plate 20-30 mm thick. A longitudinal line is drawn on it with a pencil in the center. The chisel striker is placed at an angle to this straight line. After hitting the handle, a line is imprinted on the plate, similar to the veins of leaves.
The cold forging method can be used to create three-dimensional elements.
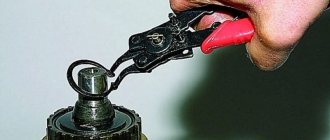
You can use pliers to form the required volume of a cold forged product. The part is clamped between a vice and bent into the desired shape. This type of work is well suited for completing a small number of items for personal use. The process of beating a pattern by hand takes a lot of time, it is quite monotonous and requires great precision.
It is more profitable to purchase stamps for permanent work (in the form of leaves, petals, flowers, etc.), since accurately turning two identical elements is a very complex process. The main parts are machined from a blank or cast by hot forging. This type of work requires a lot of experience and high precision. The punch and die must match. With strong pressure, irregularities will be imprinted on the product. If the discrepancy is very large, then the press will crush the workpieces - and you will have to start work from scratch.
Styles and elements of patterns: photos of artistic forging
Creating a beautiful pattern begins with a forging sketch. The master must have a clear idea of the picture he wants to make. Initially, a drawing is drawn, materials and the number of necessary elements are calculated, machines and equipment are selected. In order for the product to look beautiful, it is better to immediately choose the style in which it will be made. Looking through photos of cold forged products, you can easily notice which direction the pattern belongs to.
Beautiful forged products can be made in various styles.
There are several styles of forming a forged pattern.
The Romanesque style is characterized by severity and symmetry. On the fences you can see a dense arrangement of spirals in the same order, the details are often repeated and of the same type. This is a monumental pattern using the volute element (C-shaped twisted one-sided curls).
Gothic ornament . Few people know that modern fencing and fences are most often made in this style. A characteristic feature is upward striving. The rods are pointed and end with tops in the form of arrows, spears or sharp spikes. The spiral elements used in this style are called perforations, and they look like a stem branched in different directions. For variety, lanterns or voluminous spirals are added between the straight rods.
Products in the Baroque style are the most common.
Renaissance is very rare. In this style, pointed charcoal elements are practically not used. The basis is round arcs, spirals and waves. The branching metal rods are decorated with leaves or flowers; graceful curves take the shape of a figure eight. Characteristic elements are notch, spiral, volute and figure eight. The style is very harmonious, the details are installed symmetrically in the form of intertwined lines.
Baroque is the complete opposite of Renaissance. The style is openwork and very lush. C-shaped spirals, volutes, curls, curved lines and intricate patterns are used. Three-dimensional leaves and flowers are added to the weaving, creating a dynamic shape.
Rococo . This direction is characterized by the use of thin rods and double-sided curls. The rocaille ornament creates constant movement and is distinguished by filigree and three-dimensional patterns. In the photo of cold forging, asymmetry and fractional patterns are noticeable. The use of straight rods and flat gratings is unacceptable.
The classic style allows you to combine various forged elements.
Classicism . A beautiful, albeit simple style that brought symmetry back into fashion. To create an ornament, curls, perforations, spirals and straight rods are used. Another element is introduced into use - a meander (broken lines or rods bent at right angles). Vertical architectonics are always strictly maintained in fences.
Empire style is characterized by the presence of geometric patterns and long smooth rods. The main element (volute) is modified: an elongated straight line with one-sided curls at the ends. The main thing for this style is strict simplicity, symmetrical geometry combined with spiral elements.
Art Nouveau , or Art Nouveau , added biological motifs to artistic forging with one's own hands. The style does not use straight lines, only various bends, meanders, curls and spirals. Symmetry fades into the background. The ornament repeats the silhouette of a person or animal, leaves and flowers are added. The pattern is constructed in such a way that the curls evenly flow into each other throughout the entire ornament.
It is difficult to create a beautiful forged pattern without a drawing.
If a person starts work without a preliminary drawing, he will quickly get confused in creating a cold forged product. Each pattern should be thought out as much as possible, and it is better to immediately transfer edits that are made during work to the sketch in order to clearly understand what the result should be.
On a note! Even if you have photos of forged patterns, you need to make drawings and markings to accurately place all the parts.
Fastening the pattern elements: final metal processing
After all the necessary elements of the ornament have been created, its formation begins. The appearance of the pattern may differ slightly from the sketch. To identify possible errors, you need to conduct a preview. Initially, the pattern can be laid out on a flat surface without fastening its parts together. In this way, you can evaluate how successful you were in bringing your idea to life, as well as correct shortcomings in your work. You should not start forming a pattern without first viewing the result.
Products look more complete if the elements are connected by welding.
There are two main types of connections:
- Weld;
- rivets (or artistic clamps).
It is useful to use a welding machine in places where the joint seam can be easily cleaned or will be invisible. To preserve the aesthetics of the ornament of a cold forged product, you can put figured rivets. They will reliably hold the components together and complement the decor.
The ornament is connected gradually, depending on the number of parts. Initially, small elements are held together, notches, twisted lines and monograms are formed. Welding is used. The seam is smoothed with a grinder using a 0.6 cm thick sanding wheel. It easily goes around bends and irregularities. Large parts are connected with curly clamps. The rivets are placed symmetrically to each other to complement the pattern. At the end of the work, the ornament is passed around with a cleaning or polishing wheel.
Cold forging allows you to create beautiful and original products with your own hands.
Artistic forging is not only a business or a job, but can also be an entertaining hobby. Even a novice craftsman can make cold forging equipment with his own hands from scrap materials. Cold forging specialists can easily be called artists, as they create beautiful ornaments from rough rods, pipes and sheets. Such hobbies require full dedication and considerable expenses. However, all the invested funds and efforts will bear fruit if they are supported by the desire to create beauty.
Torsion bars
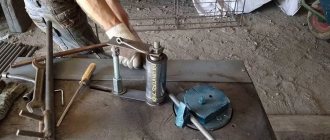
Torsion twisting of a rod without a machine
You can twist rods with a screw for artistic forging without a machine at all, see fig. on right. To prevent the workpiece from bending at the root (clamped in a vice) end, you need to place a wooden block or something like it with a V-shaped cutout at the top under the end of the guide pipe farthest from them; It is better to secure the pipe to this support with a clamp, and secure the stand to the workbench. The pipe should be shorter than the workpiece and approximately 1.5 times wider inside than its largest diameter, because When twisted, the workpiece contracts and expands in width.
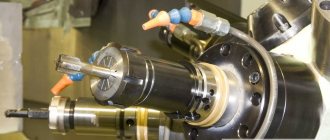
A torsion cold forging machine allows you to increase productivity and improve the quality of the resulting parts. The working force in it is transferred to the support to a significant extent, so a strong frame is needed, in the form of a spinal frame made of an I-beam from 100 mm or a pair of welded channels of the same size; the corrugated pipe will apparently be deformed. The frame must be securely secured to the supporting surface using paws from the same profile welded to its ends, pos. 1 in Fig.
Homemade torsion bar machines for cold forging
The workpiece - a square rod - is held by mandrels-chucks with sockets also of square cross-section; they are visible there in pos. 1. Because When twisted, the rod shortens in length; the chucks in the spindle and tailstock must be securely fixed with screw clamps. For the same reason, the tailstock is made sliding. To allow twisting of individual sections of the workpiece, a sliding stop with an insert with a square hole is also used.
If you only need to make a fence for yourself or something smaller, you can quickly build a torsion bar machine from scrap and scrap materials, pos. 2. On both machines, in principle, it is possible to obtain filaments by placing a bundle of 4 rods half the size into the cartridges. But don’t think that you can make a good lantern or basket by simply pushing the tailstock with a lever. You will get something like the one in the inset in pos. 1 and 2. Blacksmiths call such incidents a word that is generally known, but not used in literary speech. The branches of the filament, when twisting it in a simple torsion bar machine, must be spread out in width with a hand tool, which is difficult and does not ensure the proper quality of work.
Beautiful filaments (pos. 3) are twisted on torsion bar machines with a fixed tailstock and a screw feed spindle, pos. 4. Now let’s return briefly to Fig. with types of machines at the beginning, to pos. 2 on it. See the thing marked with a green exclamation mark? This is a replacement spindle. There are 2 of them in the set: smooth for spiral twisting along the long axis of the workpiece and screw for twisting filaments. In this design, the frame is welded from a pair of channels with a longitudinal gap, and a shoe with a threaded hole for a locking screw is welded to the tailstock. A shoe is needed with a sole from 100x100, because The tailstock fixation in filament mode is frictional and only partially jammed: the locking screw provides only an initial clamping force.
About the electric torsion bar drive
Electric drive of a homemade torsion bar machine
Working on a torsion bar machine with a manual spindle drive is tedious. But the main thing is stable quality of products such as in pos. 3 fig. with torsion bar machines, it is even more difficult to achieve. The reason is that it is difficult to create a uniform torque in a circle with your hands, like with any other lever drive. Therefore, a torsion bar machine for cold forging is exactly the case when the use of an electric drive is justified no matter what. The best option from available materials is the axle shaft of the drive axle of a rear-wheel drive car with a gear pair from the differential from the same place, see fig. on right; Just don't forget about the protective casing! Motor - 1.5-3 kW and no more than 900 rpm. Other design options are also possible, see eg. video clip: