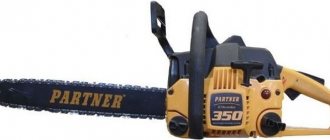
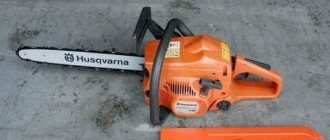
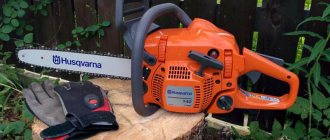
Fig 1. Electric chain saw: A – knives, B – drive wheel, C – securing the guide.
Companies produce electric chain saws with short guides - 30, 35 and 40 cm, intended for individual use. Electric saws have the same appearance as shown in Fig. 1 chain saw. All of the listed saws have the same design and structure; they differ only in the length of the guide. A closed chain sliding along the guide is tensioned on two sprockets: the front (driven), which is attached to the end of the guide, and the rear (driving the chain), attached to the drive shaft. The rear sprocket is connected to an electric motor. The guide is fitted with a longitudinal hole onto the protrusion, which is located on the body near the rear sprocket. For normal operation of the chain, it is necessary to have the correct tension on the guide (bar). If the chain is tensioned too loosely, it may fall off the guide; if it is too tight, the sprocket will wear out faster. A special screw is used to adjust the tension of the chain (Fig. 1B). In each of these saws, the chain moves at a linear speed of about 9 m/s. If necessary, it can be stopped in 0.1 seconds.
Safety precautions when working with a power saw
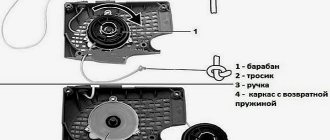
Chainsaws are very dangerous devices, during the operation of which safety regulations must be observed. First of all (as with all power tools), it is necessary to carefully check the technical condition of the wires, sockets and all connections. Work should not be started even with the slightest damage, which should be repaired immediately. The chain saw can be operated by one person holding it with both hands. We connect the electrical plug to the extension socket immediately before starting work, and disconnect them immediately after finishing it. It is forbidden to leave the saw connected to the mains (because children can turn it on)! Do not use the saw on a ladder or similar unstable objects, and do not hold the saw with one hand. These prohibitions are caused by the high cutting speed and the danger of jerking when used incorrectly. To avoid injury during transport of the saw, a plastic casing should be placed on the guide with the chain (Fig. 2), which can be easily removed by pressing it with your fingers on both sides.
Fig. 2. Chain sheathing and chain saw switch blockade
The cover must also be put on after completion of work. In order to turn on the saw, you need to press the main switch button located on its handle. In the on position, it can be locked with a special clamp on the side of the handle (as with many power tools). This makes it easier to operate the saw during long periods of work. The movement of the chain can be stopped by pressing the switch button again; this automatically releases the locking clamp. If necessary, you can stop the saw by pressing the hand guard (Fig. 1). As a result, the saw motor will stop instantly (0.1 sec.).
Caring for an electric saw.
The chainsaw guide wears out very quickly - especially the end and bottom edge, because these are the places where the chain links are under the most tension. To avoid this uneven wear, every time you sharpen the chain (discussed below), turn the guide 180°. In addition, you should regularly clean the groove along which the chain links slide, as well as the two vertical grooves (Fig. 1C) through which lubricating oil flows from the reservoir to the guide.
Getting started with an electric saw.
Before starting work, it is necessary to determine the oil level in the tank, for which a transparent indicator located on the side of the housing is used. The tanks usually hold 0.2 liters of oil; You need to top it up from time to time. You should also check the serviceability of the locking of the protective bar for the hand - the valve of this lock should always be kept closed, and nothing should interfere with the movement of the bar. However, the most important thing is checking the circuit. This is only done when the chain is cold. We place the saw on a flat surface - a slab or board - and then use our fingers to tighten the chain (Fig. 3). The gap between the chain and the guide should be 3-4 mm.
Installing a chain on a bicycle
Installation of the chain depends on the type of vehicle: high-speed; standard:
- The standard version only requires inserting the part onto the 2 stars and then turning the latch mechanism.
- The second option will require more steps.
Here the type of chain is of great importance - with a lock or not. If the model has a lock, then a squeeze will be necessary. First, the part is attached to small stars, and then check the position of the special rollers (needed for tension).
Then you need to place the links and clamp the entire structure around them. After the procedure, it is imperative to check the design for correct installation of the part. If it sag or is pulled too tightly, you need to change its position to avoid injury while driving.
The bicycle chain is easy to remove, and you can repair or replace it yourself (it only takes a few minutes). Even a beginner without skills or experience can handle the installation. Such a spare part is always available in sports stores.
Elimination of defects
What types of bicycle chain lubricants are there?
A common type of wear is sagging of the chain when its length increases relative to the original. Previously, critical values of the length of a bicycle chain were considered at which it cannot be used. Everything is true, but the chain does not have to be thrown away immediately, but can be repaired. Under prolonged loads, the axles become loose, which causes longitudinal and transverse expansion. It is impossible to eliminate the transverse one, but it is quite possible to tinker with the longitudinal one.
The extra links must be removed in such a way that the chain runs smoothly and without tension along the large sprocket. Using a squeezer, excess links are removed, and the axle shafts are completely pulled out from the elements being removed. The main thing here is not to make a mistake and not pull out too many links.
If you have to drive with a stretched chain, then in order to prevent it from falling off, you can install so-called chain stabilizers - parts that prevent the chain from flying off when driving. There are several types of such devices:
- Roller with two locks.
- With wide casters.
- Frame (or rollerless).
This is what dampers look like on a bike
Using dampers as protection is, of course, good, but it would be better to think about changing the chain.
Bicycle chain
Let's learn the math part!
In this article we will try to understand what a bicycle chain is for, what types of chains exist in nature, how to choose it correctly and maintain it during the season and more.
So, the bicycle chain is an integral part of the bicycle transmission and serves to transmit torque from the drive sprocket (front) to the driven sprocket (rear).
This part is standardized so that we have the same pitch for all types of chains, namely 2.54 cm (or 1 inch) per two chain links.
Chain selection.
Types of bicycle chains vary depending on the number of sprockets used in the transmission, and when choosing, you should be guided by these numbers. To do this, you need to look at the rear wheel and visually determine how much of what we have there:
— one chainring (we are dealing with a “singlespeed”, in other words, a single-speed bicycle or a bicycle with a planetary hub);
— five to six stars (in common parlance “ratchet”, typical of the most budget bicycles);
- seven to eight (standard cassettes for most entry-level/mid-level bicycles);
- nine to ten (standard cassettes for above-average mountain bikes, as well as for entry-level road bikes);
- eleven (standard cassettes for road bicycles).
Lubrication and cleaning.
Proper care of a bicycle chain is a sure way to extend the life of the transmission and relieve the rider of annoying squeaks and whistles when riding, as well as improve the performance of the bicycle. The main thing here is that the chain must be constantly lubricated and, as a result, have no signs of corrosion on the rollers.
Before starting, it is necessary to remove old lubricant, as well as contaminants that inevitably appear on the chain. The ideal cleaner here would be the well-known WD40 aerosol or its analogues, but if you don’t have one at hand, you can use kerosene, gasoline, acetone, alcohol-based window cleaners, or even an aqueous solution of grease-dissolving dishwashing detergents.
After cleaning, the chain must be wiped dry and lubricated. For this purpose, any mineral or synthetic machine oil is suitable, which should be applied to the chain links by pouring from an oil can, or by dripping into each link from a medical syringe. You can also use specialized silicone-based aerosol lubricants.
If there is no detachable link, then a squeezer will help here - a special device that presses out the pins, allowing you to disconnect and reconnect the chain links.
In the off-season, it is recommended to remove the chain from the bicycle and store it in a dry place, preferably in oiled paper, in order to avoid corrosion.
Replacement.
Sooner or later, the life of the chain will come to an end and there is no need to be too clever here - the chain must be replaced. Otherwise, using a worn chain has every chance of greatly reducing the service life of the drive and driven transmission sprockets, as well as the switch rollers.
It is quite easy to determine that a chain has worn out and the symptoms here include unclear gear shifting and chain skipping under load, for example, when driving uphill.
If you cannot change the chain yourself, we are waiting for you in our workshop veloman.by.
Replacing a loose chain
If the chain is not broken, but simply weakened, follow these other recommendations:
- Find the place where the chain came off. It happens that the chain does not break, but simply “goes astray.” You will not have to interfere very much with the entire process of its operation, however, you will need to install the chain back on the sprocket.
If the chain becomes loose and comes off while riding, first dismount the bike and lay it on its side with the stars facing up. Once you find the place where she slept, you can proceed with further actions. By the way, it’s a good idea to look for places where the chain might simply get stuck.
- Loosen the eccentric if the chain is tight. If you have a case where the chain is simply clamped, you need to loosen the eccentric. This can be done by releasing the small lever located in the center of the rear wheel. Once you have done this, unscrew the nut on the other side. These steps will help release the chain and remove it.
Remember that the lever should not be clamped too loosely or too tightly. This is wrong, and in both cases leads to negative consequences. The nut should be reasonably tensioned.
- Loosen the chain tension on a bike with rear derailleurs, and then tighten the chain onto the last sprocket. Almost all bicycles are equipped with a special spring, which is responsible for tensioning the chain when riding. Ignoring the resistance of the spring, tension the chain so that it can be placed on the smallest sprocket at the front. After this, release the chain and check how well it is tensioned.
After these steps you will be able to move on. The bike may ride unevenly at first until the chain is in the correct position.
- Pull the chain onto the front sprocket if you have a bike without speeds. This can be done simply by turning the pedals. We mentioned earlier that many bikes, such as single speed bikes, do not have shifters. And if you have just such a bicycle, then you can simply put the chain on the sprocket at the back, hook it onto the maximum possible number of teeth on the front sprocket and turn the pedal back. If done correctly, your chain will catch and begin to wind around the sprocket. After all the work done, the circuit will be able to operate normally.
Best articles: How recumbent bikes work: pros and cons of the design
To make pedaling easier, lift the rear wheel. Here again, a stand or something made from scrap materials will come in handy. As a last resort, you can try to hold the wheel up or turn the bike over.
Pedal carefully until you reach the desired speed. To do this, sit on your iron horse and gradually start riding
If you have a high-speed bike, the chain may return to the speed it was at before the breakdown. If this does not happen, then set the speed yourself and wait until the chain friction goes away.
Please note that a chain that falls off on single-speed bicycles is most often simply loose. And if your bike is like this, then adjust the chain tension before future trips
Be sure to check all speeds by switching them. Wait until all unusual sounds disappear.
Symptoms of a problem
First of all, you should pay attention to chain malfunctions on multi-speed bikes. Traditionally, riding time is determined by mileage, but these values are too approximate, because everything depends on the conditions of cycling: the quality of the roads, the selection of gears, speed, the load on the pedals and, accordingly, on the front sprockets. The first signs of a bicycle chain failure are inaccurate gear shifting and suspicious sounds (provided that the chain has not lost its lubrication)
The following method will certainly help you determine the malfunction: bend it away from the largest sprocket and look at the number of free teeth. If the chain moves freely from three or more teeth, replacement is required urgently. Two teeth “warn” that wear is just around the corner, but you can still ride
The first signs of a bicycle chain failure are inaccurate gear shifting and suspicious sounds (provided that the chain has not lost its lubrication). The following method will certainly help you determine the malfunction: bend it away from the largest sprocket and look at the number of free teeth. If the chain moves freely from three or more teeth, replacement is required urgently. Two teeth “warn” that wear is just around the corner, but you can still ride.
Using the same method, you can see if the chain is loose on a single-speed bicycle: bend it away from the front sprocket and look at the number of teeth.
Determination of the degree of attenuation
Another way to determine wear is to measure the length:
- 304.8 mm is the optimal chain length.
- 306.5 – 307.5 – average wear, suitability for repair. You can still drive.
- 308 mm – high degree of wear of both chain and sprockets.
- More than 308 mm – damage to the entire transmission.
Measuring elongation requires removing the chain completely from the bike.
Security measures
Before you start working with an electric saw, you should make sure that there are no foreign solid objects: the presence of hard elements can damage the tool. It is forbidden to eliminate a defect in the soil, particles of which can clog the grooves through which oil enters the operating units. Lack of regular lubrication will “kill” the tool in a very short time. You should carefully monitor the wedge of the tool: overheating of the metal leads to loss of performance characteristics, which means the service life of the tool is sharply reduced. It is very simple to determine that the saw requires sharpening: if the chips “come out” are too small and there is a dark coating on them, then this indicates that the saw is “dull.”
The explanation for this phenomenon is simple: the saw cannot cut the material and crumbles it, so small fragments appear. There should be no radii on the saw part, that is, fragments with torn out areas. The shape of the teeth and the working cutting edge must remain unchanged.
Before starting repair work, it is important to do a preventive inspection and correct diagnosis of the instrument. The complexity of the repair directly depends on the severity of the breakdown. It often happens that it is impossible to “solve the issue” on your own. There are breakdowns where you need to use special equipment. Under such circumstances, the tool must be taken to a specialized service center that has the appropriate approvals and certificates for repairing such equipment.
In the next video you will find repairs to the gearbox of an electric chain saw.
Sources:
https://tehnika.expert/dlya-sada/benzopila/natyazhka-cepi.html https://stroy-podskazka.ru/instrumenty/pily/remont-elektro/
Removing a bicycle cassette
We take the second important tool, and an adjustable wrench. We throw the puller over the wheel and install the toothy thing into the nut. Well, my favorite adjustable wrench is there too
Then press down on both sides.
It turns out that this is the thing - or rather, nothing happens. I took a stick made of some kind of pressed cardboard, which successfully showed me its guts. The next stick was made from dried birch.
We put it back on the wheel.
Press down on both sides. We hear micro-clicks of the nut (there is a ribbed surface, and when you tighten the nut, it is securely fixed).
We remove the cassette from the hub, wash and inspect each sprocket. If the wear on any of the sprockets is quite high, then it is better to change that sprocket. Most often, stars of the “favorite program” are developed. Usually medium, since there is the lightest pedaling effort. In my case, the sprockets are in pretty good condition, and after troubleshooting, I decided to put them back together in the same form, without replacements.
Causes of chain flyaway
There are two most common reasons for a chain coming off. The first is the bend of the star on the system (in particular, on the front group of stars). In this case, you don’t have to tighten the chain right away, but you will only have to move at the speed at which there is no bent sprocket. But, if the owner uses all speeds, repairs must be carried out as soon as possible (Figure 2).
If a chain falls off due to a bent sprocket, the severity of the repair depends on the type of system. If it is collapsible, it is enough to simply replace the damaged element. If the system is solid, it will have to be replaced completely.
The second common cause of chain slippage is incorrectly adjusted speeds. First of all, you need to make sure that the connecting rods are in good condition, after which you proceed to adjusting the speeds.
Figure 2. A bicycle chain can fall off due to a faulty sprocket or incorrectly configured gears.
A few tips will help you cope with the task:
- The front and rear derailleurs have adjuster bolts on top to prevent excessive transmission. If they are not adjusted correctly, the likelihood of the chain falling off increases significantly.
- If the chain has flown off the main large sprocket, it is necessary to screw in the L-bolt until the remaining sprockets are parallel to the main sprocket.
- In reverse order, screw in the H-bolt from the smallest sprocket to the parallel line of the 7th speed switch.
- If the chain has fallen off a large chain, also screw in the H-bolt, which is adjusted at the highest speed. It is screwed in until there is a space of 1mm between the chain and the outer derailleur frame.
Briefly about the main thing
A chainsaw consists of a motor, a filter, a starter, a gearbox, a clutch, a tire with a chain structure, a tensioner, a brake, and a lubrication mechanism. It works according to a classic carburetor scheme using a fuel mixture of gasoline and low-grade gasoline. The main parameters influencing the suitability of a chain for specific application conditions are the types of teeth and their characteristics, profile, shank thickness and length.
Installation and tensioning of the chain must be carried out strictly in accordance with the specified algorithm and compliance with the rules. When choosing it, the following number of parameters are taken into account:
- Step size.
- Working tooth shape.
- Shank width and cutting depth.
- Manufacturer.
At the same time, even the best chainsaw chains are not without their main drawback - sagging, which can be caused by a faulty tire, natural deformation of the metal links and weak or incorrect fixation of the sprocket.
Ratings 0
Why disassemble the chain
Only a chain that is tensioned without sagging or distortion ensures effective transmission of torque from the pedals to the rear bicycle axle. The need to disassemble and shorten it may be due to the following reasons:
- Replace due to severe wear or breakage. The new chain is the standard 114–116 links. On regular road bikes, as a rule, it is used entirely; on mountain bikes, it has to be shortened by 8–10 links. Only the necessary minimum is left on a trial bike.
- Constructive changes. After upgrading a bicycle, the chain often begins to dangle, spin, or fall off the sprockets, despite proper care.
- Sagging due to long-term use, intense load, changing a set of sprockets.
To determine the optimal length, you need to change the gear so that the chain lies on the largest sprocket at the front and rear. Then the links are opened, pulling it all the way. Having made a mark, add 2-3 more links to prevent increased loads on the transmission.
Chain replacement may be necessary due to severe wear or breakage
Quite often the chain starts to loosen or spin after upgrading the bike.
Chain sagging is possible due to long-term use or changing the set of sprockets
Adviсe
- Get a squeeze, even if there is a lock. The chain may break and this tool will come in very handy on the road. In addition, it is much easier to shorten a bicycle chain by squeezing. When choosing squeezing equipment, focus on high-quality, expensive models made of high-quality metal. The ideal option is to take a multi-set.
- Don't avoid using a padlock. The thing is practical and reliable. A chain with a split link is faster and more convenient to remove for the same routine cleaning before lubricating it.
- Do not use an old lock with a new chain. New – only new.
Standard removal process
All guides describe the same procedure for removal. To do this, you will need, first of all, a small set of tools - without them it will be quite difficult.
Top Articles: Folding Bikes Review
Tools
- rear wheel removal wrench;
- pliers for holding segments and pins;
- squeezer - a device for pressing out pins, without a lock - the most important tool in the process.
Process
Let's take a step-by-step look at how to remove a chain from a bicycle:
- We clean the links from dirt - it will interfere with each subsequent step.
- Removing the rear wheel is not a necessary step, but it is much easier to work without it.
- Press out the pin (the metal cylinder that closes each link) using a squeezer.
- Disconnect one link.
- Remove the outer links from the switches.
The reverse sequence is similar - put the chain in place and assemble the structure back, riveting the pin using a squeezer and rotating it in the opposite direction.
No tools
In the absence of a squeeze, you can install everything back without it. Pliers and any strong cylinder, for example, a small hexagon, will help. By carefully clamping the cylinder, the pin can be riveted in the same way as a squeezer, it just requires much more attention and force.
Models with a lock can be unlocked using a tight rope or cable. This allows for quick repairs literally in the field, for example, when the chain suddenly breaks on a short hike.
Chain care
Regular cleaning and lubrication is the best way to extend the life of your chain. Use a special lubricant designed for bicycle chains. Lubricate each roller. Lubricate the chain only from the inside; there should be no lubricant on the outside.
And then another layer of dust passes and melts again. Depends, as we said, every tooth is different. Each tooth will have a different number of layers. But that's a few hours per head. The end result will be something like this. In this case it is a complete denture.
Could you fit a complete denture with a denture? Yes, but they do not require an implant in every tooth. Does the dew already have a tooth? This is your mouth today. Your new tooth fits perfectly in your mouth. Now you can laugh out loud without the fear of teaching a hole. So let's summarize how the implant is made.
Do not turn the chain in the opposite direction and apply lubricant in a hurry. In addition to increased consumption of the product, the links can be overloaded. Always remove excess grease with a rag. After riding in wet weather, wipe the chain dry and reapply lubricant. This will prevent rust and chain stretching.
Basic mistakes beginners make when sharpening
There are a number of recommendations on how to sharpen a chainsaw chain to avoid common mistakes common to beginners:
- you need to make the same number of movements for each tooth;
- equal forces must be applied to all teeth to avoid unevenness;
- if the chain is too dull, then a file will not be suitable for the job and it is recommended to use an electric machine;
- The angle is set taking into account the direction in which the logs will be sawed in the future.
When using a file, you must take into account that it removes metal shavings from the chain as it moves forward.
Watch the video on how to sharpen a saw with a grinder:
It is recommended not to touch the surface of the teeth with it when performing a reverse movement. Mostly all chains are sharpened at an angle of 30°, but after completing the procedure you should check them with a template. They do this using the following algorithm:
- the template is applied to the chain;
- check how far the depth limiter protrudes;
- The limiter is trimmed with a flat file.
Typically, the depth distance at the limiter is 0.65 mm, but in general, if necessary, it can be varied within 0.45 - 0.80 mm.
How to sharpen a chain correctlySource mauro-gianvanni.ru
Now let’s talk about how to put a chain that has come off on a single-speed bicycle back in place.
The idea is this: First, it is completely put on one of the sprockets (usually the rear one, but it can also be the front one) and is thrown over the second sprocket (front or rear, respectively) to lie on part of the teeth. Further, when the pedals are scrolled in the direction of travel, the chain is captured by the remaining teeth of the sprocket and completely rests on the entire sprocket and is thus put on.
The algorithm for putting on a chain is approximately as follows.
- Turn the bike upside down on the saddle and handlebars, or lift it up so that the rear wheel can rotate freely.
- If your bike has bicycle chain protection installed, it is better to remove it. This will make it more convenient and easier to reach the front sprocket. If you’re too lazy to take it off, or you can still reach the sprocket, well, it’s up to you.
- Place the chain completely over the rear sprocket. (If you did not remove the guard, then it may be more convenient to completely put it on the front sprocket).
- Throw the chain over the front sprocket as it rotates and pedal forward as you go. When the pedals rotate, it itself falls on the remaining teeth.
Here you need to understand that if the bicycle is upside down, then the chain is thrown onto the lower part of the sprocket (in relation to you) and, turning the sprocket itself by the pedal clockwise, we throw it onto the front sprocket entirely. If you start throwing the chain on the top of the sprocket in relation to you, you will not be able to turn the pedals - after all, you will actually have to press the brake.
If the bike is in its normal position (wheels down), then again put the chain on top of the sprocket and pedal clockwise - as if you were riding forward.
That's it - the chain is on.
Take the traffic rules knowledge test for a cyclist!
Time limit:
out of 15 tasks completed
Questions:
- 1
- 2
- 3
- 4
- 5
- 6
- 7
- 8
- 9
- 10
- 11
- 12
- 13
- 14
- 15
Information
To be able to obtain rights, please click Next
You have already taken the test before. You can't start it again.
The test is loading...
You must log in or register in order to begin the test.
You must complete the following tests to start this one:
results
Correct answers: out of 15
Your time:
Time is over
You have scored
a maximum of 15 points
| Place | Name | Recorded | Points | Result |
| Table is loading | ||||
| No data |
Your result has been recorded on the leaderboard
Captcha:
- 1
- 2
- 3
- 4
- 5
- 6
- 7
- 8
- 9
- 10
- 11
- 12
- 13
- 14
- 15
- With answer
- With a viewing mark
How to remove a chain from a bicycle
To remove the chain from the bicycle, you will need to disconnect it (break it). There are several ways to do this, depending on whether the chain has a connecting link or not. Before you begin, move the chain to the smallest sprocket and smallest cog.
It will be even better if you remove the chain from the front sprocket or remove the rear wheel from the bike. Both of these methods will remove tension from the chain.
If you have a standard chain without a connecting link: Install the squeezer so that the squeezer pin aligns with the pin in the chain. Turn the release handle to pull the pin out far enough to break the chain. If you have a chain with a connecting link: To find the connecting link, look for a link that is noticeably different from the others.
This is the place where you can break the chain.
The connecting link has a pin on one side inserted into a notch on the other side.
Using pliers, squeeze the connecting link on both sides until it opens.
Depth of cut - a parameter depending on the tooth profile
The larger the tooth profile (size), the greater the depth of cut in one pass. The higher the cutting depth value, the greater the tool performance value
It is important that the higher the cutting depth of chainsaw chains, the greater the load on the tool’s engine
Determining cutting depth
The height of the links also affects the strength of the teeth, and the larger they are, the lower the strength index. Standard models of saw sets are available in two tooth heights - 0.635 and 0.762 mm. Products with a smaller profile height are called low-profile, and products with a larger profile are called high-profile. The cutting depth affects the time it takes to cut the wood.
Sequencing
Let's look at how to shorten a bicycle chain designed by Gall (this is what is used on 95-99% of all modern bicycles).
We disconnect the chain
- Find the closing link (lock). Some chains have a closing link. The link is fairly easy to spot as it is usually a little darker or lighter than the rest of the chain. It may also have protruding rollers that are secured by an outer plate. This plate usually has a large oval hole around one or two rollers.
- Pedal until the master link is between the front and rear gears for easy access. If there is no closing link on the chain, then separate the chain using a squeezer. These steps are described below.
- Unfold the master link, remove it and store it in a safe place. There are several design options for such a link. Some rotate on a hinge and allow you to remove the roller, while others can be opened by bending. Some closing links are disposable and can be removed with needle nose pliers or a special tool.
- If there is no lock on the chain, then you need to use a squeeze. We install the squeezer so that its rod is exactly in the center of the pin (roller).
- Smoothly rotate the squeeze handle until the roller comes out to the level of the second inner plate.
- We disconnect the link without removing the pin completely.
Removing unnecessary links
- We measure the required length and determine the pin for squeezing, taking into account that the released plates of the link coincide with the plates of the already squeezed one.
- We repeat the sequence from step No. 1, squeezing the roller completely.
Circuit connection
We bring both ends of the chain together and carefully, centering the squeeze at the start and controlling the process every 0.2-0.3 mm, press the pin into the link released in step No. 2.
Some people prefer to remove the chain and shorten it in a more convenient position and place - in this case, before connecting, you should check whether it is threaded through the switches.
Examination
- The pressed roller itself. If there are creaks or problems with mobility on the link, we install the plates in place, bending the chain along the plane of the link until the clicking stops; hand strength is enough, no tool is required.
- All shortened chain. We try to make several turns on the smallest sprockets - if there are problems, it will be noticeable immediately.
For a repeating type chain (half-link, with one pair of repeating plates), the process is simplified; there is no need to select a pairing. The chain of lightweight models and some sports variants can only be shortened with a specialized tool, and the shortening procedure is described in the company documentation.
If there is no squeeze
To avoid having to think about how to open a bicycle chain without special tools, it is strongly recommended to take the necessary tool with you even on short trips. Attempting to disassemble a chain without squeezing it out always risks bending or jamming the links without the possibility of their subsequent restoration. But when there is no other way out, you can try to disengage it by doing this (the method is suitable for bicycle chains without a lock, and with a locking link):
Place a suitable pin (nail, drill, dowel, awl) with a thickness slightly less than the link bead to the pin (if it is missing, to any link). Place a nut, washer, or something similar under the chain and inside the link. This item plays the role of an “amplifier” and will not allow the links to become jammed
Using a hammer, stone, or other object at hand, carefully hit the pin, trying to knock out the connection. The key to success is measuredness and accuracy of manipulations
Opening the lock and squeezing the link axis
Opening the lock is quite simple: use a screwdriver or other object (for example, a knitting needle) to pry up the pincer clamp. The main thing here is not to damage it, and even better, not to lose it, otherwise you won’t be able to fix the chain later. Next, we uncouple the entire link. That’s it, you can remove the chain and do whatever you want with it: clean it, throw it away or shorten it. However, we'll talk about this a little later.
Lock in disassembled condition
You can disconnect a continuous chain only with a special tool - a squeezer. With its help, you can easily disassemble the link without damage. The procedure is simple, but there is no need to rush:
- First, select a link for disassembly.
- We insert the chain into the position of pressing out and pressing in the pin (link axis).
- We tighten the screw with a handle and pull out the axle. The direction of extrusion is towards the squeeze screw, that is, towards yourself.
You should not remove the pin completely, as it will not be easy to return it to its place later.
Hall chain release device
Squeezing loosens the axle a little, so when disengaging again, you should select a different link. Pressing the axle into a link is carried out in the opposite order: connect adjacent links and press the pin with a screw.