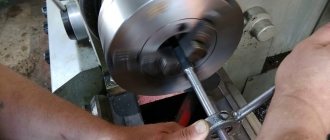
Welding seams in the lower position is the most technologically advanced and easiest to perform. During the welding process, liquid metal from the molten electrode, under its own weight, flows into the crater and remains in the molten metal bath. The welding edges of the parts being welded hold the molten metal in the liquid bath, preventing it from flowing out.
In addition, welding in the lower position promotes the release of gases and slag to the surface of the weld pool. Due to the easy release of slag and gases, the quality of the welded joint is the highest. Based on this, to improve the quality of welding, it is recommended to perform manual arc welding in the lower position, if possible.
The recommended order of making welds is from left to right, or towards you. This manual arc welding technique allows the welder to constantly control the joint location, the length of the electric arc, the movement of the electrode and the formation of the weld. Typically, the width of the roller is 3-4 times the diameter of the electrode.
What is the spatial position when welding?
Different standards have the following definitions for the term "welding position":
- the position of the weld in space, determined by the angles of inclination of the axis and rotation of the front surface of the weld relative to the horizontal plane. (GOST R ISO 6947 and ISO 6947)
- the relationship between the weld pool, the elements being joined and the heat source during the welding process. (AWS A3.0)
- The welding position is determined by the angle of inclination of the longitudinal axis of the seam and the angle of rotation transverse to the axis of the seam relative to their zero values. (GOST 11969)
The welding position, due to gravity, directly affects the nature of the transfer of the molten metal of the electrode into the weld pool and the welder during the welding process must take this into account and change the welding modes, the technique of oscillating the electrode and other parameters. The most famous are the lower, horizontal, vertical and ceiling positions, but there are a number of other positions that have their own designations, which will be discussed further.
Down position
The first steps in training all novice welders begin from the bottom position since it is the easiest. Welding is performed from above with the part located horizontally. Under the influence of gravity, the molten metal flows down and spreads evenly in the weld pool.
Vertical position
In a vertical position, the axis of the weld is located vertically, and welding is actually carried out horizontally from edge to edge. In this case, the molten metal, under the influence of gravity, will tend to flow downward, which entails its accumulation at one point, rather than its uniform distribution over the entire width of the roller.
Horizontal position
Compared to the bottom and vertical, the horizontal position is more difficult and the welder will need more skills and abilities to make a quality weld. The axis of the weld is located horizontally, and the main problem is that the molten metal of the weld pool tends to flow downwards, which is why weld defects often form in the form of undercuts.
Ceiling position
In the ceiling position, welding is performed in the most inconvenient position - above the head and requires a highly qualified welder. Before you begin welding ceiling seams, you must master welding in all other spatial positions. The molten metal of the weld pool tends to flow vertically downwards, so during the welding process it is necessary to ensure that the surface tension of the molten metal is greater than gravity and the metal remains in the weld pool. During the welding process, you must try to keep the weld pool as small as possible.
Types of welds
The type of connection determines the location in space of the objects to be welded:
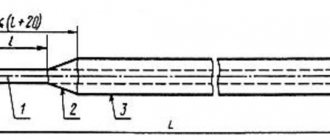
- end-to-end The ends of parts located in the same plane are mated. The operation is performed in several ways: with bending the edges of the plates being connected - the so-called. edge flanging; with beveled edges. It is relevant when one-sided welding of plates with a thickness not exceeding 5.0 mm and double-sided welding of sheet elements with a thickness of 8.0 mm or more is carried out. However, it is allowed to form a butt seam without bevelling the edges;
- overlap At least two plates are welded, laid one on top of the other with partial or complete overlap of their surfaces. Most widely used for profile connections and pipe products. A small section of one of the structural elements is immersed in the mating part of the other;
- corner. The sheets are connected so that their surfaces form a spatial angle. The cross-section of the seam is approximately triangular in shape;
- T-bar. The gender is similar to the letter "T". But there are cases when the surfaces of the workpieces form an acute angle;
- end The planes of the sheets are adjacent to one another, and their ends are welded. Connections of this type are usually used for thin plates. This eliminates the possibility of burning through them.
Designation of spatial positions on the electrode packaging
Welding is increasingly moving from the professional industry to the amateur industry, and proof of this is the presence of a welding machine in almost every garage or summer cottage. Manufacturers of welding materials, meeting the consumer halfway, do not indicate all these intricate designations of welding positions H45, B1, H1, H2, 2G, PA, etc., but provide information in an intuitive form. Some manufacturers indicate acceptable welding positions in the form of arrows on the packaging of electrodes, others - in the form of images, and some additionally indicate welding modes.
There will be those who will say that the designation of coated electrodes also indicates the permissible spatial positions and they will be right, but we wrote about domestic brands of electrodes in the article on manual arc welding, and about imported ones - this is the topic of a separate article.
Advantages and disadvantages
Advantages
Pipe welding is usually done using a butt joint
For butt connection
- less electrode metal is used,
- it is not difficult to control the process, the designs are reliable,
- The welding technique is simpler than the fillet weld technique,
- butt joints ensure the flatness of the surface of the structure,
- provide connections between parts of different thicknesses,
- It is possible to weld thick metal with a one-sided seam.
Flaws
Butt joint
- does not provide additional rigidity compared to overlap,
- Significant surface deformations may also occur after welding (especially when welding thin metal).
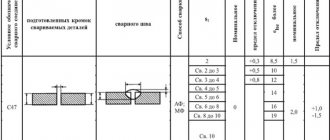
Table of provisions and their designations in accordance with NAKS, ISO, AWS and GOST standards
In order to summarize the information presented above, we can say that each standard has its own nuances in the methodology for designating the positions of welds. In the article we tried to pay attention to all the main points of differences in the designation, and in the table below everything can be seen more clearly.
By the way, you can download this table from the link, which you can print out if you wish so that it is in front of your eyes.
| Drawing | NAKS | ISO | AWS | GOST | ||||
| H1 | lower | PA | lower | 1G | flat | N | lower | |
| P1 | ceiling | P.E. | ceiling | 4G | overhead | P | ceiling | |
| IN 1 | vertical (welding from bottom to top) | PF | vertical from bottom to top | 3G | vertical | IN | vertical | |
| AT 2 | vertical (welding from top to bottom) | PG | vertical from top to bottom | |||||
| G | horizontal | RS | horizontal | 2G | horizontal | G | horizontal | |
| H1 | lower | PA | lower | 1F | flat | L | into the boat | |
| H2 | lower T-joints | P.B. | horizontal position of T-joints | 2F | horizontal | N | lower | |
| IN 1 | vertical (welding from bottom to top) | PF | vertical from bottom to top | 3F | vertical | IN | vertical | |
| AT 2 | vertical (welding from top to bottom) | PG | vertical from top to bottom | |||||
| RS | horizontal | G | horizontal | |||||
| P2 | ceiling T-joints | P.D. | ceiling position of T-joints | 4F | overhead | P | ceiling | |
| H1 | lower with horizontal axes of pipes welded with rotation | PA | lower (rotating pipe) | 1G | flat rotated | |||
| IN 1 | variable with horizontal axes of pipes welded without rotation (uphill) | PH | vertical from bottom to top (fixed pipe) | 5G | multiple | |||
| AT 2 | variable with horizontal axes of pipes welded without rotation (downhill) | P.J. | vertical from top to bottom (fixed pipe) | |||||
| G | horizontal with a vertical arrangement of the axes of pipes welded without rotation or with rotation | RS | horizontal | 2G | horizontal | |||
| H45 | variable with an inclined arrangement of the axes of pipes welded without rotation | H-L045 | inclined position (fixed pipe) welding from top to bottom | 6G | multiple | |||
| J-L045 | inclined position (fixed pipe) welding from bottom to top | |||||||
| H1 | lower with horizontal axes of pipes welded with rotation | 2F | horizontal rotated | |||||
| H2 | lower when the axis of the pipe is vertical, welded without rotation or with rotation | P.B. | horizontal position with vertical position of the pipe axes | 2F | horizontal fixed | |||
| IN 1 | variable with horizontal axes of pipes welded without rotation (uphill) | PH | vertical position from bottom to top (fixed pipe) | 5F | multiple fixed | |||
| AT 2 | variable with horizontal axes of pipes welded without rotation (downhill) | P.J. | vertical position from top to bottom | |||||
| H45 | variable with an inclined arrangement of the axes of pipes welded without rotation | H-L045 | with inclined axes, with a welding direction “from bottom to top” and an inclination angle of 45° | 6F | multiple fixed | |||
| J-L045 | with inclined axes, with a welding direction “from top to bottom” and an inclination angle of 45o | |||||||
| 1F | flat rotated | |||||||
| P2 | ceiling with a vertical pipe axis, welded without rotation or with rotation | P.D. | ceiling position with vertical pipe axes | 4F | overhead fixed | |||
| Pg | semi-horizontal | |||||||
| Pv | semi-vertical | |||||||
| pp | semi-ceiling | |||||||
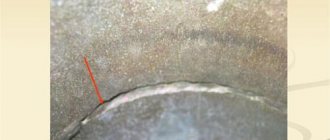
Weld processing
At the end of welding, slag stains remain on the surface of the parts. The entry of these inclusions into the completed seam leads to a deterioration in its strength characteristics. Such deposits must be removed by stripping. This requirement applies primarily to the multilayer connection option. The surface must be cleaned after each pass. The simplest option assumes that:
- first, the joint is hammered with a hammer;
- then it is brushed with a hard wire bristle brush.
The final procedure for removing slag is recommended to be carried out using a different method:
- The first stage is rough cleaning. It is performed using a special tool similar to a knife, or grinding wheels with coarse grains. Rough cleaning of seams after welding large workpieces is carried out on machines;
- the second stage is polishing the seam. Most often this is done using a fiber wheel mounted on a sanding machine.
How is it different from overlap
Welded lap joints are the fusion of different elements of a part located in parallel, partially overlapping each other. Used when butt jointing is not possible. An overlap connection is not recommended if the structure is subject to vibration; the steel thickness should be no more than 10-12 mm.
With butt it is important to take into account the accuracy of assembly , while with overlap assembly is much simpler and there is no need to cut the edges.
The disadvantage of an overlap joint will be the greater consumption of base metal, since one part covers another, corrosion of the metal may occur from moisture penetration between the parts, and it will not be easy to identify defects. In butt welding there is no overlap (overlapping) of parts; different welding techniques are used when welding overlap joints is performed using a fillet weld . In lap joints there is no need to cut the edges; there are also a large number of types of butt joints according to GOST.