Homemade products from a washing machine engine:
1. How to connect a motor from an old washing machine through a capacitor or without it 2. Homemade emery from a washing machine engine 3. Homemade generator from a washing machine engine 4. Connecting and adjusting the speed of a commutator motor from an automatic washing machine 5. Potter's wheel from a washing machine machines 6. Lathe from an automatic washing machine 7. Wood splitter with an engine from a washing machine 8. Homemade concrete mixer
Cool homemade device for trimmer
Everyone needs a trimmer! You can use it to mow grass in any hard-to-reach places. Either along the fence, or on the side of the sidewalk. Or you can mow the entire lawn around the house. All this requires not only skill, but also sufficient physical effort, even from a man. But not only men work as trimmers, but also women and teenagers (if they mow at home on their property). And if you have to mow grass all day long (at work for hire). Your shoulders and arms will get tired, and by the evening your whole body will ache.
There is a solution to this problem. It is necessary to transfer all the burden of carrying the trimmer from the shoulders and hands of a person to the wheels. Make something like a lawnmower. Only a lawnmower has 4 wheels and it can mow large, flat lawns, but it cannot get into hard-to-reach places. The trimmer will have only two wheels, so it is much more convenient to control it.
Lawn trimmer
This is a regular trimmer with a straight shaft. A frame on wheels is attached to the bar. Wheels can be taken from a regular wheelbarrow for transporting water in flasks. Make a homemade frame from a profile, buy bolts and nuts.
Source: eurosamodelki.ru
The most popular homemade products from gasoline and electric trimmer engines
For everyday household work, outdoor activities or travel, using a motor from a trimmer, many craftsmen can independently make various devices:
- cultivators;
- motorbikes;
- snow scooters;
- snow blowers.
Homemade products are much cheaper than their factory counterparts, but are not inferior in power and efficiency. Using the necessary set of tools and a minimum of knowledge, you can achieve great results in making motorcycle equipment with your own hands. Such units are characterized by simplicity of design and minimal financial costs.
snow blower
A snow blower is a machine that scoops up snow and throws it to the sides. It works on screw and rotary principles.
Screw mechanisms carry out a 1-stage intake of snow mass. The device is located in the front part of the unit, covered with a lid on the sides and top. In the process of rotating around its own axis, the auger captures, grinds snow and ice, crushes them into small fractions, transfers them inside the equipment to the throwing shovel, then to the outlet pipe. For freshly fallen snow, mechanisms with a smooth edge are suitable, for stale snow - with a serrated edge.
In a rotary type unit, the snow cover is cleared by a rotor. The nozzle is attached to the drive shaft and works like a vacuum cleaner. The blades protrude forward, making it much easier to grip snow. In a homemade snow blower from a trimmer, they are made of high-quality metal or durable plastic. The rotor creates increased centrifugal force. Snow is thrown away, passing through the pipe, at a distance of up to 12 m.
Both electric and fuel motors are suitable for snow blowers.
If the operating range of the mechanism is within the house, install an electric motor from the trimmer, taking into account the waterproofing of the unit. When carrying out work in summer cottages, it is better to install a low-power gasoline engine.
At the preparatory stage for a do-it-yourself snow blower from a trimmer, drawings of parts and assemblies are developed according to a well-thought-out plan, technology and based on the availability of material and equipment. For assembly, use the diagram of a lawn mower.
Necessary equipment for making a homemade machine:
- Petrol trimmer with straight rod and gearbox.
- Steel sheet 1.5 mm thick or metal barrel.
- Milling cutter with teeth.
- Set of tools:
- drill;
- drill;
- spanners.
- Bulgarian.
- Welding machine.
First they make the rotor:
- 4 rectangles 25x10 cm are cut out of a sheet of steel.
- One of the corners of the long side of the part is turned into a blade shape.
The deflector is made from metal strips 30x15 cm, bent, sides 10 cm high are welded. For the blade, take a blank 30x40 cm, bend the edges to a height of 2 cm.
In order to make a snow blower with your own hands from a trimmer, perform the following algorithm of actions:
- the bottom of the barrel is 15 cm, cut in a circle;
- at the bottom of the structure, a hole is drilled for the gearbox protrusion and 3 additional ones are drilled for attaching the shield;
- on the side they make a square with a side of 10 cm for unloading the snow mass;
- 1/3 of the front part of the structure is covered with a metal sheet so that the square hole is located in the center of the damper;
- the finished rotor blades are welded in a cross pattern to the gas trimmer disk;
- a deflector is installed to the unit body at the point of snow emission and welded;
- a spatula is attached from below;
- install the gearbox, securing it with bolts;
- insert the rotor.
During work they use a welding machine. Welding on thin metal is a complex technological process that only a professional can handle. Therefore, it is better to use the services of an experienced welder when manufacturing some parts.
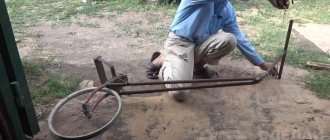
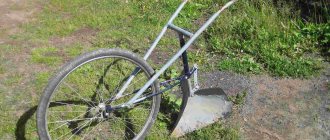
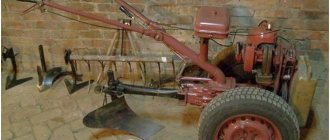
Step-by-step instructions for making a manual plow-type hiller
Required tools:
- Gas cutter;
- Welding machine;
- Vices and bench tools;
- Drill with metal drill;
- Angle grinder.
Materials that will be needed for work:
- Pipe d 32 thickness 2.5, length 1000 mm and 700 mm;
- Pipe d 45 thickness 6.5, length 1000 mm;
- Pipe d 21 thickness 2.5, length 1000 mm and 1700 mm;
- Sheet iron thickness 3 mm;
- Electrodes;
- M10 bolts - 4 pcs;
- Nuts M10 - 4 pcs;
- Belt made of flexible material - 2 m;
- Talper mechanism.
Making a stand
The manufacture of the rack is carried out as follows:
- It is necessary to bend a pipe d 45 with a length of 1000 mm in half at an angle of 30 degrees;
- On one side of the pipe, drill five through holes d 12 with a pitch of 50 mm;
- Weld two brackets on the other side to secure the front handle and the talper mechanism, as shown in Figure 2.
Production of a double-blade working body with a scoring knife
To manufacture the working body of a hiller with two blades and a scoring knife, the following steps should be performed:
- Mark two blades on a sheet of metal as shown in Figure 1;
- Cut them out using a cutter;
- Sharpen the knives with a grinder;
- Weld two dumps according to the scheme shown in Figure 1;
- Weld the working body of the hiller to the stand.
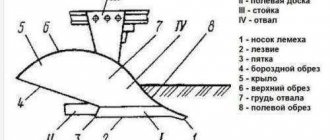
Fig.1. Marking and assembling the working body of a plow-type hiller
Making the rear control stick
The production of the rear handle is carried out in three stages:
- Bend a pipe d 32 with a length of 1000 mm on both sides at bending points 150 mm from the edges at an angle of 90 degrees;
- Drill five through holes d 12 in increments of 50 mm in a pipe d 32 with a length of 700 mm;
- Weld both workpieces according to Figures 2 and 3.
Fig.2. Assembly diagram of a manual plow-type hiller (side view)
- The working body is double-dump;
- Scoring knife;
- Rack;
- Rear control stick;
- Forward control stick;
- Talper mechanism;
- Bracket;
- Bracket;
- Left handle;
- Right handle;
- Belt for neck-axillary traction;
- Special bolt.
Fig.3. Assembly diagram of a manual plow-type hiller (top view)
Making the front control stick
To make the front control handle you need:
- Drill a through hole d 12 at a distance of 10 mm from the edge on a pipe d 21 with a length of 1000 mm;
- Weld the bracket for fastening the talper at a distance of 500 mm from the edge, as shown in Figure 2;
- Bend a pipe d 21 with a length of 1700 mm at three points at bend points 850 and 500 mm on both sides;
- Weld two brackets for fastening the belt on the bends of the pipe on both sides at a distance of 500 mm from the edges;
- Weld all elements according to the diagram in Figures 2,3.
Assembling a manual hiller
For the final assembly of a manual plow hiller, you need to connect all the hiller elements with bolts, as shown in Figures 2.3.
Making a homemade hiller is quite simple; it is better to spend some time and effort on building this necessary device than to process a potato plot manually using improvised means.
Important! Having such a tool on the farm is not only necessary, but also profitable.
In operation, such a hiller is convenient and simple, it can be adjusted to the height and parameters of its owner and will simply become an indispensable assistant in the difficult work of a gardener.
Read further:
How to make a homemade potato hiller with your own hands? Visual guide
How to choose a potato hiller - manual, tractor and cultivator? Practical advice.
Types of forks for digging potatoes, their pros and cons. Can I do it myself?
Simplify your gardening! Planting potatoes with a walk-behind tractor using a potato planter and other devices
How to plant potatoes in ridges manually and with a walk-behind tractor, what are the pros and cons of the method?
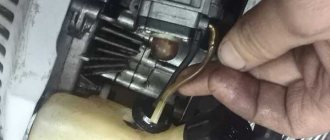
Bicycle with engine from trimmer
A homemade bicycle with a trimmer motor is a high-tech vehicle that differs from simple analogues in its high riding speed, practicality and reduced cost due to the use of cheap equipment.
To assemble a motorbike, the following equipment is required:
- the bike is in working order;
- trimmer motor;
- chain;
- tensioner;
- star;
- clamp;
- cable;
- fuse;
- controller;
- exhaust pipe;
- bushing, bolts, washers.
Converting a bicycle to a bike:
- 2 rubber spacers are attached to the rear wheel: the first - between the spokes, the second - behind them.
- The sprocket must fit the trimmer motor. It is inserted into the bushing, which is located on the outer part of the wheel. A crescent moon is attached to the inside.
- The engine is mounted on the trunk or behind the seat using a clamp purchased or made from a steel plate with your own hands.
- Install the chain on the sprocket and power unit and adjust it with a tensioner. It is not recommended to use belts instead of a chain. Under the influence of friction, they often become unusable and their service life is minimal.
- The throttle handle and the engine are connected by a cable.
- Attach the fuel tank and carburetor.
- The exhaust pipe is welded with a weld seam.
Some craftsmen create a braking system and replace standard wheel tires with non-slip ones. After assembling all the components, be sure to check the operation of the bicycle. The functionality of the mechanism and its own safety will depend on this.
An ice drill made from a trimmer is a low-power unit for winter fishing enthusiasts, characterized by its low weight and easy transportation. In order to save money on the purchase of new equipment and the effort required when manually drilling ice, fishermen make them from old trimmers. For this you need:
- petrol mower;
- factory or homemade drill;
- improvised materials.
It is difficult to make an ice screw at home. The parts to pay attention to are the screws and the blade base.
To create augers you need:
- Calculate the sizes of product segments.
- Prepare metal blanks, mark, cut out a sector, weld the segments together. The result is a steel spring welded on one side.
- Stretch the spring by a given step on a special machine in order to weld the segments on the other side.
- Grab the flange and weld it to the pipe.
- Boil the screw connections and paint.
- When choosing auger rotation, take into account the direction of rotation of the gas-powered tool.
Converting a trimmer into a gas auger is suitable for units with a folding boom. The connection adapter is the easiest to prepare.
If it is necessary to increase the rigidity and stability of the mechanism, a durable frame is made to mount the gearbox and motor.
Motorized drills are units for making holes for installing wooden piles, laying foundations, and drilling wells. The operating principle and manufacturing method are similar.
Device
Lightweight hand cultivators are in greatest demand among farmers and summer residents. As a rule, they weigh about 20 kilograms, are small in size and have high productivity. The cultivator is capable of loosening the soil, removing weeds, and thinning out plants. It is even used to apply fertilizers. This unique device simplifies not only planting, but also the process of caring for plants.
Of course, a walk-behind tractor is more powerful in terms of power, but for such small tasks a cultivator is better, as it has greater maneuverability and less weight. In addition, it is excellent for areas with difficult terrain or in hard-to-reach places.
The work of cultivators largely depends on what cutters come with it, because they are the ones who perform loosening and a number of other operations. Among the working attachments for hand-held models, the following are quite often used:
for loosening the earth;
for making furrows for sowing;
for breaking a strong earthen crust (special needle disk);
for feeding plants (with dispensers).
When it is clear which cultivator is needed for certain tasks, you can choose what parts it will consist of. Drawings of a homemade device can help with this. The main part of the cultivator is the engine, which can be electric or internal combustion. It is best to give preference to reliable and durable installations. If necessary, you need to provide a cooling system, since it is not always built-in.
The gearbox is responsible for controlling engine torque. This part reduces the speed and also facilitates the operation of the power take-off shaft. As for the frame and portal for attachments, they can be made from what is at hand. Even the simplest two-wheeled wheelbarrow will do for this. The main thing is to think about the diagram in advance in order to have a good idea of how and where the individual elements will be placed.
Comfort and adjustability are important parameters for a control lever. It should not only be comfortable, but also adjustable.
As a rule, the handles are equipped with all the elements responsible for controlling the device. Therefore, it is important to have a good idea in advance of how the unit as a whole will look in order to make it convenient to use.
Cultivator
For motorized tillage, make a cultivator from a trimmer with your own hands. The motor power must be at least 2 liters. With. When using an electric trimmer, you need to stock up on an extension cord so that the production process occurs throughout the entire area.
The main part of a motor cultivator is the nozzle. The rods of garden forks 10-15 cm long are suitable for this purpose.
The production of the part proceeds as follows:
- First you need to flatten the teeth to a width of 1 cm;
- sharpen the cutting blades for the cutters on an emery wheel;
- cut a ring with a diameter of 10 cm from a metal sheet using a jigsaw;
- grind the workpiece;
- Weld 3 cutters to a steel circle at an equal distance from each other.
If there is a reverse thread, the nozzle is screwed on after welding the pipe with the nut.
The process of creating a mower
Now let's talk about the process of creating a mower from various accessories and how to assemble it yourself. First you need to form a metal frame from a sheet 2-3 centimeters thick. It is cut, after which holes are made in it for the motor shaft.
At the next stage, the selection and installation of the motor is carried out. It is very important to choose it based on the length of the knives that will be installed. When this has been done, it is necessary to make knives and then attach them to the device.
The next step is to install a protective casing on the lawnmower, which is a metal strip rolled into a ring and serves as a frame for the knives. At the next stage, the selection and subsequent installation of mower wheels is carried out. Then you need to select and install the handles.
The final stage will be the installation of elements of the lawn mower power system.
From an old vacuum cleaner
Another option for creating a lawn mower is transforming a vacuum cleaner. First you need to make a cutter. If possible, you should use a polymer type thread. It needs to be attached to a piece of steel, in the middle of which there is a hole. Now the saw is made into a knife. By the way, if the steel is very hard, then it should be softened.
Now the workpiece should be heated very strongly, and then allowed to cool. When the knife is made, it needs to be heated again and cooled very quickly. The length of the cutter should be up to half a meter. The cutting part is usually sharpened at an angle of 60 degrees. The edges are made along the knife edges. The shaft opening must have maximum accuracy, because the cutters will have to be balanced in the future.
All parts of the structure must be secured as efficiently as possible. To prevent the cutter from accidentally becoming deformed after hitting rocks, it must be assembled. Steel knives should be attached to the base in the center on both sides using bolts. Upon impact, the knife will only rotate and the risk of damage will be minimal.
A hole is made in the plate so that it is possible to install the motor. It is placed in the slot and clamped with a steel strip, then installed across the slot and tightened with screws. The part where the turbine is located is removed from the engine. The cutting element is installed there.
On the reverse side, the turbine is dismantled and a tin fan is installed in its place. To protect the motor, a tin casing is attached to the plate. You can use a cover from a vacuum cleaner from which the engine was removed. A PCB plate with a motor is installed on a chassis with wheels. At the final stage, the handle should be attached to the device using the brackets on which the switch is fixed. Now comes the connection of the cables to the motor and button. At the end, they need to be isolated and the system’s functionality checked.
From the washing machine
To create a lawn mower from an old washing machine, you will need:
- the engine from it;
- steel knives;
- wheels;
- a pipe that will become the basis for the handle;
- electric drive;
- fork;
- switch.
If the mower is made from a machine engine, then it is better to take a model with a power of 170-190 W, equipped with a starting relay with a capacitor. You also need to select wheels.
Knives must be made of steel, 2 or 3 mm thick and half a meter long. The cutting part bends slightly downwards, which helps protect the shaft from various objects getting into it. The handle is made from a tube so that the device is comfortable to hold. It is attached to the frame by welding.
A platform previously made from sheet metal is mounted on the chassis of the trolley. Then a hole is made for the motor shaft. A steel grille is installed on the front as protection. Its upper and lower parts are screwed with bolts to which wire is attached.
The grill of the device allows you to create a gap for the knife. The motor is attached so that the shaft fits into the hole. A previously sharpened knife is mounted on it, and a hole is made in the middle.
The knife should be balanced and centered. The motor is covered with a casing for protection. Given that it needs to cool while it's running, there should also be holes in the casing. It is connected to wiring that is fixed to the housing. The metal handle should be wrapped in a rubber cover to protect against possible electric shock.
Snowmobile or snow scooter
Based on a motor, the trimmer can be converted into a self-propelled vehicle for moving on snow-covered flat terrain or a simple snow scooter (motorized sled) for a steep descent from a mountain.
Self-propelled gun is a frame structure, including:
The frame is made of welded side members, onto which racks of 30x30 cm corners and cross members are welded. A steel pipe with a diameter of 14 mm is used as the drive shaft. Skis - support-steering. The snowmobile is moved by a screw or chain drive.
General information
How well the lawn mower you assemble will work directly depends on the power of the engine and the sharpness of the cutters. It is advisable to use only high-quality steel in your work, otherwise such a unit will not last long. Sharpening steel knives is necessary according to the principle: sharper at the ends, duller at the attachment points. This will prevent grass from wrapping around the screw part of the unit and littering the engine.
If you compare factory models of lawn mowers with those made by yourself, then, of course, the former win in all respects. They have increased functionality, which includes switching speeds, adjusting the position of the knives, and less noise is also good news. And most importantly - a quality certificate and a warranty card, with which you can contact the service center if a problem occurs.
What else can you do with a trimmer?
A homemade motor scooter is a vehicle for traveling short distances on sidewalks and park paths. The mechanism reaches speeds of up to 40 km/h, due to the small wheels it has low stability, and is not intended for heavy loads and transportation of goods.
An old scooter that is mechanized is suitable for assembling the product:
- install stiffeners using a square metal profile to strengthen the frame;
- select stable and wide wheels, for example from a garden cart;
- a gearbox is made to transmit power from the engine to the rear wheel via a chain drive;
- install brake, gas handles and cables.
A motorized scooter is a good technique, but it must be remembered that children should not be given such a “toy”.
Source: specmahina.ru
DIY trimmer attachment
For many summer residents, the trimmer has long become a familiar and almost irreplaceable technique. But it is not always possible to purchase a model that can satisfy all needs. It happens that the trimmer easily copes with fresh young vegetation, but there is a desire to clear a place behind a fence or along the driveway, and tall, mature grass turns out to be too tough for the equipment.
DIY trimmer attachment
We offer the option of making your own trimmer attachment from simple, almost improvised, tools. You will need a metal perforated plate (100mm x 240mm), two hacksaw blades for metal, 4 screws and 4 M5 nuts, 4 washers and 4 enlarged washers. From a safety point of view, hacksaw blades should not be completely hardened.
Mechanical lawn mower
Mechanical type equipment produces much less noise and also does not require energy consumption. You can even work with such a lawn mower in the rain, but it is more difficult to do. The whole problem is that it is very difficult to select gears, wheels and blades.
A mower equipped with a pair of blades requires the blades to rotate quickly. It must be created through the movement of wheels and gears. The creation of such equipment requires maximum care and patience from the performer.
Trimmer blade attachment
Going shopping in search of spare parts is a thankless task, and I immediately abandoned this idea. What's the point of wasting time and money if the new part will last no longer than the previous one, but only until the first meeting with some piece of iron lurking in the grass. It’s better to immediately replace the broken coil with a homemade nozzle with stainless steel petal knives (see photo)
.
The design of the nozzle is very simple. To make it, it was necessary to make only four parts: a central bushing, a washer and two petal knives (see figure)
.
I made the central sleeve from a piece of ordinary water pipe. To adjust its internal diameter to the diameter of the shaft, I made a through longitudinal cut on one side of the workpiece and lightly hammered it down. The bushing should fit tightly on the shaft, without play.
I managed to find a ready-made washer of suitable sizes. But, if one is not found, it is not difficult to cut it out with a chisel from sheet steel 3...4 mm thick and finish it with a file. He put the washer on the bushing and welded it at four points. This is quite enough.
I cut the petal knives from stainless steel sheets 1 mm thick. The knives are attached to the washer with rivets. They must be steel. I used M4 screws as rivets. They must be riveted so that the knives are not tightly pressed to the washer, but can rotate freely. This is a very important point. If the knives are fixed tightly, they will probably bend or break at the first meeting with a stem that they cannot cut in one revolution of the trimmer shaft.
The assembled nozzle is put on the trimmer shaft and secured with a copper cotter pin ∅3 mm. It is better to drill the hole for the cotter pin locally.
The first tests of the trimmer with the new blade attachment confirmed its effectiveness. The knives easily “took” almost any grass. And during leisurely work, the electric motor was practically not overloaded. In a word, what you need!
However, we should not forget that metal knives pose a more serious danger than a thin, almost weightless fishing line. Therefore, it is advisable to mow the grass around the house when there are no people or pets nearby. And, of course, you need to constantly monitor the wear of the knives and the rivets that secure them.
Homemade protective casing
If you are making a homemade mower, then you will definitely need a protective cover. It will protect your eyes, body and legs from injury from small pebbles and knife fragments if they break.
The trimmer housing can be made from a sheet of aluminum or thin sheet metal.
- First, in the corner of a metal square, you need to drill a hole of the required diameter (depending on the type of drive of your unit) using a crown.
- Then you will need to make markings for the fasteners. As a base to which the homemade protection will be screwed, you can use a standard casing from an angle grinder if you are making a trimmer from it.
- Clamp the workpiece with a clamp and, using a tape measure and a pencil, draw the first circle with a radius of about 270 mm. The center of the circle will be the corner of the workpiece. It is impossible to give exact recommendations regarding the radius, since it will depend on the diameter of the cutting tool that you will use with the unit. Therefore, first decide which knives you will use and what line reach will be optimal.
- Next, draw a second arc (this will be a bend), slightly retreating from the first. In this case, 5 centimeters. This way you measured the height of the future shield. In general, it is recommended to make the height of the casing such that when you place it flat on the ground, the cutting tool does not reach it by about 2 cm.
- After marking the second line, you need to cut a workpiece along it using a hacksaw or a jigsaw with a metal file.
- In addition, it is necessary to make radial cuts (up to the first arc) and bend the resulting parts with pliers at an angle of 90°.
- Next, the shield is attached to the protective casing of the angle grinder, the cutting tool is installed, and the unit is ready for work.
Read also: Spray gun attachment for vacuum cleaner
In this way, you can make and install a protective cover on a trimmer purchased in a store if the shield has cracked for some reason. The shields in factory devices are made of plastic and often break if you unsuccessfully hit the trimmer head on the ground to lengthen the fishing line.
Cultivator attachment for trimmer. Is it worth buying?
By purchasing a gasoline trimmer, owners of country houses and summer cottages receive a fairly powerful and autonomous tool for various agricultural work. Moreover, manufacturers often offer a variety of attachments for them - brush cutters, dead wood shredders, blowers... Today we will talk in detail about the cultivator attachment for the trimmer.
Design and mounting options
The cultivator attachment comes in two versions:
- A disk, the cutting elements of which are a pair of cutting disks;
- Gear, which is a series of cutters located sequentially on the shaft.
The fundamental difference lies only in the design of the ripening unit. Disc attachments are more rigid and therefore suitable for processing heavier soils, while toothed attachments have a lower dead weight but are designed for working on lighter soils.
The transmission of torque from the trimmer motor to the cultivator attachment is carried out using a special shaft, which is arranged in a special rod (it will have to be purchased separately). This unit is not interchangeable, and differs in the number of splines on the end of the rod: there can be seven or nine. Therefore, when thinking about purchasing a cultivator attachment, you need to understand that an Oleo-Mac attachment will not fit a Husqvarna trimmer, and vice versa.
The spline method of attaching disks or cutters to the shaft allows free movement of the cutting elements, which is ideal for cultivation, since it allows you to loosen the soil with a fairly wide grip (up to 200...250 mm per pass), without requiring a large amplitude of movement of the rod. Restrictions on the density of beds located on the site are also lifted. As the beds lengthen, the convenience of working with the attachment in question increases, since turns will have to be made much less frequently.
Main types of devices
There are many models of homemade hillers. Depending on the type of working element, a manual hiller comes with a constant or adjustable working width.
According to the principle of operation, hillers can be divided into two groups.
Disk
A manual or disk-type hiller is designed for loosening and hilling the soil. Disc models are often used for automated processing of beds. A device for hilling beds is attached to a tractor.
The main advantage of a homemade disc cultivator lies in the ability to adjust the racks between the discs. The racks can be installed in accordance with the row spacing.
Plow type
In terms of its mechanism of action and configuration, the model in the form of a plow is similar to a disk cultivator. But this model of manual potato hiller is considered more convenient to use. For greater efficiency, a plow-type hiller can be attached to a walk-behind tractor.
A plow for hilling potato beds helps loosen the soil, hill up potato bushes, cut furrows and beds, and plant various crops.
Features of the nozzle
Any cultivator attachment for a trimmer significantly increases the weight of the entire device assembly (by at least 5...6 kg). Therefore, not everyone can work with such a tool for a long time. It is also necessary to include mechanical limitations on the power of the trimmer drive into the calculation. If the engine is designed for a power of no more than 1500 W, then the cultivator can only cultivate regularly loosened soil, or limit itself to hilling breasts, potato bushes, etc.
Since the drive of gasoline trimmers is located behind the operator, and the drive rod is quite long, vibrations constantly occur during the cultivation process. Their size is determined by both the length of the rod and the changing load on the disks or cutters. These vibrations are transmitted through the shoulder strap to the user’s hands, so it is not always convenient to operate the trimmer power button and hold a rather capacious unit. Therefore, long-term soil cultivation using a cultivator attachment is unsafe for health.
But it’s not all bad: the mobility of a gasoline trimmer makes it easy to cultivate the soil between rows, and the absence of wheels on a mounted cultivator does not damage the plants in the beds.
The cultivator attachment “does not like” compacted soil, and when first introduced into such soil, the boom is abruptly thrown back. Therefore, disc cultivators are equipped with a safety guard (toothed cutters are more likely to bend than break, although even in this case a low protective shield on the leg side would be helpful). The presence of a safety screen impairs the visibility of those working with the cultivator.
Characteristics
Any gardener who has potatoes on his plot will most likely need a hiller. This tool is characterized by its versatility and helps you cope with complex work more efficiently. The most common option is a manual hiller. The characteristic features of the product allow you to cut ridges of earth into ridges and carry out pre-emergence and post-emergence treatment. The dimensions of the standard tool are suitable for simultaneous harrowing and hilling of rows in a potato field. Depending on the characteristics of the tool, it is possible to process several rows with plantings at once.
In addition to loosening the soil between the rows, the hiller simultaneously removes weeds. A high-quality tool purchased from the manufacturer has a special device that promotes self-cleaning of adhering dirt. Hillers successfully cope with the task on any type of soil.