It would seem that the science of hammering nails is simple: mark the desired place, put the tip to the mark and hit the head several times with a hammer. Voila? May be. But only on condition that the fasteners were driven into a pliable material - like wood, for example.
But in the case of concrete, such tactics, at best, will only serve as a reason for ridicule and damage to consumables. At worst, it can lead to unpleasant injuries in the form of broken fingers. Three main methods of driving nails into a concrete wall will help you avoid this outcome.
@Andy Gries, Pixabay
How to hammer a nail into a concrete wall without a hammer
Nails for aerated concrete or concrete differ significantly from products intended for fastening other bases. In order not to make a mistake when installing them, it is worth learning a little more about these rod elements.
Types of fasteners for concrete
Trying to hammer in an ordinary construction nail, it becomes obvious: the idea is bad - it does not go into the wall, but only bends. Classic wire hardware is made of low-carbon steel, which is characterized by low strength. In the case of elements intended to be embedded in concrete, the material used is distinctively different. Only high-carbon metal that has undergone heat treatment, that is, hardening, is used.
The fact that the nails are made of stainless hardened steel makes it unnecessary to cover them with a protective layer. However, in some situations it is important to use additional thickness.
- traditional (simply hardened) – applicable for any external/internal work, with the exception of structures with excessively high humidity;
- galvanized (minimum zinc layer 5-6 microns) – used in damp rooms and production facilities;
- brass - have an aesthetic golden hue, the highest resistance to moisture and acids, they should be installed in places where exceptional anti-corrosion is required (for example, in shipbuilding).
The shape of the rod can be:
- flat – suitable for holding lightweight structures;
- round – standard option, capable of withstanding high loads;
- square - in terms of functional qualities they are not inferior to “cylinder nails”, but have a different cross-section;
- grooved - used when it comes to particularly dense material - heavy concrete.
Speaking about parameters such as weight, length, diameter, the range here is incredibly wide. Why is there no single standard size? For various designs, it is necessary to select elements of suitable sizes.
The classification according to the material from which the dowel is made deserves special attention. This spacer provides secure fastening of the nail and is usually made from:
- plastics (polyamide, polyethylene, polypropylene);
- metal
In the first case, it is a hollow cylindrical rod that expands from the middle during installation. The top is specially equipped with a cuff to avoid falling into the drilled hole. Fasteners of this type have threads on the surface, and their heads are characterized by the presence of a slot - a recess in the head. All this makes installation easy, even with the use of a screwdriver. You will find more recommendations on choosing dowels for a gas block in this article.
Unlike fasteners with plastic dowels, metal ones have a rod with a smooth surface, without threads. Expansion occurs when driven into the wall. The reverse process - dismantling - is quite complicated, so it requires long-term operation. They are important to use when working with very hard, solid materials.
A type of metal fasteners are those that require fixation using a pneumatic gun. Their base is a thick rod pointed at the end with an enlarged cap that prevents it from falling through. A lock washer is included in the package. Installation with a pneumatic gun is the fastest, least labor-intensive process necessary to create structures of the highest strength. However, such elements are not intended to be reposted.
Classification
Since you have to use nails very often (for example, to upholster furniture, hang a picture, strengthen a rickety chair), it is important to be able to select them in accordance with the type of work and type of material. Thus, to connect elements of wood structures, as a rule, the following types of nails are used: carpentry, equipped with a small hat;
carpentry, equipped with a small hat;
equipped with a flat cap,
· castle,
· capless, sharpened at both ends.
Nail sizes are usually expressed as a fraction (for example, 25/25). In this case, the upper number shows the thickness of the nail, expressed in tenths of a millimeter, and the lower number shows its length in millimeters. As the length increases, the diameter of the nail also increases.
When choosing nails, you need to know their name and type. Let's list the types.
- Carpentry
. They have a flat head (if the nails are large, then the head is grooved - this prevents the hammer from slipping). They are used to work with lumber from various types of wood.
- Plotnitsky
. Their cap is smaller and slightly rounded. This type of nails is used for various carpentry works (furniture making, flooring, etc.). Due to the fact that the head goes deep into the wood, it is not touched by the plane knife when processing the product.
- Wallpaper
. They are used for upholstery.
- Decorative wallpaper
. Designed for decorative finishing of furniture. Decorative wallpaper nails are available for sale in several colors.
- Castle
. Equipped with a rounded cap. As a rule, the total length does not exceed twenty millimeters. They are used to nail locks on tables, cabinets and other pieces of furniture.
- Construction
. There are notches on their shaft, so the nails are better held inside the wood. Used for knocking together window and door frames. Like the head of carpenter's nails, the head of construction analogues is entirely embedded in the wood.
- Plastering
. Their sizes are 22/30. Used for plastering work, as well as for the purpose of preliminary fastening of stretched fabric and wire when upholstering walls.
- Hairpins
. These are bent nails, pointed at both ends. The dimensions of the studs are indicated in exactly the same way, only the lower number shows the entire length of the two bent ends (for example, 18/18). Designed for attaching springs, wires, rods, etc. to wooden parts.
- Crutches
. They are equipped with a flat tetrahedral head, which is located perpendicular to the nail barrel. These elements are indispensable when it is necessary to hang any heavy objects (shelves, pictures, mirrors, etc.).
- Slotting
. They belong to the special subtype. Equipped with a rounded flat cap. Such nails can even be driven into brick walls.
- Shoemakers
. Used for shoe repair. They are also well suited for knocking together various small items. To indicate dimensions, you only need to indicate the length.
- Glass
. They have a triangular shape. Used in glazing doors and windows to secure glass. A driven glass nail will absolutely not interfere with your work with a spatula.
Today, screws are increasingly used to connect wooden elements. This is explained by the fact that nails, no matter how firmly you drive them, often become loose after the wood dries. In addition, they are difficult to remove without damaging the surface of the wood.
Based on the shape of their heads, screws are divided into four types:
- with a hidden head,
- with a semicircular head,
- with a cone-shaped (semi-secret) head,
- construction
The first three types of screws have a slot in the head. Thanks to this, they can be screwed or unscrewed using a precisely selected screwdriver. But the fourth type of screws is used to fasten scaffolding. They are screwed in and out using a wrench.
How to hammer a nail into a concrete wall?
It is necessary to follow a certain algorithm of actions, and also have the necessary tools at hand:
- when working with classic dowel-nails - a punch for marking, a hammer + an impact drill or a hammer drill;
- pneumatic gun - when using appropriate wedge-shaped products.
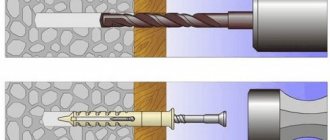
When planning fastening using the first method, the sequence of actions should be as follows:
- the optimal location for installation is selected;
- using a hammer or center punch, a mark is made;
- a hole of the required depth is drilled using a drill or hammer drill (the marking of the drill/drill must match the diameter of the fastener);
- debris is removed from the surface;
- the nail is driven into the hole with a hammer until it stops.
The use of a pneumatic gun allows fastening without prior preparation. That is, it is enough to attach the tool to the desired place and fire a shot with a loaded dowel by pressing the trigger. The rod will enter the surface, and the washer will move up to the cap, thereby causing a tighter and more reliable fit.
What to do if you don’t have a drill (hammer hammer, pneumatic gun)?
An impact drill and a concrete construction gun are expensive things and not every person has them. If these devices are not available, the following may be used:
- bolt;
- pobedit drill;
- punch (beard);
- steel rod.
Initially, you have to decide on the size of the future hole and the object that will become an alternative to the drill/drill. If the diameter is less than 15 mm, then the ideal tool will be a bolt - a metal tube with teeth at the end. You will need to place it in the intended place and hit it with a hammer, turning it 1/3 of a turn after every 2-3 blows. Periodically, concrete crumbs need to be shaken out.
To drive a nail into a wall with other objects, you should take care of modifying their device. That is, one side should be sharpened, and the other, on the contrary, sanded with sandpaper until a smooth surface is obtained.
When working with concrete, it is possible to replace not only the tools, but also the dowels with ordinary nails. In such a situation, a wooden plug (cork) must first be driven into the formed recess.
Pulling algorithm
A protruding nail disrupts the aesthetic appearance, so it must be removed or hidden. When removing old fasteners from the wall, your wits and ability to use power tools will come in handy.
It is often necessary to remove the remaining plastic casing in the wall without a metal rod. Experts advise doing this:
select the appropriate self-tapping screw of the required size for the sleeve (more about the types of screws for concrete), screw in three-quarters of the length, then loosen and remove, use a hand corkscrew to remove the dowel, carefully unscrewing it; if you cannot pull it out using the above methods, you should try cutting off the protruding parts with a knife, the rest hammer into the wall, drill out the plastic sleeve, selecting a tool of equal or larger diameter.
Before carrying out work, builders recommend assessing their feasibility. It is really necessary to think about pulling it out if you need to make a new hole nearby. For example, if you need to hang a new cornice in the same place, but the old fasteners do not fit.
The resulting depression, after you manage to remove the nail, will become large and will have to be sealed. To do this, you need to fill it with putty or plaster, apply a paint mesh, clean it, and level the surface with sandpaper after drying.
What to do if a dowel falls out of the wall?
The condition of the concrete does not always correspond to the required level, since low-quality mortar was used during construction. Interior partitions and window openings are made of material that, after decades, has become loose and free-flowing. In houses like this, nails fall out.
There are several ways to solve this problem:
The main thing is to adhere to the rules that ensure reliability and durability during operation: make additional reinforcement, select an element with dimensions larger than usual.
Instructions for carrying out work
The technology for attaching a nail to concrete is as follows:
- Using a drill, make a small hole in the wall. Ideally, it is located at a slight upward angle.
- We make a chopik from a wooden strip using a knife. It should be slightly larger than the width of the hole.
- Next, it must be lubricated with glue and driven into the hole made with a hammer.
- Drive a nail into the resulting base. Fastening will now not be difficult - the nail will easily go into the wood. This type of fastener is very reliable. However, if you need to increase its strength, screw a screw into the chop.
Note. If a dowel is used, it must be driven directly into the drilled hole.
Finishing tiles
Ceramic and tiled surfaces are sensitive to impact loads and installation of fasteners. In this case, it is worth using a dowel-nail. The location of the fasteners should be the tile seam or the middle of the tile element. Using a metal screw, carefully tap the location of the future fastener 0.5-1 mm, then drill a hole in the trim to the depth of the tile element. After removing the dust, continue working with the base wall to the depth required for installing the dowel. Carefully hammer the dowel into the tile and insert the nail.
In addition, we should not forget that all actions should be carried out with protective gloves and glasses to avoid damage to the skin and mucous membranes, and should be done with even pressure and without sudden movements or excessive force. Otherwise, there is a high risk of not only damaging the fasteners, but also damaging the wall.
Features of the work
To perform fastening you need to know several nuances:
- carefully choose the place for fastening, since it will be impossible to remove the nail without serious damage;
- Only solid areas that do not have cracks, chips or other damage are suitable for fastening;
Note. In places with cracks, nails will not hold, and when making fasteners, the wall can be seriously damaged.
- when attaching the dowel, make sure that the trajectory of its entry is perpendicular to the wall, hammer it in with confident and strong blows;
- Always wear safety glasses; a flying nail can cause serious injury.
So, special tools are used to drive a nail into a concrete wall. For example, a drill, a hammer, a wooden strip and other work accessories.
To attach a regular nail, a chopper is used; to install a dowel nail, a chopper is not required. If the installation technology is followed, the fasteners will have increased durability.
Wooden surfaces
After marking the location of the nail, the product should be held carefully and strictly perpendicular to the surface. You should not hit the nail sharply or forcefully; first you need to slowly drive it into the wood, making sure that the fastener enters at a right angle. Some craftsmen recommend lubricating the tip of the nail with soap or wax for better penetration into the material. If wooden walls are covered with wallpaper, then before driving in the fasteners it is recommended to make a neat cross-shaped cut in the wallpaper, and after installing the nail, glue the trim.
A convenient method for driving nails into wooden surfaces is a pneumatic nail gun.
How to hammer a nail into a concrete wall?
In everyday life, we often encounter this problem, especially new residents when moving or during renovations - we need to drive a nail into the wall. While a gypsum block or brick wall can still be easily dealt with, problems arise with a concrete wall. As a rule, no nail will go into concrete. Therefore, based on what item we are going to hang, we act accordingly. We hang a light picture or photograph like this: using a drill, we drill a hole, cut a wooden peg under it and drive a nail into it. But for heavier objects we need to have dowel-nails. We drill a hole, drive in a dowel and then a nail. There is no other way.
The grade of concrete from which the wall is made may vary.
The concept of “nail” also includes this dowel-nail
This type of nail can be driven into some concrete walls without drilling into the wall.
Remove the washer from the dowel-nail (you can hold it with pliers and a couple of blows with a hammer).
We hold the nail, you can use the same pliers, the nail is slightly at an angle to the top.
Next, we simply apply blows with a hammer, at the entrance the blows are a little more powerful.
Hold the dowel-nail tightly, it can fly off like a “bullet” (this is fraught).
If we are talking about an ordinary nail, then it will not withstand driving into concrete, that is, it will simply bend.
For hammering, the following actions are necessary:
A hole in concrete (you need a hammer drill, drill with a hammer and a drill with a Pobedit tip).
The hole is ready, or we buy furniture “chops”, or cut out a wedge-shaped product from wood.
We hammer a wooden chopper into the wall.
And the nail itself is driven directly into the nail, not into the wall.
To drive a nail into a concrete wall, you will need an electric drill with a Pobedite drill inserted into the chuck. The mechanism of this work is as follows:
- Using a drill of sufficient diameter, drill a hole in the concrete wall.
- Prepare a cork from wood by breaking it off from a piece of board. It will be better if the plug is tetrahedral. The length of the plug should be slightly greater than the depth of the hole. And its thickness completely fills the diameter of the hole.
- Using light blows of a hammer, drive the plug into the hole to the bottom.
- Bite off any protruding excess with pliers or saw off with a hacksaw.
- Carefully drive a nail into the center of the cork, pointing it at the same angle as the cork.
For that. To drive a nail into a concrete wall, you first need to prepare a hole. Electric drills with a hammer drill function cope best with this task. When using conventional drills, you need to use a hammer. In Soviet times, they were sold in sets for new residents. In principle, it was possible to knock out a hole in the wall with one hammer, but with an electric drill with a Pobedit or diamond drill it is more accurate. Without a hammer, the drill simply warmed up, sometimes until it glowed orange.
Construction of houses
How to hammer a nail?
It would seem that every self-respecting man should know the answer to this question.
But is everything really that simple, if every now and then you hear about split boards, falling off plaster, bent nails and injured fingers? Maybe there are still some rules, nuances and secrets for carrying out this “manipulation”? Let's try to figure it out.
Table of contents
- Every nail has its own hammer
- Basic secrets of hammering nails
- How to hammer a dowel into a nail correctly?
Every nail has its own hammer
The most common carpenter's hammers come in four sizes:
- MST-1 (handle – 25-28 centimeters, working part – 9 centimeters, weight – 250 grams) is intended for driving parcel and wallpaper nails (up to 40 millimeters long);
- MST-2 (handle – 30-32 centimeters, working part – 11 centimeters, weight – 500 grams) is intended for driving larger fasteners. The most versatile tool;
- MST-3 (handle – 30-32 centimeters, working part – 12 centimeters, weight – 800 grams) will cope with the same tasks as MST-2, it’s just heavier;
- MST-4 (handle - 35-37 centimeters, working part - no more than 13 centimeters, weight - 1000 grams) is intended for driving large (over 80 millimeters in length) nails, as well as dowel nails.
Of course, a wallpaper nail will fit nicely “into place” with the help of a fourth hammer, but it’s much more comfortable to work with a striking tool of adequate size for your purposes.
Basic secrets of hammering nails
- Start driving with gentle movements; proceed to sharp blows only after you are sure that the nail enters correctly. Hold the hammer by the end of the handle, while making blows, try to concentrate your gaze on the head of the product. Remember, the fewer blows a nail gets, the better and more reliable it will hold. Three or four wrist and two or three solid elbows should be enough.
- If you are working with wood, make sure that the diameter of the nail does not exceed a quarter of the thickness of the board. For a thin board, it would not be a bad idea to blunt the product - bite off the edge with pliers. The fibers will wrinkle and tear, but the wood will not subsequently split.
- To firmly connect two boards, you need to select nails in such a way that they can completely “penetrate” the first and enter at least a third into the second. If you drive fasteners at an angle to each other, the strength of the structure will increase even more.
- If necessary, lubricate the tip of the nail with wax or soap - the work will go like clockwork.
- It is not recommended to hit a large number of nails on the same line in close proximity to each other - the board will crack.
- For hanging joints, you can use a massive hammer as a support.
- To prevent a long nail being driven into hardwood from bending, it should be held with pliers close to the head.
- If there is a need to install fasteners close to the edge of the board, be sure to compact this place using a punch and a hammer.
- A punch can help to thoroughly deepen a nail into almost any surface for plastering - just place it on the head of the product and hit it with a hammer. If you use only a hammer for these purposes, you will not be able to avoid dents in the area.
- Before hammering a nail into a wallpapered wall, use a blade to make an X-shaped cut into the wallpaper. Carefully move the corners apart, install the fastener, and glue the corners.
- Before nailing telephone wiring, you must first pierce it with nails - in the middle, carefully, so that they do not touch the cores.
- Many craftsmen are often interested in how to hammer a nail by hand. It is impossible to drive a fastener into wood or concrete manually - this is obvious to any sane person. But in sand, earth or clay - very much so. The main thing is to be careful and perform manipulations confidently.
- An ordinary clothespin can help a “newbie” to protect his fingers from being hit by a hammer.
How to make a hole in the wall using available materials
Interior decoration with paintings
When starting a renovation or wanting to decorate a room with a decorative element, you may encounter typical difficulties.
If the wall where the desired picture or shelf will be hung is concrete, you must use a drill or hammer drill.
But not every person has expensive tools. Therefore, you should not abandon the planned solution, just think about possible cheaper analogues.
First, you need to decide on the size of the desired hole and the object that will replace the hammer drill. If the diameter does not exceed 10-15 mm, a bolt is ideal. This is the name of a metal tube with sharpened teeth at the end.
The bolt is placed on the intended area and hit with a hammer. After each pair of blows, turn it a third of a turn and continue further, not forgetting to periodically shake out the accumulated dust in the hole.
If you don't have a bolt, you can use:
- steel rod
- punch
- metal drill
The selected item must be modified in advance. The end on which we will hit with a hammer should be sanded with sandpaper to give a smooth surface so that it is convenient to hit. The other side must be sharpened, and then used in the same way as a bolt.
If you encounter a hard stone in your work, you can take a special dowel-nail. After removing the washer and holding it with pliers, pointing it slightly upward, apply careful blows. The sharp thin tip will split the stone, after which the main tool will finish it.
Taking care of the aesthetic appearance, it is important to do everything carefully, having previously marked the point of contact of the wall with the bolt, that is, the future hole, with a pencil. Next, carefully, without jerking and keeping an eye on the point, a hole is made. The end result should not have any breaks, so it is important to pay due attention to the process.
In this simple way you can hammer a nail into a concrete wall without a hammer drill.
What can replace a nail?
Dowel instead of nail
When it comes to concrete, a nail is considered a poor solution.
You can replace it with a dowel.
It is sold in construction stores and is relatively inexpensive.
The buyer has a wide selection of products to choose from: plastic, metal, nylon.
If you need to hang a picture or a shelf, when hammering it in, you need to hold it at an angle from top to bottom.
Thus, the mount will become more reliable and will last for many years. In case of unexpected impact on the walls due to time or climate conditions, the interior part will not fall and will hold securely.
Special dowel-nails would also be an ideal option. They are designed to be driven directly into concrete. Concrete nails have thicker walls, so they won't break while working with them.
The material and design make them easy to use, just use a heavy hammer for greater efficiency. They will fit perfectly into the wall.
If it is possible to replace the nail with a more suitable solution, you should pay special attention to this.
Adviсe
- Wire cutters should be used last as their edges are designed for stripping wires and will become dull if they are used to pinch nails.
- If the appearance of the board is not important, you can simply cut off the protruding pin with a hacksaw.
- Using a hammer as a lever, you should place a board under it so as not to damage the wall.
- If you remove the nail with several grips (tilting the pliers), then without further straightening its further use will be impossible. Therefore, when using pliers, it is better to work in one plane.
Drive a nail using a cork
Wooden plugs - chopiki
In cases where replacing a nail is not permissible, they resort to using a wooden plug, called by many a chopik.
It is cut out of wood and adjusted to the required dimensions.
The length corresponds to the depth of the hole; one tip is made in the shape of a cone for better fit.
The width of the other edge is left 2-3 mm larger than the hole. If you don’t want or have the opportunity to make a chop yourself, you can buy it in a store by choosing the appropriate size.
You can make a cut in the sharp tip of the chopik and insert a small wedge. By reaching the bottom of the hole, it will increase the strength of the connection between the chop and the wall.
So, hammering a nail into a concrete wall without a drill will be much easier. The soft, wooden surface of the chopik will replace the hard material of the wall. You just need to carefully, slowly hammer in the nail and you're done.
You can easily screw a self-tapping screw or screw into a clogged recess. This can be made more convenient with the help of special plastic plugs, which are sold in stores. Then, you don’t have to take the chopik into account. By inserting the dowel into the recess made by the skewer, the self-tapping screw is easily screwed in.
Tools
This may seem strange, but the tools used to drive nails into concrete are exactly the same as when working with other materials. Most often, a construction hammer is used, with a head weighing at least a kilogram and a fairly long handle. Using a lighter tool, you are unlikely to achieve success, because in our work we will need a large supply of energy, and a long handle will serve as an excellent lever.
The easiest way to secure a nail in a concrete wall is to use a pneumatic, electric or powder nailer gun. By properly setting up the equipment, you can quickly complete a fairly large amount of work without much effort. Before using a powerful tool, be sure to read the user manual - not all nail driving devices allow you to work with concrete. If the manufacturer allows such use of its product, it is worth clarifying the necessary settings and requirements for fasteners in the passport.
Dowel nail
Needless to say, trying to hammer an ordinary nail into concrete is unlikely to be successful? To work with this dense building material, special nails made from special grades of steel are used. Also, nails for concrete, which are also called dowels, have a special shape - they are thicker than usual, have a massive head and, very often, a notch - longitudinal or spiral. Dowels for construction guns, produced in recent years, can also be equipped with a special ballistic tip, which facilitates the penetration of hardware into the thickness of dense material. Many types of dowel-nails are produced with a washer pressed onto the rod.
Depending on the shape of the working part, nails for driving into concrete and brick can be of the following varieties:
- Grooved - for the heaviest concrete;
- Flat – for fixing parts of small mass;
- Round is the most common classic type;
- Square - used when performing specialized work.
Hardened stainless steel is most often used as a material for dowel-nails, so corrosion is not a problem for such fasteners. Fastening using concrete nails is extremely durable, provided the installation technology is followed. A dowel hammered into a wall can perform its functions without reducing its load-bearing capacity for decades, even in the open air. It should also be mentioned that removing a nail, especially one hammered by mechanization, is a very difficult and time-consuming task. During dismantling, there are often cases of serious damage to the surface around the fastener, therefore, when choosing a place for the dowel, you need to be extremely careful.