Any creative work, in any industry, requires certain knowledge and skills. If an author wants to create something truly valuable, his technique must be honed to the appropriate level. Working with a hand jigsaw can easily be classified as such an activity. In skillful hands, this seemingly simple device can create real works of art. Fortunately, it takes quite a bit of time to master figure sawing. All you need is a desire, and we will be happy to provide detailed instructions for action.
What material is best to work with?
The most suitable material for figured cutting is plywood, 3-10 mm thick. Durability and ease of cutting make it the best option for creating decorative elements with complex patterns. The average price of a sheet of plywood (1500x1500x6) is approximately 300 rubles, and you can find it at your nearest building materials store. Accessibility, aesthetics and ease of processing are the main qualities that the material used for figure sawing should have.
For cutting thin patterns, it is better to use thin, sanded plywood, 3-5 mm thick. Sawing such material is much easier, even for those who do not know how to use a hand jigsaw on wood, and the chance of damaging the product is significantly lower.
Another interesting material suitable for sawing with a hand jigsaw is sheet polystyrene (not to be confused with expanded polystyrene). It is essentially a durable plastic that comes in all colors and sizes. In order not to complicate manual sawing, it is better to work with sheets up to 5 mm thick. The beauty of polystyrene crafts is accompanied by the high price of the material (from 700 rubles per sq.m.) and limited availability. If you are confident in your cutting skills and are ready to create an original glossy craft, you can start your search at local construction markets.
How to apply a design to a workpiece
Not everyone, even a creative person, can boast brilliant artistic skills. For some, cutting with a hand jigsaw itself is a much simpler task than drawing the outline of a future craft. Fortunately, applying a pattern to a surface can be done in several basic ways that are accessible to almost everyone. Transfer the outline of the model using carbon paper. You can find one in office supplies, at an average price of 150 rubles for a pack of 50 sheets, which is enough for several hundred crafts.
Glue the patterned paper with double-sided tape or glue. In the second case, after cutting, the glued paper will have to be removed with sandpaper. Double-sided tape, can be carefully peeled off.
What you need for work
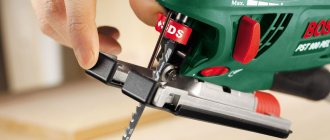
Jigsaw
This is a priori, since we are talking about making crafts using such a tool. The question is different - which one is better to work with. Electric models are much more expensive than their manual counterparts, but have many advantages. About in .
For example, high speed and cutting accuracy, clean edges, the ability to change cutting parameters and a number of others. If crafting from plywood is not a one-time, short-term hobby, then it’s worth spending money on an electric jigsaw. It is universal and will come in handy on the farm more than once, since depending on the type of file it can “work” not only with wood, but also with non-ferrous metals, plastics, and plexiglass.
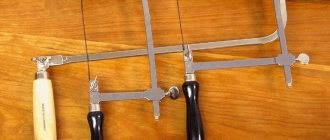
It is somewhat more difficult with a hand jigsaw. Its design is quite simple - a frame with screw clamps and a handle + a file.
The nuance is that cutting blades break quite easily (from excessive pressure, changing the position of a hand tool), and therefore it is advisable to purchase them with a reserve; Fortunately, they are cheap.
Hacksaw
It is needed only at one stage - when cutting a dimensional sheet into separate fragments. Doing this with a hand jigsaw is an unpromising and unprofitable activity; A lot of time and files will be wasted.
Stand
No one will cut plywood by weight; It's clear. Cutting out parts by laying the sheet on the tabletop risks damaging it. It is precisely in order to ensure the “safety” of the latter that the stand is needed. You can make it yourself from scrap boards. What such a device looks like (one of the options) can be seen in the figure.
The stand is fixed to the base using clamps (on a non-working table) or self-tapping screws (if there is a carpentry workbench in the outbuilding, shed, or garage). Although these are not the only mounting options. It is not difficult to understand what to do, depending on local conditions.
Skin
The ideal tool for fine woodworking is the . But for crafts made from plywood that do not have large areas, it is not suitable. Therefore, only sandpaper; medium-fraction - for primary grinding of workpieces and with fine grain - for finishing.
Additionally
- Files and needle files.
- Awl.
- A simple pencil and carbon paper.
- Glue, if the craft is created as a composite or multi-level one, that is, with the fixation of two or more shaped fragments in separate areas.
- Varnishes, paints, stains.
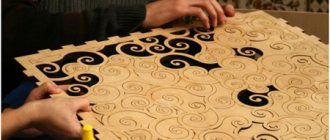
Examples of drawings and sketches of plywood crafts
Copying “one to one” in this case is hardly advisable. Any work done with your own hands is a process with a creative component. That is why the dimensions should be determined independently, depending on where you intend to place (or how to use) the craft. For example, will it “look” in a particular place, will it fit organically into the interior of the room.
Even if you liked the drawing, it is not difficult to change the geometry of the figure by applying the scaling rules. Especially when it comes to drawing a contour on plywood with a simple pencil; It’s quite easy to correct any mistake, or to correct anything in certain areas. It is not much more difficult to modify any sketch, introducing something of your own, original into the sample.
There is another solution - you can download any picture you like from the Internet. Printing it to the required scale is not a problem. All that remains is to transfer it onto the plywood using carbon paper and shade the areas that need to be cut out. This is if we are talking about figurative crafts. It's even easier with a contour pattern; cut exactly along the line - and that's it, ready. All that remains is to work on the artistic design of the product.
How to assemble a manual jigsaw
When the material has been selected and the contour to be cut has been drawn, you can begin assembling the working tool. First of all, we tighten the file in the lower fastening (at the handle), after which we thread the free end into the opposite groove and, slightly squeezing the frame, fix it in it. Be sure to remember that the teeth of the saw blade should always face the handle of the tool.
When compressing, do not put strong pressure on the frame, trying to bend the metal arc. It is enough for the fasteners to come closer to each other by about 1 cm. You can squeeze the metal frame in your hand, or by resting the tool with the handle on your chest. For devices with tubular arches, there are special devices with grooves. If you can’t tighten the lambs with your bare hand tightly enough, use pliers.
If the saw blade is installed correctly, it does not dangle, and during operation there is a high-pitched sound of teeth biting into the material. It is better to understand how to properly assemble a jigsaw from the very beginning, since thin files tend to burst. The easier the process of assembling the device is for you, the more enjoyable it will be to work.
Surface coating
After sanding, the surface of the plywood must be dried and dust and sawdust residues must be thoroughly wiped off. If necessary, cover the top with a thin layer of putty to perfectly level the surface. If this is not important, since the craft will be located on the street or in the garden, then you can skip this procedure.
Before painting, the surface must be primed. Most often, ordinary drying oil or a primer with an alkyd base are used for these purposes. Now there are special compounds on sale that fill the pores of wood.
This is an important stage in preparation for painting. After all, wood is a living natural material; it can change size due to changes in temperature and humidity, the pores of the wood narrow or expand. If you apply paint right away, such changes will quickly cause it to crack. The primer fills all the cracks and pores, which will protect your craft from such a fate.
How to cut correctly
Before moving on to the cutting technique, we should say a few words about the workplace. Of course, you can work by simply pressing the plywood to the edge of the table or your knee, but it will be more effective to use a simple device called a “dovetail” (not to be confused with the type of connection). It is a regular rectangular surface with a wedge-shaped cutout, where a round hole is located in place of an acute angle. You can easily make such a platform yourself or ask the store where you purchased the jigsaw. The device is attached to the table with a clamp and makes sawing with a hand jigsaw much easier.
Where do you recommend starting?
First of all, you should properly organize your workspace. Despite the apparent formality, this is a very important condition. A properly equipped place provides not only comfort and convenience, which is important when working for many hours with a hand jigsaw, but also directly affects the quality of the project being implemented.
A special machine-table is used as a thrust structure, behind which the name “dovetail” is assigned. It is a small rectangular board with a wedge-shaped cutout that turns into a working field for sawing. The dovetail is attached to the edge of a table or workbench using a clamp.
They work with a hand jigsaw while sitting or standing, placing the workpiece for cutting at a level of 30-40 cm from the eyes. The light source is placed in front at an angle to the working plane. Compliance with these rules will allow you to control the cutting line as accurately as possible, thereby improving the quality of the cut project.
Which jigsaw should you choose?
Despite the simplicity of their design, modern manual jigsaws have a number of features that you should pay attention to when choosing. It is better to avoid models with a frame made of sheet iron and choose a jigsaw made from a metal tube. This option provides better tension on the blade and eliminates its distortion, so the file will not “lead” during operation.
The file is fixed in the frame by tightening the upper and lower wing nuts. When choosing a jigsaw, pay attention that it is equipped with blades made of high-quality steel with wide ears. This will significantly increase the ease of use of the tool during work.
How to properly prepare a tool for use?
The file in the jigsaw is fixed strictly vertically, with the teeth down. The canvas must be stretched. The degree of tension is regulated by compressing the frame: the tool is rested against the edge of the table or squeezed by hand, after which the wings are tightened, if necessary, tightening them with pliers. By straightening, the frame will ensure proper tension on the canvas.
To cut out small parts, figures with sharp contours and complex wood patterns with a hand jigsaw, small files with a large number of teeth per inch are used. They do not jam when turning, creating a thin and neat cut without leaving chips. To create large plywood products and long straight cuts, blades with large teeth are used, which cut much faster.
Correct sawing technique
Cutting and fitting plywood
The most difficult question is choosing files with the appropriate size for this tool.
There is a very wide range of these products on the market.
And many of them are only a few millimeters thick.
The main thing is to remember that these files are only enough for a couple of hours of work.
And they must be handled very carefully.
The smallest saws can only process plywood.
If the material is harder and dense, it means you need to take a larger file. This will also help answer the question of how to cut plywood smoothly.
Let's get down to business. How to cut out plywood and wood with a jigsaw?
To get an accurate and neat cutting line, you should follow a number of basic rules:
- The hand with the jigsaw should only perform vertical movements.
- Up and down movements are made without sudden jerks and with maximum amplitude in order to use the entire working length of the blade.
- The second hand smoothly turns and moves the workpiece during the sawing process.
- There is no need to press the file onto the workpiece or apply lateral pressure to the blade.
- Sawing occurs only at the moment when the file moves from top to bottom, so the reverse movement should be performed freely without pressure.
When working with a hand jigsaw, it is not guided along the line of the pattern, but along the inside of the contour, since even the thinnest blade leaves a cut, the width of which should be taken into account. This is especially important when cutting items with precise fitting elements, such as puzzles or intarsia.
When you're done, don't forget to loosen one of the clamps so that the jigsaw frame doesn't lose its elasticity.
Sawing process
In order to get started, it is necessary to carry out preliminary activities and prepare:
- gloves;
- protective glasses;
- machine oil;
- the material we will process;
- clamps guiding the tape measure;
- construction pencil;
- the jigsaw itself.
The sawing process is carried out as follows:
- Strengthening the source material. In our example, the starting material will be wood. The prepared sample of wood and the guide, the role of which can be played by an ordinary flat strip, must fit between two clamps. The sample is placed on some elevation so that the jigsaw cannot rest during the cutting process. After this, using a tape measure, you need to accurately measure the desired width of the product that should be obtained, and draw a cutting line with a pencil. Then lay the guide at the required distance from the line and secure it with clamps. A jigsaw with a guide placed with a file in the direction of the marked line is also secured with a clamp. You need to fasten well, but do not overdo it. The same is done on the other side.
- Sawing Turn on the jigsaw and start working. Proper use of the device does not involve pressing it too hard, which can cause the product to quickly heat up and break. You should also not use the same file for a long time, since it becomes dull very quickly. If a very hard wood is chosen as the starting material, then you can pre-lubricate the surface with machine oil. The file will glide easier, the cut will become smoother, and the jigsaw will last longer.
What about practicing basic techniques?
The most intricate patterns are always based on a number of basic shapes and elements, after working on which you will be prepared to carry out complex projects. It is advisable to do this on thin plywood up to 3 mm thick.
Obtuse and right angles : the jigsaw moves smoothly without pressing on the workpiece, as if idling; at this time, the second hand slowly turns the wooden piece to the desired angle.
Inner circular contour : for this, a small hole is drilled in the inner part of the figure through which a file is passed. When cutting out a circle, the cutting line is drawn along the inner contour of the design. The stroke of the tool should be of medium intensity; the workpiece unfolds in proportion to the movements of the jigsaw.
Oval contour : when cutting out such a figure, increase the stroke of the jigsaw in steep areas, turning the workpiece faster in this place.
Sharp corners : a neat sharp corner without chips or other defects is obtained by bringing two cuts together.
Need some advice on why the file is sticking?
You have gotten a good feel for the jigsaw, have achieved smooth movement and are maintaining a neat cutting line, but then the movement of the tool becomes difficult and the file jams in the workpiece. This is a typical situation that arises when carving plywood with a hand jigsaw. It happens for the following reasons:
- Overheating of the file - during prolonged use, the blade expands due to heating. To avoid such situations, take short breaks or periodically wipe the canvas with a damp cloth.
- Features of wooden blanks. The movement of the jigsaw may be difficult due to the fact that the file has run into a denser area: a knot, a lump of glue in plywood, etc.
- On long cuts, the saw blade can become pinched between two nearly separated pieces of plywood. You can continue sawing comfortably by pinning the separated ends together with a clothespin.
What kind of plywood is needed for cutting with a jigsaw?
Practice shows that the best material for working with a hand jigsaw is birch plywood with a thickness of 2 to 8 mm. It is affordable, easy to use and highly durable.
To create small details or a “dense” openwork pattern, it is more appropriate to use three-layer plywood up to 3 mm thick. It is easy to saw and at the same time quite durable. The likelihood that you will spoil the sawn curl when the blade jams again is significantly lower.
When choosing material for crafts, pay attention to the fact that the plywood is smooth and without a large number of knots. Examine the end for the presence of air chambers; their presence indicates uneven application of the glue. It is better to refuse such low-grade plywood, otherwise you will not avoid a large number of chips that will spoil the appearance of the product.
What if you use wooden blanks?
For all its practicality, plywood does not have such an expressive texture as board. By sawing projects from planks, you can take advantage of these advantages: play on the difference in colors and shades, the orientation of wood fibers (as in intarsia), etc. Crafts made from wood have a more attractive end (without a layered structure like plywood) and are much easier to treat with a finishing compound.
For sawing with a hand jigsaw, workpieces from soft and hard rocks up to 10 mm thick are used. When choosing a material, give preference to tangential cut boards. It is not recommended to use radial cut workpieces, because... they have parallel annual rings, which, due to their hardness, will lead the jigsaw away when sawing.
Sawing technology
Preparation
When we cut out plywood with a jigsaw, the quality of the finished product largely depends on how responsibly we approached the preparation process.
To avoid incidents during work, you need to spend just a few minutes:
- We inspect the plywood intended for work for damage and peeling of the veneer.
- We check the quality of drying by making a test cut.
- We attach the template printed on the printer to the plywood and secure it with tape or push pins.
- Simple shapes can be transferred to plywood by piercing, leaving awl marks on the material.
Copying the drawing
For clarity, we paint over with a pencil those places on the workpiece that must be removed after cutting. It is better to do this immediately after translating the template, since it will be more difficult to understand the interweaving of lines later.
Basic Operations
So, the preparation is complete, and you can begin your first attempts to cut something out of plywood with your own hands. Of course, if you have never picked up a jigsaw before, then it is worth practicing on simple products before starting a large-scale project. Furniture work using a jigsaw
The work begins with cutting out the outline of the workpiece, after which internal cuts are made. To make a through hole, first drill the plywood with a drill, and only then insert the jigsaw blade.
Below we will describe the sequence of performing basic operations using a hand jigsaw. Using an electric or band saw has its own nuances, but once you master the basics, you will not have any difficulties when working with more advanced equipment. Straight cut
The simplest operation is cutting in a straight line.
The instructions for this operation are as follows:
- We insert the jigsaw file into the drilled hole so that the teeth are directed towards the handle.
- We stretch the canvas so that it does not vibrate during operation, and fix it with a screw.
- We place the workpiece on the workbench, press it with our left hand to the sawing table and gradually begin to saw through.
- When cutting a straight line, move the jigsaw up and down, gradually feeding the workpiece under the saw.
- Control of the straightness of the cut can be ensured by placing a guide bar on the workbench.
Tool position when cutting
Figure cutting is more complex, and you should start it only when you have fully mastered straight cutting:
- We fix the jigsaw file in the same way as in the previous case.
- We lay the workpiece with a clearly drawn line on the workbench.
- We saw from top to bottom, feeding the plywood with our left hand so that the blade does not go beyond the line.
- When the file moves in relation to the template line, we stop moving with our left hand until the file begins to move freely. After this, we adjust the position of the plywood and continue working.
All elements are cut out using this principle, including obtuse corners. But you shouldn’t cut out an acute angle by turning the workpiece, since there is a high risk of the final fragment breaking off. In this case, two slits should be made, connecting them at the top of the corner. We process the edge of the workpiece with a file
After cutting out all the elements, the workpiece must be processed with a file, since even the most careful work does not allow making a product with perfectly smooth edges. Using wood files, we carefully polish the outer and inner cutting lines, after which we process the entire workpiece with sandpaper and sandpaper.
The final stage is finishing the product. Plywood can be stained, painted or varnished.
Safety precautions
Sawing from plywood is not a hazardous activity, but safety rules must still be followed:
- Only proper tools should be used for the job.
- It is prohibited to cut using blade fragments or band saw fragments.
- When working with power tools, you should check the quality of the insulation to avoid electric shock.
Eyes and hands must be protected
- Sawing with a jigsaw or band saw is carried out only on a special workbench, and the cutting part of the tool must be limited by special devices (frames, shields, etc.).
- When performing work, you must use personal protective equipment: goggles, gloves, dust mask or respirator.
What to do if chips keep appearing?
The number and size of chips depend on the type of plywood used, the quality of the blade and how correctly the master saws. A few tips and professional tricks will help you cut with a hand jigsaw without chipping:
- using low-quality plywood that is prone to chipping, saw more intensively, installing blades with fine teeth;
- use a saw blade with a reverse (reverse) tooth, designed to minimize chipping.
- glue the cut lines on the back side with tape or masking tape;
- moisten the back of the workpiece.
Classification and features according to the type of material being processed
The modern market offers a large selection of different saws for sawing the same material. They differ in length, shape and size of the tooth, pitch and metal from which they are made. But they belong to the same group, for example, a type of wood saw.
Tree
For this material, you can choose a file with a length from 75 mm to 150 mm.
As a rule, they are all labeled with the word Wood (wood) or Hardwood (hard, hard wood). Different types of files are selected for different tasks.
- A saw with large, sparse teeth, up to 6 mm, will provide a quick rough cut.
- A cleaner cut is made with saws with teeth of about 3 mm.
- For curly cutting along curved lines, a narrow file with a fine tooth, about 2 mm, is suitable.
Laminate
For sawing various laminates, saw blades are selected according to the same principle as for wood. The only difference is that the file must have a medium or fine tooth, designed for laminate, or be universal (wood/plastic).
Metal
An electric jigsaw is rarely used for cutting metal. There are cutting methods that are much more efficient (angle grinders with cutting wheels for metal, hand jigsaws with long files, gas cutters, etc.). However, in some cases it is rational to use a jigsaw with a suitable file.
For example, a long cut with a complex curvilinear shape (rounds and circles, sharp triangles, etc.) cannot be made with a cutting wheel and a hand jigsaw. It is not recommended to use a jigsaw to cut metal thicker than 3 mm, especially black.
Steel grade – high-speed cutter HSS or bimetal BiM.
Plastic
The plastic is sawed off by turning off the pendulum stroke. Files with small and medium teeth of short length are used. Fiber&Plaster marking. For certain types of plastic (PVC), files for hard wood (Hardwood), or universal ones with the inscription “wood/plastic” in Russian or English, are sometimes well suited.
Glass
It is impossible to cut ordinary glass with saws. For this, glass cutters with a diamond wheel are used. You can use saws to cut plexiglass, which is a transparent type of plastic. They also cut it with the same files as plastics (see above).
Ceramics
Ceramics are hard and brittle materials. To cut it, special saw blades with a carbide coating are used, which is much stronger than ceramics. Most often it is tungsten carbide or artificial diamond powder. The file itself is made of ordinary tool steel. The marking of such files is Carbide Technology (CT) or NM. The blade is smooth, without teeth.
Soft materials (rubber)
Universal and special files are suitable for such materials. The first ones should be tried in practice during practical cutting. Rubber, paper and other materials are cut completely differently. Special files are made specifically for a specific material. They can have teeth or be wavy (for cardboard, foam, rubber, etc.). Suitable files may be labeled SoftMaterial or Acrylic.
Universal
There are no absolutely universal files “for all materials”. But often the same files can be used to cut different materials with different densities, structures, viscosities and strengths.
For example, a metal saw can cut wood and plastic. In this case, the file can get stuck in rubber or linoleum due to strong friction and sawdust sticking in the slot. Therefore, the selection of saw blades, even if they are positioned by sellers and manufacturers as universal, is only possible with trial cuts.
Files are often sold in a set that includes files for a variety of materials. This is convenient for users.
- Firstly, there is no need to look separately for special files for different materials.
- Secondly, it is possible to try how the saws will cut different materials. For example, a saw for metal – wood.
Everything seems to be clear. Although no, what about files?
We talked about the types and functional features of files for a manual jigsaw separately in this article.
Despite the abundance of electric jigsaws, manual versions of this tool are still in trend. A hand jigsaw for wood is both a good physical activity for the entire shoulder joint, and an increase in the level of your woodworking skills, and the opportunity to do what you love in any conditions.
Sawing technology
The cutting technology itself is not complicated, but in each operation you will need to acquire sufficient skill.
The process is divided into preparatory operations, main operations and final operations.
Preparation
The thoroughness of preparation largely determines the convenience of work and the quality of the final result.
So at this stage you should:
- Carefully inspect the selected piece of plywood and make sure there are no stains, knots, blisters or peeling veneer.
- Check the dryness of the material by making a test cut 1 centimeter from the edge
- Attach a sketch of the design to the plywood with tape or thumbtacks.
- At key points in the drawing, the beginnings and ends of lines, places of their intersections, etc. make punctures with a thin sharp awl.
- If the ornament is complex, then you can get confused in the jumble of dots. In this case, place carbon paper under the sketch and trace the outline of the drawing with a hard or medium pencil, transferring its lines onto the plywood.
- The areas to be removed after cutting should be immediately shaded on the plywood with a pencil to avoid confusion later.
Important! The pattern on the plywood sheet should be oriented so that most of the cuts are perpendicular to the direction of the grain of the face veneer sheet - this will make cutting easier
Basic Operations
Upon completion of the preparatory operations, you can begin the actual cutting.
If you don’t have enough experience yet, then it’s better to start with simple drawings and outlines—for example, cut out a house with a window and a pipe from a child’s drawing. The battle of Chinese dragons is unlikely to succeed the first time.
Sawing on a jigsaw
First, you should cut out the outline of the future product, then you need to drill starting holes for the internal contours.
It is better to start mastering the skill with a simple operation - a straight cut. To do this you should:
- Insert a jigsaw file into the drilled starting hole. The teeth should be directed from the holder arc and towards the handle.
- Secure the blade with a screw from the side of the handle, tighten it so that it does not rattle when cutting, and tighten the second screw. The degree of tension is determined by bending the holder arc.
- Place the plywood on the platform, press it against it with your left hand and, moving the jigsaw up and down by the handle, begin cutting. As you move along the cutting line, feed the workpiece under the saw so that the jigsaw remains in place.
- To avoid straying from a straight line, you can place a guide bar on the workbench.
Cut out a few squares and rectangles to practice straight cutting.
The next operation that you need to master is a curved cut, or actually figured cutting:
- Secure the blade in the same way as in the case of a straight cut.
- Lay plywood with a clearly drawn outline on the work site.
- Start cutting with slow movements, feeding and turning the workpiece with your left hand so that the blade does not go beyond the boundaries of the contour line.
- If the cut deviates from the line, you should stop turning and lateral feeding and return the blade to the line with a short straight cut.
The first circle will most likely resemble a gear. Do not despair, only the genius of the Renaissance, the Florentine Giotto, could draw a perfect circle with one movement of his hand, and even Leonardo Da Vinci himself used a compass for this. On the fifth or sixth circle, your hand will become firmer, and the teeth on your gear will become completely invisible.
All elements of the drawing are performed in a similar way, including obtuse angles. Sharp corners are cut out with two cuts converging to the top, otherwise, most likely, the tip of the plywood at the top of the corner will break off and everything will have to start all over again.
Final operations
After all the elements of the design have been cut out, all edges should be processed first with a file, then with a needle file and, finally, with fine sandpaper. Even the most experienced craftsman cannot make the edges of all cuts perfectly smooth. During training, you will most likely have to wave a file and rustle with sandpaper quite a bit.
Next, in accordance with the type of finish you choose, the plywood is stained, painted or varnished. Varnishing is also a rather labor-intensive process; it makes sense to resort to it when your works leave the range of student crafts and begin to acquire aesthetic value.
How to choose a jigsaw?
It’s good when there are senior comrades nearby who already have experience working with this tool - they will suggest a model that is suitable for the price, and recommend a set of replacement tools, or even directly help with choosing a model. The temptation to stick to drive versions, for example, cordless jigsaws, is great, but you should know that beginners should not use jigsaws. There are a number of reasons for this:
- Lack of practical skills often leads to rapid breakage of saw blades, because they do not take any bending loads well.
- Driven jigsaws are often purchased by craftsmen engaged in the mass production of shaped crafts from wood and plywood.
- It is impossible to cut a complex profile with a jigsaw.
- The primary skills of cutting wood with a hand jigsaw have already been recorded at the level of manual labor lessons at school, so mastering the tool will go much faster.
So, a manual jigsaw is a tool that is conducive to leisurely, thoughtful and quiet work somewhere in the country, or on the balcony - a good alternative to mechanized options.
The first step is to choose the right manual jigsaw. The selection criteria are usually:
- Frame shape: depending on its configuration, it will become clear what the longest cutting length is. There are jigsaws on sale whose frame length reaches 300 mm, which significantly expands the technological capabilities of the tool, but at the same time leads to an increase in its weight and dimensions. For home craftsmen who do not have experience in figure sawing, it is worth purchasing manual jigsaws with a frame length of no more than 150 mm.
- Frame material: when pressing on the bow, the frame should spring back, which is a good sign of quality - such a frame will not break when noticeable lateral loads are applied to a manual jigsaw for wood.
- Frame height: for reasons of strength, this parameter should not be more than three times the length, otherwise the rigidity of the jigsaw will decrease and the quality of the cutting line will be unsatisfactory.
- Method of tensioning the saw blade: usually wing nuts of different lengths are used for this, which, in turn, depends on the diameter of the thread. As the diameter increases, the length of the nut antennae increases, which increases the convenience of tightening. The presence of holes on the antennae increases the accuracy of fixation. Nuts should not be cast, but stamped.
What rules will protect against injury?
The mechanism seems harmless and simple only at first glance.
When performing any work, you must follow basic safety rules to avoid injury. There is work to be done
Safety rules when working with a jigsaw
with a sharp, metal part that hurts painfully, and on occasion will reach the bone. Before work, you need to inspect the jigsaw, check that the handle is firmly and firmly secured. If the fastening is broken during creative actions, the handle will fall off, but the hand will continue to move until it comes into contact with the metal pin. Which won't bring anything good.
A workbench or metalworking table must also be equipped with all special devices for safe work. Sometimes even a fall from a simple, unstable chair can cause injury and bone fractures.
The master always tries to take a closer look at his creation. This should not be done during work processes. If you lower your head too low, shavings will get into your eyes.
When a person gets used to a jigsaw and overcomes all the difficult moments, working with it becomes a real passion, and crafts become a source of pride. But a hobby can be combined with a source of income. Manual labor has always been valued much more than mechanical stamping.
- Related Posts
- Rating of manual riveters
- DIY metal clamp
- Rating of the best manual tile cutters of 2022
« Previous entry
How to use a hand jigsaw?
Working with a hand jigsaw, even of minimal size, is a painstaking and tedious task. It is no coincidence that in the previous section there is no mention of the shape of the handle - all manufacturers have long worked out the most ergonomic shape for a jigsaw handle. However, my hands still get tired. In order for this to happen as late as possible, you must adhere to the following recommendations:
- A hand jigsaw, or rather its interchangeable blades, are not intended for making cuts at an angle. If necessary, figure sawing is suspended and continued on the opposite side. Naturally, for this, markings are first made in the place where the length of the cut deviates from the horizontal/vertical by more than 5...10°.
- To save effort, especially for figure sawing, it is recommended to use the maximum saw span: this not only increases the sawing speed, but also improves the conditions for removing chips. This is especially important for working with thick wood (more than 1.5 mm).
- You should only use jigsaw blade designs that are designed for these purposes. For example, spiral blades are good for figured cuts, and spur blades are good for straight cuts.
- It is extremely inconvenient to work with a workpiece that is not securely fastened. Therefore, for manual jigsaws, you usually purchase a clamping device or a reliable clamp, which will help you quickly and correctly fix the workpiece on the workbench.
- In order for the saw blade to be easily inserted into the gap, there must be a gap between the clamping surface and the upper end of the table, at least 3...5 times the thickness of the workpiece.
- It should be recalled that a manual jigsaw for figure cutting is not a saw, and any strong pressure on the frame can lead to breakage of the saw blade. Therefore, when making cuts, the force is applied gradually. The criterion for the correctness of the force is the nature of the chips formed - if it is small and uniform, then the force is optimal. If the pressing force is exceeded, the chips become rough, and a burr begins to form on the surface of the cut.
- Often when working with a hand jigsaw on wood you have to make sharp turns of the saw blade. To prevent the blade from breaking, you should pre-drill a hole with a diameter no larger than the thickness of the workpiece material at the site of the intended rotation, insert the blade there, and, without tilting the frame, continue cutting.
Features of working with a jigsaw
The design of a jigsaw is very different from its manual relative.
The file is fixed only on one side, so it is several times thicker than a manual one; instead of a thin arc holder, there is a massive body with an electric motor and gearbox. A jigsaw provides many times more productivity than a manual jigsaw for cutting, but you have to pay for it with more weight, strong vibration and reduced cutting accuracy when making curved cuts.
The unit allows you to quickly make cuts along a straight line or along a curved line with large radii.
The best result for artistic cutting with a jigsaw is obtained by combining a manual and electric document. Particularly fine details of the design and small radius roundings should, of course, be entrusted to a hand jigsaw.
An ordinary household or professional jigsaw is not very suitable for cutting. Its purpose is construction work, and cutting out complex designs with a jigsaw will lead to rapid fatigue due to the heavy weight and damage to the material.
Band jigsaw
However, there are also band jigsaws - in them the blade is clamped on both sides, the material rests on a massive wide work table and the arc of the holder from a manual jigsaw is visible in the design. With such a semi-professional device, you can achieve even greater cutting accuracy than with a hand tool. But this miracle unit costs accordingly.
How much does a hand jigsaw cost for wood?
The price of the tool is determined by the manufacturer, based on the capabilities of the jigsaw. For example, a wooden handle is simpler and safer than a plastic one, but a jigsaw with such a handle will cost more, since durable types of wood (pear, hornbeam, oak) are used to make this part.
The price of a manual jigsaw for figure cutting also depends on the design of the clamping device. Aluminum wings are lighter, which has a positive effect on the weight of the tool, but a negative effect on its durability: over time, the aluminum wings on the nuts will begin to deform, and the quality of clamping the saw blade will deteriorate. Hand jigsaws for wood, equipped with brass or steel clamping nuts, are more reliable and durable.
The shape of the frame also makes its contribution to pricing - rectangular frames reduce the cost of a jigsaw, while square frames increase it.
Thus, manual jigsaws adapted for household rather than professional needs will be cheaper. Everything else will be determined by the characteristics of the saw blades.
Of the amateur options, the most trusted are manual jigsaws produced by the FIT brand (price - from 300 rubles), professionals prefer products from the Zubr or Stanley brand (price - from 900 rubles). It is worth noting that the specialized market for hand jigsaws is overcrowded with products from little-known companies (mostly Chinese), which hide behind visually similar names of well-known manufacturers of woodworking tools (for example, Stayer versus Steyr).