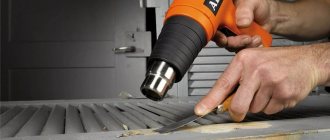
A construction or industrial hair dryer is not a mandatory tool for a home craftsman, but its presence allows you to carry out a number of complex jobs. Such work includes removing paintwork, separating two parts glued together with a sealant (car headlights), as well as heating materials when de-noising the car. If used frequently and incorrectly, the tool may fail, so we will find out in detail what repairing a hair dryer is, how to find a breakdown and fix it at minimal cost.
How does a technical hair dryer work and what is inside it?
When buying a hair dryer, many are probably surprised at the relatively low cost of this device. However, the whole point is that the design of this tool is so primitive that it has a positive effect on its cost. To understand how an industrial hair dryer works, let’s first find out all its constituent elements:
- Housing - in which all the components of this device are located. The case is made primarily of impact-resistant and heat-resistant plastic
- Power cord—transmits current to the power tool. Manufacturers also produce stand-alone type hair dryers, that is, battery-powered ones. They are less popular because they are more expensive than mains ones due to the use of lithium-ion batteries
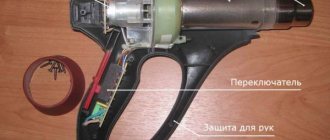
- Power button and mode switching - most hair dryers are equipped with a switch that performs the function of not only turning on the device, but also switching operating modes
- The electric motor of the fan is one of the main components of the device. Its purpose is to provide targeted air flow to the heating coil. For this purpose, blades are installed on the motor shaft to provide airflow. Corded hair dryers use DC motors. Their power is quite enough to blow the heating coils. An inverter converter - a board located next to the electric motor - is responsible for converting and reducing the voltage from 220V to 12V-18V. On budget models of hair dryers, the voltage on the motor decreases due to the load on the heating element
- A heating element is a heating coil that creates hot air. The heating element consists of a spiral and a ceramic base (on inexpensive devices, instead of ceramics, a special foil material is used). A nickel-chrome spiral is wound onto a ceramic base. The heating element is placed in a cylindrical metal flask
These are the main details of the tool in question. The hair dryer does not have a complex design, but even despite this, it breaks more often than screwdrivers, drills and grinders. One of the weakest points of this tool is the heating part. To understand how to repair a hair dryer with your own hands, let’s first understand the operating principle of the tool.
Heating element for hair dryer
The heating element is nothing more than a spiral that is wound on a ceramic base. In many models, the manufacturer integrates a temperature sensor, which, in case of overheating, turns off the power to the hair dryer. Nichrome is usually used as a spiral material. Having a certain resistance, the spiral takes part of the heat when current passes through it and releases it into the environment, thereby providing a continuous hot air flow.
The operating principle of a construction hair dryer and its design diagram
If a hair dryer breaks down, then in order to repair it yourself, you need to know not only the design, but also the operating principle of the tool. Understanding why each element of the device is needed, you can check its serviceability and eliminate breakdowns. It should be noted right away that industrial hair dryers can be divided into two types:
- Budget ones that have the simplest design. A distinctive feature of such tools is that they are low cost, and they do not come with an electronic control board.
- Expensive - the design of such devices uses electronic boards, as well as semiconductor elements responsible for supplying voltage to the spiral and electric motor, as well as microcontrollers that analyze data. There are also models equipped with displays and controllers, through which you can more accurately adjust the air temperature
The electrical diagram of the operation of the simplest construction hair dryer, which has two speeds of rotation of the motor shaft, is presented below.
The operating principle of a construction hair dryer has the following format:
- When the hair dryer button is turned to position “1”, the engine starts and a thin coil is simultaneously connected. Some models of technical hair dryers have a separate “Off” button, which is responsible for turning the heating elements on and off, as shown in the photo below. When the button is turned off, the coils heat up slightly
- If there is no button to turn off the heating elements on the hairdryer, then the coil heats up simultaneously when the tool is turned on. The main voltage is supplied to the spiral, and the residual voltage is supplied to the electric motor. As a result, it turns out that the heating element consumes the bulk of the voltage, and the electric motor operates due to a voltage drop equal to 12-18V
- In front of the button there is a smoothing filter - capacitor C2, which eliminates voltage drops. Some hair dryers have ferromagnetic cores that smooth out the current
- Power is supplied to the rectifier diode bridge, through which the voltage is rectified from AC to DC, from which the electric motor operates
- If there is a circuit board in the design of the hair dryer, then it is responsible for the operation of the tool. A thyristor is installed on the board, which distributes voltage to the coil and the hair dryer motor
- When the button is switched to mode “2,” the rotation speed of the electric motor increases, as well as the connection of an additional heating element spiral—thick nichrome wire. As a result, the hair dryer operates at full power, producing a heated air stream with a maximum temperature of over 1000 degrees
If the spiral breaks, the hair dryer motor will not turn on, but if the motor fails, then all the voltage is supplied to the heating element, which leads to the burnout of the nichrome thread. Most devices use protective elements to prevent the coil from overheating.
The more switches there are in the design of a device, the higher the likelihood that one of them may fail. Often the cause of breakdown of construction hair dryers is their improper use, which entails burnout of the heating element coil. First of all, you must remember three main rules when operating the device in question:
- Always install the device on a special stand in a vertical position, and never place it horizontally.
The horizontal position of the hair dryer is only permissible with a cooled heating element, and if this main rule is not followed, then not only will the plastic body of the tool melt, but also the failure of the coils - When you turn on the device, you should hear the sound of the engine running.
If the engine does not turn on, the hair dryer must be turned off immediately. A few seconds are enough for the heating element to burn out when the fan is not working. Most instruments have built-in elements - a thermocouple, which prevent overheating of the spirals and their failure. Often, when you turn on the tool and the electric motor does not start, the fuse blows. Many people do not know about the existence of such a protective element, so they begin repairs by replacing the spiral. However, it is enough to replace the thermocouple to restore the functionality of the device in question. - Do not drop the hairdryer, as the ceramic base of this device will immediately be damaged.
Damaged ceramics cause adjacent spirals to come into contact, and as a result, they burn out
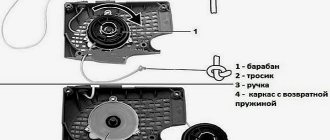
The simplest diagram of how a hair dryer works is shown in the photo below. Not only budget models of construction hair dryers work according to the principle of this scheme, but also household ones.
Now let's take a closer look at repairing a hair dryer with our own hands. Moreover, for this it is not at all necessary to know the basics of electrical engineering and electronics in order to find and fix the malfunction.
Device structure
The main elements that make up a hair dryer:
- engine;
- a heating element;
- fan.
The device has a lot of power, and its performance depends on the number of liters of air that the hair dryer passes per minute.
Many modern models have the following functions:
- air flow and temperature adjustment;
- selecting the desired operating mode;
- attachments that simplify working with materials of varying strengths;
- LED indicator that determines the heating temperature.
Tip
Unlike a conventional hair dryer, a construction hair dryer has a much more powerful electric motor and heating element. An electric motor, coils and fans are concentrated inside a case made of impact-resistant plastic. The latter are heating elements.
In addition to these elements, there are additional elements inside the mechanism that play an important role in the operation of the hair dryer:
- Power off button. Sometimes with built-in temperature controller.
- Temperature regulator. The air leaving the tool nozzle is heated by this sensor.
- Replaceable nozzles. They are attached to the nozzle.
Malfunctions of a construction hair dryer, their identification and elimination
How to repair a hair dryer is asked by many owners of this tool who are faced with its inoperability. To successfully find the cause of the malfunction and eliminate it, you need to follow the sequence of actions for diagnosing tool breakdowns.
First, it is recommended to make sure that there is voltage in the outlet being connected. After all, it often happens that a powerful electrical appliance connected to the network causes the circuit breaker to trip. To be able to operate the device, and at the same time prevent the circuit breaker from tripping, you need to reduce the load on the line by turning off powerful electrical appliances - boiler, washing machine, hood, electric kettle, etc.
Next, we will consider the sequence of the algorithm for identifying the causes of malfunctions of an industrial hair dryer and then eliminating them.
Expert advice
Experts advise adhering to the following recommendations:
- The cause of the breakdown is identified by diagnosing a hair dryer. It would be a good idea to disassemble the device, even if the defect is visible visually.
- In order to properly assemble the device after disassembling and fixing the problem, it is necessary to record all located parts with a camera. You can draw a diagram, but this is more difficult and requires a detailed, painstaking analysis of the constituent elements.
- When the device is turned on, a characteristic barely audible sound comes out. If it’s not there at all, or if creaks or rustling noises appear, then the problem is definitely in the engine.
Repairing hair dryers is quite easy if you do everything correctly. To do this, you need to follow a clear sequence of actions to identify the breakdown and quickly fix it.
General check of the health of the hair dryer with a multimeter
To make sure that the device is out of order, it is recommended to first perform the following manipulations:
- Using a multimeter, test the instrument
- On the multimeter, turn on the diode testing or resistance measurement mode
- Touch the probes to the power tool plug terminals.
- Switch the hair dryer button to different positions
When you switch the button on the device, the readings should change, indicating the presence of resistance. If the readings do not change, then it is appropriate to assume that there is an open circuit in the circuit. To clarify the reasons, you will need to disassemble the tool, unscrewing the fasteners, and perform a detailed diagnosis.
Causes of breakdowns
Let's look at the most common technical reasons for a hot air gun that cause the device to stop working.
- Buttons and switches. These elements often jam, which is why electric current is not able to pass freely through the contacts. This happens due to the appearance of soot and the formation of oxides. It is enough to disassemble the hair dryer and clean all connecting contacts that have rust or other deposits. In some cases, replacing the switch will return the device to working condition.
Checking the serviceability of the network cable
How to make sure that the hair dryer's power cord is working properly. It is extremely problematic to do this visually, since damage to the cores inside the insulation often occurs, and this is not visible from the outside. This happens quite often, especially if you use Chinese hair dryers from little-known manufacturers.
Moreover, damage to the core occurs not only through mechanical action, for example, squeezing the wire by a door, but also during prolonged use of the tool at maximum power. It happens something like this: the core heats up, it burns, as a result of which the copper material becomes brittle and easily breaks. You can diagnose such a breakdown using a multimeter:
- First you need to disassemble the hair dryer
- Enable dialing mode on the multimeter
- Connect the probe from the multimeter to one contact of the plug
- Using the second probe of the device, touch the contacts on the terminal block one by one
- If a sound signal from the device is triggered in one of the contacts of the terminal block, then one core is ok
- We switch the probe to the second contact of the plug, and the procedure is repeated. The multimeter should now beep when you touch the second pin of the terminal block
If the multimeter beeps, then the network cable is working and does not need repair or replacement. If the device does not emit a sound signal when you touch one of the contacts, this indicates damage to the network cable core. In this case, it is recommended to replace the wire, since it is almost impossible to find the location of its damage. If your goal is to find the location where the mains wire is damaged, then an indicator screwdriver will help with this.
There is another case when the device emits a signal when the probe touches both contacts of the terminal block. This indicates that the wire cores are short-circuited, and the cable also needs to be replaced.
This is interesting! A malfunction in the power cord may occur when the device is in use and switches off automatically during operation. Such self-shutdown indicates a weak contact in the wire, so the device may show a positive result during measurements, but the instrument works intermittently. Replacing the power cord will help resolve the problem.
Testing a Switch or Button
Next, you need to make sure that the hairdryer button is working properly. Often oxides and carbon deposits form on the switch, which prevent the contacts from closing for the flow of electric current. To make sure that the hair dryer button is working properly, you also need to use a multimeter. To do this, in the dialing mode of the device, touch the button terminals with the probes. In the off position, the device should not “beep”, and when the first or second mode is turned on, the multimeter emits a beep.
This signal is a sign that the reason why the hair dryer does not turn on is a malfunction of other components of the tool. If the manipulations to check the button lead to the conclusion that it is faulty, then you should disassemble it and clean the contacts. On some hair dryer models, the switches are of a non-separable type, so you just need to replace them.
This is interesting!
Many people often suspect that the capacitor smoothing out network noise is faulty. This yellow capacitor is connected to the button and filters network interference, while preventing failure of the hair dryer's electronics, as well as the motor and coil. If the capacitor is faulty, then this will not affect the operation of the hair dryer in any way, but its failure may subsequently cause failure of the rectifier diodes, microcontroller, thyristor, resistors and other elements of the microcircuit. A capacitor failure can be easily determined visually; if it is inflated, it means it is faulty.
Principle of operation
The operating principle can be described by the following points:
- Starting the tool simultaneously with the operation of the electric motor and heating element.
- A fan, which is attached to the motor shaft, ensures the flow of hot air from the nozzle. Its function is to cool the heating coil and prevent it from melting.
Without the engine running, heating elements will not be able to work. They will simply fail after a few minutes or even seconds. If additional protection is attached to them, then there is a possibility that the heating element will not overheat or break. Without the operation of these elements, heated air will not be able to escape from the nozzle. It will only blow cold.
Important
If a hair dryer stops working, it should not be thrown away and replaced with a new one. It is likely that the problem lies in the failure of some parts. You should not contact the service center, as this will cost you a lot. The best option is to disassemble the hair dryer yourself, find out the cause of the breakdown, and correct it.
How to check the serviceability of a hair dryer's commutator motor
If you suspect that the engine is faulty, you can check it in two ways:
- Ring with a multimeter
- Connect to a DC voltage source of appropriate size. Please note that the board with the diode bridge must be disconnected. In order not to disconnect it, you can connect it to an alternating voltage source of the appropriate value for which the engine is designed
To test the electric motor with a multimeter, you need to connect the probes to the output contacts of the device. The presence of resistance indicates that the device winding is not damaged. In order to make sure that this part is in good condition, you can supply it with 12-18V power. Typically, the power supply voltage of the hair dryer motor is indicated on the housing, so take this value into account so as not to “burn” the rotor winding.
A construction (technical) hair dryer is a hand-held power tool for directed supply of heated air for the purpose of non-contact (indirect) heating of the material being processed. The scope of application of the tool is very wide: from simple drying with air at room temperature, to powerful exposure to temperatures over five hundred degrees Celsius. The demand for construction hair dryers is fueled by their low price (for entry-level models), due to the simplicity of the design and, in many ways, time-tested circuit solutions.
Interskol FE-2000 is a representative of household construction hair dryers with the minimum required set of functions: smooth temperature control, two blowing intensity modes. This set, as a rule, is quite sufficient to perform the vast majority of tasks. A specific copy of this hair dryer (the first modification, board DB3011) was purchased about three years ago and had a very considerable (but not prohibitive) daily operating load. For this reason, all the imperfections in the design of the hair dryer appeared quickly.
A few months after the start of operation, the first breakdown occurred: there is no temperature control, the outgoing air is always cold. The cause of the breakdown is overheating of the BTA16 triac, its failure due to insufficient pressure to the radiator and non-use of thermal conductive paste. The repair consisted of replacing the triac with preliminary application of KPT-8 paste. This failure did not occur again.
Hairdryer Interskol FE-2000. Suitcase included.
Nozzle. A ceramic heater with a spiral inside is visible.
At the end of the first year of operation of the hair dryer, a fracture (internal wire break) occurred in the power cable next to the body of the tool. This malfunction is often found among non-professional tools. The original power cable is not of high quality, it has medium-hard insulation, the fourth or fifth class of flexibility of copper current-carrying conductors. Installation of a new cable KG 2×1.5 (in rubber, double insulation) made it possible to forget about this type of fault.
In the second year of operation, the high-resistance winding of the heater, which serves as ballast for powering the electric motor, broke. The cause of the break is difficult to establish; it could be either a manufacturing defect (which is most likely) or spontaneous rubbing of the nichrome wire on the hard edges of the ceramic due to many heating-cooling cycles. The winding broke and the engine stopped. As a result of stopping the engine with subsequent overheating of the main (high-temperature) winding of the heating element, the thermal fuse tripped (the high-temperature winding remained intact). The body of the hair dryer was disassembled, the heating element was disassembled, and the location of the nichrome wire break was localized. The break point turned out to be not far from one of the ends of the winding, for this reason it was decided not to connect the ends of the wire, but to wind (remove) a short section. The resistance of the ballast winding was reduced, according to approximate calculations, by 8-12%, which is not critical for the engine. By this time, extraneous noise from the engine bearings began to appear from time to time and, unfortunately, its time was clearly coming to an end. The standard thermal fuse had a nominal response temperature of 125°C, it was replaced with a new one with a higher temperature of 150°C. The small temperature reserve is explained by the assumption that an additional 25°C is unlikely to allow the heating element winding to burn out (in the event of an emergency), but will give more time to promptly turn off the hair dryer before the thermal fuse trips (breaks). To replace the thermal fuse, you need to almost completely disassemble the heating element. About half of all the ceramic rings from which the heating element core is made cracked over time (apparently due to the poor quality of the ceramics) and, when the outer mica shell is removed, the rings disintegrate into small particles. The thermal fuse is connected to the winding of the heating element and to the power wire using miniature crimp sleeves, which are very difficult to re-press properly (without a special tool). For the convenience of possible replacement of the thermal fuse in the future, it was installed using flat connectors (car terminals).
By the end of the second year of operation, the plain bearings in the engine began to “ring” loudly. Also, in a random manner, the voltage on the high-temperature spiral of the heating element began to disappear and reappear when the regulator knob was rotated. These malfunctions quickly worsened, and further normal use of the hair dryer for its intended purpose was not possible: the engine hummed, its speed dropped, and it was almost impossible to set the desired heating temperature. There is an urgent need to deeply restore the performance of the hair dryer.
Explosion diagram (assembly diagram) of the Interskol FE-2000 hair dryer.
Electrical circuit diagram of the Interskol FE-2000 hair dryer.
The body of the hair dryer has been opened (photo above). Housing mounting screws (photo below).
The insides of the Interskol FE-2000 hair dryer. From left to right: board, motor with impeller, operating mode switch, heater.
Replacing the electric motor.
Finding the right engine for sale is not an easy task. Therefore, when a suitable engine was discovered, the decision was made to purchase the engine regardless of its other characteristics (RPM, voltage). As a result, it turned out that the purchased motor had a supply voltage several times lower (12 V) and approximately one and a half to two times less revolutions than the standard hair dryer motor. These problems had to be solved, but first we needed to remove the old one and install a new motor into the hair dryer body. The engine replacement process is not very complicated. The greatest difficulty is removing the plastic impeller from the motor shaft. Using improvised means, we organize a wedge-shaped stop at the bottom of the hub and, using a drill with a diameter of 2 mm, we gradually knock out the engine shaft. As the shaft comes out, the position of the stop (wedge) needs to be adjusted. Be extremely careful not to damage the plastic impeller hub! Before placing the removed impeller on the shaft of the new engine, it is necessary to secure the engine with two screws and degrease the surface of the shaft with acetone. It will not be superfluous to clean and degrease the inner surface of the impeller hub with gasoline or alcohol. We place the impeller on the shaft of the new engine manually (you can lightly pound it with a miniature rubber mallet), resting the other end of the shaft (located near the brush-collector assembly) against something solid.
Motor with impeller.
Close-up of a plastic impeller.
Remove the impeller from the engine. We use tweezers as a stop. We apply light blows to the drill, which rests against the motor shaft, with a small hammer.
The impeller has been removed from the shaft. The engine has been removed.
Old (left, without markings) and new (right) engines. No capacitors were installed on the new engine.
Thermal fuse (photo on the left). Flat connector type RpIm+RpIp (photo on the right).
Motor power supply.
The problem of powering an electric motor can be solved in two ways: increase the length (number of turns) of the ballast winding or supply power to the motor from some other source. The first method is complicated by the need to find the necessary nichrome wire and a place to place additional turns in the heating element (which literally crumbles in your hands). Let's take the second path - we'll make a separate power source. A cell phone charger turned out to be very suitable in size and load current. The charger board is placed next to the standard board of the hair dryer; it is necessary to ensure proper levels of insulation (prevent unwanted touching of the boards) and fastening (fixation). But there is one catch - the output voltage. As you know, the charger has about 5 V, but we need 12. Therefore, we will increase the number of turns in the secondary winding of the output transformer of the power supply (charger). We desolder the transformer, disassemble the magnetic circuit, carefully separating the ferrite core into two halves (warming the transformer to 100°C and using acetone can simplify the task). As a last resort, if you cannot disassemble the magnetic circuit, you can wind it using the shuttle principle so that the number of turns is small. The main thing is not to split the ferrite!
We find the finishing end of the secondary winding and begin to slowly wind up turn after turn, counting their number and remembering the direction of winding the wire. When the secondary winding is wound, it is necessary to make basic calculations to determine the number of turns for the motor supply voltage (in our case - 12 V): we find the number of turns per 1 V (knowing the former output voltage of the charger), multiply the target supply voltage by it . It wouldn’t hurt to add a couple of turns in reserve (if necessary, they can be quickly wound up).
We increased the output voltage by 2.4 times, the maximum load current naturally decreases by the same value. As is known, the current of a transformer winding depends on the cross-sectional area of the conductor. To determine the minimum permissible cross-section of the wire for the new secondary winding, we measure the diameter (and calculate the cross-sectional area) of the wound wire, divide the resulting value by 2 (a rough approximation, we will not delve into the jungle of calculations). If the width of the gap for laying the wire allows, then it is not at all necessary to choose a thinner wire, the main thing is to fit the required number of turns and fit the magnetic circuit loosely. We wind the wire turn to turn, observing the direction of winding and counting the number of turns. Upon completion, solder the ends of the wire to the terminals of the transformer, not forgetting to remove the insulating enamel at the soldering points. We cover the mating ends of each of the two halves of the magnetic circuit with tsapon varnish, assemble the transformer by pressing the ferrite halves together until the varnish dries. We tightly wrap two or three layers of a thin strip of insulating tape or paper tape on top of the magnetic circuit, cover it with tsaponlak on top, and dry it. We solder the transformer into the power supply board, connect the motor, and measure the voltage. If it is too large, wind up the turns. When the voltage is correct, we fix the secondary winding - apply a thin layer of tsaponlak to it. The transformer is ready. It should be noted that as a result of this alteration, we received only one engine rotation speed, namely a certain average value in relation to the two original (nameplate) speeds.
Cell phone charger board before conversion.
Let's disassemble the transformer. The secondary winding of the transformer had 12 turns of wire D=0.35 mm in one layer.
Photo on the left: a coil with PETV enamel wire D=0.32 mm, which will be used to wind the transformer. Photo on the right: wound transformer coil (29 turns of PETV D=0.32 mm in two layers).
Installation (gluing) of a ferrite magnetic core. Application of tsaponlak. Circular winding with insulating tape (photo on the right).
The standard motor power diodes (D1-D5) were removed to obtain additional free space (photo on the left). The motor power supply board is in place (photo on the right).
Replacing the variable resistor.
To verify that it is faulty, instead of the high-temperature winding of the heater, we will connect an incandescent lamp (see a similar example in the article - repair of a Solomon SR-976 soldering station). We supply power to the board and see that the lamp does not respond adequately to the rotation of the variable resistor. We unsolder the standard variable resistor, temporarily connect any other (known good one) with the same resistance of 100 K. We see the correct operation of the circuit: the duty cycle of the lamp flashes is clearly tied to the angle of rotation of the variable resistor knob (slider), and in one extreme position of the slider there is no glow of the lamp, in the other, there is full intensity. The malfunction has been localized, we replace the variable resistor with a new (good) one. In our case, an engine with lower revolutions was installed, and the intensity of the spiral blowing decreased. It is necessary to limit the maximum heating temperature of the coil to avoid overheating and/or tripping of the thermal fuse. To do this, in series with a variable resistor (into the gap of the side terminal corresponding to the maximum power), we solder a constant resistor, the resistance of which is determined experimentally, visually observing the color of the filament of the spiral.
An incandescent lamp is connected instead of a spiral.
The left photo shows the old (left) and new (right) variable resistors. The right photo shows the new dual type variable resistor (2 x 100 K). Opening the case is the fastest way to determine pin assignments.
Needle files will help give the resistor handle the desired shape (photo on the left). The new variable resistor is installed (photo on the right). Inside the red heat shrink tube there is an additional 130K resistor.
The degree of heating of the spiral in the position of the regulator knob, corresponding to the maximum air temperature.
Measurement of minimum and maximum air temperature.
Conclusions.
The technical solutions used in the design of the Interskol FE-2000 construction hair dryer of the first modification are not unique and are not highly reliable. The hairdryer is rightly not positioned by the manufacturer as a tool for professional use. The tool is quite suitable for home use. If the user has some initial level of training, it will not be difficult to restore the hair dryer’s functionality on your own, since its maintainability is good. Future owners of the FE-2000 model, and those who plan to use the hair dryer intensively, can be recommended to check the quality of the thermal contact of the triac with the radiator immediately after purchase and, if necessary, apply heat-conducting paste. It would also be a good idea to immediately replace the power cord with a better one.
Similar articles:
- Repair of button EN61058 electric drill Interskol DU-13/780ER
- Mini-review with opening of the Interskol DU-13/780ER electric drill
- Installation and repair of household hair dryers
Repair of a hair dryer coil and determination of a heating element malfunction
You can hear the following advice from experienced specialists: if the coil on an industrial hair dryer burns out, then it’s easier to buy a new tool. Why buy a new hair dryer when you can repair or replace the hair dryer coil.
However, before we find out how to repair a hair dryer coil, we will consider the features of diagnosing its malfunction. The principle of diagnosing a hair dryer coil is as follows:
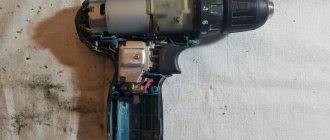
- First you need to remove the heating element from the metal flask
- Next, you should inspect the connection of the wires to the contacts of the heating element spiral. Very often the cause of a hair dryer malfunction is a banal disconnection of one of the wires or oxidation of the contacts
- Turn the multimeter into resistance measurement mode and connect the spiral to the contacts. The hair dryer uses 1 or more spirals, which depends on the design and number of speeds of the tool
- The spirals must have resistance, and if the device shows a zero value, then the integrity of the nichrome thread is compromised. Over time, due to exposure to high temperatures, the nickel-chromium thread loses its properties and becomes brittle, and therefore fails
If the diagnostics show that the coils are working properly and have resistance, but the hair dryer does not work, then the breakdown is hidden directly in the thermal fuse - a thermocouple. This is an element that prevents the coil from overheating, however, under the influence of high temperatures, the thermocouple can also fail. The principle of its operation is that as the temperature increases, the resistance in the circuit changes. You can check the serviceability of the thermocouple with a multimeter by measuring the resistance. If the element is working, the device will show the resistance value, and if it is faulty, then the resistance will be zero.
Now let’s consider a situation where the hair dryer coil has failed. What to do if the spiral is broken, and how to repair it? To repair the nichrome spiral of a hair dryer, you will need to use small connecting elements, that is, a bolt with a nut. It is with the help of these parts that you can connect the nichrome spiral of the hair dryer. Soldering the spiral will not help, since the nickel-chromium material cannot be soldered. To repair a hair dryer coil, you will first need to find the break point, and then perform the following steps:
- Assess the condition of the spiral. If it not only has a break, but is also damaged in different places, then it is recommended to replace it
- The break is eliminated by connecting two parts of the spiral using small bolts and nuts. Connected areas must be strong
- Connecting the spiral with threaded connectors increases the resistance, so keep in mind that the heating temperature of the tool will be reduced
As you can see, it is not at all difficult to repair the spiral of a hair dryer. If the heating element cannot be repaired, then it can be replaced. To do this, you will need to buy a new spiral of the appropriate length and replace it. In addition to replacing the coil, you can also buy a new heating element assembly for your make and model of hair dryer. However, it is not possible to find new heating elements for all hair dryer models. The most popular manufacturers of the instruments in question:
- Interskol
- Bison
- Makita
- Hitachi
- Storm
It is not recommended to buy the cheapest version of a hair dryer, but if the tool is needed only for one-time use, then it makes no sense to overpay for a branded device that costs 2-3 times more. Repairing hair dryers is quite easy if you approach this issue correctly. To do this, you need to follow a clear sequence of actions to identify the breakdown and fix it as quickly and easily as possible.
Parameters of DV3011 electronic board parts
| TR1 -BTA 16 600CMAR729 | R1=100Com | |||||
| D1 -6C2RSHL LM358P – microcircuit | R2=97Com | |||||
| C1=3.3mF (50V) | R3=100Kom | |||||
| C3=0.47mF (50V) | R4=21.7Com | |||||
| С18=470mF (25V) | R5= | |||||
| С=.22mF KX2 (250V) MEX CPF 40/85/21/C | R6=50Com | |||||
| D1-9 – 1N4007 ZX | R7= | |||||
| D10 – 6A10 | R8=430Com | |||||
| Z2-1N744A (zener diode) | R9= | |||||
| S1 – switch “Defond” DSE 2410 10A 250V~ T85 | R10=68Com | |||||
| P – heating elements | R11=68Com | |||||
| F – thermal fuse (thermal link) LEBAO R4D 250V 10A TF-135°C | ||||||
If the circuit board of a hair dryer is burnt out, how to repair it?
Failures related to electronics are not uncommon. On budget versions of construction hair dryers, only one board is used - a rectifying diode bridge. You can check the health of the diodes using a multimeter, and if one diode burns out, the engine will not start. Having identified a faulty diode, it should be replaced using a soldering iron.
If an inverter board is used on a construction hair dryer, then any element of the electronics on it may fail. In order to understand which element has failed on the board, you need to perform a visual inspection. Typically, burnt elements appear externally as blackening. To repair the circuit board of a hair dryer, you will need minimal knowledge of electronics and also be able to use a soldering iron. Using a multimeter, you can check the serviceability of all elements on the board and replace those that are faulty.
This is interesting!
If the ceramic part is damaged, then in this case it is recommended to buy a new heating element, which can cost almost the same as the tool itself. That is why, if it is impossible to carry out independent repairs, you should weigh the cost of spare parts and a new hair dryer, on the basis of which you can make the right decision.
If the electric motor fails
If diagnostics show that the electric motor on the hair dryer has failed, then it should be replaced. On hair dryers, DC motors consist of a rotor (armature) with a winding, as well as a stator made of magnets. To supply current to the armature, a commutator is used in the motor design. It consists of copper plates that are connected to the rotor winding terminals. If a motor malfunction occurs, it is enough to replace the armature to continue operating the power tool.
This is interesting! When choosing a new anchor, you will need to indicate the make and model of your tool, since engines from different manufacturers differ in size.
Conclusions about repairing a hair dryer
When faced with a hair dryer malfunction, it is important to pay attention to the initial signs of failure. After all, these breakdowns manifest themselves in different ways:
- Hairdryer won't turn on
- Only one of two or more modes works
- Turns on, but turns off during operation
- The fan works, but the hair dryer does not heat up
- The fan does not work - in this case, protection is triggered, which prevents overheating of the coils and their damage to their integrity
A detailed step-by-step description of how to repair a hair dryer yourself is discussed in the material. The video instructions below will help you find the breakdown and fix it yourself. It is worth remembering that the service life of an industrial hair dryer depends, first of all, on the correct use and storage. If the device is stored in a garage, then before using it, it is recommended to blow out the spirals with a compressor. Sometimes failure to follow the simplest rules for operating power tools leads to them breaking down much earlier and faster than expected.
How to fix it?
Before you repair a hair dryer yourself, you need to carry out diagnostics. After determining the cause, you need to arm yourself with a screwdriver and, possibly, a soldering iron. For example, you will have to solder the disconnected wires when replacing the spiral.
If you need to replace a capacitor, select a new element with the same power, as well as taking into account the rated voltage value. Not all parts of a hair dryer can be repaired: for example, the external wire is usually replaced with a new one. To do this, disconnect it by opening the case and attach a new cord. Before fixing the bolts to the body, check whether the device will work with a new wire, for which it is necessary to plug it into the network. After making sure that everything is in order, you can begin assembling the case.
In general, repairing a hair dryer does not require special knowledge: you only need the desire and ability to handle basic tools. In addition, precautions and safety precautions should be observed when repairing power tools. All diagnostic procedures, locating faults, as well as the repair itself are carried out with the device disconnected from the network.