The breakdown appeared unexpectedly at the most inopportune moment. After prolonged warm rains, the grass in the garden and on the lawns of the dacha had grown greatly, and it became necessary to mow it. I had to use the trimmer. I connected it to an electrical outlet via an extension cord and started working.
After a short period of time, the electric motor suddenly turned off. I checked the voltage on the extension cable: everything is fine. I picked up the trimmer and started mowing. He quickly refused again.
This happened several times. I had to inspect the extension cord wires and check the power. No faults found. I concluded that the breakdown occurred in the trimmer. You need to look for it.
How to use a lawn mower correctly?
Since we are talking about equipment that is subjected to heavy loads, of course, we want to extend its service life. Therefore, it will be useful to learn a few simple rules that will help achieve extended tool life. Your workforce will increase if you listen to the recommendations of specialists.
The operator must operate the equipment only in dry weather. If the humidity is high, metal parts will soon succumb to corrosion, after which they will completely stop performing their task.
The choice of gasoline plays an important role, because it determines how powerful the engine, muffler and cutting system as a whole will work.
Avoid hitting hard objects, such as stones. Before starting the lawn mower, clean the area, remove branches and any objects that may interfere with the work.
The place for storing the tool must be chosen carefully - it must be dry and closed. When you send equipment for long-term storage, it is important to clean the tank of the fuel that remains inside, and unscrew the spark plug. This will keep the engine running so you can resume operation of the equipment at any time. A brush cutter will last for many years if used and maintained correctly.
Tools for repair
The work required screwdrivers and an old tester with wires and a soldering iron.
I had the camera with me and managed to photograph all the steps to restore the operation of the electric motor sequentially. I inserted these photographs into the text of the article.
Continuity diagram
To check electrical circuits, you need to call them with a tester or a continuity tester. I have an old Ts4324 device stored at my dacha for such purposes. Its current measurement circuit is powered by nickel-cadmium batteries.
After long-term storage, they ended up in a discharged state, and have been in use since 1994, when I purchased them at a sale. It was no longer possible to use them.
Tester power supply
The technical solution was suggested by an old mobile phone. I used its battery to supply voltage, having previously checked it with the same device in voltmeter mode.
I removed the old batteries and supplied power with thin wires of different colors directly to the tester terminals, observing the polarity. To connect I used a soldering iron and tape.
Calibration
There were no difficulties here. The battery power of the mobile phone was sufficient for measurements and calibration.
I set the device switches to the “Ohmmeter” position, and used the potentiometer handle to set the arrow pointer to zero. I did not adjust the mechanical balancer of the pointer; it was normal before.
The tester is prepared for measuring resistance in Ohm divisions.
Screwdrivers
The electric motor housing is secured with medium-sized cross-head self-tapping screws. An old Soviet-era screwdriver fit satisfactorily under them, and a good coverage of the edges was created with a head from a set of tools purchased in an online store.
However, the short working body of the combination screwdriver did not allow working in deep recesses. All hard-to-reach places were inaccessible to her. Images of screwdrivers are shown in subsequent photographs.
Device
It’s safe to say that the self-propelled type of lawn mower meets high standards and requirements, and is therefore in great demand. The equipment is ergonomic, and this makes operation comfortable and efficient.
The equipment of a petrol trimmer on wheels is similar to a standard scythe. It is based on a gasoline engine that transmits the force of the crankshaft to the cutting mechanism of the tool. The drive shaft is designed to transmit power and is located in a horizontal housing. The gearbox is responsible for bringing the cutting part of the system into operation. To make the equipment easier to use, a U-shaped handle is attached to it; its handles are covered with a material that is soft to the touch and does not allow the hand to slip during operation. The handles have gas levers and wheel locks.
The wheels are located at the rear, there can be either two or four of them, depending on the model and manufacturer, the same applies to the size.
Inexpensive brush cutter (Assembly)
A separate drive rotates the device. When the engine starts, most of the power is sent to torque, and less is used to drive the wheels. If the brake system breaks down, the operator must turn off the ignition and the wheels will stop.
Review of trimmers and lawn mowers of the Hoper brand
The development of the Khoper brand on the Russian market began in 2010.
The position became stronger over time thanks to the successful design of the equipment and the use of inexpensive but high-quality materials. To reduce the cost of products, all capacities were transferred to China, but this did not affect the quality. Large-scale assembly is carried out on the territory of Russia. The Hoper company also produces a wide range of component materials. Trimmer Hopper
The popularity of the Khoper brand was facilitated by the fact that most of the technical characteristics were copied from the popular brands Zirka and Kadvi. Thanks to multi-stage control carried out in production, Hoper products are not inferior in quality to well-known brands.
The Hopper product line is represented by various models of trimmers and trimmers with a gasoline engine. All models are distinguished by reliability, build quality and long service life.
How to choose?
It is necessary to make a purchase of garden equipment carefully, having previously studied all the pros and cons, analyzing information about the characteristics and advantages. The petrol mower is perfect for working in remote areas where there is no access to electricity. Trimmers are lightweight and can handle long-term use. Before purchasing, pay attention to several criteria, and then you will be satisfied with a wise investment in quality equipment.
Power is the main indicator in such equipment, because it directly affects the performance of the device. If you want to mow regularly to maintain your lawn, models with power ratings ranging from 800 to 1500 watts can do the job. However, when it comes to tree sprouts, something serious is required. Pay attention to professional units whose characteristics indicate power above 2500 W.
This option is more suitable for utility companies and private companies providing city cleaning services.
The type of engine varies, but this affects the noise intensity. In this case, you can use headphones to avoid damaging your hearing and start working. Experts say that four-stroke engines create less noise and consume less fuel. But such equipment is much more expensive and weighs more.
The design of the rod is recommended to be straight. It must be a durable material within which the shaft is located. This design feature allows you to achieve greater power.
For a review of the Champion LMH5640 wheel trimmer, see below.
Removing and disassembling the starter, replacing broken parts
To repair the trimmer
, first you need to disassemble it and then reassemble it. This process is not particularly difficult. To work, you need a screwdriver with a tip of the desired shape.
Replacing a broken cord
A broken rope is replaced in the following sequence:
- The old cord is removed;
- Choose a rope that is suitable in size (thickness and length)
- Pass it through a special hole in the spool and tie a knot;
- Winding the spring, generating the required number of revolutions;
- Lock the handle.
READ How to Remove the Coil on a Trimmer Champion Video
It is not difficult to assemble the starter onto the trimmer and wind the spring, but this should be done carefully and carefully. For different models of gasoline cutters, the breakdowns of the trigger mechanisms are the same, so they are repaired in the same way. However, there are some nuances associated with their design features.
How to properly assemble a trimmer - Step-by-Step Instructions PHOTO VIDEO
Garden trimmers are similar in design. Detailed instructions for one model will help you understand the intricacies of installing analogues. Let's look at the main stages of assembling an electric trimmer using the FUBAG FET 1200R model as an example.
Before we get started, let’s figure out what we have on hand after the purchase. The instrument is sold unassembled:
- Boom with motor
- Scythe handle
- Trimmer head housing
- Trimmer head
The kit also includes a shoulder strap, a three-bladed knife and a tool set.
Installing the protective cover
We combine the holes in the protective casing and in the fastening bar.
We secure the casing to the bar with screws and washers using the key included in the kit.
In this model, the casing is secured with metal plates on both sides. This guarantees additional reliability and durability of the trimmer.
The casing itself is made of dense but flexible plastic. Such material will definitely not break off when hitting small obstacles. We advise you to pay attention to this if you are just going to choose an electric trimmer or a gas trimmer.
Attach the tool handle
Unscrew the thumbscrew 2. Remove the top cover of the fastener
To adjust the handle, you need to loosen the thumb and move it. Then you should fix the screw.
FUBAG electric trimmers are equipped with rubberized handles, which increases convenience and safety of use. They allow you to hold the instrument securely even in wet hands.
Attaching the shoulder strap
One of the simplest manipulations when assembling an electric trimmer. Many people will understand how to attach the shoulder strap intuitively. For those who are not sure, we decided to add several important points to the instructions:
We connect the carabiner with the ring for fastening the belt 2. Adjust the position of the fastening ring on the rod 3. Fix the ring with the fastening screw
How to change the starter cord?
It happens that it is not the spring that is to blame for the inability to start the starter, but the cord itself. It can grab or even break. Disassembling the starter or trimmer of a gasoline cutter is universal for its steps.
- Remove the starter assembly from the trimmer or brush.
- Remove the main bolt while holding the handbrake.
- Remove the reel and unscrew the remaining worn cord from it.
- Undo the knot on the handle of the cord and remove the end from it.
- Undo the knot at the other end (at the beginning of the spool) and remove the old cord. Knots that have become tight can be resolved with pliers or pliers.
- Tie a knot at one end of the new cord and pass it through the hole at the beginning of the spool (closer to its axis).
- Wind several turns of the new cord onto the spool. If it is long, cut off the excess.
- Load and charge the spring cord tensioner (if removed) and spring elements in the correct sequence.
- Replace the reel and thread the free end of the cord through the socket and starter handle.
- Reinstall the starter unit.
Tighten the starter by the cord, start the engine of gasoline cutters or trimmers. The larger and more powerful the engine, the more pulling the cord will be required when starting, the norm is no more than 7 times. The result is a quick and smooth start of the engine, the unit is ready for work.
Sources:
https://tehnika.Expert/dlya-sada/trimmer/razobrat-i-pochinit-svoimi-rukami.Html https://strport.Ru/instrumenty/trimmer-benzinovyi-patriot-pt-2540-osobennosti-kharakteristiki-instruktsiya -otzyvy https://stroy-podskazka.Ru/trimmery/startery-dlya-benzokosy/
Assembling the trimmer in STEPS
Installing a reel with fishing line
To begin, we align the hole on the washer with the hole in the gearbox cup and lock it with a special rod.
Unscrew the fastening nut from the hub clockwise. 3. Remove the cup from the shaft and the pressure washer
We twist the spool of fishing line counterclockwise until it stops, holding the rod.
Functionality check
Before you start diagnosing the magneto, you need to make sure that the problem is actually in this unit. To do this, you need to check the entire circuit and make sure that there are no other reasons for the trimmer failure.
- First, you should carefully inspect the reel for cracks and other external defects on the body. Next, you will need to examine all the elements and components that conduct current and make sure that they are clean.
- The next step is to inspect the high-voltage wires. They must be in good working order and securely attached to the contacts, without traces of rust and with intact insulation.
- The next step is to check the spark plug cap. As a result of careless actions, the user often tears it off from the high-voltage wire, and then improvises and creates a homemade mount. You need to understand that any poor-quality connection in this place significantly reduces the power of the spark plug's electric arc.
- Then you should make sure that the spark plug itself is working properly. If you fill your lawn mower with low quality gasoline, the service life of this part will be significantly reduced. In addition, it may be flooded or have large deposits that impede operation. Sometimes the spark plug even gets stuck and won’t come off.
- Next you need to inspect the circuit breaker. On trimmers and chainsaws made in China, it very often breaks.
READ How to Reduce Idle Speed on a Huter Trimmer
Magneto - design and operating principle
The purpose of the ignition coil is to convert rotational energy into a high-voltage discharge and form a spark that ignites the fuel mixture. In an internal combustion engine, this part is called a magneto, since in it alternating current is generated from the rotation of a permanent magnetic rotor or armature.
The magneto is structurally composed of two windings: high and low voltage. A capacitor with breaker contacts is connected in parallel to the latter. While the leads of the high voltage winding are connected to the spark plug and the housing. They are both wound on a core, between the poles of which a rotating magnet, magnetized longitudinally, is installed.
On a note! The whole structure looks like a large coil mounted on a U-shaped core.
How to remove the reel and replace the line
Trimmer owners, mostly beginners, are confused, bordering on panic, when the need arises to change the cutting tool or line in the reel. Too often, when trying to unscrew the head of a lawnmower, users simply render it unusable, unaware that it is unscrewing in the opposite direction. . To avoid this, if you need to replace the tool, it is recommended that you read the step-by-step instructions below.
- Before inserting line into the spool, turn off the hedge trimmer motor or turn off the electric trimmer to avoid injury that could occur if the cutting tool accidentally spins.
- Unscrew the attached attachment and the transmission shaft. To do this, you need to fix the shaft by aligning the holes on the washer and on the axle and inserting a metal rod or screwdriver.
- Unscrew the nozzle. You should know that the threads on the shaft remain. Therefore, turn the trimmer coil to the right, that is, clockwise.
- Disassemble the mowing head. Most often, the main cover is attached with clips. To remove it, you will need to lower these clips onto the body by squeezing the edges of the cover. If your trimmer has a semi-automatic mower with a button on the bottom, be careful to disassemble the attachment as you may lose the spring that sometimes pops out when you remove the cover.
- Cut the required amount of fishing line. Typically its length is 5 meters. Use cord with the diameter specified in the tool manual. It is not recommended to exceed the maximum diameter of the mowing line, as this will increase the load on the engine and increase gas mileage.
- Find the middle of a piece of cord by folding it in half. You will receive a loop.
- Cut the coils into special grooves (there may be holes). Insert a loop of fishing line into this groove.
- Wind the line onto the reel by turning it counterclockwise. It is necessary to fill the cord as evenly as possible, turns must take place without overlap and with good tension. After winding is completed, leave free ends of the fishing line about 20 cm long and secure them in the grooves on the sides of the reel.
- Assemble the mowing head. Before you finally assemble the attachment, be sure to install the spring and washer (if available). Insert the spool into the housing and push the ends of the cord through the holes or eyes.
- Replace the cover and secure it with the latches.
- Screw the nozzle back onto the gearbox shaft, also securing it with a screwdriver. Turn the trimmer spool to the left (counterclockwise).
READ How to Correctly Assemble a Gasoline Trimmer
Disassembling the trimmer. DIY trimmer coil repair
Starter breakdowns
The most difficult starter breakdown occurs when the rope breaks and winds around the flywheel of a running engine. As a result, the spring may burst and the pulley may break off. In this case, only a complete replacement of the spare part will help. Such a breakdown rarely occurs. More often it happens:
- break of the shmorgalka rope;
- spring breakage;
- spring failure.
In this case, it is easy to repair the starter yourself. The manufacturer has prepared step-by-step instructions for this.
Homemade snow blower
There are many options for creating snow removal equipment based on a trimmer. The simplest method of modernization is to replace the knife with a rotor. This snow blower works like a shovel, but it is simply moved through the snow: the device scoops it up and moves it to the side.
To carry out the planned alteration, you will need the following materials and tools:
- a brush cutter with a straight rod, at the end of which a gearbox is installed;
- a metal keg, even a beer keg will do, for example, for the Baltika drink;
- a trimmer cutter with many teeth (used for mowing dense thickets of grass);
- drill with drills;
- grinder and welding machine.
Instead of a barrel, you can use a thin sheet of metal (tin) 1.5 mm thick.
The snow blower assembly process is performed in the following sequence:
- cut the barrel in a circle, 15 cm from the bottom;
- make a hole in the bottom for the brush cutter gearbox and drill 3 more small holes to secure its shield;
- a square of 10 by 10 cm is cut out on the side to throw snow through;
- a third of the open front part of the barrel is covered with a piece of metal (tin), and the ejection hole should be located along the center line of the damper;
- make a rotor;
- make a deflector that will direct the thrown snow in the desired direction;
- weld it to the body at the location of the hole for the ejection of snow mass;
- attach the scapula from below;
- install the brush cutter gearbox and secure it with bolts;
- install the rotor like a simple working knife.
The deflector is made like this:
- cut out a strip of metal, the width of which is 15 cm and the length of 30 cm;
- slightly bend the workpiece;
- 10 cm high sides are welded on the long sides so that the snow does not scatter at the exit.
The rotor is manufactured in the following sequence:
- cut rectangular strips measuring 25 by 10 cm from the metal sheet;
- cut and grind the plates to the shape of the blades;
- Weld them crosswise to the disk from the brush cutter.
A spatula is made from the remaining material. To do this, use a piece of tin 30 by 40 cm. The edges are folded along the long sides to form a two-centimeter side.
A self-made snow blower should be used at full throttle - this will extend the life of the device, because frequent pressing of the gas leads to engine damage. It is difficult to join thin metal by welding, because it easily burns through it. Therefore, the work must be performed by an experienced welder.
How to disassemble a gasoline trimmer. Malfunctions and their elimination
Electric and gasoline trimmers experience typical breakdowns and malfunctions. For devices powered by an internal combustion engine, these are:
- problems in the carburetor;
- engine breakdown;
- problems with the fuel system;
- breakdown of the gearbox, starter, muffler;
- blockages;
- air filter failure;
- problems with the ignition coil.
Electrical units have specific breakdowns:
- problems with the control button and electrical cable;
- burnt out motor stator winding;
- broken contacts.
For simple problems, you can repair the trimmer yourself.
If it stalls when you press the gas
There are several reasons why the trimmer stalls when you press the gas:
- The first reason is carburetor misadjustment.
- Fuel valve clogged.
- Check valve clogged.
- Loose and sagging carburetor cable or sagging fuel intake hose.
To avoid the described problems with the lawn mower, you need to carefully monitor the condition of the device and its components. Timely cleaning and washing of the unit and spare parts can increase its service life.
Mow for hay
Hay is a necessity for a villager - it is food for animals in winter, fertilizer and covering material that protects plantings from the cold. Of course, with such versatility of use, the question of pre-harvesting hay arises. Mowing for workpieces differs from the usual aesthetic cleaning of the perimeter in several ways.
- For example, in order to prevent the mowed grass from being crushed into mulch, it is necessary to mow at the root, lowering the bar with the disk as low as possible.
- You should mark swaths in which the mowed grass will fall - this will help to avoid piling up and crowding. Plus, it will be easier to clean up after finishing the job.
- Another very important point is mowing large weeds. For example, a mature burdock bush, which not every knife can cut. If such a large weed comes across your path, you should mow it in a circle and continue working. When the work around the perimeter is completed, lonely weeds will remain on the site, which can be easily removed by hand, and they will not mix with the grass.
- The main thing in mowing for hay is to leave the length of the grass without letting it lose its shape. Otherwise, the resulting mulch can only be used as a covering material.
- The cutting width must remain strictly fixed, because It is necessary to remember the average size and length of the workpiece.
Some experts recommend using a fishing line when cutting hay, but this is not always correct. Firstly, the grass in such an area is usually tall, and its base is more dense and formed. Using a fishing line will increase wear on the engine, as it will have to operate at higher speeds. Of course, this will also affect performance. Secondly, the fishing line is simply not designed for such loads. By using this material, you risk not only the line itself, but the entire mower.
The best option is a disc designed for shrubs - it is designed for increased loads. In addition, tall grass is coarser at the base and will be cut more productively by a blade than by a line designed for soft, silky lawn grass.
There are additional attachments for cutting hay with a trimmer, but they are all unofficial modifications. In other words, homemade modifications, the use of which is highly discouraged, because The behavior of the device under unknown conditions may be unpredictable. By following simple recommendations, you can quickly gain the necessary experience and produce hay in large quantities.
The design and principle of operation of a starter on a trimmer
The gas engine is, in principle, the main part of the brush. Its power lies in the range of 0.5-2.5 hp. The movement from it is transmitted to the shaft, which is located inside the hollow rod, and then through a gearbox consisting of gears, a fishing line or a knife (working body).
The gasoline brush also has the following elements:
- Protective cover;
- Lever arm;
- A belt designed for ease of use of the device;
- A starter used to start a gasoline internal combustion engine.
All details of the brushes are shown in the photo below.
Trimmer starter. This is an integral part that starts the engine. It is shown separately in two photographs below.
The starting mechanisms of various models of gasoline brushes work on the same principle: when the internal combustion engine starts, the protrusions, designated 1 in the photo above, close with paws 3. When the engine starts running, they return to their previous position due to centrifugal force. Wires 2 play a similar role.
The process of returning the mechanism elements to their original position occurs due to the presence of a spring wound around the axis. It unfolds when the rope is pulled. After releasing the cord, it is tightened and twisted by winding the spring. When the internal combustion engine of a gasoline mower is started, the starting mechanism returns the shaft until it starts working (starts).
Today, gasoline brushes are equipped with two types of starter mechanisms:
- Allowance;
- Electric.
The first option is much more common.
The trimmer starter can operate for a long time without breakdown. It is not possible to clearly indicate a period of continuous time. Everything is determined by the initial quality of the device and compliance with the rules of handling it.
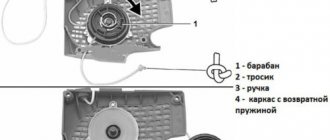
Starter assembly
The collection of the starting unit is carried out in several stages:
- The coil is turned over, installing it so that the spring bend fits exactly into the groove of the body, as in the photo below;
- There are two washers, between which a spring is placed;
- Put the cup with antennae in place;
- Tighten the screw (photo below).
When doing the described manipulations, you must put two washers. If this is not done, the spring will eventually damage the plastic cup, and wedging will begin when it is pulled. Because of this, it feels like spring has flown away. To eliminate this drawback, you need to install this longer part or an additional washer.
When such parts are not available, you can simply unscrew the screw a little and the starter unit will start working without being secured. But this option is temporary. It is better to have a quality repair as soon as possible.
Running in a gasoline trimmer
Most often, running-in is used in a brush cutter ( gasoline trimmer ). Running in involves operating the engine at low speeds, without load. To break-in, you need to start the lawn mower and let it run at idle speed. It is best to make the first mowing with a fishing line, since when mowing lawn grass, a lower load on the engine is implied than when working with hay or shrubs.
The load must be increased gradually, gradually increasing engine speed. If you start operating at high speeds, the engine may run in poorly, which will affect the entire future operation of the brush cutter.
You should not use up the entire temporary resource when starting the engine for the first time. It is best to mow the lawn for 10-15 minutes after idling, then turn off the machine and let it cool a little. You should use the brush cutter carefully, without sudden movements, in order to avoid collisions with hard objects (stones). Hitting a stone can have a bad effect on the operation of components that have not yet been broken in. In some cases, backlash, noise and hum appear during operation. This can be easily avoided if you properly break in the trimmer .
How to assemble a NEW Chinese trimmer after purchase!!!!
Gasoline unit
In the case of a gasoline trimmer, it is necessary to check the gearbox for lubrication. Also, do not forget to add lubricants to the fuel tank if the instruction manual says so. As a rule, gasoline and oil are mixed in a ratio of 45 to 1, but these figures may vary depending on the model and manufacturer, so you should carefully study all the technical requirements for the device. The fuel container must be filled to the very neck. If all technical fluids are filled, you can try to start the device. But you shouldn’t mow right away; it would be better to let the trimmer run without load so that the engine gets used to the filled fuel. A few minutes will be enough, after which you can give the lawn mower a full load.
How does the starter of a lawn mower or trimmer work?
The starter mechanism as a whole is the only one and universal for gasoline cutters, trimmers, gasoline and diesel generator sets. It is not a problem to equip them even in a car, motorcycle or scooter, as long as your car has free space to install it. No wonder many Soviet cars and trucks were equipped with a starter tool that vaguely resembles a tire bent in half.
The starter kit consists of the following parts:
- Hook ignition spring;
- The cord is wound onto a reel;
- Return the spring;
- Ratchet and main spring;
- Housing of the mechanism protecting the ratchet;
- Retaining bolt.
READ How to Clean the Trimmer Fuel Filter
Putting on the belt
It is impossible to operate the trimmer without a belt: it ensures a redistribution of tension from the arms to the shoulders and spine, and helps optimize performance. The belt must be put on the already assembled device when the rod is in the engine groove.
The belt itself is attached to a metal loop, which ensures a tight fit even under maximum load. The design of the belt fastening is the same in all models and does not require additional manipulations during installation. It is enough to insert the loop into the provided hole - and fixation will be ensured.
Just putting on a belt is not enough, you need to adjust it to suit you. The belt is adjusted depending on the height of the person. You can check that the belt is tensioned correctly at work. If during the mowing process your shoulders and arms do not get tired quickly enough, and the vibration does not cause unpleasant sensations in the muscles, then the belt is set correctly. If your hands get tired quickly, you should turn off the device, loosen the belt, and tighten it again to your height. This procedure must be carried out until the trimmer lies exactly “on the hand”, and in weight the length of its rod is optimal relative to the surface.
READ How to Correctly Install the Piston on the Patriot Trimmer
Important: it is not recommended to use a trimmer with a poorly tightened belt; this can be dangerous. Such a belt runs the risk of slipping off your shoulder and getting under your feet. And without redistributing effort using a belt, your hands get tired much faster.
Adjusting the length of the belt using the loop is quite easy: just tighten it to reduce the volume, or loosen it to increase the length.
How to mow the lawn so that it is smooth
A lawn implies an open, flat area, excluding any large landscape irregularities (holes, hills). Of course, snags and stumps should not stick out of the ground - they should be uprooted in advance. It is best to plant the area under the lawn with soft varieties of grass that are easy to mow. In this case, you will spend much less effort.
- Experts recommend dividing the entire area into small squares and mowing along them, moving from one to another clockwise. In this case, the grass that you mowed always remains on the left and will not interfere with further manipulations with the trimmer.
- If it is necessary to mow “at the root”, then the angle of contact with the surface must be at least 30 degrees. With this operating technique, the device practically comes into contact with the surface with a cutting knife.
- There is an opinion that to give the lawn a finished look, it must be mowed with a trolley-type lawn mower. This is partly true, but with some practice, you can achieve good results with a manual trimmer. To correct defects after trimmer operation, it is also recommended to use hand-held grass shears.
- The lower the line is, the smoother the lawn will be. By leaving the grass taller, there is a chance that it will be mowed differently in different areas. This is due to the fact that the trimmer is not fixed on a horizontal plane, which leads to unevenness during the reciprocating movement made during operation.
Basic coil malfunctions
Users of electric trimmers and hedge trimmers often encounter problems with semi-automatic mowers. Coil malfunctions can be as follows:
- The line does not spread automatically;
- The cord involuntarily comes out of the reel.
line does not expand automatically
If the line does not lengthen by lightly touching the trimmer reel button to the ground, the reasons for this may be the following.
Option 1. There was a bite, i.e. Clip cord between turns. This problem usually occurs if the user winds the line onto the reel with an uneven winding cross-section or winds it with insufficient tension. In the latter case, when the mower rotates at high speed under the influence of centrifugal force, the cord begins to compress, which leads to possible twisting of the mowing line. To fix the problem, you will have to disassemble the reel into a trimmer and rewind the cord correctly, that is, in equal turns with good tension.
Option 2. The ends are too short and stick out from the head. When hitting the ground, the rod may not fall out if its ends protruding from the head are not long enough (short). In this case, the centrifugal force is not enough to stretch the line. Therefore, it is necessary to stop the unit (turn off the engine or disconnect the electric trimmer from the power supply) and pull out the line manually by first pressing the button.
READ How to Assemble a Lawn Mower Starter
Option 3. The line is soldered inside the mower. This causes the reel to stop and not spin when the button is pressed. This is mainly due to several reasons: poor quality of the cord, overheating of the reel during continuous operation of the machine and the impact of the mowing line on hard objects.
- In the first case, the cord from third-party manufacturers may be made of low-quality and fusible materials that cannot withstand mechanical and thermal loads. Therefore, it is necessary to give preference to “branded” fishing lines.
- But if you still bought a fishing line of unknown quality, and it often gets soldered during operation, you can follow the example of some users who, after filling the cord into the reel, wet it with either silicone grease (from a spray can) or mineral oil. This procedure significantly reduces the likelihood of soldering between turns of the mowing line.
- The line can also be soldered if it hits a hard object (stone, fence, dry branch, etc.) during mowing. As a result, it stretches a little and reaches the head at high speed. The cord heats up due to friction, and its coils stick together. The only thing you can do to solve this problem is to open the trimmer spool and rewind the line.
The cord involuntarily lengthens
There are situations when a trimmer user notices very rapid line consumption. However, he never pressed the button on the ground to extend the line. The reason that the fishing line involuntarily lengthens, cutting off the special knife on the body of the device, may be a lack of spring in the mowing head. Often, novice mower users, when trying to load line into the reel, forget to install the compression spring in the head or even lose it when opening the lid, and in the future they will not even know about its existence.
Mowing duration
An electric mower can work without a break for no more than 20 minutes, after which it will need the same amount of time to rest. The motor needs to cool down to prevent the plastic parts from melting.
Gasoline trimmers allow longer operation. On average, you can work for up to 40-60 minutes, or until the fuel runs out. In any case, the break should not be less than ten minutes, but it is better if it is twenty. The point here is in the engine itself, which is deprived of the liquid cooling system natural to the internal combustion engine. To avoid overheating and increased wear, it is better to give the device the opportunity to cool down, and at the same time restore its strength or collect the already cut grass.
Edger for leveling lawns under a ruler
To level the lawn, you will need to supplement the lawn mower with a device such as an edger. Structurally, the attachment has much in common with the trimmer cutting disc, but with minor differences. The device consists of a protective casing, a cutting part and a guide wheel. The main purpose of the equipment is to level the lawn along the contour or separate it from flower beds, beds or fences.
Edge cutter
The edge cutter attachment for a lawn mower has a mechanical regulator, which sets the depth of insertion of the knife into the ground. The equipment is easy to use, and it will be useful for owners of private houses who like to care for their lawns, maintaining not only their cleanliness, but also order in their design.
The types of attachments for motor trimmers intended for caring for gardens and vegetable gardens were discussed above. The functionality of everyone’s favorite gas scythe does not end there, and below is a list of devices that will be useful for fishermen, builders and specialists in other professions.
First use of an electric trimmer
Setting up and running an electric trimmer is also not difficult. To do this, it must be assembled and launched, but not working immediately. It is best to run the device several times (3-5 is enough) to make sure it starts easily. If the device starts without problems, you can run it for five minutes on lawn grass, without heavy loads.
Almost all modern electric trimmers are designed for 20/20 operating mode, i.e. twenty minutes of operation and twenty minutes of rest. The latter is necessary for the engine to cool down a little. If you operate such a trimmer for more than 20 minutes without giving it the necessary rest time, the engine life may sharply decrease as it experiences increased load.
The electric trimmer does not have a continuous operation mode, but, nevertheless, if you do not run it in correctly, gradually increasing the load and operating time (up to 20, but not more than, minutes), the device may not work correctly, causing trouble to the owner with constant breakdowns and malfunctions. at work.
It is important to remember that running in and putting the device into operation is an integral part of proper care of the equipment. Thanks to this, the device will last much longer. Its further work largely depends on what the first launch will be like. There is no need to rush, even if the amount of work to be done is not small, it is best to give the electric motor its proper rest, because this way it will last much longer.
Wall Squats
- Press the ball firmly with your lower back against a horizontal, stable surface.
- Exhaling, slowly squat, rolling the ball. Knees come forward.
- Fix in the lower position, maintaining tension in all muscles.
For untrained athletes, it is recommended to start with 10 squats in three sets.
Fitball exercises are also useful for young mothers to restore their usual slimness. Thanks to the soft, elastic surface of the ball, girls can perform simple exercises in the first months after the birth of the baby.
User manual
Features of using electric models
Electric trimmers are considered the most maintenance-friendly due to their power supply from the electrical network. It is advisable to prevent the engine from overheating.
Electric trimmer circuit
To do this, you should adhere to the correct operating mode: 20 minutes of work, 20 minutes of break. Before each season of operation, lubricate the gearbox.
Important! Do not use the electric trimmer in wet or rainy weather.
Basic malfunctions and their elimination
Main malfunctions of the electric model:
- Doesn't work when turned on. Check the contact in the plug connector, make sure that the power cable, switch and plug are in good condition.
- The line may become tangled. Check all contact connections.
- During prolonged use, the nylon thread may stick together. Using an indicator screwdriver, check the contacts with the control knob.
Features of using gasoline models
The Hopper trimmer uses a mixture of gasoline and oil as fuel. To prepare the mixture, you need to take the ratio - 1 part adapted motor oil and 25 parts gasoline with an octane number of at least 92. If you do not follow the given proportions, the engine life will be significantly reduced.
Trimmer device diagram
Running in the lawn mower is not required, but the unit initially requires gentle operation, so only half the power is used. To abundantly lubricate the engine elements, you need to use 10% more oil than recommended when preparing the fuel mixture for the first two refuelings. Do not try to prepare the fuel mixture with a reserve, as the fuel ages and does not fulfill its purpose.
To extend the life of the motor, adhere to the following rules:
- Use only high-quality gasoline with the obligatory addition of oil.
- Do not use the trimmer at high speeds without load.
- Use oils only for 2-stroke engines.
Trimmer motor components diagram
After 10 hours of using the lawn mower, you need to:
- Check the condition of the muffler;
- Clean or replace the air filter;
- Check the gap between the spark plug contacts. It should be 0.6-0.7 mm;
- Clean the ventilation holes;
- Add oil to the gearbox.
If a breakdown is detected, do not repair the power unit yourself. You should contact the service center.
To reduce the load on the engine and prevent overheating, after every 45 minutes of operation, a technical break is taken for 10-15 minutes, while completely turning off the engine.
How to do weight loss exercises correctly
You can do them in any order three to four times a week. But before doing the exercises, you should do a short warm-up.
The number of approaches is two or three. The number of repetitions is 15-25 or more, depending on the exercise. Perform static exercises – planks – for 30 seconds or more.
Walking should be practiced daily for 30-60 minutes or more.
You can’t do the exercises all at once, but spread them out over different days and do them every day. It's much more efficient!
Now you know enough about the most effective exercises for losing weight at home. All you need to do is put them into practice and enjoy the results. I wish you success!
What heart rate should you train at to lose weight? Interval training is the best way to lose weight. A set of exercises for losing weight in the gym. 10 best exercises for legs and buttocks. Exercises for the back. Muscle training, stretching and relaxation.
Tags: lose weight, exercises for home, exercises for weight loss
Hyperextension
- Lie with the middle of your stomach on the fitball, take a relaxed position, as if hanging down.
- Place your feet on the floor and fold your arms across your chest.
- Take a breath.
- The body should be extended into a straight line.
- Exhaling, return to the first point.
For beginners, it is recommended to perform 10 repetitions in three sets.
Thanks to intense movements on the ball and the simultaneous inclusion of large muscles in the work, you can effectively work out the main problem areas: buttocks, back of the arms, inner thighs, waist.
Cultivator assembly
If you have a summer house or just a plot of land, then a cultivator will help facilitate soil cultivation. Traditionally, a hoe is used for these purposes, but working with it takes a lot of time and effort. Using a cultivator will reduce labor costs, and the entire process will take a shorter period of time. Factory-produced equipment is expensive, so if funds are limited, the question arises of assembling a cultivator yourself. Both gasoline trimmers and electric scythes are suitable for this.
To create a simple example of technology, you should stock up on the following tools and materials:
- a grinder with a set of discs (suitable diameter - 125 mm) for metal;
- drill with drills of various diameters;
- welding machine;
- electrodes;
- jigsaw or hacksaw for metal;
- an emery machine with two abrasive wheels of different grain sizes;
- a functioning petrol trimmer;
- with a pitchfork;
- a steel tube suitable in diameter for the brush cutter shaft;
- hand tools: keys, hammer, pliers, core, tape measure and marker;
- a sheet of metal with a thickness of 3 to 5 mm and dimensions of at least 10*10 cm.
The manufacturing process begins with the working part. Curved rods of garden forks will serve for this purpose. Their recommended length is from 10 to 15 cm - this is enough to loosen the soil.
The working nozzle is manufactured in the following sequence:
- the fork teeth are flattened to a width of 1 cm;
- on emery, using a circle with fine abrasive, sharpen the cutters;
- using a jigsaw, cut a circle with a diameter of 10 cm from the metal;
- process it on an emery machine until an almost ideal shape is achieved;
- Prepared cutters are welded to the metal circle at regular intervals (recommended quantity - 3).
With more than 3 pieces, the load on the equipment increases greatly.
The next step is to attach a weeding cutter to the trimmer. The process is greatly simplified if there is a reverse thread located at the end of the brush cutter shaft, onto which the manufactured working part is simply screwed. To do this, a tube with a nut is first welded to the cutter.
If you have plumbing experience and welding skills, converting a trimmer into a cultivator is quite simple. The financial costs are insignificant. If you use an electric scythe for your work, you will need to think about an extension cord so that it reaches over the entire area being processed.
Tips for training with a fitball
Before moving on to the list of exercises with a fitball, let's remember how to properly exercise with a rubber ball so that the workout is effective and high-quality. We offer you 10 useful tips for training with a fitball at home or in the gym.
Features of performing exercises with a fitball:
- When performing exercises with a fitball, you should be focused on your muscles and feel their tension. Try to train not for speed, but for quality.
- Use in your workout not only exercises for your problem area, but also exercises for the whole body. To successfully lose weight, you need to work in a balanced manner on all muscle groups, and not just on the stomach or just, for example, on the hips.
- Remember that the more you inflate the fitball, the more difficult it is to perform the exercises. If you are just learning to train with the ball, do not inflate it until it is completely elastic at first.
- If you don't know how to build a workout, then use the circular principle. Take 5-6 exercises and alternate them with each other in several rounds. The second part of the article offers specific exercise programs that can be taken as a basis.
- All 50 exercises with a fitball that we offer are divided into 4 groups: for the upper body (shoulders, arms, chest), for the core (back, abdomen), for the lower body (hips and buttocks), for the whole body (working all major muscle groups).
- Exercises with a fitball are especially effective in working on the muscular corset, so even exercises with a ball for the hips and buttocks help strengthen the abdominal and back muscles as well.
- For most of the proposed exercises, you will not need any other additional equipment other than a fitball.
- If you find it difficult to repeat an exercise with a fitball (for example, due to insufficient balance), then either modify it into a more simplified version, or do not perform this exercise at all for now.
- Exercises with a fitball are an excellent way to prevent back and lower back pain.
- Read more about the benefits of a fitball, as well as how to choose the right one, in the article: Fitball for weight loss: effectiveness, features, how to choose.
READ How much horsepower does the Huter 1900 trimmer have?
To begin with, let’s remember once again what the benefits of training with a fitball are:
- strengthening the abdominal muscles, arms, legs and buttocks
- burning calories and accelerating fat burning
- strengthening the deep abdominal muscles and muscular corset
- improving posture and preventing back pain
- low-impact load without harm to joints
- fitball is a simple and affordable equipment for everyone
Pumping the body in the upper part
Let's start the training with the upper body: chest, arms and shoulder torso. The basic elements are shown in the table:
Additional equipment will provide an enhanced effect from working out the upper body.
Just ten minutes is enough to use a gymnastic ball and dumbbells to get rid of the “jelly” of the arms in the biceps area and maintain the elasticity of the chest.
Here you can use the following elements:
- While standing, we rest one palm on the apparatus, and place the second hand with a dumbbell along the body. Bend your arm at the elbow, pulling the dumbbell to your chest. We return to the starting position. Repeat several times and move on to the other hand.
- We sit on the ball, take dumbbells in straight hands located along the body. Pull the dumbbells to your chest while bending your elbows. Your forearms should form a straight line.
- From the same position, we raise our arms straight to the sides. Both hands should go into a straight line with the shoulders.
- From the same position, bend your elbows, holding the dumbbells at ear level. Straighten your arms above your head so that they are behind your ears. We return to the starting position.
- We leave our hands at the top, as in exercise 4, and from this position we place our hands behind our heads, bending our elbows. The forearm does not work.
- We sit on the fitball and lean forward, placing our chest on our knees. We bend our elbows and place our palms with dumbbells at chest level. We move our arms with dumbbells back, straightening our elbows. The forearm doesn't work, only the hand.
- From the same starting position, straighten your arms down, straining your back muscles.
- Straighten your back and spread your arms with dumbbells to the sides. The palms are facing forward. We turn our hands so that our palms face back.
- From the same position, we begin to slowly draw circles in the air, first in one direction, then in the other. The elbows should be slightly bent.
- We lie on the ball with our backs, feet on the floor, knees bent. Raise your arms out to the sides to an angle of 45 degrees relative to the floor. We begin to draw circles in the air, first in one direction, then in the other. In this case, the elbows should be slightly bent, the buttocks should be squeezed, and the stomach should be pulled in.
- From the same position, bend your elbows and place your palms with dumbbells so that they look outward. We turn our palms inward, while simultaneously straightening our arms up.
Important! Start with light weights. In the beginning, it will be enough to take dumbbells weighing one kilogram. And then increase the weight.
User manual
Many brands of lawn mowers use a mixture of gasoline and lubricant as fuel. And Khoper was no exception. To prepare the mixture, you need to take the following ratio: 1 part adapted motor oil and 25 parts gasoline with an octane rating of at least 92. If you do not adhere to this ratio, the engine will quickly become unusable and begin to break down.
Trimmer device diagram
Despite the fact that the lawn mower does not need to be run in, it is advisable to use only half the power during initial start-up. For the first two fills, add oil 10% more than the recommended amount. Do not try to prepare the fuel mixture with a reserve, as the fuel ages and becomes unsuitable for use.
To extend the life of the motor, adhere to the following rules:
- Do not use dirty gasoline. Be sure to add oil!
- Do not use the trimmer at high speeds without load.
- Since the engine is 2-stroke, the use of oil for 4-stroke engines is prohibited.
Trimmer motor components diagram
After 10 hours of using the lawn mower, you need to:
- Check the condition of the muffler;
- Clean or replace the air filter;
- Check the gap between the spark plug contacts. It should be 0.6-0.7 mm;
- Clean the ventilation holes;
- Add oil to the gearbox.
The manufacturer does not recommend carrying out independent repairs of the power unit. And in case of any breakdowns, you should contact the service center.
To reduce the load on the engine and prevent overheating, after every 45 minutes of operation, a technical break is taken for 10-15 minutes, while completely turning off the engine.
Pilates exercises on fitball
Pilates is an exercise aimed at all muscle groups that does not require a fast pace of execution.
A fitball is often used as an auxiliary device. This equipment increases the effectiveness of Pilates classes. With the help of such a simulator you can not only pump up your muscles, but also relax them. In addition, fitballs are used for weight loss.
To achieve this effect, you need to perform the exercises listed below.
Regular crunches on the floor or bench help pump up your abdominal muscles. Pilates crunches on a fitball promote weight loss and also pump up the muscles of the abdomen, arms and buttocks. You need to perform the exercise as follows:
- Sit down on the fitball, on your stomach. After this, move over the ball so that your palms rest on the floor, your body is suspended, and only the feet of your shins remain on it to the middle.
- Keep your legs straight. They should form one line with the body parallel to the horizontal surface.
- Exhale and pull your knees towards your chest. In this case, only your feet should remain on the ball. Hold this position for 5 seconds and return back.
- Repeat Pilates crunches 15-20 times. Do 3 sets with a minute break in between.
With this Pilates exercise you can pump up your abdominal and leg muscles. It is quite difficult to do, however, it is considered one of the most effective exercises in this series. To perform Pilates pica, you need to do the following:
- Sit down on the fitball, on your stomach. Place your hands on the floor and move forward until only your feet remain on the apparatus.
- Inhale and lift your hips up. In this case, the projectile should be pulled to the chest, and the legs and torso should form an acute angle. Hold the position for a few seconds and return back.
- Perform 10-15 repetitions and 3 sets.
This Pilates exercise on a fitball helps pump up the thigh muscles, both from the outside and from the inside. To do this, you need to do this:
- Get down on the floor, on your back. Place the projectile between your knees. Legs need to be supported.
- Inhale and turn to the left. The knees should not touch the floor. Come back as you inhale. Hold your breath again and turn in the other direction. Inhale and come back.
- Do 30 repetitions of the exercise in both directions. In total you need to complete 3 approaches.
This Pilates exercise helps pump up the muscles of the buttocks, back and abdomen. There are several ways to do this and each of them will be discussed below.
how to assemble a gasoline trimmer (assembling a lawn mower)
- Lower yourself onto the apparatus, onto your stomach. After this, move your arms back and lift your body until your shoulder blades come together. Then go back. Do 15 repetitions in 3 sets.
- Lower yourself onto the apparatus, onto your stomach. Stretch your arms in front of you. After this, simultaneously raise your torso and arms as high as possible. Do the exercise 15 times in 3 approaches.
- Lower yourself onto the apparatus, onto your stomach. Move forward a little so that your chest extends beyond the exercise ball. Keep your legs together and raise them as high as possible. Freeze for 5 seconds and slowly return them back. Perform the exercise 15 times and do 3 approaches.
All exercises on a fitball for weight loss using the Pilates technique should be performed slowly. Classes should be conducted daily. After completing them, you can move on to strength training.
Simple push-ups:
- Start by kneeling in front of the ball. Curl your fingers into fists and place your hands on the ball.
- Then draw air into your chest and rise from your knees to your toes, placing the main emphasis on your forearms.
- Hold your body like this for about 1 second and then return to your place.
- Perform 3 sets of 10 repetitions.
Electrical problems
Equipment that operates from the network differs from similar devices that have a built-in power drive in that it has a simpler design. The main elements of the trimmer are the following components:
- the mechanical part that transmits torque to the trimmer head;
- electric motor;
- power cable.
In this case, all problems that may arise with this equipment can be presented in the following groups.
Mechanical problems
The main function when using the device is assigned to the trimmer head , whose cutting surface is made of fishing line. In most cases, the device fails due to problems with its supply.
- If the supply of fishing line is used up, it is necessary, following the instructions in the instructions, to wind a new one.
- One of the reasons for stopping work may be tangling of the fishing line. In such a situation , you need to unwind it and insert a new bobbin if it shows signs of damage.
- The trimmer can also fail due to sticky nylon thread, which may be due to overheating of the device during long-term operation. This problem is solved by rewinding the fishing line.
- Problems may be related directly to the coil: for example, its bottom may fall off. Repair in this case will come down to replacing it or creating a new bottom with your own hands. Having chosen the last option, you need to prepare a piece of PCB or a bolt with a nut.
- In some cases, the coil may not show signs of damage, and the motor may also be fine, but the head does not rotate. In such a situation, you should look at the drive shaft. If the fear of its breakage is confirmed, then the device must be returned to a service center.
If the failure of a gasoline trimmer is associated with problems in the mechanical part, then the repair technology will mostly repeat the work carried out on electric models.
Electrical damage
To repair electric trimmers, you need to prepare the appropriate tools:
- indicator screwdriver;
- multimeter;
- blowtorch.
It is quite difficult to find out by visual inspection what caused the problem; in most cases, only the most obvious faults can be determined “by eye”.
Regardless of the nature of the malfunction, this in any case leads to the engine stopping.
- If there are signs of damage to the power cable, you will need to consider installing a new one.
- If the problem is in the socket, then in this case you need to make sure with an indicator screwdriver that this is really the case. If your fears are confirmed, you should choose a different outlet to connect to.
- Engine failure may be due to damage to the fork. In this case, it must be disassembled and replaced with a functional product.
- Sometimes problems can be related to the control knob. First you need to make sure of this, for which you use an indicator screwdriver : if one of the wires breaks, the contact will not close. In this case, the damaged wiring is replaced.
- The motor stator winding can also cause the motor to fail. First, check with a multimeter. To do this, the measuring device must be switched to operating mode with minimal resistance , and then its probes are connected to graphite brushes. If there are no resistance readings, then based on this we can conclude that the winding has burned out. The repair will consist of installing a new engine. Usually, there are no problems finding the necessary spare parts for an electric trimmer.
- Also, the engine may fail as a result of a break in one of the contact connections. If there are no signs of damage to the winding, it is necessary to check all connections using a multimeter. When a damaged contact is detected, you need to solder it yourself.
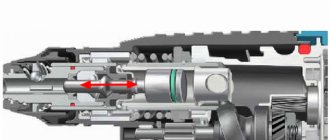
The main difference between an electric trimmer and a brush cutter is the type of drive. The electric scythe is driven by an electric motor, powered by a 220 V household network.
Electric trimmers are lighter in weight than their gasoline counterparts. The most simplified control is reduced to a single “On/Off” switch, which provides for fixation in case of prolonged operation.
Electric trimmers differ in the location of the motor, which can be located in the upper or lower part.
The location of the electric motor in the upper part is typical for powerful units (up to 1.4 kW). Such mowers can easily cope with tall, wet grass and shrubs, the thickness of the stems of which reaches 1 cm. In most cases, they are equipped with both a reel of fishing line and a metal blade.
Moving the electric motor to the bottom simplifies the trimmer circuit, eliminating the need for a gearbox and transmission shaft. The attachment with the cutting tool is installed directly on the spindle. Reducing the elements increases the reliability of the device, but limits its speed. Reducing the speed has a negative impact on performance. Such trimmers are effective when mowing young, thin grass.
Exercises for losing weight on a ball at home photo
Do you want to lose weight and shape your figure? Try a fitball for weight loss. Thanks to balancing on the ball, the body will be in constant tension, which allows you to work out each muscle group well. At the same time, the exercises have a beneficial effect on the spine and joints, without overloading them, but making them healthier.
- Tips for training with a fitball
- Pilates exercises on fitball
- General rules and recommendations
- Ball training program for beginners
- "Pull Up":
- "Superwoman":
- "Plank":
- Downloading the press:
- Simple push-ups:
- How to do weight loss exercises correctly
- We pump up the back muscles with a fitball
- Full body workout
- Pumping the body in the upper part
- Advice from experts
- What time to train
- How many workouts per week
- Lower body exercises
- The best exercises for buttocks and thighs
- Hyperextension
- Wall Squats
- Jumping
- Gluteal bridge
- Reverse bridge: raising the pelvic area while rolling the apparatus
Sources:
https://fubag.ru/tips/kak-pravilno-sobrat-trimmer-poshagovaya-instruktsiya-foto-video/ https://remont.ru-best.com/remont-kvartir/kak-razobrat-benzinovyy-trimmer- neispravnosti-i-ih-ustranenie https://tehnika.expert/dlya-sada/trimmer/instrukciya-po-ekspluatacii-elektricheskogo-i-benzinovogo.html https://luxusfoto.ru/instrumenty-dachnika/benzinovyy-i- elektricheskiy-trimmer-sravnenie-plyusy-i-minusy
Other homemade options
Thanks to its economical and reliable engine, the trimmer is the basis for many other homemade products. Below we will briefly describe the possible options and provide video instructions for their implementation.
Converting a trimmer into a chainsaw
A gasoline brush cutter can also be turned into a chainsaw. To bring the rationalization idea to life, you will need old models of devices. All details will be taken from them. The video below shows the result.
Converting a trimmer into a gasoline saw involves installing this part from a brush cutter instead of its own engine.
Making a snowmobile for children
The trimmer can also be converted into a snowmobile. The process involves installing the engine on a structure equipped with skis. Due to the insufficient power of the motors available on brush cutters, the independent equipment created is capable of transporting only a relatively small weight. It also moves on relatively flat terrain. This homemade product will serve as an interesting and useful toy for children.
The videos below show some possible options for homemade equipment:
Home craftsmen have come up with many different ways to adapt the motor from a trimmer to a snowmobile. Here the limitations are related to personal imagination and the existing list of unnecessary devices and equipment that can be used to create homemade snowmobiles.
Motor drill
Brush cutters can be converted into a motor drill, which can also be used as an ice drill if necessary. As a result, construction work will speed up and require less labor. A motor drill is used to make excavations for fence posts, pile foundations, and for erecting other structures.
Motor scooter
In addition to the bicycle, the motor of the brush cutter is also installed on the scooter. The assembly principle is similar to creating a motorbike, only the design features of the scooter are taken into account.
The video below shows an airplane whose engine is taken from a gasoline scythe.
Having at your disposal an old working and unnecessary trimmer, you can make various technical devices with your own hands, not only those discussed above. Your own imagination will suggest different options. But when creating any device, you should remember that it is safe for those around you and those using it.