From compressed air | 11/29/2016
After a man invented the nut, he was faced with two of its bad properties. When not needed, she easily turns away and gets lost. And vice versa - attempts to turn away sometimes remain in vain. Over the centuries, this problem has been solved in different ways. Today, a special tool is used for this purpose - a nutcutter (also called: nutcutter, nutcutter, nutcutter).
How do you usually unscrew bad nuts?
Until recently, improvised means were used to unscrew problematic fasteners (boiled, rusted nuts, as well as those with licked edges).
Gentle ways:
- Moisten the threaded connection with kerosene or penetrating lubricant such as WD-40. This procedure requires a long time, since one time is not enough and requires exposure for several hours.
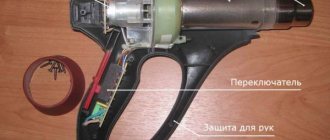
- Heat the nut using a gas torch or heat gun.
- Weld another, larger nut to the one being unscrewed, and then try to unscrew what happened using a larger wrench.
Surgical methods:
- Move it from its place or cut it with a chisel. To do this, you need to have a steady hand and an accurate eye. A minimal command of profanity will also come in handy after you hit your hand with a hammer.
- Saw off with a hacksaw or grinder, if you have access.
As a result of surgery, the bolt or pin will also be damaged.
Manufacturing
We take an unnecessary tie rod end from a passenger car and saw off everything that is not needed from it.
Next, drill a hole in the center with a 10 mm drill.
We weld the M12 nut to the base of the tip so that both holes coincide; to do this, you can insert a 10 mm rod into the hole of the nut, which will center the two workpieces.
We grind and polish the finished part (optional) giving a more aesthetic and beautiful appearance to our workpiece.
Now, to make a piercing element for our nut splitter, we use a piece of the shank from a 10 mm drill. We cut a piece of drill 35 mm long and sharpen it on both sides like a chisel.
Next, we take a sharpened piece of the drill and insert it inside the nut, after which we screw in the bolt. It is advisable to use a bolt with a hardness of at least 8.8 units, so your device will last much longer.
Design and operating principle of a nutbreaker
Despite the variety of designs of mechanical devices, they all include:
- The body, usually an annular or closed shape, is the most rigid. Some tools (hydraulic with a multiplier) have a C-shaped body shape. The rigidity of the open case is less, but this shape is dictated by the design features.
- The cutting element is a wedge knife, which can be either movable or stationary (fixed to the body).
- Drive for moving the knife or pressure support.
| Movement mechanism | type of drive | Pump | Hydro station |
| Mechanical (screw) | Manual | — | — |
| Hydraulic | — | — | |
| Manual | — | ||
| Foot | — | ||
| Mechanized | — | + |
How does a nut work? According to the principle of operation, it resembles a chisel. The difference is that it cuts the part not with an impact, but with a smooth movement of the cutting tooth.
In a mechanical device, movement is ensured by a screw drive (thread). To do this, use a wrench to rotate a power screw, which, when screwed into a stationary threaded bushing, forces the cutting wedge to move, as a result of which the hexagon wall is bitten.
Hydraulic nutbreakers operate from a piston drive due to the pressure of the working fluid (oil). There are the following types:
- With built-in hydraulic booster . Externally, nothing reveals the hydraulic nature of the device (except for the open shape of the body). The part is cut by rotating the same screw as in mechanical devices. But, as the French say, “the devil is in the details.” Inside there are two cylindrical bores of different diameters, filled with oil, each of which contains its own piston. When the screw rotates, it does not move the cutter, but a small piston that creates pressure in front of it. In the second boring, it acts over a larger area, resulting in increased force.
- Analogous to a hydraulic jack . It is a body with two handles, inside of which there is an oil reservoir and a two-piston multiplier. During work, the tool is held by one handle, while the other makes rocking movements. Outwardly, this resembles working with a hydraulic jack or with a grease syringe.
- Operating from a separate drive . The cutting device, instead of a pressure screw, is equipped with a coupling for quick hydraulic connection. An external source of pressure is a manual or foot-operated hydraulic pump (pump), or an electrically driven hydraulic station.
Classification
By method of use
Impact chisels
Immersion is ensured by light blows on the end part. The handles are equipped with metal rings on the back. It prevents the handle from breaking.
Hand chisels
Immersion into the tree is done by hand effort.
By shape
The purpose and appearance are determined by the name:
| Name | Working part width (mm) | Handle size (mm) | Longitudinal section type | Cross-sectional shape |
| semicircular | 12 | 145X25 | smooth | ͝ |
| semicircular | 16 | 145X25 | smooth | ͝ |
| semicircular cerasic | 4 | 145X21 | smooth | ᴗ |
| eismus | 8 | 145X21 | smooth | ˅ |
| cranberry | 12 | 145X25 | spoon | ͝ |
| curved cranberry | 4 | 145X21 | spoon | ᴗ |
| cranberry-cerasic | 4 | 145X21 | spoon | ᴗ |
| semiclucarza | 12 | 145X25 | curved | ͝ |
Among classifications, national traditions can be taken as a criterion. For example, Japanese craftsmen proposed their own unique form of chisel. It is equipped with a shorter blade with a thick, long cone-shaped neck. This makes the tool comfortable, easier to hold and control while carving.
Thanks to a special recess on the back side, sharpening is more economical and faster. The combination of the shank and the conical cup makes the connection to the handle the most durable.
Thanks to two layers of the metal part (soft iron and high-strength steel), the sharpness is maintained for a long time, the blade is easily and quickly sharpened.
According to work purpose
- Plotnitsky. Allows rough processing of workpieces of different types.
- Carpentry. Used for neat, delicate work. Suitable for carving linden, spruce and poplar.
- Lathes. Cutters used for working on a lathe.
- Klukarzy. Thanks to the curved working part, they allow material to be removed from deep grooves.
- Multifunctional. Combines a nail puller and a frame lifting device. It's called "European".
- Looped. They have a special device. Used for rounding corners, preparing hinges and locks.
- Scrapers. Made from plastic. Needed for cleaning irregularities, repairing wheels, removing burrs and protrusions.
- Pocket. They have a folding blade.
- Mini chisels. Purpose: fine thread. These include rivets (miniature models with a narrow blade similar to a sharp leaf, allowing you to create a neat, high-precision design), marigolds (designed for cutting out thin elements with rounded shapes).
- Chisels. Used when knocking out unnecessary elements in the material.
- Jambs. Cutters equipped with an oblique blade for decorative work on relief. Used for sculptural carving.
- Shtiheli. They are distinguished by mushroom-shaped handles and an oblique cutter. Used for preparing grooves.
By type of longitudinal section
- Direct. The most common. The blade and blade are completely smooth.
- Curved. A special feature is the noticeable bend of the blade and blade.
- Klukarzy. They are distinguished by a sharply curved blade along the entire length. Used for punching wide pieces of wood.
- Reverse. The presence of sharpening on the other side of the blade and a notch on it allows you to create relief elements above the main surface. Such specimens are called “reverse cranberries.”
By cross section type
- Flat. The difference is the straight profile. Available in many sizes.
- Angular cerasics. The cross section resembles the letter "V". Its angle is 60-90 degrees. Convenient for three-dimensional carvings, for example, images of hair.
- Radial. The cross section resembles a semicircle. Allows you to carefully and smoothly bury the tool into the wood. Used for contour carving. The working part can be sloping or flat.
- Stapled. The smooth cutting part is equipped with sides of various sizes, placed at certain angles. Gives a narrow, even sample.
- Cerasics are round. Similar to the radius version, with a smaller thickness. Purpose – figured carving.
According to the shape of the working part
- Straight (the blade is perpendicular to the blade, used for rough processing in even stripes).
- Oblique (the beveled blade makes it easier to penetrate the wood).
Types and applications of nut breakers
Mechanical manual
An affordable tool, mainly for household use, if you need to remove soured fasteners when repairing a car or other transport equipment. For all handy car enthusiasts or those involved in the repair of various metal structures. They are offered for sale as a separate tool or as part of a set (usually 2 or 4 items). The cost of one item starts from 200 rubles and goes over 3 thousand (3300 rubles - STAHLWILLE nut for fastener sizes 19 - 27 mm). The sets are offered at a price of 1000 – 3500 rubles. Cutting large nuts requires a lot of physical effort, so the size of the edges is limited to 27 mm.
Hydraulic compact
Nutbreakers with a hydraulic booster develop greater force than mechanical ones - up to 5 tons. At the same time, it is easier for them to rotate the working screw. Some models, for example - LICOTA ATA-7700 (working range 7 - 22 mm, cost 5687 rubles) are professional. Their price in comparison with mechanical ones is higher and ranges from 1.5 to 7 thousand.
Hydraulic manual
Thanks to the developed force of 14 to 35 tons, they crush nuts S = 33 mm like nuts. The price starts from 9 thousand rubles and exceeds 30 thousand Russian signs. For example, a hydraulic nut breaker TOR HHQ-4150 with a force of 35 tons, hexagon size 27 - 33 mm, is offered for 31,781 rubles. They can be used during construction and repair work, especially if there is no electrical network nearby. The disadvantage is the high cost.
Hydraulic with separate drive
It would be a stretch to call these products tools; they rather refer to mechanized equipment or installations. In addition to the hydraulic cutter itself, a manual (or alternatively a foot) pump or a hydraulic station with power supply is required. The size of the hexagon that such a cutter can cut through is 50 mm (M36 thread). Example of configuration: hydraulic nut breaker GLG-3241 costing 16,000 rubles. Drive options:
- Manual pump PMR-7010 worth 17,500 rubles.
- Foot pump PMN-7008 costs 15,500 rubles.
- Electric pumping station Serozak costing from 60 to 240,000 rubles.
- A Serozak petrol pumping station on rubber wheels costs from 260 to 480 thousand rubles.
A manual installation costs about 32 thousand rubles. The most expensive one will cost almost half a million (the price of a budget car).
Products of this class are used in industry, during the operation of railway transport, repair of power lines, and construction and installation work.
Electric stations are cheaper than gasoline ones, but are tied to an electrical circuit, which is their disadvantage. Gasoline analogues can be used wherever there is no electricity, and they are also easy to move within the workplace.
DIY steering wheel nut - Do it yourself
For everyone who doesn’t know, a nut splitter is a simple device that helps deal with any nuts.
The purpose of the nut cracker is to preserve the threads and get rid of the nut.
List of materials
- drill 10 mm;
- bolt M12;
- long nut M12;
- vehicle tie rod end.
Production process
It is necessary to saw off all unnecessary parts from the steering tip.
Then we drill the hole we need in the middle with a drill with a diameter of 10 mm.
We attach the M12 nut to the base of the steering rod by welding. It is necessary to weld so that the holes match. To make it easier, insert something round to center them.
To give an aesthetic appearance, you can sand the resulting product.
: Skilled motorist: DIY mud flaps
Next, we make a part that will split our nuts. Take a piece of shank from a 10 mm drill. We cut off the excess from the drill and leave 35 mm and sharpen it.
We insert the drill inside the nut and screw the bolt there. The bolt must have a hardness of more than 8.8 units for a longer service life.
- Application of the resulting homemade product
- Our homemade product is used when the nut is in an inaccessible place for an angle grinder.
- In the example, you saw that a self-made device copes perfectly with a soured nut and does not violate the integrity of the thread.
- Good luck to everyone in your endeavors!
: DIY solar battery
Do-it-yourself nut hammer: diagram, photo and description
A homemade nut breaker is a convenient device for removing stuck nuts.
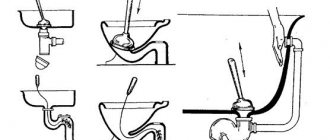
When doing plumbing work, quite often you have to unscrew stuck nuts. To make your work easier, the author made a homemade nut hammer. This device is also called a nutcutter and a nutcutter. You can make it yourself from scrap materials.
Materials used:
- Washer (thickness 10 mm, outer diameter 27 mm, inner 17 mm).
- Screw from a two-legged puller M12.
- A piece of hexagon for 17.
- Valve diameter 11.5 mm.
The figure shows a diagram of a nutbreaker.
The process of making a nut cutter is as follows: the valve is cut, sharpened without a certain angle and hardened. Washer 1 cm thick from old stock. I drilled a through hole in the hexagon and cut the thread. The threaded part is 45 mm, the same amount remains approximately for the chisel. The chisel tip is hidden flush. I made it for 13mm nuts. Therefore, the size of the nutbreaker is small.
I immediately tested the homemade product. I cut the nut with two turns by hand.
- The original knob was slightly bent, remade with a 17 key and painted.
- You can make such a simple device for removing old stuck nuts with your own hands.
Nutbreaker: purpose, use and types of tools
When dismantling and replacing parts, you have to deal with rusted and stuck nuts. Unfortunately, unscrewing such fasteners using a key is quite problematic. One of the easiest to use and most effective methods is to disassemble bolted joints using a nutbreaker.
Mechanical manual
Suitable for car enthusiasts and household needs. The forces generated by the tool are enough to unscrew a soured bolt or stud. It is inexpensive, sometimes they make it themselves.
Sold in stores separately or as part of sets of 2-3 items. Prices for a mechanical nut breaker start at 200 rubles. and reach 3000.
The main disadvantage of the device is that working with it requires significant physical strength, and therefore the maximum diameter of the nuts is limited to 27 mm.
The design and operating principle are extremely simple. The tool is a steel ring of sufficient thickness and rigidity with a welded handle pipe through which the cutting element enters the ring area.
The cutter is connected to a bolt that pushes it forward through a steel ball bearing.
Hydraulic compact
Such a tool looks little different from its mechanical counterpart. During the operation of a hydraulic nut cutter, the screw is also turned, but the pressure is not transmitted directly to the cutting surface, but through a hydraulic booster, due to which the person strains less. A compact hydraulic nutbreaker develops forces of up to 5 tons and costs in the range of 2000–7000 rubles.
Hydraulic manual
In appearance, a hydraulic manual nutbreaker is similar to a plastic grease gun. The tool has two handles - a holder and a hydraulic lever.
The piston system is responsible for increasing the force in the device, thanks to which it is possible to obtain a significant 35 tons. A hydraulic nut costs more than 9,000 rubles; there are models for 30,000.
Such nut cutters find their application in construction and other professional fields. The undoubted advantages are high power and independence from external energy sources.
Hydraulic with separate drive
This type of nut cutter is connected to an external power source. Pumps that create pressure operate on electricity, gasoline or the muscular power of a worker. The hydraulic nut-breaker develops enormous force with the help of an external drive; nuts up to M36 are cut inclusive.
Application – construction, railway transport, industry.
The price of the nut cutter itself is about 15,000. The cost of the tool together with the drive reaches 500,000 rubles. Choosing an electric pump saves about half this amount, but makes the installer dependent on the network.
The nut hammer is intended for removing nuts that are stuck, rusted or with broken threads. In this case, the bolt remains undamaged. Different models of nut cutters are widely used in auto mechanics, construction of buildings and engineering structures, fastening of industrial equipment, power plants...
Recommendations for selection
- Before purchasing a nutbreaker, use a ruler or tape measure to measure the dimensions of the free space around the nut to be removed, otherwise the purchased tool may not fit in the work area or there will be no access for your hand.
- Avoid cheap products from a dubious manufacturer: an unknown brand, slightly different in spelling from the popular name or generally “no name”. There is a high probability that the cutting tooth will be softer than the nut or, on the contrary, overheated and will crumble.
- To remove one or two nuts, you don’t have to spend money on an expensive tool; you can buy a household-grade item, for example, STAB or FIT.
- Sometimes you can pick up a set of several items at a price slightly higher than the cost of one tool. In this case, approaching the nut to be removed will be more convenient.
In conclusion, we can say that today, when trying to unscrew or cut a stubborn nut, hitting a chisel with a hammer, risking damage to your fingers or the unit being repaired, is a sign of your technical backwardness. In order to perform this operation quickly and easily, there is a non-impact chisel - a nut hammer, which has many designs depending on the scale of the work. You just need to choose the tool that is most suitable for each specific situation.
Electrodes. Price overview
Electric marker for metal. How to make an engraving?
State standards
The shape of the cotter pins complies with a number of standards. This not only makes it easy to find the correct shape, but also ensures that you get fasteners of the same quality and standard sizes. The following standards are available and are currently in use.
- GOST 397-79 corresponds to ISO 1234 - German standard DIN 94.
- ISO 7072 - DIN 11024.
There are also a number of specially shaped cotter pins available for specific requirements that are not regulated by standards. For example, as shown in the pictures, pins, wire or pins, round, guide springs.
For standardized ones, the following types of markings are used:
- Standard (adjustable, flexible) - DIN 94;
- Spring (needle) - spring clamp DIN 11024;
- Quick release with ring (folding tire, folding plug (DIN 11023)).
Details about determining the excess of points using a leveling staff
Finding the difference in height of two or more points is a rather serious process that requires the operator to be attentive and knowledgeable about the operational characteristics of the device. For this work, a rail is used, the regulation of which is carried out by a second person.
It is necessary to determine the starting point of measurement. For clarity, it can be designated by the Latin letter A. It is on it that the rail is installed. The vertical location of this element is the most appropriate. In order to calibrate the staff, you need to check the vertical line of the reticle.
On a note! 360° laser levels also require installation and adjustment of a measuring rod, but their peculiarity is the creation of a more voluminous plane.
The process of finding the difference in height of two or more points is a rather complex procedure.
Then you need to point the device at the staff and adjust the measuring device so that it acquires a clear outline in the eyepiece.
Next, you can begin recording the data obtained during the work process. To do this, you need to mark the position of the horizontal lines included in the reticle
You should pay attention to the lower indicator. The number corresponding to the number of centimeter divisions located between the value line and the device’s sight line is added to it
Then the assistant must change the position of the staff. This is done to determine the next point B, after which the value must be recorded again. There is one rule you should know. The horizon of the device is static, so only the rack moves. The measured value depends on the height of its position. The lower the rail is placed, the greater the value will be, which can be determined using the working part of the device.
A nut from an old spanner
The idea of this homemade product belongs to the author of the YouTube channel Mr. Deswal.
Required parts:
- box wrench;
- extended nut;
- steel round timber;
- long bolt.
First of all, you need to cut off one of the heads from the ring wrench. We cut out a small part in it so that it can be put on the extended nut.
Next, we prepare the parts for welding. We clamp the elongated nut in a bench vice, put the head of a spanner on it (as shown in the photo below), and scald it. We clean the weld seam.
We cut the workpiece to the required length from a round steel bar.
We recommend: Large bench vice made from old scrap metal
We cut one of the ends of the round timber on both sides at an angle, and then finish it on a grinder or using a grinder.
We insert the steel round timber with its sharp side into the elongated nut, and then screw in a long bolt, which, when tightened, will rest against the end of the round timber and put pressure on it.
The homemade nut hammer is ready. Now you can test it in action.
In a vice we clamp the bolt with the stuck nut. We put the device on it, fix it with pliers or other available tools, and tighten the bolt.
As it is tightened, the end of the bolt will push the round rod forward, which, in turn, with its pointed part will “bite” into the nut, gradually splitting it.
Then we remove the nut splitter to the side, and remove the split nut from the bolt using pliers.
Details on how to make a simple nut with your own hands are shown in the author's video. We recommend you watch it.
To make the device comfortable to hold in your hands, it makes sense to weld a handle made of a round or square rod to one of the sides of the elongated nut (or a piece of tube can be used).
Process without removal
Why did I start with it, because it is the easiest and more or less simple. So, I’ll describe it step by step:
- The car is suspended on lifts and the wheel is removed
- The caliper is unscrewed (suspended by the holder to the spring), freeing the disc
- The approximate curvature of the canvas is measured. Needed to understand how much to sharpen
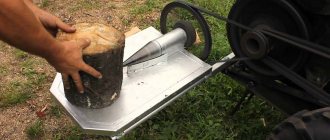
- Next, a special motor is installed on the studs or fastening points, which will spin the disk
- A special frame is screwed into the “ears” of the caliper, along which the cutters will run. AND immediately grinding down two planes from above and below.
- The grooving process begins, usually a little is removed, because there is a minimum permissible thickness