A construction or industrial hair dryer is not a mandatory tool for a home craftsman, but its presence allows you to carry out a number of complex jobs. Such work includes removing paintwork, separating two parts glued together with a sealant (car headlights), as well as heating materials when de-noising the car. If used frequently and incorrectly, the tool may fail, so we will find out in detail what repairing a hair dryer is, how to find a breakdown and fix it at minimal cost.
How does a technical hair dryer work and what is inside it?
When buying a hair dryer, many are probably surprised at the relatively low cost of this device. However, the whole point is that the design of this tool is so primitive that it has a positive effect on its cost. To understand how an industrial hair dryer works, let’s first find out all its constituent elements:
- Housing - in which all the components of this device are located. The case is made primarily of impact-resistant and heat-resistant plastic
- Power cord—transmits current to the power tool. Manufacturers also produce stand-alone type hair dryers, that is, battery-powered ones. They are less popular because they are more expensive than mains ones due to the use of lithium-ion batteries
- Power button and mode switching - most hair dryers are equipped with a switch that performs the function of not only turning on the device, but also switching operating modes
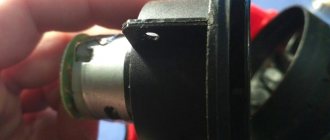
- The electric motor of the fan is one of the main components of the device. Its purpose is to provide targeted air flow to the heating coil. For this purpose, blades are installed on the motor shaft to provide airflow. Corded hair dryers use DC motors. Their power is quite enough to blow the heating coils. An inverter converter - a board located next to the electric motor - is responsible for converting and reducing the voltage from 220V to 12V-18V. On budget models of hair dryers, the voltage on the motor decreases due to the load on the heating element
- A heating element is a heating coil that creates hot air. The heating element consists of a spiral and a ceramic base (on inexpensive devices, instead of ceramics, a special foil material is used). A nickel-chrome spiral is wound onto a ceramic base. The heating element is placed in a cylindrical metal flask
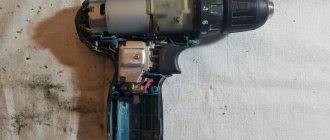
These are the main details of the tool in question. The hair dryer does not have a complex design, but even despite this, it breaks more often than screwdrivers, drills and grinders. One of the weakest points of this tool is the heating part. To understand how to repair a hair dryer with your own hands, let’s first understand the operating principle of the tool.
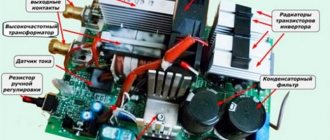
The operating principle of a construction hair dryer and its design diagram
If a hair dryer breaks down, then in order to repair it yourself, you need to know not only the design, but also the operating principle of the tool. Understanding why each element of the device is needed, you can check its serviceability and eliminate breakdowns. It should be noted right away that industrial hair dryers can be divided into two types:
- Budget ones that have the simplest design. A distinctive feature of such tools is that they are low cost, and they do not come with an electronic control board.
- Expensive - the design of such devices uses electronic boards, as well as semiconductor elements responsible for supplying voltage to the spiral and electric motor, as well as microcontrollers that analyze data. There are also models equipped with displays and controllers, through which you can more accurately adjust the air temperature
The electrical diagram of the operation of the simplest construction hair dryer, which has two speeds of rotation of the motor shaft, is presented below.
The operating principle of a construction hair dryer has the following format:
- When the hair dryer button is turned to position “1”, the engine starts and a thin coil is simultaneously connected. Some models of technical hair dryers have a separate “Off” button, which is responsible for turning the heating elements on and off, as shown in the photo below. When the button is turned off, the coils heat up slightly
- If there is no button to turn off the heating elements on the hairdryer, then the coil heats up simultaneously when the tool is turned on. The main voltage is supplied to the spiral, and the residual voltage is supplied to the electric motor. As a result, it turns out that the heating element consumes the bulk of the voltage, and the electric motor operates due to a voltage drop equal to 12-18V
- In front of the button there is a smoothing filter - capacitor C2, which eliminates voltage drops. Some hair dryers have ferromagnetic cores that smooth out the current
- Power is supplied to the rectifier diode bridge, through which the voltage is rectified from AC to DC, from which the electric motor operates
- If there is a circuit board in the design of the hair dryer, then it is responsible for the operation of the tool. A thyristor is installed on the board, which distributes voltage to the coil and the hair dryer motor
- When the button is switched to mode “2,” the rotation speed of the electric motor increases, as well as the connection of an additional heating element spiral—thick nichrome wire. As a result, the hair dryer operates at full power, producing a heated air stream with a maximum temperature of over 1000 degrees
If the spiral breaks, the hair dryer motor will not turn on, but if the motor fails, then all the voltage is supplied to the heating element, which leads to the burnout of the nichrome thread. Most devices use protective elements to prevent the coil from overheating.
The more switches there are in the design of a device, the higher the likelihood that one of them may fail. Often the cause of breakdown of construction hair dryers is their improper use, which entails burnout of the heating element coil. First of all, you must remember three main rules when operating the device in question:
- Always install the device on a special stand in a vertical position, and never place it horizontally.
The horizontal position of the hair dryer is only permissible with a cooled heating element, and if this main rule is not followed, then not only will the plastic body of the tool melt, but also the failure of the coils - When you turn on the device, you should hear the sound of the engine running.
If the engine does not turn on, the hair dryer must be turned off immediately. A few seconds are enough for the heating element to burn out when the fan is not working. Most instruments have built-in elements - a thermocouple, which prevent overheating of the spirals and their failure. Often, when you turn on the tool and the electric motor does not start, the fuse blows. Many people do not know about the existence of such a protective element, so they begin repairs by replacing the spiral. However, it is enough to replace the thermocouple to restore the functionality of the device in question. - Do not drop the hairdryer, as the ceramic base of this device will immediately be damaged.
Damaged ceramics cause adjacent spirals to come into contact, and as a result, they burn out
The simplest diagram of how a hair dryer works is shown in the photo below. Not only budget models of construction hair dryers work according to the principle of this scheme, but also household ones.
Now let's take a closer look at repairing a hair dryer with our own hands. Moreover, for this it is not at all necessary to know the basics of electrical engineering and electronics in order to find and fix the malfunction.
Heating element assembly
The main problem when assembling a device such as a hair dryer for soldering microcircuits with your own hands is the creation of an element for heating. Heaters from household devices such as a hair dryer or soldering iron are unsuitable in this case. The required part should be made independently based on nichrome wire, the cross-section of which is 0.4-0.8 mm. Nichrome with a large cross-section provides high power, but it will be difficult to achieve the desired temperature. For a compact position of the heating element, you will need to make a spiral with a diameter of 4-8 mm.
The spiral must be wound onto some kind of cylindrical base made of a material with high thermal resistance. In this case, quartz or porcelain is used in the form of an empty cone or tube. This base can be removed from an old hair dryer. A product made of quartz from tube-based halogen lamp spotlights with a power rating of 2.3-2.6 kW becomes more preferable.
A small standard fan is suitable as an element responsible for forcing air flow. When assembling a hair dryer at home, this part will become the most expensive. The blower can be removed from an old high power hair dryer. For household fans, the BAKU 8032 brand with a power of 30 l/m is suitable.
The assembled hairdryer for soldering microcircuits with your own hands, the photo of which is presented in this article, operates from a 220 V power supply and has a power of approximately 420 Watts.
The cheapest and most standardized option is to use a small compressor for aquarium fish. It is installed together with the receiver (air storage tank). For this purpose, any small plastic bottle is used, since there will be no heating in the installation area, and hot air will escape in the opposite direction.
When manufacturing the device body, several options are used:
- A material with a high level of thermal insulation is used (ceramics or porcelain). But these materials are not cheap and will complicate the design.
- Highly reliable thermal insulation is used to distribute hot air. In this case, the material is not affected by temperature, with the exception of the area adjacent to the nozzle.
The body base, which also includes the handle, can serve as the base of any medium-sized household hair dryer. The body nose, that is, the nozzle, is made of thermal insulation material that can withstand heating temperatures of 800 ºС. At the same time, it acts as an insulator for other parts of the housing from high temperatures. The nozzle must be made of metal, taking into account possible contact with melts during the soldering process.
Thermal insulation can be provided by quartz elements (tube, plate, mica, fiberglass, glass, porcelain, ceramics, etc.). When manufacturing the unit, heat-resistant glue will be needed.
A power control system can be assembled from old electrical appliances, provided they are in working order. A key or push-button modification is used as a switch.
Malfunctions of a construction hair dryer, their identification and elimination
How to repair a hair dryer is asked by many owners of this tool who are faced with its inoperability. To successfully find the cause of the malfunction and eliminate it, you need to follow the sequence of actions for diagnosing tool breakdowns.
First, it is recommended to make sure that there is voltage in the outlet being connected. After all, it often happens that a powerful electrical appliance connected to the network causes the circuit breaker to trip. To be able to operate the device, and at the same time prevent the circuit breaker from tripping, you need to reduce the load on the line by turning off powerful electrical appliances - boiler, washing machine, hood, electric kettle, etc.
Next, we will consider the sequence of the algorithm for identifying the causes of malfunctions of an industrial hair dryer and then eliminating them.
General check of the health of the hair dryer with a multimeter
To make sure that the device is out of order, it is recommended to first perform the following manipulations:
- Using a multimeter, test the instrument
- On the multimeter, turn on the diode testing or resistance measurement mode
- Touch the probes to the power tool plug terminals.
- Switch the hair dryer button to different positions
When you switch the button on the device, the readings should change, indicating the presence of resistance. If the readings do not change, then it is appropriate to assume that there is an open circuit in the circuit. To clarify the reasons, you will need to disassemble the tool, unscrewing the fasteners, and perform a detailed diagnosis.
Checking the serviceability of the network cable
How to make sure that the hair dryer's power cord is working properly. It is extremely problematic to do this visually, since damage to the cores inside the insulation often occurs, and this is not visible from the outside. This happens quite often, especially if you use Chinese hair dryers from little-known manufacturers.
Moreover, damage to the core occurs not only through mechanical action, for example, squeezing the wire by a door, but also during prolonged use of the tool at maximum power. It happens something like this: the core heats up, it burns, as a result of which the copper material becomes brittle and easily breaks. You can diagnose such a breakdown using a multimeter:
- First you need to disassemble the hair dryer
- Enable dialing mode on the multimeter
- Connect the probe from the multimeter to one contact of the plug
- Using the second probe of the device, touch the contacts on the terminal block one by one
- If a sound signal from the device is triggered in one of the contacts of the terminal block, then one core is ok
- We switch the probe to the second contact of the plug, and the procedure is repeated. The multimeter should now beep when you touch the second pin of the terminal block
If the multimeter beeps, then the network cable is working and does not need repair or replacement. If the device does not emit a sound signal when you touch one of the contacts, this indicates damage to the network cable core. In this case, it is recommended to replace the wire, since it is almost impossible to find the location of its damage. If your goal is to find the location where the mains wire is damaged, then an indicator screwdriver will help with this.
There is another case when the device emits a signal when the probe touches both contacts of the terminal block. This indicates that the wire cores are short-circuited, and the cable also needs to be replaced.
This is interesting! A malfunction in the power cord may occur when the device is in use and switches off automatically during operation. Such self-shutdown indicates a weak contact in the wire, so the device may show a positive result during measurements, but the instrument works intermittently. Replacing the power cord will help resolve the problem.
Testing a Switch or Button
Next, you need to make sure that the hairdryer button is working properly. Often oxides and carbon deposits form on the switch, which prevent the contacts from closing for the flow of electric current. To make sure that the hair dryer button is working properly, you also need to use a multimeter. To do this, in the dialing mode of the device, touch the button terminals with the probes. In the off position, the device should not “beep”, and when the first or second mode is turned on, the multimeter emits a beep.
This signal is a sign that the reason why the hair dryer does not turn on is a malfunction of other components of the tool. If the manipulations to check the button lead to the conclusion that it is faulty, then you should disassemble it and clean the contacts. On some hair dryer models, the switches are of a non-separable type, so you just need to replace them.
This is interesting!
Many people often suspect that the capacitor smoothing out network noise is faulty. This yellow capacitor is connected to the button and filters network interference, while preventing failure of the hair dryer's electronics, as well as the motor and coil. If the capacitor is faulty, then this will not affect the operation of the hair dryer in any way, but its failure may subsequently cause failure of the rectifier diodes, microcontroller, thyristor, resistors and other elements of the microcircuit. A capacitor failure can be easily determined visually; if it is inflated, it means it is faulty.
Lack of power.
Lack of power can often cause a hair dryer to break down. What is this connected with?
Firstly, with the condition of the power cord. Therefore, if it heats up during operation or you find creases and swelling on it, you need to take a few simple steps:
- First, you need to find the damaged area and cut it out;
- Secondly, you need to solder the ends of the cable;
- Thirdly, you should not forget about safety. Therefore, after soldering, you need to wrap this area with electrical tape;
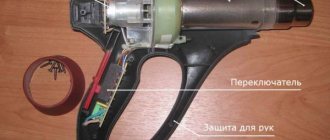
Also, the lack of power may be due to poor contacts inside the case. To do this you need:
- Disassemble the body;
- Next, use a voltage indicator to check the power contacts of the hair dryer (Fig. 2).
- If you find bad contacts inside the case, they must be cleaned with sandpaper;
Most often, these actions are enough to get the device working again.
Hair dryer contacts (Fig. 2)
You can watch this breakdown in detail in this video: https://www.youtube.com/watch?v=xgg5jaiIDZo
How to check the serviceability of a hair dryer's commutator motor
If you suspect that the engine is faulty, you can check it in two ways:
- Ring with a multimeter
- Connect to a DC voltage source of appropriate size. Please note that the board with the diode bridge must be disconnected. In order not to disconnect it, you can connect it to an alternating voltage source of the appropriate value for which the engine is designed
To test the electric motor with a multimeter, you need to connect the probes to the output contacts of the device. The presence of resistance indicates that the device winding is not damaged. In order to make sure that this part is in good condition, you can supply it with 12-18V power. Typically, the power supply voltage of the hair dryer motor is indicated on the housing, so take this value into account so as not to “burn” the rotor winding.
Little tricks
There are standard requirements for the safe operation of an electric hair dryer, which can push the boundaries of trouble-free operation of the device, without contacting service centers:
- There is no need to wrap the electrical wire around the handle of the device and generally try to avoid twists and loops on the wire;
- Use only those attachments that were supplied with the device;
- Do not use the device in rooms with high humidity to prevent water from entering the hair dryer body;
- If the distance to the outlet is too large, only factory extension cords can be used;
- It would be a good idea to protect the air intake area with a fine-mesh filter to prevent dust particles and hair from getting inside the device;
- Do not carry the hair dryer, holding it suspended by holding it with your hand by the cord;
- If even minor interruptions occur, further operation of the device is prohibited;
- Avoid excessive overheating of the product;
- After work, you need to let the device cool down and only then put it away for storage;
- The electric hair dryer must be stored in a dry and ventilated area;
- Follow basic safety rules when repairing electrical appliances;
- Repairing a hair dryer requires electrical skills. If they are not there, it is better to entrust the work to professionals in specialized workshops.
Let us repeat once again - independent repairs are possible if all work is carried out especially carefully. This is always true for electrical appliances.
Repair of a hair dryer coil and determination of a heating element malfunction
You can hear the following advice from experienced specialists: if the coil on an industrial hair dryer burns out, then it’s easier to buy a new tool. Why buy a new hair dryer when you can repair or replace the hair dryer coil.
However, before we find out how to repair a hair dryer coil, we will consider the features of diagnosing its malfunction. The principle of diagnosing a hair dryer coil is as follows:
- First you need to remove the heating element from the metal flask
- Next, you should inspect the connection of the wires to the contacts of the heating element spiral. Very often the cause of a hair dryer malfunction is a banal disconnection of one of the wires or oxidation of the contacts
- Turn the multimeter into resistance measurement mode and connect the spiral to the contacts. The hair dryer uses 1 or more spirals, which depends on the design and number of speeds of the tool
- The spirals must have resistance, and if the device shows a zero value, then the integrity of the nichrome thread is compromised. Over time, due to exposure to high temperatures, the nickel-chromium thread loses its properties and becomes brittle, and therefore fails
If the diagnostics show that the coils are working properly and have resistance, but the hair dryer does not work, then the breakdown is hidden directly in the thermal fuse - a thermocouple. This is an element that prevents the coil from overheating, however, under the influence of high temperatures, the thermocouple can also fail. The principle of its operation is that as the temperature increases, the resistance in the circuit changes. You can check the serviceability of the thermocouple with a multimeter by measuring the resistance. If the element is working, the device will show the resistance value, and if it is faulty, then the resistance will be zero.
Now let’s consider a situation where the hair dryer coil has failed. What to do if the spiral is broken, and how to repair it? To repair the nichrome spiral of a hair dryer, you will need to use small connecting elements, that is, a bolt with a nut. It is with the help of these parts that you can connect the nichrome spiral of the hair dryer. Soldering the spiral will not help, since the nickel-chromium material cannot be soldered. To repair a hair dryer coil, you will first need to find the break point, and then perform the following steps:
- Assess the condition of the spiral. If it not only has a break, but is also damaged in different places, then it is recommended to replace it
- The break is eliminated by connecting two parts of the spiral using small bolts and nuts. Connected areas must be strong
- Connecting the spiral with threaded connectors increases the resistance, so keep in mind that the heating temperature of the tool will be reduced
As you can see, it is not at all difficult to repair the spiral of a hair dryer. If the heating element cannot be repaired, then it can be replaced. To do this, you will need to buy a new spiral of the appropriate length and replace it. In addition to replacing the coil, you can also buy a new heating element assembly for your make and model of hair dryer. However, it is not possible to find new heating elements for all hair dryer models. The most popular manufacturers of the instruments in question:
- Interskol
- Bison
- Makita
- Hitachi
- Storm
It is not recommended to buy the cheapest version of a hair dryer, but if the tool is needed only for one-time use, then it makes no sense to overpay for a branded device that costs 2-3 times more. Repairing hair dryers is quite easy if you approach this issue correctly. To do this, you need to follow a clear sequence of actions to identify the breakdown and fix it as quickly and easily as possible.
The fan does not spin well.
The fan does not spin well: the first reason.
A fan that doesn't work is often caused by dirt and hair inside (Fig. 3). Since the air passes inside with the help of an impeller and gradually curls the hair. Over time, the engine becomes difficult to turn. Failure to clean regularly using a brush or tweezers may cause the filament to burn out.
Example of a dirty hair dryer (Fig. 3)
Also, when cleaning your hair dryer, do not forget to follow safety rules. Firstly, do not disassemble a hair dryer whose power cord is plugged into an outlet. Secondly, do not try to wash contaminated parts with water, as water may remain inside and short-circuit the device.
For cleaning you will need:
- Toothbrush;
- Vacuum cleaner;
- It is also advisable to have tweezers with you.
And so you have prepared all the necessary cleaning tools. What to do next? Let's look at the procedure step by step:
- First, you need to remove the grille from the back of the hair dryer. This is not difficult to do, so we will not focus on this.
- Secondly, use a toothbrush to carefully clean the grille and filter from dirt.
- Thirdly, we pick up a vacuum cleaner and go through the grille and filter well to remove everything that the toothbrush did not remove.
- If there is dirt left on the surfaces of the grille or filter that could not be removed using the previously described methods, you will have to use tweezers.
- The next step after these steps is to assemble the hair dryer in the reverse order.
The fan does not spin well: the second reason.
The second reason for a poorly functioning fan may be old, dried-out electric motor grease. If this is confirmed during testing, you need to wash off the old lubricant with solvent and apply a new one. It is worth noting that such a malfunction is rare. Therefore, first clean the hair dryer from visible dirt.
The fan does not spin well: the third reason.
Another reason could be a broken impeller. In this case, the air flow will be weak, the hair dryer will vibrate and make extraneous noise. If, when disassembling the device, the breakdown is confirmed, then the faulty part is replaced with a new one.
In conclusion, I would like to recommend a video that describes in detail the process of cleaning a hair dryer: https://www.youtube.com/watch?v=V-SGXMS9hqs&feature=share
If the circuit board of a hair dryer is burnt out, how to repair it?
Failures related to electronics are not uncommon. On budget versions of construction hair dryers, only one board is used - a rectifying diode bridge. You can check the health of the diodes using a multimeter, and if one diode burns out, the engine will not start. Having identified a faulty diode, it should be replaced using a soldering iron.
If an inverter board is used on a construction hair dryer, then any element of the electronics on it may fail. In order to understand which element has failed on the board, you need to perform a visual inspection. Typically, burnt elements appear externally as blackening. To repair the circuit board of a hair dryer, you will need minimal knowledge of electronics and also be able to use a soldering iron. Using a multimeter, you can check the serviceability of all elements on the board and replace those that are faulty.
This is interesting!
If the ceramic part is damaged, then in this case it is recommended to buy a new heating element, which can cost almost the same as the tool itself. That is why, if it is impossible to carry out independent repairs, you should weigh the cost of spare parts and a new hair dryer, on the basis of which you can make the right decision.
Conclusions about repairing a hair dryer
When faced with a hair dryer malfunction, it is important to pay attention to the initial signs of failure. After all, these breakdowns manifest themselves in different ways:
- Hairdryer won't turn on
- Only one of two or more modes works
- Turns on, but turns off during operation
- The fan works, but the hair dryer does not heat up
- The fan does not work - in this case, protection is triggered, which prevents overheating of the coils and their damage to their integrity
A detailed step-by-step description of how to repair a hair dryer yourself is discussed in the material. The video instructions below will help you find the breakdown and fix it yourself. It is worth remembering that the service life of an industrial hair dryer depends, first of all, on the correct use and storage. If the device is stored in a garage, then before using it, it is recommended to blow out the spirals with a compressor. Sometimes failure to follow the simplest rules for operating power tools leads to them breaking down much earlier and faster than expected.
Final Tips
Repairing professional hair dryers is more complex. Design elements are often complemented by smooth controls and additional options such as the Care button. Spirals are made from special alloys that, when heated, create negative ions that have a beneficial effect on hair. The technique remains the same:
- cord;
- switches and buttons;
- dust removal;
- spirals;
- motor;
- visual inspection of capacitors and resistors.
Before repairing, it is advisable to get a schematic diagram.
Industrial models are not much different from household ones. But drying your hair is not recommended. Such products are distinguished by increased resistance to dust, shock, vibration, humidity, and other climatic factors. Home restoration of industrial hair dryers will not end well.
Electrical radio products used in household models are not suitable for use in harsh conditions. Requirements apply to wires, power cord, motor and coils.